帳戶連結會使用業界標準的 OAuth 2.0 隱含和授權碼流程。您的服務必須支援符合 OAuth 2.0 標準的授權和權杖交換端點。
In the implicit flow, Google opens your authorization endpoint in the user's browser. After successful sign in, you return a long-lived access token to Google. This access token is now included in every request sent from Google.
In the authorization code flow, you need two endpoints:
The authorization endpoint, which presents the sign-in UI to your users that aren't already signed in. The authorization endpoint also creates a short-lived authorization code to record users' consent to the requested access.
The token exchange endpoint, which is responsible for two types of exchanges:
- Exchanges an authorization code for a long-lived refresh token and a short-lived access token. This exchange happens when the user goes through the account linking flow.
- Exchanges a long-lived refresh token for a short-lived access token. This exchange happens when Google needs a new access token because the one it had expired.
Choose an OAuth 2.0 flow
Although the implicit flow is simpler to implement, Google recommends that access tokens issued by the implicit flow never expire. This is because the user is forced to link their account again after a token expires with the implicit flow. If you need token expiration for security reasons, we strongly recommend that you use the authorization code flow instead.
Design guidelines
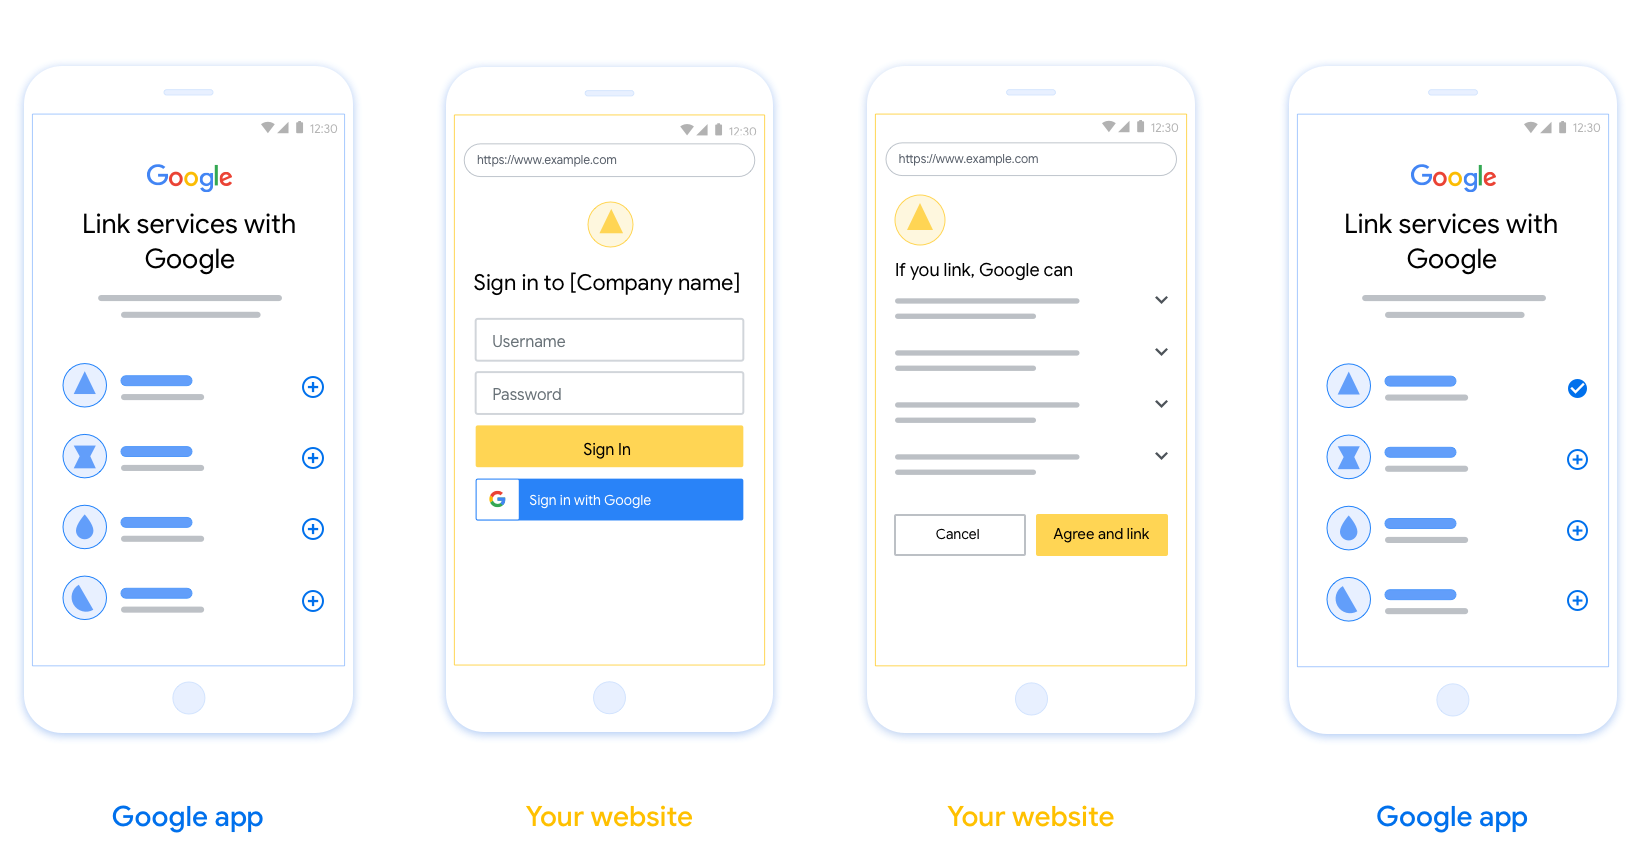
This section describes the design requirements and recommendations for the user screen that you host for OAuth linking flows. After it's called by Google's app, your platform displays a sign in to Google page and account linking consent screen to the user. The user is directed back to Google's app after giving their consent to link accounts.
Requirements
- You must communicate that the user’s account will be linked to Google, not a specific Google product like Google Home or Google Assistant.
Recommendations
We recommend that you do the following:
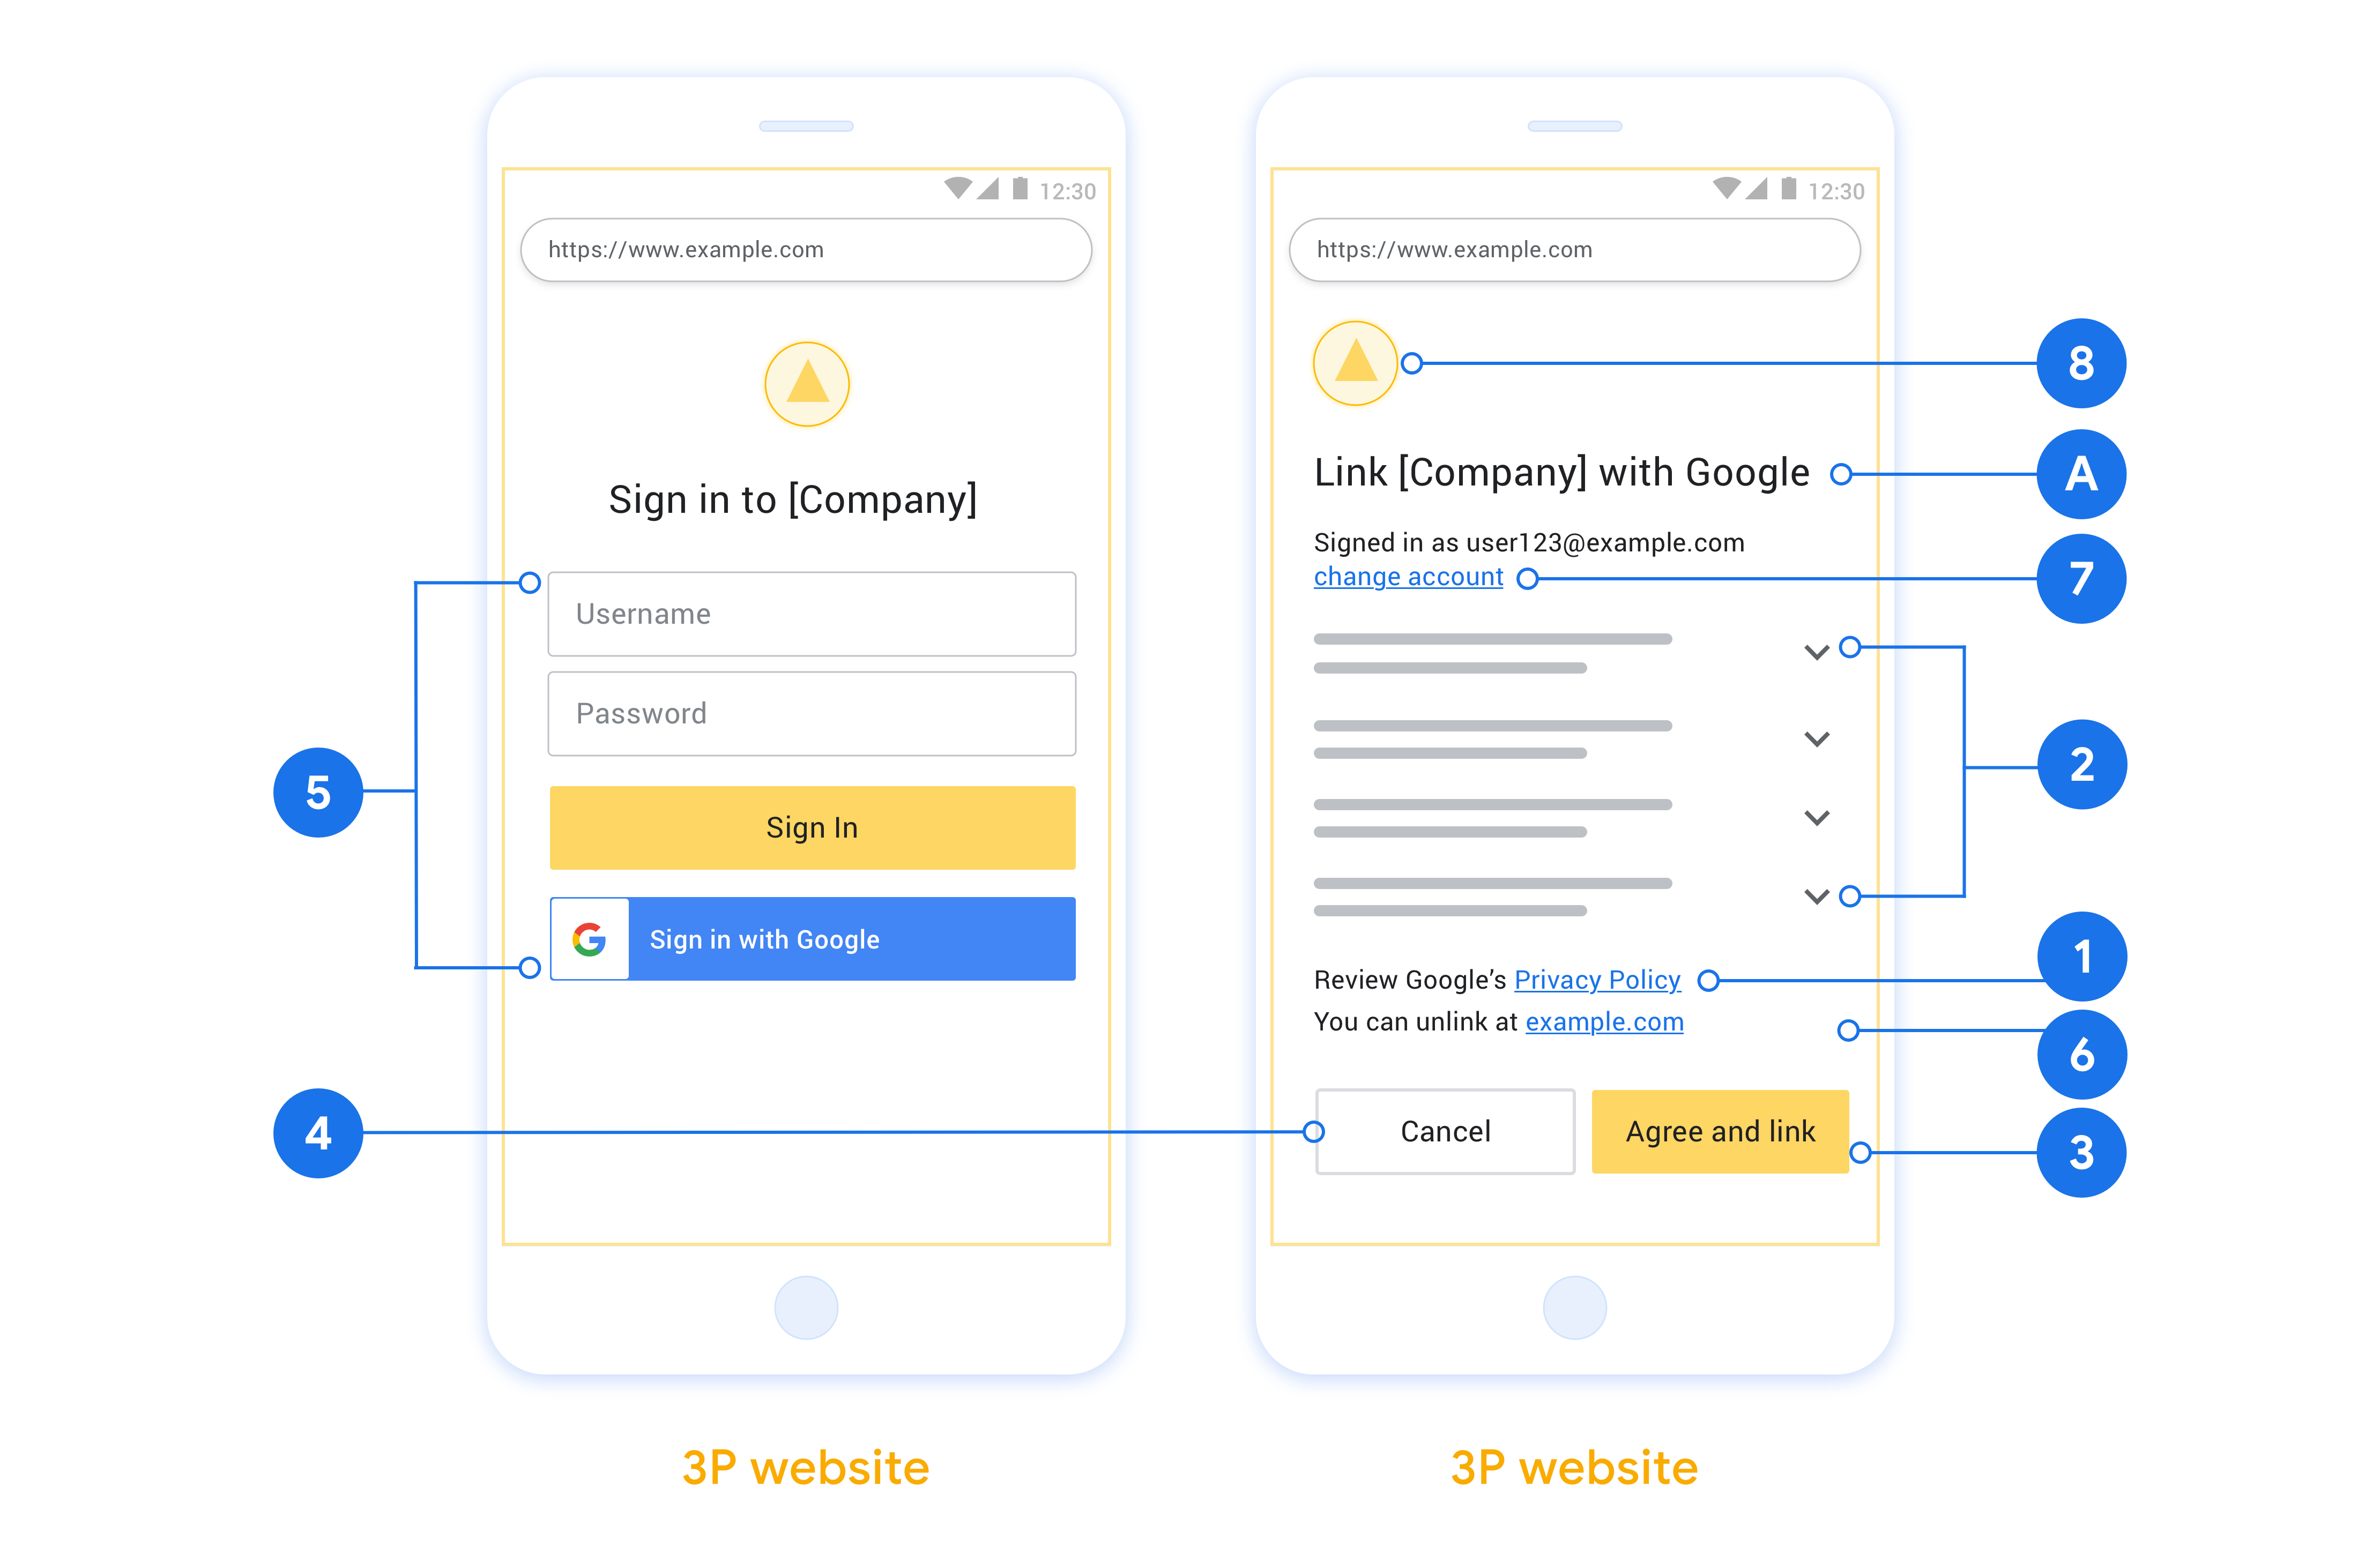
Display Google's Privacy Policy. Include a link to Google’s Privacy Policy on the consent screen.
Data to be shared. Use clear and concise language to tell the user what data of theirs Google requires and why.
Clear call-to-action. State a clear call-to-action on your consent screen, such as “Agree and link.” This is because users need to understand what data they're required to share with Google to link their accounts.
Ability to cancel. Provide a way for users to go back or cancel, if they choose not to link.
Clear sign-in process. Ensure that users have clear method for signing in to their Google account, such as fields for their username and password or Sign in with Google.
Ability to unlink. Offer a mechanism for users to unlink, such as a URL to their account settings on your platform. Alternatively, you can include a link to Google Account where users can manage their linked account.
Ability to change user account. Suggest a method for users to switch their account(s). This is especially beneficial if users tend to have multiple accounts.
- If a user must close the consent screen to switch accounts, send a recoverable error to Google so the user can sign in to the desired account with OAuth linking and the implicit flow.
Include your logo. Display your company logo on the consent screen. Use your style guidelines to place your logo. If you wish to also display Google's logo, see Logos and trademarks.
Create the project
To create your project to use account linking:
- Go to the Google API Console.
- 單擊創建項目 。
- 輸入名稱或接受生成的建議。
- 確認或編輯所有剩餘字段。
- 點擊創建 。
要查看您的項目ID:
- Go to the Google API Console.
- 在登錄頁面的表格中找到您的項目。項目ID出現在ID列中。
Configure your OAuth Consent Screen
The Google Account Linking process includes a consent screen which tells users the application requesting access to their data, what kind of data they are asking for and the terms that apply. You will need to configure your OAuth consent screen before generating a Google API client ID.
- Open the OAuth consent screen page of the Google APIs console.
- If prompted, select the project you just created.
On the "OAuth consent screen" page, fill out the form and click the “Save” button.
Application name: The name of the application asking for consent. The name should accurately reflect your application and be consistent with the application name users see elsewhere. The application name will be shown on the Account Linking consent screen.
Application logo: An image on the consent screen that will help users recognize your app. The logo is shown on Account linking consent screen and on account settings
Support email: For users to contact you with questions about their consent.
Scopes for Google APIs: Scopes allow your application to access your user's private Google data. For the Google Account Linking use case, default scope (email, profile, openid) is sufficient, you don’t need to add any sensitive scopes. It is generally a best practice to request scopes incrementally, at the time access is required, rather than up front. Learn more.
Authorized domains: To protect you and your users, Google only allows applications that authenticate using OAuth to use Authorized Domains. Your applications' links must be hosted on Authorized Domains. Learn more.
Application Homepage link: Home page for your application. Must be hosted on an Authorized Domain.
Application Privacy Policy link: Shown on Google Account Linking consent screen. Must be hosted on an Authorized Domain.
Application Terms of Service link (Optional): Must be hosted on an Authorized Domain.
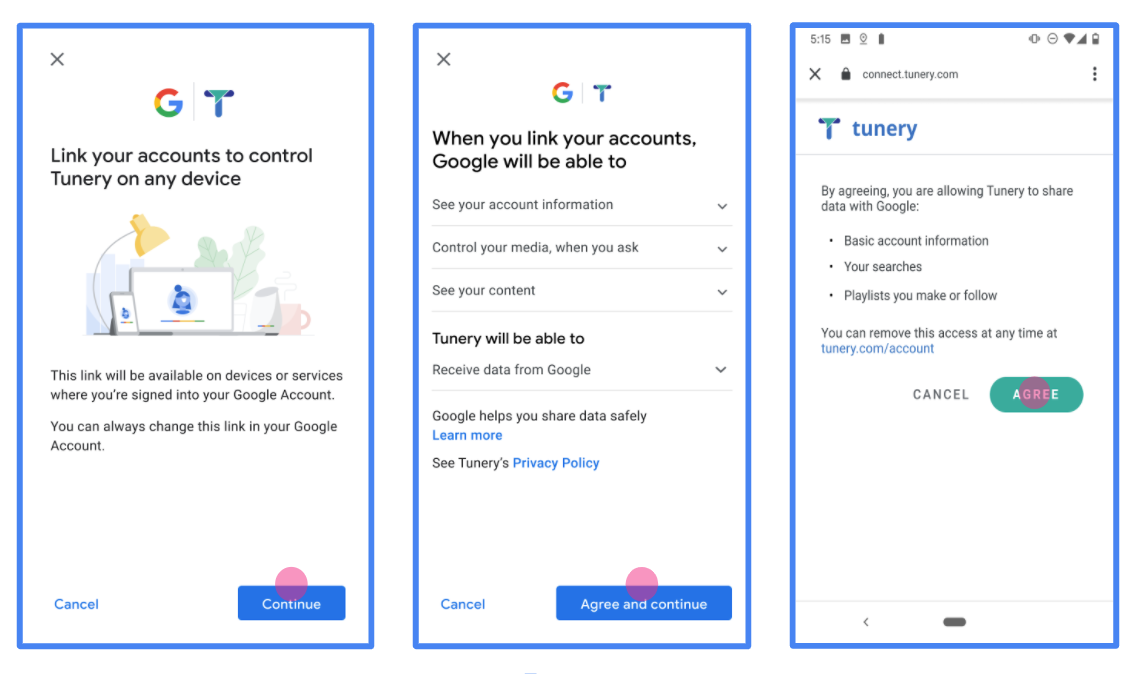
Figure 1. Google Account Linking Consent Screen for a fictitious Application, Tunery
Check "Verification Status", if your application needs verification then click the "Submit For Verification" button to submit your application for verification. Refer to OAuth verification requirements for details.
實作 OAuth 伺服器
授權碼流程的 OAuth 2.0 伺服器實作包含 服務透過 HTTPS 提供第一個端點 是授權端點,負責尋找或取得 徵得使用者同意並授予資料存取權授權端點會顯示 登入使用者介面,供尚未登入的使用者查看,且將同意 所要求的存取權第二個端點是權杖交換端點 用於取得加密字串 (稱為「權杖」),藉此授權使用者 存取您的服務。
當 Google 應用程式需要呼叫服務的其中一個 API 時,Google 會使用 這些端點都會一起取得權限,以便使用者呼叫這些 API 管理。
由 Google 發起的 OAuth 2.0 授權碼流程工作階段, 下列流程:
- Google 會在使用者的瀏覽器中開啟授權端點。如果流程 透過純語音裝置啟動動作,則 Google 將 到手機上
- 使用者登入後 (如果尚未登入),並將權限授予 Google 透過您的 API 存取他們的資料 (如果尚未授予權限)。
- 您的服務會建立授權碼,並傳回 Google。待辦 因此,請透過授權碼將使用者的瀏覽器重新導向回 Google 附加在要求中
- Google 將授權碼傳送至權杖交換端點 驗證程式碼的真實性,並傳回存取權杖和 更新權杖。存取權杖是服務 以憑證存取 API。更新權杖存在長期 憑證,可供 Google 儲存,用於取得新的存取權杖 過期。
- 使用者完成帳戶連結流程後, 來自 Google 的要求會包含存取權杖。
處理授權要求
使用 OAuth 2.0 授權碼執行帳戶連結時 流程時,Google 會透過以下要求將使用者傳送到您的授權端點 包含下列參數:
| 授權端點參數 | |
|---|---|
client_id |
您指派給 Google 的用戶端 ID。 |
redirect_uri |
您傳送回應到這項要求的網址。 |
state |
傳回給 Google 的記帳金額,值維持不變 重新導向 URI |
scope |
選用:一組以空格分隔的範圍字串,指定 也就是 Google 要求授權的資料 |
response_type |
要在回應中傳回的值類型。針對 OAuth 2.0
授權碼流程,回應類型一律為 code。
|
user_locale |
中的 Google 帳戶語言設定 RFC5646 格式,用來將內容翻譯成使用者偏好的語言。 |
舉例來說,如果您的授權端點位於
https://myservice.example.com/auth,要求可能如下所示:
GET https://myservice.example.com/auth?client_id=GOOGLE_CLIENT_ID&redirect_uri=REDIRECT_URI&state=STATE_STRING&scope=REQUESTED_SCOPES&response_type=code&user_locale=LOCALE
如要讓授權端點處理登入要求,請按照下列步驟操作: 步驟:
- 確認
client_id與您指派給 Google 的用戶端 ID 相符,且redirect_uri與 Google 為您的服務提供的重新導向網址相符。這些檢查至關重要 存取非預期或設定錯誤的用戶端應用程式。如果跨平台支援 OAuth 2.0 流程,也可以確認response_type是code。 - 檢查使用者是否已登入您的服務。如果使用者未登入, 完成服務的登入或註冊流程。
- 產生授權代碼,讓 Google 用來存取您的 API。 授權碼可以是任何字串值,但必須不重複 代表使用者、該權杖所屬的用戶端,以及代碼的到期時間 而且您無法憑空猜測您通常會核發授權 驗證碼會在大約 10 分鐘後失效
- 請確認
redirect_uri參數指定的網址包含 以下表單:https://oauth-redirect.googleusercontent.com/r/YOUR_PROJECT_ID https://oauth-redirect-sandbox.googleusercontent.com/r/YOUR_PROJECT_ID
- 將使用者的瀏覽器重新導向至
redirect_uri參數。附上 產生的原始值,以及您在重新導向時 方法是附加code和state參數。以下是 結果網址的範例:https://oauth-redirect.googleusercontent.com/r/YOUR_PROJECT_ID?code=AUTHORIZATION_CODE&state=STATE_STRING
處理權杖交換要求
服務的權杖交換端點負責兩種權杖 廣告交易平台:
- 交換存取權杖和更新權杖的授權碼
- 交換存取權杖的更新權杖
權杖交換要求包含下列參數:
| 權杖交換端點參數 | |
|---|---|
client_id |
用來識別要求來源為 Google 的字串。此字串必須 在您的系統中註冊為 Google 專屬識別碼。 |
client_secret |
您向 Google 註冊的服務專用密鑰。 |
grant_type |
要交換的權杖類型。這可以是
authorization_code 或 refresh_token。 |
code |
如果 grant_type=authorization_code,這個參數是
Google 從登入或權杖交換收到驗證碼
端點 |
redirect_uri |
如果 grant_type=authorization_code,這個參數是
用於初始授權要求的網址。 |
refresh_token |
如果 grant_type=refresh_token,這個參數是
Google 從您的權杖交換端點收到更新權杖。 |
交換存取權杖和更新權杖的授權碼
使用者登入,且您的授權端點傳回 授權代碼傳送給 Google,Google 會向你的權杖交換要求傳送要求 來交換存取權杖的授權碼 產生下一個符記
在這些要求中,grant_type 的值為 authorization_code,
code 的值是您先前授予的授權碼
Google。以下為
存取權杖和更新權杖的授權碼:
POST /token HTTP/1.1
Host: oauth2.example.com
Content-Type: application/x-www-form-urlencoded

client_id=GOOGLE_CLIENT_ID&client_secret=GOOGLE_CLIENT_SECRET&grant_type=authorization_code&code=AUTHORIZATION_CODE&redirect_uri=REDIRECT_URI
如要交換存取權杖和更新權杖的授權碼,您的
權杖交換端點會執行下列命令來回應 POST 要求:
步驟:
- 驗證
client_id會將要求來源識別為已授權的要求 ,且client_secret符合預期值。 - 請檢查授權碼是否有效且未過期,且 要求中指定的用戶端 ID 與 授權碼。
- 確認
redirect_uri參數指定的網址相同 設為初始授權要求使用的值。 - 如果您無法驗證上述所有條件,請傳回 HTTP
400 「Bad Request」錯誤,內文為
{"error": "invalid_grant"}。 - 否則,請使用授權碼中的使用者 ID 產生重新整理 權杖和存取權杖這些符記可以是任何字串值,但 必須明確代表憑證所屬的用戶端、 另一個使用者如果是存取權杖,也請記下 權杖,通常是在您核發權杖後 1 小時。 重新整理權杖沒有期限。
- 在 HTTPS 回應的內文中傳回下列 JSON 物件:
{
"token_type": "Bearer",
"access_token": "ACCESS_TOKEN",
"refresh_token": "REFRESH_TOKEN",
"expires_in": SECONDS_TO_EXPIRATION
}
Google 會儲存使用者和記錄的存取權杖和更新權杖 存取權杖的到期時間存取權杖到期時,Google 會使用 更新憑證,從權杖交換端點取得新的存取權杖。
交換存取權杖的更新權杖
存取權杖到期時,Google 會傳送要求至您的權杖交換 更新憑證,藉此將更新憑證交換給新的存取權杖。
在這些要求的 grant_type 值為 refresh_token,其值為
refresh_token 是您先前授予的更新權杖值
Google。以下是交換更新權杖的要求範例
定義存取權杖:
POST /token HTTP/1.1
Host: oauth2.example.com
Content-Type: application/x-www-form-urlencoded

client_id=GOOGLE_CLIENT_ID&client_secret=GOOGLE_CLIENT_SECRET&grant_type=refresh_token&refresh_token=REFRESH_TOKEN
如要將更新權杖換成存取權杖,權杖交換端點
執行下列步驟來回應 POST 要求:
- 驗證
client_id會將要求來源指定為 Google。client_secret與預期值相符 - 驗證更新權杖是否有效,以及 此請求會與更新權杖關聯的用戶端 ID 相符。
- 如果您無法驗證上述所有條件,請傳回 HTTP 400
「Bad Request」錯誤,以
{"error": "invalid_grant"}為主體。 - 否則,請使用更新權杖的使用者 ID 產生存取權 產生下一個符記這些權杖可以是任何字串值,但必須不重複 代表使用者和用戶端,不得 容易猜測的字詞如果是存取權杖,也請記錄權杖的到期時間 通常在核發權杖後一小時。
- 在 HTTPS 內文中傳回下列 JSON 物件
回應:
{
"token_type": "熊",
"access_token": "ACCESS_TOKEN",
「expires_in」:SECONDS_TO_EXPIRATION
}
Handle userinfo requests
The userinfo endpoint is an OAuth 2.0 protected resource that return claims about the linked user. Implementing and hosting the userinfo endpoint is optional, except for the following use cases:
- Linked Account Sign-In with Google One Tap.
- Frictionless subscription on AndroidTV.
After the access token has been successfully retrieved from your token endpoint, Google sends a request to your userinfo endpoint to retrieve basic profile information about the linked user.
| userinfo endpoint request headers | |
|---|---|
Authorization header |
The access token of type Bearer. |
For example, if your userinfo endpoint is available at
https://myservice.example.com/userinfo, a request might look like the following:
GET /userinfo HTTP/1.1
Host: myservice.example.com
Authorization: Bearer ACCESS_TOKEN
For your userinfo endpoint to handle requests, do the following steps:
- Extract access token from the Authorization header and return information for the user associated with the access token.
- If the access token is invalid, return an HTTP 401 Unauthorized error with using the
WWW-AuthenticateResponse Header. Below is an example of a userinfo error response:HTTP/1.1 401 Unauthorized WWW-Authenticate: error="invalid_token", error_description="The Access Token expired"
If the access token is valid, return and HTTP 200 response with the following JSON object in the body of the HTTPS response:
{ "sub": "USER_UUID", "email": "EMAIL_ADDRESS", "given_name": "FIRST_NAME", "family_name": "LAST_NAME", "name": "FULL_NAME", "picture": "PROFILE_PICTURE", }userinfo endpoint response subA unique ID that identifies the user in your system. emailEmail address of the user. given_nameOptional: First name of the user. family_nameOptional: Last name of the user. nameOptional: Full name of the user. pictureOptional: Profile picture of the user.
驗證實作
您可以使用 OAuth 2.0 Playground 工具驗證實作結果。
請在工具中按照下列步驟操作:
- 點選「Configuration」圖示 ,開啟 OAuth 2.0 設定視窗。
- 在「OAuth 流程」欄位中,選取「用戶端」。
- 在「OAuth 端點」欄位中,選取「自訂」。
- 在對應的欄位中指定 OAuth 2.0 端點,以及您指派給 Google 的用戶端 ID。
- 在「步驟 1」部分中,請勿選取任何 Google 範圍。請改為將這個欄位留空,或輸入有效的伺服器範圍 (如果您不使用 OAuth 範圍,則輸入任意字串)。完成後,按一下「授權 API」。
- 在「步驟 2」和「步驟 3」部分,請完成 OAuth 2.0 流程,並確認每個步驟都能正常運作。
您可以使用 Google 帳戶連結示範工具驗證實作成果。
在工具中執行下列步驟:
- 按一下「使用 Google 帳戶登入」按鈕。
- 選擇要連結的帳戶。
- 輸入服務 ID。
- 您可以選擇輸入一或多個要申請存取權的範圍。
- 按一下「開始試用」。
- 系統顯示提示時,請確認您可以同意或拒絕連結要求。
- 確認系統是否會將你重新導向至平台。