Связывание учетных записей осуществляется с использованием стандартного для отрасли протокола авторизации OAuth 2.0.
OAuth 2.1 & PKCE for Agents
Для агентов ИИ без сохранения состояния и многомодальных конвейеров рекомендуется принудительное использование OAuth 2.1 .
- PKCE (Proof Key for Code Exchange) : Должен использоваться для защиты потока авторизационного кода и предотвращения атак перехвата.
- Отсутствие неявного потока : Неявный поток раскрывает токены доступа в URL-адресе, что представляет собой риск безопасности для агентских сред.
Ваш сервис должен поддерживать авторизацию и точки обмена токенами , соответствующие стандартам OAuth 2.0/2.1.
Создайте проект
Для создания проекта с использованием привязки учетных записей:
- Перейдите в консоль Google API .
- Нажмите «Создать проект» .
- Введите имя или примите предложенное имя.
- Подтвердите или отредактируйте оставшиеся поля.
- Нажмите «Создать» .
Чтобы просмотреть идентификатор вашего проекта:
- Go to the Google API Console .
- Найдите свой проект в таблице на главной странице. Идентификатор проекта указан в столбце ID .
Настройте экран согласия OAuth.
Процесс привязки учетной записи Google включает в себя экран согласия, который информирует пользователей о приложении, запрашивающем доступ к их данным, о типе запрашиваемых данных и применимых условиях. Вам потребуется настроить экран согласия OAuth перед генерацией идентификатора клиента Google API.
- Откройте страницу согласия OAuth в консоли Google API.
- Если появится запрос, выберите только что созданный вами проект.
На странице «Экран согласия OAuth» заполните форму и нажмите кнопку «Сохранить».
Название приложения: Название приложения, запрашивающего согласие. Название должно точно отражать ваше приложение и соответствовать названию приложения, которое пользователи видят в других местах. Название приложения будет отображаться на экране подтверждения привязки учетной записи.
Логотип приложения: изображение на экране согласия, которое поможет пользователям узнать ваше приложение. Логотип отображается на экране согласия при привязке учетной записи и в настройках учетной записи.
Адрес электронной почты службы поддержки: Для связи с пользователями по вопросам, касающимся их согласия.
Области действия для API Google: Области действия позволяют вашему приложению получать доступ к личным данным пользователей Google. Для сценария использования привязки учетной записи Google достаточно области действия по умолчанию (электронная почта, профиль, OpenID), добавлять какие-либо конфиденциальные области действия не требуется. Как правило, рекомендуется запрашивать области действия постепенно, по мере необходимости доступа, а не сразу. Подробнее .
Авторизованные домены: Для вашей защиты и защиты ваших пользователей Google разрешает использовать авторизованные домены только приложениям, аутентифицирующимся с помощью OAuth. Ссылки на ваши приложения должны размещаться на авторизованных доменах. Подробнее .
Ссылка на главную страницу приложения: Домашняя страница вашего приложения. Должна размещаться на авторизованном домене.
Application Privacy Policy link: Shown on Google Account Linking consent screen. Must be hosted on an Authorized Domain.
Ссылка на Условия использования приложения (необязательно): Приложение должно размещаться на авторизованном домене.
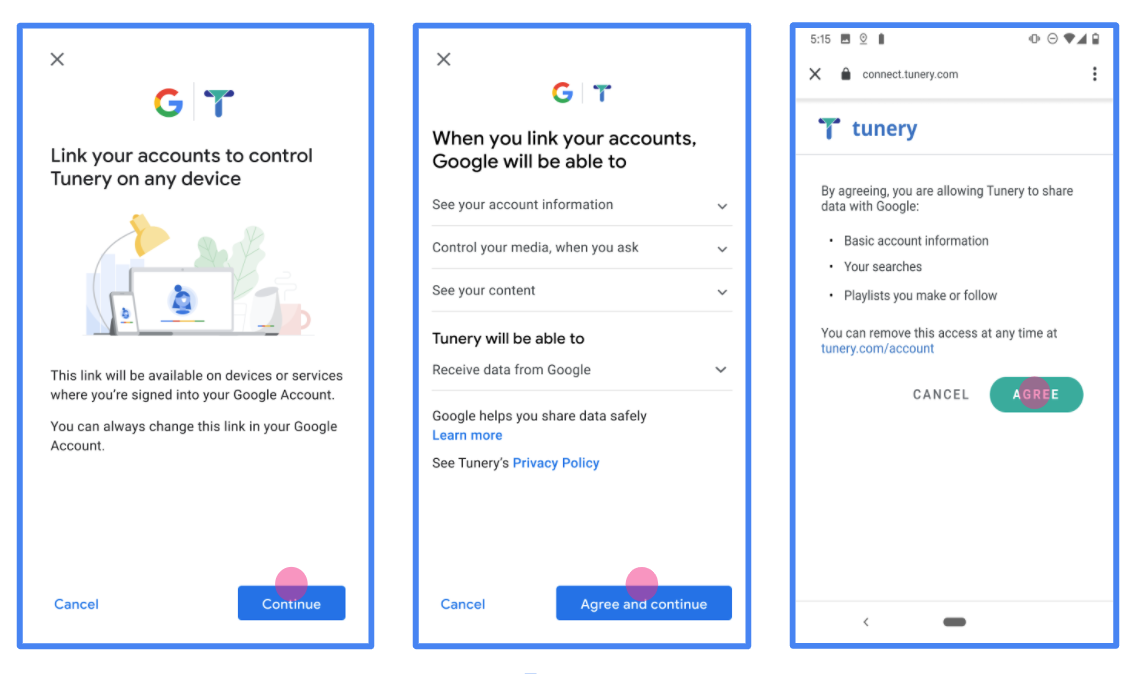
Рисунок 1. Экран согласия на привязку учетной записи Google для вымышленного приложения Tunery.
Проверьте «Статус проверки». Если ваше приложение нуждается в проверке, нажмите кнопку «Отправить на проверку», чтобы отправить приложение на проверку. Подробную информацию см. в требованиях к проверке OAuth .
Implement your OAuth server
Реализация потока авторизационного кода на сервере OAuth 2.0 состоит из двух конечных точек, которые ваш сервис предоставляет по протоколу HTTPS. Первая конечная точка — это точка авторизации, которая отвечает за поиск или получение согласия пользователей на доступ к данным. Точка авторизации отображает пользовательский интерфейс входа в систему для пользователей, которые еще не авторизованы, и регистрирует согласие на запрошенный доступ. Вторая конечная точка — это точка обмена токенами, которая используется для получения зашифрованных строк, называемых токенами, которые авторизуют пользователя для доступа к вашему сервису.
Когда приложению Google необходимо вызвать один из API вашего сервиса, Google использует эти конечные точки вместе, чтобы получить разрешение от ваших пользователей на вызов этих API от их имени.
Привязка учетной записи Google: процесс авторизации OAuth.
На приведенной ниже диаграмме подробно описаны взаимодействия между пользователем, Google и конечными точками вашего сервиса.
Роли и обязанности
В таблице ниже определены роли и обязанности участников процесса OAuth-аутентификации при привязке учетной записи Google (GAL). Обратите внимание, что в GAL Google выступает в роли клиента OAuth, а ваш сервис — в роли поставщика идентификации/услуг .
| Актер / Компонент | Роль GAL | Обязанности |
|---|---|---|
| Приложение/сервер Google | Клиент OAuth | Инициирует процесс, получает код авторизации, обменивает его на токены и безопасно сохраняет их для доступа к API вашего сервиса. |
| Ваша точка авторизации | Сервер авторизации | Проверяет подлинность пользователей и получает их согласие на передачу доступа к их данным компании Google. |
| Ваша конечная точка обмена токенов | Сервер авторизации | Проверяет коды авторизации и токены обновления, а также выдает токены доступа на сервер Google. |
| URI перенаправления Google | Конечная точка обратного вызова | Получает от вашей службы авторизации перенаправление пользователя с указанием code и state . |
Сессия авторизации OAuth 2.0, инициированная Google, имеет следующий порядок действий:
- Google открывает вашу точку авторизации в браузере пользователя. Если процесс начался на устройстве, поддерживающем только голосовое управление, для действия, Google переносит выполнение на телефон.
- Пользователь входит в систему, если он еще не вошел, и предоставляет Google разрешение на доступ к своим данным через ваш API, если он еще не предоставил такое разрешение.
- Ваш сервис создает код авторизации и возвращает его в Google. Для этого перенаправьте браузер пользователя обратно на сайт Google, прикрепив к запросу код авторизации.
- Google отправляет код авторизации на вашу конечную точку обмена токенов, которая проверяет подлинность кода и возвращает токен доступа и токен обновления . Токен доступа — это кратковременный токен, который ваш сервис принимает в качестве учетных данных для доступа к API. Токен обновления — это долговременный токен, который Google может хранить и использовать для получения новых токенов доступа по истечении срока действия предыдущих.
- После завершения пользователем процедуры привязки учетной записи каждый последующий запрос, отправляемый Google, будет содержать токен доступа.
Рецепт реализации
Выполните следующие шаги для реализации процесса авторизации с использованием кода авторизации.
Шаг 1: Обработка запросов на авторизацию
Когда Google инициирует привязку учетной записи, он перенаправляет пользователя на вашу конечную точку авторизации. Подробные сведения о протоколах и требованиях к параметрам см. в разделе « Конечная точка авторизации» .
Для обработки запроса выполните следующие действия:
Подтвердите запрос :
- Убедитесь, что
client_idсовпадает с идентификатором клиента, присвоенным Google. - Убедитесь, что
redirect_uriсоответствует ожидаемому URL-адресу перенаправления Google:none https://oauth-redirect.googleusercontent.com/r/YOUR_PROJECT_ID https://oauth-redirect-sandbox.googleusercontent.com/r/YOUR_PROJECT_ID - Убедитесь, что
response_typeимеетcode.
- Убедитесь, что
Аутентификация пользователя :
- Проверьте, вошел ли пользователь в вашу систему.
- Если пользователь не авторизован, предложите ему пройти процедуру входа или регистрации.
Сгенерируйте код авторизации :
- Создайте уникальный, не поддающийся угадыванию код авторизации, связанный с пользователем и клиентом.
- Установите срок действия кода примерно на 10 минут.
Перенаправить обратно на Google :
- Перенаправьте браузер на URL-адрес, указанный в
redirect_uri. - Добавьте следующие параметры запроса:
-
code: сгенерированный вами код авторизации. -
state: Неизмененное значение состояния, полученное от Google.
-
- Перенаправьте браузер на URL-адрес, указанный в
Шаг 2: Обработка запросов на обмен токенов
Ваша конечная точка обмена токенов обрабатывает два типа запросов: обмен кодов на токены и обновление просроченных токенов доступа. Подробные сведения о протоколах и требованиях к параметрам см. в разделе « Конечная точка обмена токенов» .
А. Обмен кодов авторизации на токены.
Когда Google получает код авторизации, он вызывает вашу конечную точку обмена токенов (POST) для получения токенов.
Подтвердите запрос :
- Проверьте
client_idиclient_secret. - Убедитесь, что код авторизации действителен и не просрочен.
- Убедитесь, что
redirect_uriсовпадает со значением, использованным на шаге 1. - Если проверка не пройдена, верните HTTP-
400 Bad Requestс{"error": "invalid_grant"}.
- Проверьте
Выдача токенов :
- Сгенерируйте долгосрочный
refresh_tokenи краткосрочныйaccess_token(обычно на 1 час). - Возвращает HTTP-код
200 OKсо стандартным JSON-токеном.
- Сгенерируйте долгосрочный
B. Обновить токены доступа
Когда срок действия токена доступа истекает, Google запрашивает новый токен, используя токен обновления.
Подтвердите запрос :
- Проверьте
client_id,client_secretиrefresh_token. - Если проверка не пройдена, верните HTTP-
400 Bad Requestс{"error": "invalid_grant"}.
- Проверьте
Выдать новый токен доступа :
- Сгенерировать новый кратковременный
access_token. - Возвращает HTTP-код
200 OKс ответом в формате JSON (опционально, включая новый токен обновления).
- Сгенерировать новый кратковременный
Обработка запросов информации о пользователях
Конечная точка userinfo — это ресурс, защищенный OAuth 2.0, который возвращает утверждения о связанном пользователе. Реализация и размещение конечной точки userinfo не является обязательной, за исключением следующих случаев использования:
- Вход в связанную учетную запись с помощью Google One Tap.
- Простая подписка на AndroidTV.
После того как токен доступа был успешно получен из конечной точки вашего токена, Google отправляет запрос в конечную точку информации о пользователе, чтобы получить основную информацию профиля связанного пользователя.
| заголовки запроса конечной точки userinfo | |
|---|---|
Authorization header | Токен доступа типа Bearer. |
Например, если ваша конечная точка userinfo доступна по адресу https://myservice.example.com/userinfo , запрос может выглядеть следующим образом:
GET /userinfo HTTP/1.1
Host: myservice.example.com
Authorization: Bearer ACCESS_TOKEN
Чтобы ваша конечная точка userinfo могла обрабатывать запросы, выполните следующие действия:
- Извлеките токен доступа из заголовка авторизации и верните информацию для пользователя, связанного с токеном доступа.
- Если токен доступа недействителен, верните ошибку HTTP 401 Unauthorized с использованием заголовка ответа
WWW-Authenticate. Ниже приведен пример ответа об ошибке с информацией о пользователе:HTTP/1.1 401 Unauthorized WWW-Authenticate: error="invalid_token", error_description="The Access Token expired"
Если токен доступа действителен, верните ответ HTTP 200 со следующим объектом JSON в теле ответа HTTPS:
{ "sub": "USER_UUID", "email": "EMAIL_ADDRESS", "given_name": "FIRST_NAME", "family_name": "LAST_NAME", "name": "FULL_NAME", "picture": "PROFILE_PICTURE", }ответ конечной точки с информацией о пользователе subУникальный идентификатор, идентифицирующий пользователя в вашей системе. emailАдрес электронной почты пользователя. given_nameНеобязательно: Имя пользователя. family_nameНеобязательно: фамилия пользователя. nameНеобязательно: Полное имя пользователя. pictureНеобязательно: изображение профиля пользователя.
Validating your implementation
Вы можете проверить свою реализацию, используя инструмент OAuth 2.0 Playground .
В инструменте выполните следующие действия:
- Нажмите конфигурации », чтобы открыть окно «Конфигурация OAuth 2.0».
- В поле «Процесс аутентификации OAuth» выберите «На стороне клиента» .
- В поле «Конечные точки OAuth» выберите «Пользовательские» .
- Укажите в соответствующих полях вашу конечную точку OAuth 2.0 и идентификатор клиента, который вы присвоили Google.
- В разделе «Шаг 1» не выбирайте никаких областей действия Google. Вместо этого оставьте это поле пустым или введите область действия, действительную для вашего сервера (или произвольную строку, если вы не используете области действия OAuth). После завершения нажмите «Авторизовать API» .
- В разделах «Шаг 2» и «Шаг 3» пройдите весь процесс аутентификации OAuth 2.0 и убедитесь, что каждый шаг работает должным образом.
Вы можете проверить работоспособность своей реализации, используя демонстрационный инструмент для привязки учетных записей Google .
В инструменте выполните следующие действия:
- Нажмите кнопку « Войти через Google» .
- Выберите учетную запись, которую хотите связать.
- Введите идентификатор службы.
- При желании укажите одну или несколько областей доступа, к которым вы запрашиваете доступ.
- Нажмите «Начать демонстрацию» .
- При появлении запроса подтвердите свое согласие и отклоните запрос на привязку.
- Убедитесь, что вас перенаправили на вашу платформу.