계정은 업계 표준 OAuth 2.0 승인 코드 흐름을 사용하여 연결됩니다.
에이전트용 OAuth 2.1 및 PKCE
상태 비저장 AI 에이전트 및 멀티모달 파이프라인의 경우 OAuth 2.1 시행이 권장됩니다.
- PKCE (Proof Key for Code Exchange): 승인 코드 플로우를 보호하고 가로채기 공격을 방지하는 데 사용해야 합니다.
- 암시적 흐름 없음: 암시적 흐름은 URL에 액세스 토큰을 노출하므로 에이전트 환경에 보안 위험이 됩니다.
서비스는 OAuth 2.0/2.1 호환 승인 및 토큰 교환 엔드포인트를 지원해야 합니다.
프로젝트 만들기
계정 연결을 사용하도록 프로젝트를 만들려면 다음 단계를 따르세요.
- Google API 콘솔로 이동합니다.
- 프로젝트 만들기를 클릭합니다.
- 이름을 입력하거나 생성된 추천을 수락합니다.
- 나머지 필드를 확인하거나 수정합니다.
- 만들기를 클릭합니다.
프로젝트 ID를 보려면 다음 단계를 따르세요.
- Google API 콘솔로 이동합니다.
- 방문 페이지의 표에서 프로젝트를 찾습니다. 프로젝트 ID는 ID 열에 표시됩니다.
OAuth 동의 화면 구성
Google 계정 연결 프로세스에는 사용자에게 데이터 액세스를 요청하는 애플리케이션, 요청하는 데이터의 종류, 적용되는 약관을 알려주는 동의 화면이 포함됩니다. Google API 클라이언트 ID를 생성하기 전에 OAuth 동의 화면을 구성해야 합니다.
- Google API 콘솔의 OAuth 동의 화면 페이지를 엽니다.
- 메시지가 표시되면 방금 만든 프로젝트를 선택합니다.
'OAuth 동의 화면' 페이지에서 양식을 작성하고 '저장' 버튼을 클릭합니다.
애플리케이션 이름: 동의를 요청하는 애플리케이션의 이름입니다. 이름은 애플리케이션을 정확하게 반영해야 하며 사용자가 다른 곳에서 보는 애플리케이션 이름과 일치해야 합니다. 애플리케이션 이름은 계정 연결 동의 화면에 표시됩니다.
애플리케이션 로고: 사용자가 앱을 인식하는 데 도움이 되는 동의 화면의 이미지입니다. 로고는 계정 연결 동의 화면과 계정 설정에 표시됩니다.
지원 이메일: 사용자가 동의에 대해 문의할 수 있습니다.
Google API 범위: 범위를 사용하면 애플리케이션이 사용자의 비공개 Google 데이터에 액세스할 수 있습니다. Google 계정 연결 사용 사례의 경우 기본 범위 (이메일, 프로필, openid)로 충분하며 민감한 범위를 추가할 필요가 없습니다. 일반적으로 액세스가 필요한 시점에 미리 요청하는 대신 점진적으로 범위를 요청하는 것이 좋습니다. 자세히 알아보기
승인된 도메인: 나와 내 사용자를 보호하기 위해 Google에서는 OAuth를 사용하여 인증하는 애플리케이션만 승인된 도메인을 사용할 수 있도록 허용합니다. 애플리케이션의 링크는 승인된 도메인에서 호스팅되어야 합니다. 자세히 알아보기
애플리케이션 홈페이지 링크: 애플리케이션의 홈페이지입니다. 승인된 도메인에서 호스팅해야 합니다.
애플리케이션 개인정보처리방침 링크: Google 계정 연결 동의 화면에 표시됩니다. 승인된 도메인에서 호스팅해야 합니다.
애플리케이션 서비스 약관 링크 (선택사항): 승인된 도메인에서 호스팅해야 합니다.
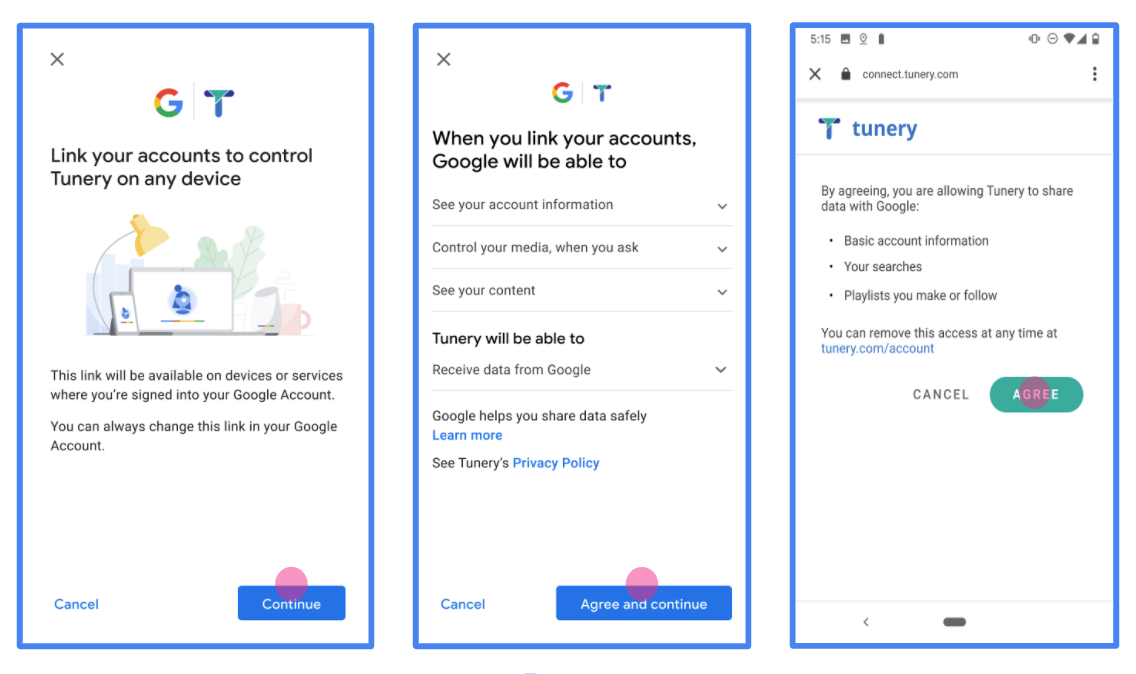
그림 1. 가상 애플리케이션 Tunery의 Google 계정 연결 동의 화면
'인증 상태'를 확인합니다. 애플리케이션에 인증이 필요한 경우 '인증을 위해 제출' 버튼을 클릭하여 인증을 위해 애플리케이션을 제출합니다. 자세한 내용은 OAuth 인증 요구사항을 참고하세요.
OAuth 서버 구현
승인 코드 흐름의 OAuth 2.0 서버 구현은 서비스에서 HTTPS를 통해 제공하는 두 개의 엔드포인트로 구성됩니다. 첫 번째 엔드포인트는 데이터 액세스에 대한 사용자 동의를 찾거나 획득하는 역할을 하는 승인 엔드포인트입니다. 승인 엔드포인트는 아직 로그인하지 않은 사용자에게 로그인 UI를 표시하고 요청된 액세스에 대한 동의를 기록합니다. 두 번째 엔드포인트는 토큰 교환 엔드포인트로, 사용자가 서비스에 액세스할 수 있도록 승인하는 토큰이라는 암호화된 문자열을 획득하는 데 사용됩니다.
Google 애플리케이션이 서비스의 API 중 하나를 호출해야 하는 경우 Google은 이러한 엔드포인트를 함께 사용하여 사용자를 대신하여 이러한 API를 호출할 권한을 사용자로부터 얻습니다.
Google 계정 연결: OAuth 승인 코드 플로우
다음 시퀀스 다이어그램은 사용자, Google, 서비스의 엔드포인트 간의 상호작용을 자세히 설명합니다.
역할 및 책임
다음 표에서는 Google 계정 연결 (GAL) OAuth 흐름의 행위자의 역할과 책임을 정의합니다. GAL에서 Google은 OAuth 클라이언트 역할을 하고 서비스는 ID/서비스 제공업체 역할을 합니다.
| 작업 수행자 / 구성요소 | GAL 역할 | 책임 |
|---|---|---|
| Google 앱 / 서버 | OAuth 클라이언트 | 흐름을 시작하고, 승인 코드를 수신하고, 토큰으로 교환하고, 서비스의 API에 액세스하기 위해 안전하게 저장합니다. |
| 승인 엔드포인트 | 승인 서버 | 사용자를 인증하고 Google과 데이터 액세스 권한을 공유하는 데 대한 사용자의 동의를 얻습니다. |
| 토큰 교환 엔드포인트 | 승인 서버 | 승인 코드와 갱신 토큰을 검증하고 Google 서버에 액세스 토큰을 발급합니다. |
| Google 리디렉션 URI | 콜백 엔드포인트 | code 및 state 값이 포함된 승인 서비스에서 사용자 리디렉션을 수신합니다. |
Google에서 시작한 OAuth 2.0 승인 코드 플로우 세션은 다음과 같은 플로우를 갖습니다.
- Google이 사용자의 브라우저에서 승인 엔드포인트를 엽니다. 작업의 흐름이 음성 전용 기기에서 시작된 경우 Google은 실행을 휴대전화로 트랜스퍼합니다.
- 사용자가 아직 로그인하지 않은 경우 로그인하고, 아직 권한을 부여하지 않은 경우 Google에 API로 데이터에 액세스할 수 있는 권한을 부여합니다.
- 서비스가 승인 코드를 만들어 Google에 반환합니다. 이렇게 하려면 요청에 승인 코드를 첨부하여 사용자의 브라우저를 Google로 다시 리디렉션하세요.
- Google은 승인 코드를 토큰 교환 엔드포인트로 전송하며, 이 엔드포인트는 코드의 진위성을 확인하고 액세스 토큰과 갱신 토큰을 반환합니다. 액세스 토큰은 서비스가 API에 액세스하기 위한 사용자 인증 정보로 허용하는 단기 토큰입니다. 갱신 토큰은 Google이 저장하고 액세스 토큰이 만료될 때 새 액세스 토큰을 획득하는 데 사용할 수 있는 장기 토큰입니다.
- 사용자가 계정 연결 흐름을 완료한 후 Google에서 전송되는 모든 후속 요청에는 액세스 토큰이 포함됩니다.
구현 레시피
다음 단계에 따라 승인 코드 플로우를 구현하세요.
1단계: 승인 요청 처리
Google이 계정 연결을 시작하면 사용자를 승인 엔드포인트로 리디렉션합니다. 자세한 프로토콜 계약 및 매개변수 요구사항은 인증 엔드포인트를 참고하세요.
요청을 처리하려면 다음 작업을 실행하세요.
요청 유효성 검사:
client_id이 Google에 할당된 클라이언트 ID와 일치하는지 확인합니다.redirect_uri이 예상되는 Google 리디렉션 URL과 일치하는지 확인합니다.none https://oauth-redirect.googleusercontent.com/r/YOUR_PROJECT_ID https://oauth-redirect-sandbox.googleusercontent.com/r/YOUR_PROJECT_IDresponse_type이code인지 확인합니다.
사용자 인증:
- 사용자가 서비스에 로그인했는지 확인합니다.
- 사용자가 로그인하지 않은 경우 로그인 또는 가입 절차를 완료하라는 메시지를 표시합니다.
승인 코드 생성:
- 사용자 및 클라이언트와 연결된 추측할 수 없는 고유한 승인 코드를 만듭니다.
- 코드가 약 10분 후에 만료되도록 설정합니다.
Google로 다시 리디렉션:
- 브라우저를
redirect_uri에 제공된 URL로 리디렉션합니다. - 다음 쿼리 매개변수를 추가합니다.
code: 생성한 승인 코드입니다.state: Google에서 수신한 수정되지 않은 상태 값입니다.
- 브라우저를
2단계: 토큰 교환 요청 처리
토큰 교환 엔드포인트는 토큰용 코드 교환과 만료된 액세스 토큰 새로고침이라는 두 가지 유형의 요청을 처리합니다. 자세한 프로토콜 계약 및 매개변수 요구사항은 토큰 교환 엔드포인트를 참고하세요.
A. 승인 코드를 토큰으로 교환
Google에서 승인 코드를 수신하면 토큰 교환 엔드포인트 (POST)를 호출하여 토큰을 가져옵니다.
요청 유효성 검사:
client_id및client_secret을 확인합니다.- 승인 코드가 유효하고 만료되지 않았는지 확인합니다.
redirect_uri이 1단계에서 사용한 값과 일치하는지 확인합니다.- 유효성 검사가 실패하면
{"error": "invalid_grant"}와 함께 HTTP400 Bad Request를 반환합니다.
토큰 발급:
- 장기
refresh_token와 단기access_token(일반적으로 1시간)을 생성합니다. - 표준 JSON 토큰 응답과 함께 HTTP
200 OK를 반환합니다.
- 장기
B. 액세스 토큰 새로고침
액세스 토큰이 만료되면 Google은 갱신 토큰을 사용하여 새 토큰을 요청합니다.
요청 유효성 검사:
client_id,client_secret,refresh_token를 확인합니다.- 유효성 검사가 실패하면
{"error": "invalid_grant"}와 함께 HTTP400 Bad Request를 반환합니다.
새 액세스 토큰 발급:
- 새 단기
access_token를 생성합니다. - JSON 토큰 응답 (선택적으로 새 갱신 토큰 포함)과 함께 HTTP
200 OK를 반환합니다.
- 새 단기
사용자 정보 요청 처리
userinfo 엔드포인트는 연결된 사용자에 대한 클레임을 반환하는 OAuth 2.0 보호 리소스입니다. 다음 사용 사례를 제외하고 userinfo 엔드포인트를 구현하고 호스팅하는 것은 선택사항입니다.
- Google 원탭을 사용한 연결된 계정 로그인
- AndroidTV의 원활한 구독
토큰 엔드포인트에서 액세스 토큰을 성공적으로 가져오면 Google은 사용자 정보 엔드포인트에 요청을 보내 연결된 사용자에 대한 기본 프로필 정보를 가져옵니다.
| 사용자 정보 엔드포인트 요청 헤더 | |
|---|---|
Authorization header |
Bearer 유형의 액세스 토큰입니다. |
예를 들어
https://myservice.example.com/userinfo인 경우 요청은 다음과 같을 수 있습니다.
GET /userinfo HTTP/1.1
Host: myservice.example.com
Authorization: Bearer ACCESS_TOKEN
userinfo 엔드포인트에서 요청을 처리하려면 다음 단계를 수행합니다.
- 승인 헤더에서 액세스 토큰을 추출하고 액세스 토큰과 연결된 사용자의 정보를 반환합니다.
- 액세스 토큰이 유효하지 않은 경우
WWW-Authenticate응답 헤더를 사용하여 HTTP 401 승인되지 않은 오류를 반환합니다. 다음은 userinfo 오류 응답의 예입니다.HTTP/1.1 401 Unauthorized WWW-Authenticate: error="invalid_token", error_description="The Access Token expired"
액세스 토큰이 유효하면 HTTPS 본문에 다음 JSON 객체가 포함된 HTTP 200 응답을 반환합니다. 응답:
{ "sub": "USER_UUID", "email": "EMAIL_ADDRESS", "given_name": "FIRST_NAME", "family_name": "LAST_NAME", "name": "FULL_NAME", "picture": "PROFILE_PICTURE", }사용자 정보 엔드포인트 응답 sub시스템에서 사용자를 식별하는 고유 ID email사용자의 이메일 주소입니다. given_name선택사항: 사용자의 이름입니다. family_name선택사항: 사용자의 성. name선택사항: 사용자의 전체 이름입니다. picture선택사항: 사용자의 프로필 사진입니다.
구현 확인
OAuth 2.0 Playground 도구를 사용하여 구현의 유효성을 검사할 수 있습니다.
도구에서 다음 단계를 수행합니다.
- 구성 을 클릭하여 OAuth 2.0 구성 창을 엽니다.
- OAuth 흐름 필드에서 클라이언트 측 을 선택합니다.
- OAuth 엔드포인트 필드에서 맞춤 을 선택합니다.
- 해당 필드에서 OAuth 2.0 엔드포인트와 Google에 할당한 클라이언트 ID를 지정합니다.
- 1단계 섹션에서 Google 범위를 선택하지 않습니다. 대신 이 필드를 비워 두거나 서버에 유효한 범위 (또는 OAuth 범위를 사용하지 않는 경우 임의의 문자열)를 입력합니다. 완료되면 API 승인 을 클릭합니다.
- 2단계 및 3단계 섹션에서 OAuth 2.0 흐름을 진행하고 각 단계가 의도한 대로 작동하는지 확인합니다.
Google 계정 연결 데모 도구를 사용하여 구현의 유효성을 검사할 수 있습니다.
도구에서 다음 단계를 수행합니다.
- Google 계정으로 로그인 버튼을 클릭합니다.
- 연결하려는 계정을 선택합니다.
- 서비스 ID를 입력합니다.
- 액세스 권한을 요청할 범위를 하나 이상 입력합니다(선택사항).
- 데모 시작 을 클릭합니다.
- 메시지가 표시되면 연결 요청에 동의하거나 거부할 수 있음을 확인합니다.
- 플랫폼으로 리디렉션되는지 확인합니다.