As contas são vinculadas usando o fluxo padrão do setor de código de autorização do OAuth 2.0.
OAuth 2.1 e PKCE para agentes
Para agentes de IA sem estado e pipelines multimodais, é recomendável usar a aplicação do OAuth 2.1.
- PKCE (chave de prova para troca de código): precisa ser usado para proteger o fluxo do código de autorização, evitando ataques de interceptação.
- Sem fluxo implícito: o fluxo implícito expõe tokens de acesso no URL, o que é um risco de segurança para ambientes de agentes.
Seu serviço precisa oferecer suporte a endpoints de autorização e troca de tokens compatíveis com OAuth 2.0/2.1.
Criar o projeto
Para criar seu projeto para usar a vinculação de contas:
- Vá para o Console de APIs do Google.
- Clique em Criar projeto.
- Insira um nome ou aceite a sugestão gerada.
- Confirme ou edite os campos restantes.
- Clique em Criar.
Para conferir o ID do projeto:
- Vá para o Console de APIs do Google.
- Encontre seu projeto na tabela da página de destino. O ID do projeto aparece na ID coluna.
Configurar a tela de permissão OAuth
O processo de conexão de contas do Google inclui uma tela de permissão que informa aos usuários o aplicativo que está solicitando acesso aos dados deles, o tipo de dados que estão pedindo e os termos aplicáveis. Você precisa configurar a tela de permissão OAuth antes de gerar um ID do cliente da API Google.
- Abra a página da tela de permissão OAuth do console de APIs do Google.
- Se solicitado, selecione o projeto que você acabou de criar.
Na página "Tela de permissão OAuth", preencha o formulário e clique no botão "Salvar".
Nome do aplicativo:o nome do aplicativo que precisa da permissão. O nome precisa refletir com precisão o aplicativo e ser consistente com o nome que os usuários veem em outros lugares. O nome do aplicativo será mostrado na tela de permissão de vinculação de contas.
Logotipo do aplicativo: uma imagem na tela de permissão que ajuda os usuários a reconhecer seu app. O logotipo é mostrado na tela de permissão de vinculação de contas e nas configurações da conta
E-mail de suporte:para que os usuários entrem em contato com você para esclarecer dúvidas sobre o consentimento deles.
Escopos para APIs Google:os escopos permitem que seu aplicativo acesse os dados do Google particulares do usuário. Para o caso de uso de vinculação de contas do Google, o escopo padrão (e-mail, perfil, openid) é suficiente. Não é necessário adicionar escopos sensíveis. Geralmente, é uma prática recomendada solicitar escopos de forma incremental, no momento em que o acesso é necessário, em vez de antecipadamente. Saiba mais.
Domínios autorizados:para proteger você e seus usuários, o Google permite apenas que aplicativos autenticados usando o OAuth usem domínios autorizados. Os links dos seus aplicativos precisam ser hospedados em domínios autorizados. Saiba mais.
Link da página inicial do aplicativo:página inicial do seu aplicativo. Precisa ser hospedado em um domínio autorizado.
Link da Política de Privacidade do aplicativo:mostrado na tela de permissão de vinculação de contas do Google. Precisa ser hospedado em um domínio autorizado.
Link dos Termos de Serviço do aplicativo (opcional) : precisa ser hospedado em um domínio autorizado.
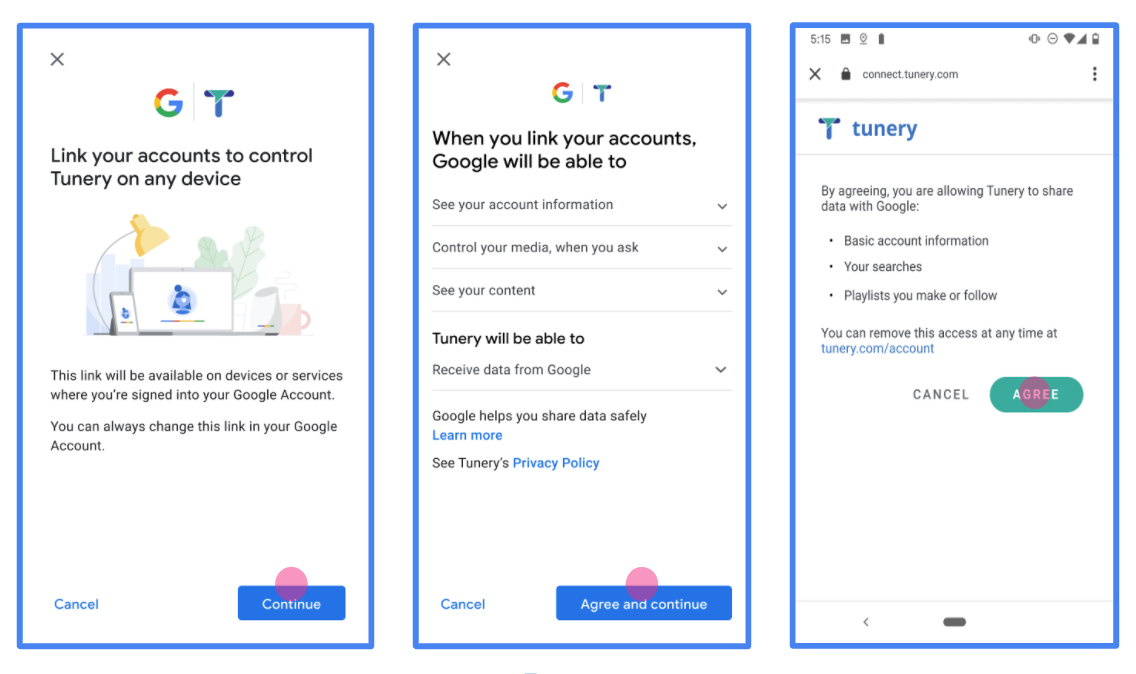
Figura 1. Tela de permissão de vinculação de contas do Google para um aplicativo fictício, o Tunery
Verifique o "Status da verificação". Se o aplicativo precisar de verificação, clique no botão "Enviar para verificação" para enviar o aplicativo. Consulte os requisitos de verificação do OAuth para mais detalhes.
Implementar seu servidor OAuth
Uma implementação de servidor OAuth 2.0 do fluxo de código de autorização consiste em dois endpoints, que seu serviço disponibiliza por HTTPS. O primeiro endpoint é o de autorização, responsável por encontrar ou obter consentimento dos usuários para acesso aos dados. O endpoint de autorização apresenta uma interface de login para usuários que ainda não fizeram login e registra o consentimento para o acesso solicitado. O segundo endpoint é o de troca de tokens, usado para receber strings criptografadas, chamadas de tokens, que autorizam um usuário a acessar seu serviço.
Quando um aplicativo do Google precisa chamar uma das APIs do seu serviço, o Google usa esses endpoints juntos para receber permissão dos usuários e chamar essas APIs em nome deles.
Vinculação de contas do Google: fluxo do código de autorização OAuth
O diagrama de sequência a seguir detalha as interações entre o usuário, o Google e os endpoints do seu serviço.
Funções e responsabilidades
A tabela a seguir define as funções e responsabilidades dos atores no fluxo do OAuth de vinculação de contas do Google (GAL, na sigla em inglês). Observação: no GAL, o Google atua como o cliente do OAuth, enquanto seu serviço atua como o provedor de identidade/serviço.
| Ator / componente | Função na GAL | Responsabilidades |
|---|---|---|
| App / servidor do Google | Cliente OAuth | Inicia o fluxo, recebe o código de autorização, troca por tokens e os armazena com segurança para acessar as APIs do seu serviço. |
| Seu endpoint de autorização | Servidor de autorização | Autentica seus usuários e obtém o consentimento deles para compartilhar o acesso aos dados com o Google. |
| Seu endpoint de troca de token | Servidor de autorização | Valida códigos de autorização e tokens de atualização e emite tokens de acesso para o servidor do Google. |
| URI de redirecionamento do Google | Endpoint de callback | Recebe o redirecionamento do usuário do seu serviço de autorização com os valores
code e state. |
Uma sessão de fluxo do código de autorização do OAuth 2.0 iniciada pelo Google tem o seguinte fluxo:
- O Google abre seu endpoint de autorização no navegador do usuário. Se o fluxo começar em um dispositivo somente de voz para uma ação, o Google vai transferir a execução para um smartphone.
- O usuário faz login, se ainda não tiver feito isso, e concede ao Google permissão para acessar os dados dele com sua API, se ainda não tiver concedido permissão.
- Seu serviço cria um código de autorização e o retorna ao Google. Para isso, redirecione o navegador do usuário de volta ao Google com o código de autorização anexado à solicitação.
- O Google envia o código de autorização para seu endpoint de troca de token, que verifica a autenticidade do código e retorna um token de acesso e um token de atualização. O token de acesso é um token de curta duração que seu serviço aceita como credenciais para acessar APIs. O token de atualização é um token de longa duração que o Google pode armazenar e usar para adquirir novos tokens de acesso quando eles expiram.
- Depois que o usuário concluir o fluxo de vinculação de contas, cada solicitação subsequente enviada pelo Google vai conter um token de acesso.
Receita de implementação
Siga estas etapas para implementar o fluxo do código de autorização.
Etapa 1: processar solicitações de autorização
Quando o Google inicia a vinculação de contas, ele redireciona o usuário para seu endpoint de autorização. Para ver contratos de protocolo detalhados e requisitos de parâmetros, consulte o endpoint de autorização.
Para processar a solicitação, faça o seguinte:
Valide a solicitação:
- Confirme se o
client_idcorresponde ao ID do cliente atribuído ao Google. - Confirme se o
redirect_uricorresponde ao URL de redirecionamento do Google esperado:none https://oauth-redirect.googleusercontent.com/r/YOUR_PROJECT_ID https://oauth-redirect-sandbox.googleusercontent.com/r/YOUR_PROJECT_ID - Verifique se
response_typeécode.
- Confirme se o
Autentique o usuário:
- Verifique se o usuário fez login no seu serviço.
- Se o usuário não estiver conectado, peça que ele conclua o fluxo de login ou inscrição.
Gerar código de autorização:
- Crie um código de autorização exclusivo e não adivinhável associado ao usuário e ao cliente.
- Defina a expiração do código em aproximadamente 10 minutos.
Redirecionar de volta para o Google:
- Redirecione o navegador para o URL fornecido em
redirect_uri. - Anexe os seguintes parâmetros de consulta:
code: o código de autorização gerado.state: o valor de estado não modificado recebido do Google.
- Redirecione o navegador para o URL fornecido em
Etapa 2: processar solicitações de troca de token
O endpoint de troca de tokens processa dois tipos de solicitações: troca de códigos por tokens e atualização de tokens de acesso expirados. Para ver contratos de protocolo detalhados e requisitos de parâmetros, consulte o endpoint de troca de tokens.
A. Trocar códigos de autorização por tokens
Quando o Google recebe o código de autorização, ele chama seu endpoint de troca de token (POST) para recuperar tokens.
Valide a solicitação:
- Verifique
client_ideclient_secret. - Verifique se o código de autorização é válido e não expirou.
- Confirme se
redirect_uricorresponde ao valor usado na Etapa 1. - Se a validação falhar, retorne um HTTP
400 Bad Requestcom{"error": "invalid_grant"}.
- Verifique
Tokens de problema:
- Gere um
refresh_tokende longa duração e umaccess_tokende curta duração (normalmente 1 hora). - Retorne um HTTP
200 OKcom a resposta padrão do token JSON.
- Gere um
B. Atualizar tokens de acesso
Quando o token de acesso expira, o Google solicita um novo usando o token de atualização.
Valide a solicitação:
- Verifique
client_id,client_secreterefresh_token. - Se a validação falhar, retorne um HTTP
400 Bad Requestcom{"error": "invalid_grant"}.
- Verifique
Emitir um novo token de acesso:
- Gere um novo
access_tokende curta duração. - Retorne um HTTP
200 OKcom a resposta do token JSON (opcionalmente incluindo um novo token de atualização).
- Gere um novo
Processar solicitações userinfo
O endpoint userinfo é um recurso protegido pelo OAuth 2.0 que retorna declarações sobre o usuário vinculado. A implementação e hospedagem do endpoint userinfo é opcional, exceto nos seguintes casos de uso:
- Login da conta vinculada com o Google One Tap.
- Assinatura sem atrito no AndroidTV.
Depois que o token de acesso for recuperado do endpoint do token, o Google enviará uma solicitação ao endpoint de informações do usuário para recuperar informações básicas de perfil sobre o usuário vinculado.
| cabeçalhos de solicitação do endpoint userinfo | |
|---|---|
Authorization header |
O token de acesso do tipo Bearer. |
Por exemplo, se seu ponto de extremidade de informações do usuário estiver disponível em
https://myservice.example.com/userinfo, uma solicitação terá esta aparência:
GET /userinfo HTTP/1.1
Host: myservice.example.com
Authorization: Bearer ACCESS_TOKEN
Para que o endpoint userinfo processe solicitações, siga estas etapas:
- Extrair o token de acesso do cabeçalho "Autorização" e retornar as informações do usuário associado ao token de acesso.
- Se o token de acesso for inválido, retorne o erro "HTTP 401 Unused" ao usar o cabeçalho de resposta
WWW-Authenticate. Veja abaixo um exemplo de resposta de erro userinfo:HTTP/1.1 401 Unauthorized WWW-Authenticate: error="invalid_token", error_description="The Access Token expired"
Se o token de acesso for válido, retorne uma resposta HTTP 200 com o seguinte objeto JSON no corpo do HTTPS resposta:
{ "sub": "USER_UUID", "email": "EMAIL_ADDRESS", "given_name": "FIRST_NAME", "family_name": "LAST_NAME", "name": "FULL_NAME", "picture": "PROFILE_PICTURE", }resposta do endpoint userinfo subUm ID exclusivo que identifica o usuário no seu sistema. emailEndereço de e-mail do usuário. given_nameOpcional:nome do usuário. family_nameOpcional:sobrenome do usuário. nameOpcional:o nome completo do usuário. pictureOpcional:foto do perfil do usuário.
Como validar a implementação
Use a ferramenta OAuth 2.0 Playground para validar sua implementação.
Na ferramenta, siga estas etapas:
- Clique em Configuração para abrir a janela de configuração do OAuth 2.0.
- No campo Fluxo do OAuth, selecione Do lado do cliente.
- No campo Endpoints OAuth, selecione Personalizado.
- Especifique seu endpoint OAuth 2.0 e o ID do cliente atribuído ao Google nos campos correspondentes.
- Na seção Etapa 1, não selecione nenhum escopo do Google. Em vez disso, deixe esse campo em branco ou digite um escopo válido para seu servidor (ou uma string arbitrária se você não usar escopos do OAuth). Quando terminar, clique em Autorizar APIs.
- Nas seções Etapa 2 e Etapa 3, siga o fluxo do OAuth 2.0 e verifique se cada etapa funciona como esperado.
Você pode validar sua implementação usando a ferramenta Demonstração da Vinculação da Conta do Google.
Na ferramenta, siga estas etapas:
- Clique no botão Fazer login com o Google.
- Escolha a conta que você quer vincular.
- Insira o ID do serviço.
- Se quiser, insira um ou mais escopos para os quais você vai solicitar acesso.
- Clique em Iniciar demonstração.
- Quando solicitado, confirme que você pode consentir e negar o pedido de vinculação.
- Confirme se você foi redirecionado para sua plataforma.