Hesaplar, endüstri standardı OAuth 2.0 yetkilendirme kodu akışı kullanılarak bağlanır.
Aracılar için OAuth 2.1 ve PKCE
Durum bilgisiz yapay zeka aracıları ve çok modlu ardışık düzenler için OAuth 2.1 zorunlu kılınması önerilir.
- PKCE (Proof Key for Code Exchange): Yetkilendirme kodu akışını güvenli hale getirmek ve araya girme saldırılarını önlemek için kullanılmalıdır.
- Örtülü Akış Yok: Örtülü akış, URL'deki erişim jetonlarını kullanıma sunar. Bu durum, aracı ortamları için güvenlik riski oluşturur.
Hizmetiniz, OAuth 2.0/2.1 uyumlu yetkilendirme ve jeton değişimi uç noktalarını desteklemelidir.
Projeyi oluşturma
Hesap bağlamayı kullanmak için projenizi oluşturmak üzere:
- Google API Konsolu'na gidin.
- Proje oluştur'u tıklayın.
- Bir ad girin veya oluşturulan öneriyi kabul edin.
- Kalan alanları onaylayın veya düzenleyin.
- Oluştur'u tıklayın.
Proje kimliğinizi görüntülemek için:
- Google API Konsolu'na gidin.
- Açılış sayfasındaki tabloda projenizi bulun. Proje kimliği, Kimlik sütununda görünür.
OAuth kullanıcı rızası ekranınızı yapılandırma
Google Hesabı bağlantısı sürecinde, kullanıcılara verilerine erişim isteyen uygulamayı, hangi tür verileri istediğini ve geçerli şartları bildiren bir kullanıcı rızası ekranı gösterilir. Google API istemci kimliği oluşturmadan önce OAuth kullanıcı rızası ekranınızı yapılandırmanız gerekir.
- Google API'leri konsolunun OAuth kullanıcı rızası ekranı sayfasını açın.
- İstenirse yeni oluşturduğunuz projeyi seçin.
"OAuth kullanıcı rızası ekranı" sayfasında formu doldurun ve "Kaydet" düğmesini tıklayın.
Uygulama adı: İzin isteyen uygulamanın adı. Ad, uygulamanızı doğru bir şekilde yansıtmalı ve kullanıcıların başka yerlerde gördüğü uygulama adıyla tutarlı olmalıdır. Uygulama adı, hesap bağlama kullanıcı rızası ekranında gösterilir.
Uygulama logosu: Kullanıcıların uygulamanızı tanımasına yardımcı olacak, kullanıcı rızası ekranında gösterilen bir resim. Logo, hesap bağlama kullanıcı rızası ekranında ve hesap ayarlarında gösterilir.
Destek e-postası: Kullanıcıların rızalarıyla ilgili soruları için sizinle iletişime geçmesi amacıyla.
Google API'leri için kapsamlar: Kapsamlar, uygulamanızın kullanıcınızın gizli Google verilerine erişmesine olanak tanır. Google Hesabı Bağlantısı kullanım alanı için varsayılan kapsam (e-posta, profil, openid) yeterlidir. Hassas kapsamlar eklemeniz gerekmez. Genel olarak, kapsamları önceden değil, erişim gerektiğinde artımlı olarak istemek en iyi uygulamadır. Daha fazla bilgi edinin.
Yetkilendirilen alanlar: Google, sizi ve kullanıcılarınızı korumak için yalnızca OAuth kullanarak kimlik doğrulayan uygulamaların yetkilendirilen alanları kullanmasına izin verir. Uygulamalarınızın bağlantıları, yetkilendirilmiş alanlarda barındırılmalıdır. Daha fazla bilgi edinin.
Uygulama ana sayfası bağlantısı: Uygulamanızın ana sayfası. Yetkili bir alan adında barındırılmalıdır.
Uygulama gizlilik politikası bağlantısı: Google Hesabı Bağlama kullanıcı rızası ekranında gösterilir. Yetkili bir alan adında barındırılmalıdır.
Uygulama Hizmet Şartları bağlantısı (isteğe bağlı): Yetkili bir alanda barındırılmalıdır.
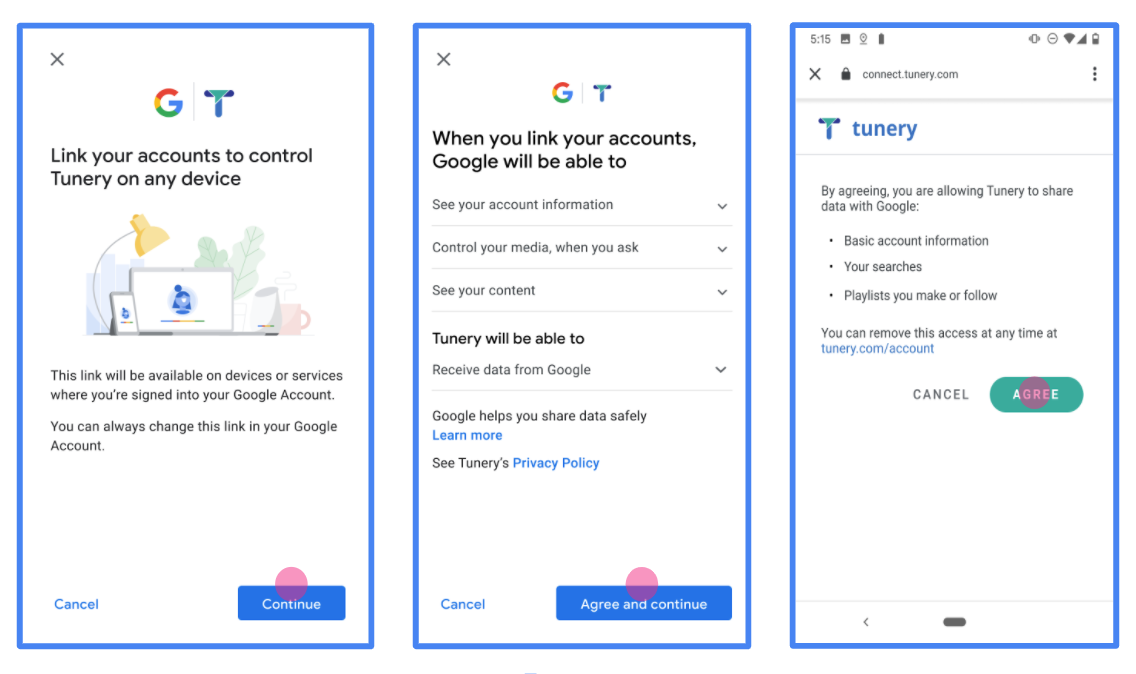
Şekil 1. Kurgusal bir uygulama olan Tunery için Google Hesabı bağlantısı İzin Ekranı
"Doğrulama Durumu"nu kontrol edin. Uygulamanızın doğrulanması gerekiyorsa "Doğrulamaya Gönder" düğmesini tıklayarak uygulamanızı doğrulamaya gönderin. Ayrıntılı bilgi için OAuth doğrulama koşulları başlıklı makaleyi inceleyin.
OAuth sunucunuzu uygulama
Yetkilendirme kodu akışının OAuth 2.0 sunucu uygulaması, hizmetinizin HTTPS üzerinden kullanılabilir hale getirdiği iki uç noktadan oluşur. İlk uç nokta, yetkilendirme uç noktasıdır. Bu uç nokta, veri erişimi için kullanıcılardan izin bulmaktan veya izin almaktan sorumludur. Yetkilendirme uç noktası, henüz oturum açmamış kullanıcılarınıza bir oturum açma kullanıcı arayüzü sunar ve istenen erişim için izni kaydeder. İkinci uç nokta, jeton değişimi uç noktasıdır. Bu uç nokta, kullanıcıya hizmetinize erişme yetkisi veren jeton adı verilen şifrelenmiş dizeleri almak için kullanılır.
Bir Google uygulamasının hizmetinizin API'lerinden birini çağırması gerektiğinde Google, kullanıcılarınızdan bu API'leri onlar adına çağırmak için izin almak üzere bu uç noktaları birlikte kullanır.
Google Hesabı bağlantısı: OAuth Yetkilendirme Kodu Akışı
Aşağıdaki sıra diyagramı, Kullanıcı, Google ve hizmetinizin uç noktaları arasındaki etkileşimleri ayrıntılı olarak açıklar.
Roller ve sorumluluklar
Aşağıdaki tabloda, Google Hesap Bağlama (GAL) OAuth akışındaki aktörlerin rolleri ve sorumlulukları tanımlanmaktadır. GAL'de Google'ın OAuth istemcisi, hizmetinizin ise kimlik/hizmet sağlayıcı olarak hareket ettiğini unutmayın.
| İşlemi gerçekleştiren / Bileşen | GAL Rolü | Sorumluluklar |
|---|---|---|
| Google Uygulaması / Sunucusu | OAuth İstemcisi | Akışı başlatır, yetkilendirme kodunu alır, jetonlarla değiştirir ve hizmetinizin API'lerine erişmek için bunları güvenli bir şekilde depolar. |
| Yetkilendirme uç noktanız | Yetkilendirme Sunucusu | Kullanıcılarınızın kimliğini doğrular ve verilerine erişim iznini Google ile paylaşmak için kullanıcılarınızın iznini alır. |
| Jeton Değişimi Uç Noktanız | Yetkilendirme Sunucusu | Yetkilendirme kodlarını ve yenileme jetonlarını doğrular ve Google sunucusuna erişim jetonları verir. |
| Google Yönlendirme URI'si | Geri Arama Uç Noktası | Kullanıcı yönlendirmesini, yetkilendirme hizmetinizden code ve state değerleriyle birlikte alır. |
Google tarafından başlatılan bir OAuth 2.0 yetkilendirme kodu akışı oturumu aşağıdaki akışa sahiptir:
- Google, yetkilendirme uç noktanızı kullanıcının tarayıcısında açar. İşlem için akış yalnızca sesli cihazda başlatıldıysa Google, yürütmeyi telefona aktarır.
- Kullanıcı, henüz oturum açmadıysa oturum açar ve Google'a, daha önce izin vermediyse API'nizle verilerine erişme izni verir.
- Hizmetiniz bir yetkilendirme kodu oluşturur ve bunu Google'a döndürür. Bunu yapmak için kullanıcının tarayıcısını, isteğe eklenmiş yetkilendirme koduyla birlikte Google'a geri yönlendirin.
- Google, yetkilendirme kodunu jeton değişimi uç noktanıza gönderir. Bu uç nokta, kodun gerçekliğini doğrulayıp bir erişim jetonu ve bir yenileme jetonu döndürür. Erişim jetonu, hizmetinizin API'lere erişmek için kimlik bilgisi olarak kabul ettiği kısa ömürlü bir jetondur. Yenileme jetonu, Google'ın saklayabileceği ve süresi dolduğunda yeni erişim jetonları almak için kullanabileceği uzun ömürlü bir jetondur.
- Kullanıcı, hesap bağlama akışını tamamladıktan sonra Google'dan gönderilen her sonraki istekte bir erişim jetonu bulunur.
Uygulama Tarifi
Yetkilendirme kodu akışını uygulamak için aşağıdaki adımları uygulayın.
1. adım: Yetkilendirme isteklerini işleme alın
Google, hesap bağlama işlemini başlattığında kullanıcıyı yetkilendirme uç noktanıza yönlendirir. Ayrıntılı protokol sözleşmeleri ve parametre koşulları için Yetkilendirme Uç Noktası'na bakın.
İsteği işlemek için aşağıdaki işlemleri yapın:
İsteği doğrulayın:
client_iddeğerinin Google'a atanan istemci kimliğiyle eşleştiğini onaylayın.redirect_urideğerinin beklenen Google yönlendirme URL'siyle eşleştiğini doğrulayın:none https://oauth-redirect.googleusercontent.com/r/YOUR_PROJECT_ID https://oauth-redirect-sandbox.googleusercontent.com/r/YOUR_PROJECT_IDresponse_typedeğerinincodeolduğunu doğrulayın.
Kullanıcının kimliğini doğrulayın:
- Kullanıcının hizmetinizde oturum açıp açmadığını kontrol edin.
- Kullanıcı oturum açmadıysa oturum açma veya kaydolma akışınızı tamamlamasını isteyin.
Yetkilendirme kodu oluşturma:
- Kullanıcı ve istemciyle ilişkilendirilmiş, tahmin edilemeyen benzersiz bir yetkilendirme kodu oluşturun.
- Kodun süresini yaklaşık 10 dakika sonra dolacak şekilde ayarlayın.
Google'a geri yönlendirme:
- Tarayıcıyı
redirect_uriiçinde sağlanan URL'ye yönlendirin. - Aşağıdaki sorgu parametrelerini ekleyin:
code: Oluşturduğunuz yetkilendirme kodu.state: Google'dan alınan değiştirilmemiş durum değeri.
- Tarayıcıyı
2. adım: Jeton değişimi isteklerini işleme
Jeton değişimi uç noktanız iki tür isteği işler: kodları jetonlarla değiştirme ve süresi dolmuş erişim jetonlarını yenileme. Ayrıntılı protokol sözleşmeleri ve parametre koşulları için Token Exchange Endpoint'i (Jeton Değişimi Uç Noktası) inceleyin.
C. Jetonlar için yetkilendirme kodlarını kullanma
Google, yetkilendirme kodunu aldığında jetonları almak için jeton değişimi uç noktanızı (POST) çağırır.
İsteği doğrulayın:
client_idveclient_secret'ı doğrulayın.- Yetkilendirme kodunun geçerli olduğunu ve süresinin dolmadığını doğrulayın.
redirect_urideğerinin 1. adımda kullanılan değerle eşleştiğini onaylayın.- Doğrulama başarısız olursa
400 Bad Requestile birlikte bir HTTP{"error": "invalid_grant"}döndürün.
Jeton verme:
- Uzun ömürlü
refresh_tokenve kısa ömürlüaccess_token(genellikle 1 saat) oluşturun. - Standart JSON jetonu yanıtıyla bir HTTP
200 OKdöndürün.
- Uzun ömürlü
B. Erişim jetonlarını yenileme
Erişim jetonunun süresi dolduğunda Google, yenileme jetonunu kullanarak yeni bir jeton ister.
İsteği doğrulayın:
client_id,client_secretverefresh_tokenişletmelerini doğrulayın.- Doğrulama başarısız olursa
400 Bad Requestile birlikte bir HTTP{"error": "invalid_grant"}döndürün.
Yeni erişim jetonu verme:
- Yeni bir kısa ömürlü
access_tokenoluşturun. - JSON jetonu yanıtıyla (isteğe bağlı olarak yeni bir yenileme jetonu da dahil) bir HTTP
200 OKdöndürün.
- Yeni bir kısa ömürlü
Kullanıcı bilgileri isteklerini işleme
userinfo uç noktası, bağlı kullanıcıyla ilgili hak taleplerini döndüren, OAuth 2.0 korumalı bir kaynaktır. Kullanıcı bilgileri uç noktasını uygulamak ve barındırmak, aşağıdaki kullanım alanları hariç isteğe bağlıdır:
- Google One Tap ile Bağlı Hesapta Oturum Açma.
- AndroidTV'de sorunsuz abonelik.
Erişim jetonu, jeton uç noktanızdan başarıyla alındıktan sonra Google, bağlı kullanıcıyla ilgili temel profil bilgilerini almak için kullanıcı bilgileri uç noktanıza bir istek gönderir.
| kullanıcı bilgileri uç nokta istek başlıkları | |
|---|---|
Authorization header |
Taşıyıcı türündeki erişim jetonu. |
Örneğin, kullanıcı bilgileri uç noktanız
https://myservice.example.com/userinfo, talep aşağıdaki gibi görünebilir:
GET /userinfo HTTP/1.1
Host: myservice.example.com
Authorization: Bearer ACCESS_TOKEN
Kullanıcı bilgileri uç noktanızın istekleri işlemesi için aşağıdaki adımları uygulayın:
- Yetkilendirme başlığından erişim jetonunu çıkarın ve erişim jetonuyla ilişkilendirilmiş kullanıcının bilgilerini döndürün.
- Erişim jetonu geçersizse
WWW-Authenticateyanıt üstbilgisini kullanarak HTTP 401 Yetkilendirilmemiş hatası döndürün. Aşağıda kullanıcı bilgileri hata yanıtı örneği verilmiştir:HTTP/1.1 401 Unauthorized WWW-Authenticate: error="invalid_token", error_description="The Access Token expired"
Erişim jetonu geçerliyse HTTPS gövdesinde aşağıdaki JSON nesnesiyle HTTP 200 yanıtını döndürün ve HTTP 200 yanıtını alın yanıt:
{ "sub": "USER_UUID", "email": "EMAIL_ADDRESS", "given_name": "FIRST_NAME", "family_name": "LAST_NAME", "name": "FULL_NAME", "picture": "PROFILE_PICTURE", }userinfo uç nokta yanıtı subSisteminizdeki kullanıcıyı tanımlayan benzersiz bir kimlik. emailKullanıcının e-posta adresi. given_nameİsteğe bağlı: Kullanıcının adı. family_nameİsteğe bağlı: Kullanıcının soyadı. nameİsteğe bağlı: Kullanıcının tam adı. pictureİsteğe bağlı: Kullanıcının profil resmi.
Uygulamanızı doğrulama
OAuth 2.0 Playground aracını kullanarak uygulamanızı doğrulayabilirsiniz.
Araçta aşağıdaki adımları uygulayın:
- OAuth 2.0 Yapılandırma penceresini açmak için Yapılandırma'yı tıklayın.
- OAuth akışı alanında İstemci tarafı'nı seçin.
- OAuth Uç Noktaları alanında Özel'i seçin.
- OAuth 2.0 uç noktanızı ve Google'a atadığınız istemci kimliğini ilgili alanlarda belirtin.
- 1. adım bölümünde herhangi bir Google kapsamı seçmeyin. Bunun yerine bu alanı boş bırakın veya sunucunuz için geçerli bir kapsam yazın (OAuth kapsamları kullanmıyorsanız rastgele bir dize yazabilirsiniz). İşiniz bittiğinde API'leri yetkilendir'i tıklayın.
- 2. adım ve 3. adım bölümlerinde OAuth 2.0 akışını inceleyin ve her adımın beklendiği gibi çalıştığını doğrulayın.
Uygulamanızı Google Hesabı Bağlantısı Demosu aracını kullanarak doğrulayabilirsiniz.
Araçta aşağıdaki adımları uygulayın:
- Google ile oturum aç düğmesini tıklayın.
- Bağlamak istediğiniz hesabı seçin.
- Hizmet kimliğini girin.
- İsteğe bağlı olarak, erişim isteğinde bulunacağınız bir veya daha fazla kapsam girin.
- Start Demo'yu (Demoyu Başlat) tıklayın.
- İstendiğinde, bağlantı isteğini onaylayabileceğinizi ve reddedebileceğinizi onaylayın.
- Platformunuza yönlendirildiğinizi onaylayın.