
アカウントは、業界標準の OAuth 2.0 認可コードフローを使用してリンクされます。
エージェント向けの OAuth 2.1 と PKCE
ステートレス AI エージェントとマルチモーダル パイプラインには、OAuth 2.1 の適用をおすすめします。
- PKCE(Proof Key for Code Exchange): 認可コードフローを保護し、傍受攻撃を防ぐために使用する必要があります。
- 暗黙的フローなし: 暗黙的フローでは、アクセス トークンが URL に公開されるため、エージェント環境でセキュリティ リスクが生じます。
サービスは、OAuth 2.0/2.1 準拠の認可エンドポイントとトークン 交換エンドポイントをサポートする必要があります。
プロジェクトを作成する
アカウント リンクを使用するプロジェクトを作成するには:
- Google API コンソールに移動します。
- [プロジェクトの作成] をクリックします。
- 名前を入力するか、生成された候補を受け入れます。
- 残りのフィールドを確認または編集します。
- [作成] をクリックします。
プロジェクト ID を表示するには:
- Google API コンソールに移動します。
- ランディング ページの表でプロジェクトを探します。プロジェクト ID は [ID] 列に表示されます。
OAuth 同意画面を構成する
Google アカウントのリンク プロセスには同意画面が含まれています。この画面では、データへのアクセスをリクエストしているアプリケーション、リクエストしているデータの種類、適用される規約がユーザーに通知されます。Google API クライアント ID を生成する前に、OAuth 同意画面を構成する必要があります。
- Google API コンソールの OAuth 同意画面 ページを開きます。
- プロンプトが表示されたら、作成したプロジェクトを選択します。
[OAuth 同意画面] ページでフォームに入力し、[保存] ボタンをクリックします。
アプリケーション名: 同意を求めるアプリケーションの名前。名前はアプリケーションを正確に反映し、ユーザーが他の場所で見るアプリケーション名と一致している必要があります。アプリケーション名は、アカウント リンクの同意画面に表示されます。
アプリケーション ロゴ: 同意画面に表示される画像で、ユーザーがアプリを認識しやすくなります。ロゴは、アカウント リンクの同意画面とアカウント設定に表示されます。
サポートメール: 同意に関して問い合わせる際に使用します。
Google API のスコープ: スコープを使用すると、アプリケーションはユーザーの非公開の Google データにアクセスできます。Google アカウントのリンクのユースケースでは、デフォルトのスコープ(email、profile、openid)で十分です。機密性の高いスコープを追加する必要はありません。一般的に、スコープは事前にリクエストするのではなく、アクセスが必要になったときに段階的にリクエストすることが効果的な手法です。詳細
承認済みドメイン: デベロッパーとユーザーを保護するために、Google では、OAuth を使用して認証するアプリケーションのみに承認済みドメインの使用を許可しています。アプリケーションのリンクは、承認済みドメインでホストする必要があります。詳細
アプリケーションのホームページへのリンク: アプリケーションのホームページ。承認済みドメインでホストする必要があります。
アプリケーションのプライバシー ポリシーへのリンク: Google アカウント リンクの同意画面に表示されます。承認済みドメインでホストする必要があります。
アプリケーションの利用規約へのリンク(省略可): 承認済みドメインでホストする必要があります。
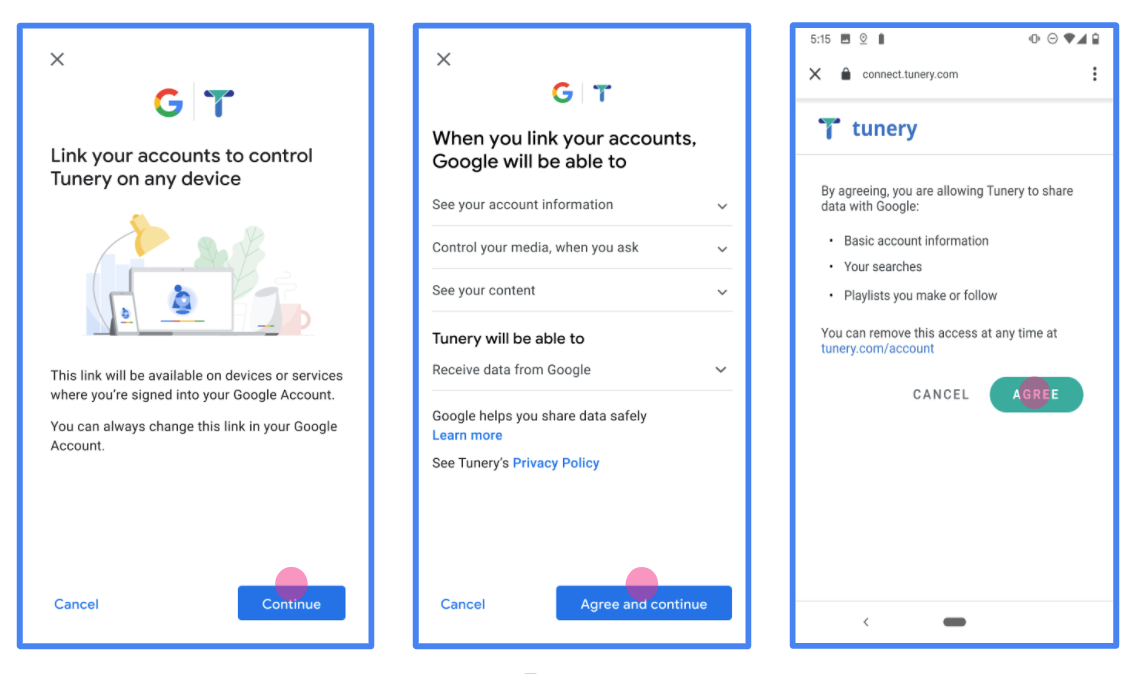
図 1. 架空のアプリケーション Tunery の Google アカウントのリンクの同意画面
[検証ステータス] を確認します。アプリケーションの検証が必要な場合は、[検証のために送信] ボタンを**クリック**して、検証を受けるためにアプリケーションを送信します。詳しくは、OAuth の検証要件をご覧ください。
OAuth サーバーを実装する
認可コードフローの OAuth 2.0 サーバーは 2 つのエンドポイントで構成されます。これらのエンドポイントには HTTPS 経由でアクセスできます。最初のエンドポイントは認可エンドポイントで、これはデータアクセスに対するユーザーの同意を検索または取得する処理を担当します。認可エンドポイントは、ログインしていないユーザーにログイン用の UI を表示し、リクエストされたアクセスへの同意を記録します。2 つ目のエンドポイントはトークン交換エンドポイントで、トークンという暗号化された文字列を取得し、ユーザーにサービスへのアクセスを許可します。
Google アプリケーションでサービスの API を呼び出す必要がある場合、Google はこれらのエンドポイントを使用して、API の呼び出し許可をユーザーから取得します。
Google アカウントのリンク: OAuth 認可コードフロー
次のシーケンス図は、ユーザー、Google、サービスの各エンドポイント間のインタラクションの詳細を示しています。
役割と責任
次の表に、Google アカウントのリンク(GAL)OAuth フローにおけるアクターの役割と責任を定義します。GAL では、Google は OAuth クライアントとして機能し、サービスはID/サービス プロバイダとして機能します。
| アクター / コンポーネント | GAL の役割 | 責任 |
|---|---|---|
| Google アプリ / サーバー | OAuth クライアント | フローを開始し、認証コードを受け取ってトークンと交換し、サービス API にアクセスするために安全に保存します。 |
| 承認エンドポイント | 認可サーバー | ユーザーを認証し、Google とのデータへのアクセス権の共有についてユーザーの同意を得ます。 |
| トークン交換エンドポイント | 認可サーバー | 認証コードと更新トークンを検証し、Google サーバーにアクセス トークンを発行します。 |
| Google リダイレクト URI | コールバック エンドポイント | code 値と state 値を含むユーザー リダイレクトを認証サービスから受け取ります。 |
Google が開始する OAuth 2.0 認可コードフローのセッションは次のような流れになります。
- Google がユーザーのブラウザで認可エンドポイントを開きます。アクションのフローが音声専用デバイスで開始した場合、Google は実行をスマートフォンに転送します。
- ユーザーがログインし(ログインしていない場合)、Google が API を使用してデータにアクセスすることを承諾します(まだ許可していない場合)。
- サービスが認証コードを作成し、Google に返します。そのためには、認証コードをリクエストに付加して、ユーザーのブラウザを Google にリダイレクトします。
- Google が認可コードをトークン交換エンドポイントに送信します。トークン交換エンドポイントはコードの真正性を検証し、アクセス トークンと更新トークンを返します。アクセス トークンは、API にアクセスするための認証情報としてサービスが受け入れる有効期間の短いトークンです。更新トークンは長期のトークンで、アクセス トークンが期限切れになったときに新しいトークンを取得するために使用されます。
- ユーザーがアカウント リンクフローを完了すると、それ以降 Google から送信されるすべてのリクエストにアクセス トークンが含まれます。
実装レシピ
認可コードフローを実装する手順は次のとおりです。
ステップ 1: 認可リクエストを処理する
Google がアカウントのリンクを開始すると、ユーザーは認証エンドポイントにリダイレクトされます。プロトコル契約とパラメータ要件の詳細については、認可エンドポイントをご覧ください。
リクエストを処理するには、次の操作を行います。
リクエストを検証します。
client_idが Google に割り当てられたクライアント ID と一致することを確認します。redirect_uriが想定される Google リダイレクト URL と一致していることを確認します。- Prod:
https://oauth-redirect.googleusercontent.com/r/YOUR_PARTNER_ID - サンドボックス:
https://oauth-redirect-sandbox.googleusercontent.com/r/YOUR_PARTNER_ID
- Prod:
response_typeがcodeであることを確認します。
ユーザーを認証する:
- ユーザーがサービスにログインしているかどうかを確認します。
- ユーザーがログインしていない場合は、ログインまたは登録フローを完了するよう促します。
認証コードを生成する:
- ユーザーとクライアントに関連付けられた、推測不可能な一意の認証コードを作成します。
- コードの有効期限を約 10 分に設定します。
Google にリダイレクトする:
- ブラウザを
redirect_uriで指定された URL にリダイレクトします。 - 次のクエリ パラメータを追加します。
code: 生成した認証コード。state: Google から受け取った変更されていない状態値。
- ブラウザを
ステップ 2: トークン交換リクエストを処理する
トークン交換エンドポイントは、コードとトークンの交換、期限切れのアクセス トークンの更新という 2 種類のリクエストを処理します。プロトコル契約とパラメータの要件の詳細については、トークン交換エンドポイントをご覧ください。
A. トークンの認証コードを交換する
Google が認可コードを受け取ると、トークン交換エンドポイント(POST)を呼び出してトークンを取得します。
リクエストを検証します。
client_idとclient_secretを確認します。- 認証コードが有効で、期限切れになっていないことを確認します。
redirect_uriがステップ 1 で使用した値と一致していることを確認します。- 検証に失敗した場合は、
{"error": "invalid_grant"}を含む HTTP400 Bad Requestを返します。
トークンを発行する:
- 有効期間の長い
refresh_tokenと有効期間の短いaccess_token(通常は 1 時間)を生成します。 - 標準の JSON トークン レスポンスを含む HTTP
200 OKを返します。
- 有効期間の長い
B. アクセス トークンを更新する
アクセス トークンの有効期限が切れると、Google は更新トークンを使用して新しいアクセス トークンをリクエストします。
リクエストを検証します。
client_id、client_secret、refresh_tokenを確認します。- 検証に失敗した場合は、
{"error": "invalid_grant"}を含む HTTP400 Bad Requestを返します。
新しいアクセス トークンを発行する:
- 新しい短期間の
access_tokenを生成します。 - JSON トークン レスポンス(必要に応じて新しい更新トークンを含む)を含む HTTP
200 OKを返します。
- 新しい短期間の
userinfo リクエストを処理する
userinfo エンドポイントは、OAuth 2.0 で保護されたリソースで、リンクされたユーザーに関するクレームを返します。userinfo エンドポイントの実装とホストは任意ですが、以下のユースケースを除きます。
- Google One タップによるリンクされたアカウントへのログイン。
- Android TV のスムーズな定期購入。
トークン エンドポイントからアクセス トークンが正常に取得されると、Google は、リンクされたユーザーに関する基本的なプロフィール情報を取得するためのリクエストを userinfo エンドポイントに送信します。
| userinfo エンドポイント リクエスト ヘッダー | |
|---|---|
Authorization header |
Bearer タイプのアクセス トークン。 |
たとえば、userinfo エンドポイントが
https://myservice.example.com/userinfo の場合、リクエストは次のようになります。
GET /userinfo HTTP/1.1
Host: myservice.example.com
Authorization: Bearer ACCESS_TOKEN
userinfo エンドポイントでリクエストを処理するには、次の手順を行います。
- Authorization ヘッダーからアクセス トークンを抽出し、そのアクセス トークンに関連付けられたユーザーの情報を返します。
- アクセス トークンが無効な場合は、
WWW-Authenticateレスポンス ヘッダーを使用して HTTP 401 Unauthorized エラーを返します。userinfo エラー レスポンスの例を次に示します。HTTP/1.1 401 Unauthorized WWW-Authenticate: error="invalid_token", error_description="The Access Token expired"
アクセス トークンが有効な場合は、HTTPS の本文に次の JSON オブジェクトを含む HTTP 200 レスポンスを返します。 レスポンス:
{
"sub": "USER_UUID",
"email": "EMAIL_ADDRESS",
"given_name": "FIRST_NAME",
"family_name": "LAST_NAME",
"name": "FULL_NAME",
"picture": "PROFILE_PICTURE",
}
userinfo エンドポイント レスポンス subシステム内でユーザーを識別する一意の ID。 emailユーザーのメールアドレス。 given_name省略可: ユーザーの名。 family_name省略可: ユーザーの姓。 name省略可: ユーザーの氏名。 picture省略可: ユーザーのプロフィール写真。
実装の検証
OAuth 2.0 Playground ツールを使用して、実装を検証できます。
このツールで、次の手順を行います。
- [構成] 設定をクリックして、[OAuth 2.0 構成] ウィンドウを開きます。
- [OAuth flow] フィールドで、[クライアントサイド] を選択します。
- [OAuth Endpoints] フィールドで、[Custom] を選択します。
- 対応するフィールドに、OAuth 2.0 エンドポイントと Google に割り当てたクライアント ID を指定します。
- [Step 1] セクションで、Google スコープを選択しないでください。代わりに、このフィールドを空白のままにするか、サーバーで有効なスコープを入力します(OAuth スコープを使用しない場合は任意の文字列を入力します)。完了したら、[Authorize APIs] をクリックします。
- [Step 2] セクションと [Step 3] セクションで、OAuth 2.0 フローを確認し、各ステップが意図したとおりに動作することを確認します。
Google アカウント リンク デモツールを使用して、実装を検証できます。
このツールで、次の手順を行います。
- [Google でログイン] ボタンをクリックします。
- リンクするアカウントを選択します。
- サービス ID を入力します。
- 必要に応じて、アクセスをリクエストするスコープを 1 つ以上入力します。
- [Start Demo] をクリックします。
- 確認のメッセージが表示されたら、リンク リクエストに同意または拒否できることを確認します。
- プラットフォームにリダイレクトされることを確認します。