Gli account vengono collegati utilizzando i flussi OAuth 2.0 impliciti e codice di autorizzazione standard di settore. Il servizio deve supportare gli endpoint di autorizzazione e scambio di token conformi a OAuth 2.0.
Nel flusso implicito, Google apre il tuo endpoint di autorizzazione nel browser dell'utente. Una volta eseguito l'accesso, restituisci un token di accesso di lunga durata a Google. Questo token di accesso è ora incluso in ogni richiesta inviata da Google.
Nel flusso del codice di autorizzazione sono necessari due endpoint:
L'endpoint di autorizzazione, che mostra l'interfaccia utente di accesso agli utenti che non hanno ancora eseguito l'accesso. L'endpoint di autorizzazione crea anche un codice di autorizzazione di breve durata per registrare il consenso degli utenti all'accesso richiesto.
L'endpoint di scambio di token, responsabile di due tipi di scambi:
- Scambia un codice di autorizzazione con un token di aggiornamento di lunga durata e un token di accesso di breve durata. Questo scambio avviene quando l'utente segue il flusso di collegamento dell'account.
- Scambia un token di aggiornamento a lungo termine con un token di accesso a breve termine. Questo scambio avviene quando Google ha bisogno di un nuovo token di accesso perché quello in suo possesso è scaduto.
Scegliere un flusso OAuth 2.0
Sebbene il flusso implicito sia più semplice da implementare, Google consiglia di non far scadere mai i token di accesso emessi dal flusso implicito. Questo accade perché l'utente è costretto a collegare di nuovo il proprio account dopo la scadenza di un token con il flusso implicito. Se hai bisogno della scadenza del token per motivi di sicurezza, ti consigliamo vivamente di utilizzare il flusso del codice di autorizzazione.
Istruzioni sul design
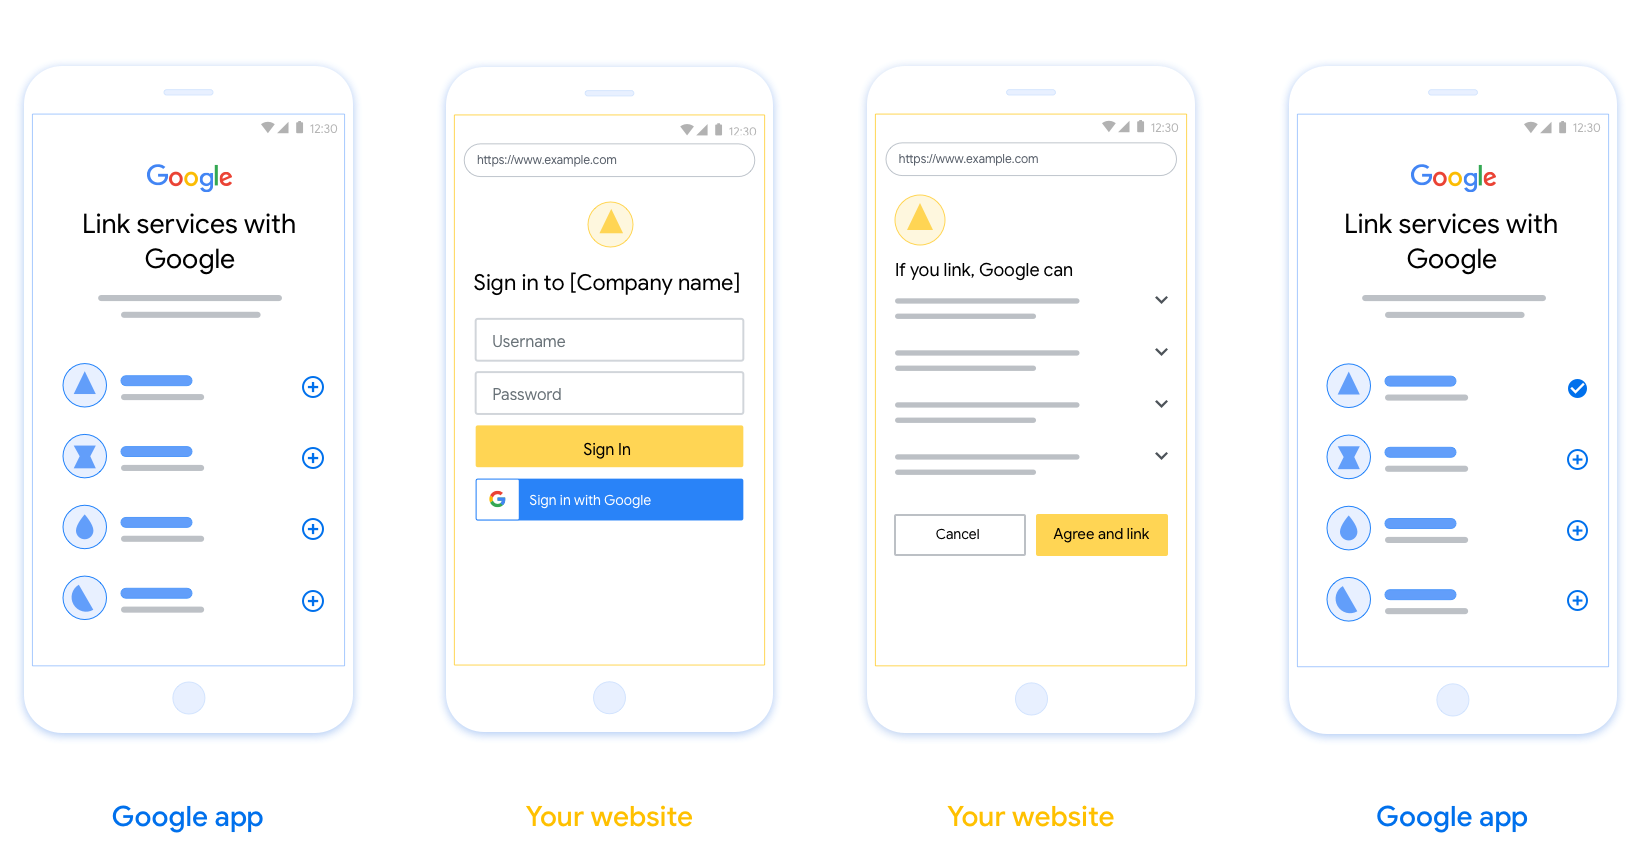
Questa sezione descrive i requisiti di progettazione e i consigli per la schermata utente ospitata per i flussi di collegamento OAuth. Dopo essere stata richiamata dall'app di Google, la tua piattaforma mostra all'utente una schermata di accesso alla pagina Google e all'account per il consenso per il collegamento. L'utente viene reindirizzato all'app di Google dopo aver dato il suo consenso al collegamento degli account.

Requisiti
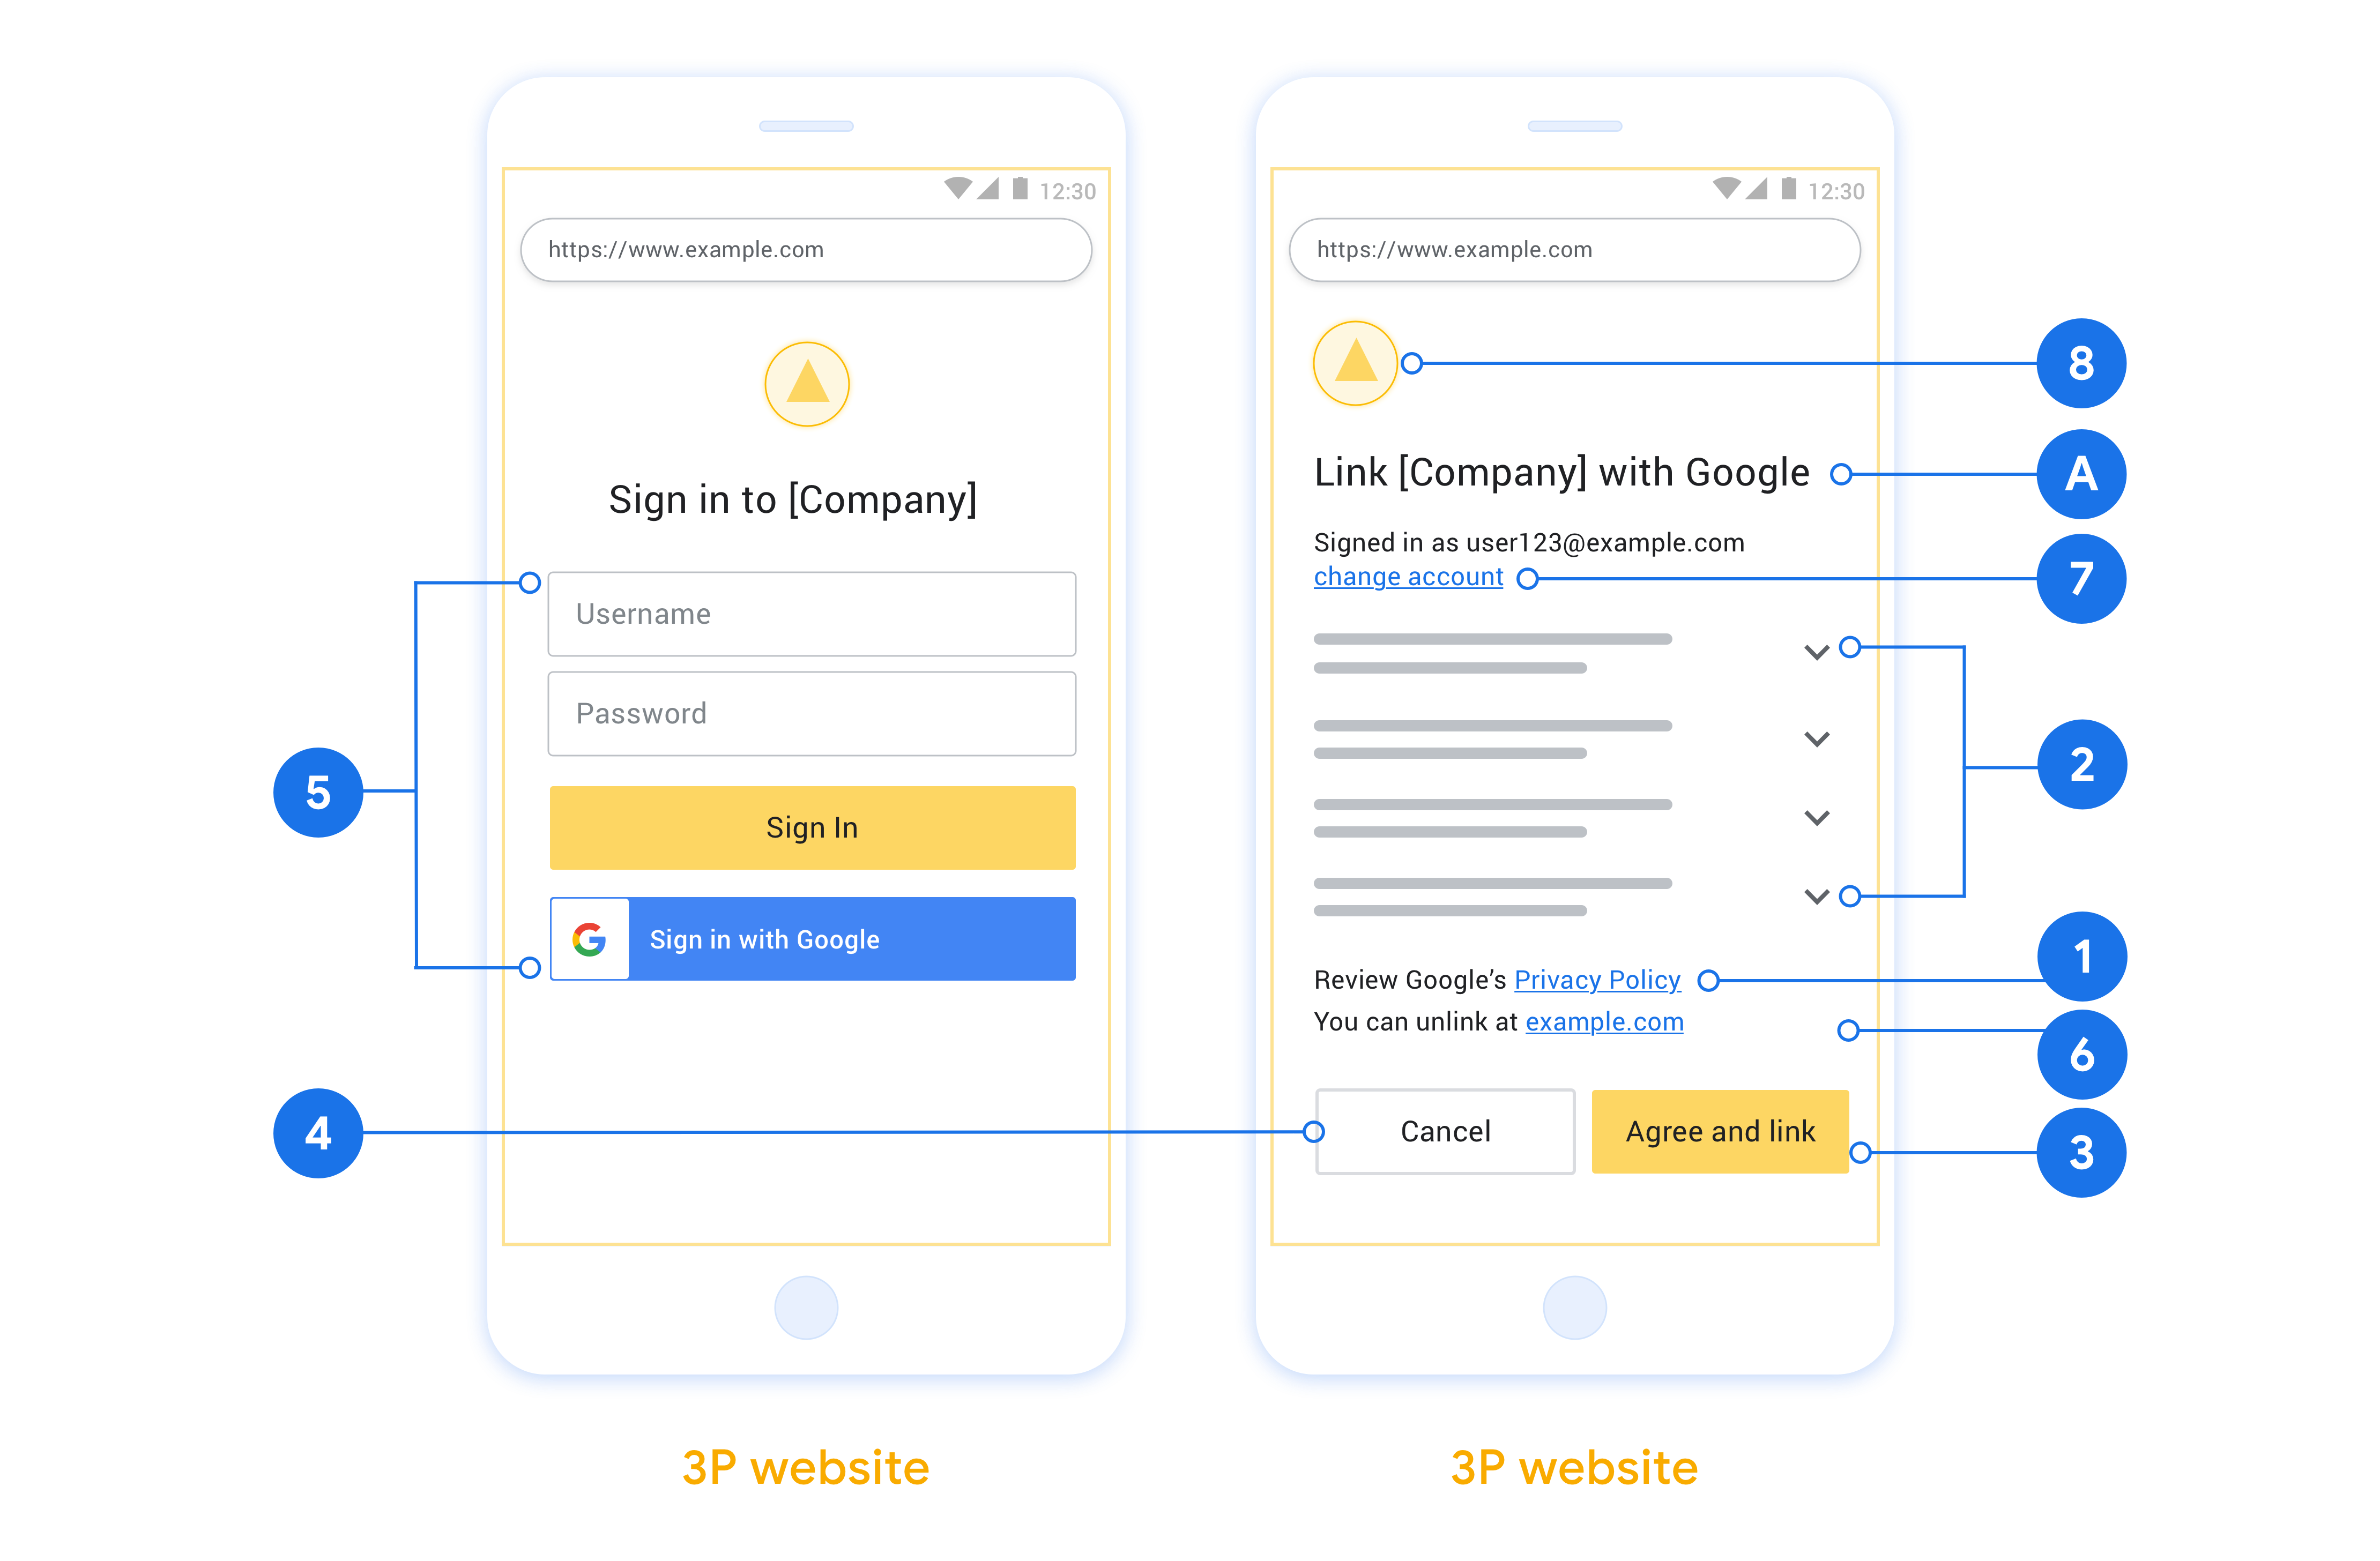
- Devi comunicare che l'account dell'utente verrà collegato a Google, non a un prodotto Google specifico come Google Home o l'Assistente Google.
Consigli
Ti consigliamo di procedere come segue:
Mostra le Norme sulla privacy di Google. Includi un link alle Norme sulla privacy di Google nella schermata per il consenso.
Dati da condividere. Usa un linguaggio chiaro e conciso per spiegare all'utente quali dati di sua proprietà richiedono Google e perché.
Invito all'azione chiaro. Indica un invito all'azione chiaro nella schermata del consenso, ad esempio "Accetta e collega". Questo perché gli utenti devono capire quali dati devono condividere con Google per collegare i propri account.
Possibilità di annullare. Fornisci agli utenti un modo per tornare indietro o annullare, se scelgono di non eseguire il collegamento.
Cancella la procedura di accesso. Assicurati che gli utenti dispongano di un metodo chiaro per accedere al loro Account Google, ad esempio campi per nome utente e password o Accedi con Google.
Possibilità di scollegare. Offrire un meccanismo per consentire agli utenti di scollegare, ad esempio un URL alle impostazioni del loro account sulla tua piattaforma. In alternativa, puoi includere un link all'Account Google in cui gli utenti possono gestire il proprio account collegato.
Possibilità di modificare l'account utente. Suggerisci un metodo per consentire agli utenti di cambiare account. Questa opzione è particolarmente utile se gli utenti tendono ad avere più account.
- Se un utente deve chiudere la schermata del consenso per cambiare account, invia un errore recuperabile a Google in modo che l'utente possa accedere all'account preferito con il collegamento OAuth e il flusso implicito.
Includi il tuo logo. Mostra il logo della tua azienda nella schermata del consenso. Utilizza le linee guida di stile per posizionare il logo. Se vuoi mostrare anche il logo di Google, consulta Loghi e marchi.

Create the project
To create your project to use account linking:
- Go to the Google API Console.
- Click Create project.
- Enter a name or accept the generated suggestion.
- Confirm or edit any remaining fields.
- Click Create.
To view your project ID:
- Go to the Google API Console.
- Find your project in the table on the landing page. The project ID appears in the ID column.
Configure your OAuth Consent Screen
The Google Account Linking process includes a consent screen which tells users the application requesting access to their data, what kind of data they are asking for and the terms that apply. You will need to configure your OAuth consent screen before generating a Google API client ID.
- Open the OAuth consent screen page of the Google APIs console.
- If prompted, select the project you just created.
On the "OAuth consent screen" page, fill out the form and click the “Save” button.
Application name: The name of the application asking for consent. The name should accurately reflect your application and be consistent with the application name users see elsewhere. The application name will be shown on the Account Linking consent screen.
Application logo: An image on the consent screen that will help users recognize your app. The logo is shown on Account linking consent screen and on account settings
Support email: For users to contact you with questions about their consent.
Scopes for Google APIs: Scopes allow your application to access your user's private Google data. For the Google Account Linking use case, default scope (email, profile, openid) is sufficient, you don’t need to add any sensitive scopes. It is generally a best practice to request scopes incrementally, at the time access is required, rather than up front. Learn more.
Authorized domains: To protect you and your users, Google only allows applications that authenticate using OAuth to use Authorized Domains. Your applications' links must be hosted on Authorized Domains. Learn more.
Application Homepage link: Home page for your application. Must be hosted on an Authorized Domain.
Application Privacy Policy link: Shown on Google Account Linking consent screen. Must be hosted on an Authorized Domain.
Application Terms of Service link (Optional): Must be hosted on an Authorized Domain.

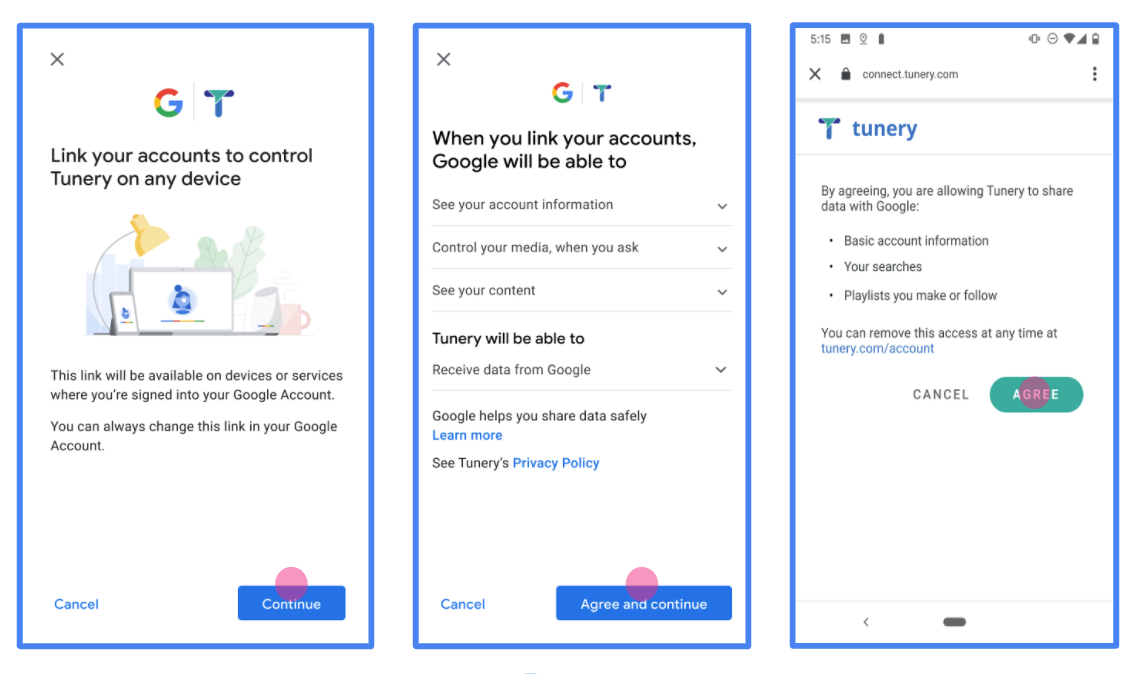
Figure 1. Google Account Linking Consent Screen for a fictitious Application, Tunery
Check "Verification Status", if your application needs verification then click the "Submit For Verification" button to submit your application for verification. Refer to OAuth verification requirements for details.
Implementa il server OAuth
To support the OAuth 2.0 implicit flow, your service makes an authorization endpoint available by HTTPS. This endpoint is responsible for authentication and obtaining consent from users for data access. The authorization endpoint presents a sign-in UI to your users that aren't already signed in and records consent to the requested access.
When a Google application needs to call one of your service's authorized APIs, Google uses this endpoint to get permission from your users to call these APIs on their behalf.
A typical OAuth 2.0 implicit flow session initiated by Google has the following flow:
- Google opens your authorization endpoint in the user's browser. The user signs in, if not signed in already, and grants Google permission to access their data with your API, if they haven't already granted permission.
- Your service creates an access token and returns it to Google. To do so, redirect the user's browser back to Google with the access token attached to the request.
- Google calls your service's APIs and attaches the access token with each request. Your service verifies that the access token grants Google authorization to access the API and then completes the API call.
Handle authorization requests
When a Google application needs to perform account linking via an OAuth 2.0 implicit flow, Google sends the user to your authorization endpoint with a request that includes the following parameters:
| Authorization endpoint parameters | |
|---|---|
client_id |
The client ID you assigned to Google. |
redirect_uri |
The URL to which you send the response to this request. |
state |
A bookkeeping value that is passed back to Google unchanged in the redirect URI. |
response_type |
The type of value to return in the response. For the OAuth 2.0 implicit
flow, the response type is always token. |
user_locale |
The Google Account language setting in RFC5646 format used to localize your content in the user's preferred language. |
For example, if your authorization endpoint is available at
https://myservice.example.com/auth, a request might look like the following:
GET https://myservice.example.com/auth?client_id=GOOGLE_CLIENT_ID&redirect_uri=REDIRECT_URI&state=STATE_STRING&response_type=token&user_locale=LOCALE
For your authorization endpoint to handle sign-in requests, do the following steps:
Verify the
client_idandredirect_urivalues to prevent granting access to unintended or misconfigured client apps:- Confirm that the
client_idmatches the client ID you assigned to Google. - Confirm that the URL specified by the
redirect_uriparameter has the following form:https://oauth-redirect.googleusercontent.com/r/YOUR_PROJECT_ID https://oauth-redirect-sandbox.googleusercontent.com/r/YOUR_PROJECT_ID
- Confirm that the
Check if the user is signed in to your service. If the user isn't signed in, complete your service's sign-in or sign-up flow.
Generate an access token for Google to use to access your API. The access token can be any string value, but it must uniquely represent the user and the client the token is for and must not be guessable.
Send an HTTP response that redirects the user's browser to the URL specified by the
redirect_uriparameter. Include all of the following parameters in the URL fragment:access_token: The access token you just generatedtoken_type: The stringbearerstate: The unmodified state value from the original request
The following is an example of the resulting URL:
https://oauth-redirect.googleusercontent.com/r/YOUR_PROJECT_ID#access_token=ACCESS_TOKEN&token_type=bearer&state=STATE_STRING
Google's OAuth 2.0 redirect handler receives the access token and confirms
that the state value hasn't changed. After Google has obtained an
access token for your service, Google attaches the token to subsequent calls
to your service APIs.
Handle userinfo requests
The userinfo endpoint is an OAuth 2.0 protected resource that return claims about the linked user. Implementing and hosting the userinfo endpoint is optional, except for the following use cases:
- Linked Account Sign-In with Google One Tap.
- Frictionless subscription on AndroidTV.
After the access token has been successfully retrieved from your token endpoint, Google sends a request to your userinfo endpoint to retrieve basic profile information about the linked user.
| userinfo endpoint request headers | |
|---|---|
Authorization header |
The access token of type Bearer. |
For example, if your userinfo endpoint is available at
https://myservice.example.com/userinfo, a request might look like the following:
GET /userinfo HTTP/1.1
Host: myservice.example.com
Authorization: Bearer ACCESS_TOKEN
For your userinfo endpoint to handle requests, do the following steps:
- Extract access token from the Authorization header and return information for the user associated with the access token.
- If the access token is invalid, return an HTTP 401 Unauthorized error with using the
WWW-AuthenticateResponse Header. Below is an example of a userinfo error response:HTTP/1.1 401 Unauthorized WWW-Authenticate: error="invalid_token", error_description="The Access Token expired"
If the access token is valid, return and HTTP 200 response with the following JSON object in the body of the HTTPS response:
{ "sub": "USER_UUID", "email": "EMAIL_ADDRESS", "given_name": "FIRST_NAME", "family_name": "LAST_NAME", "name": "FULL_NAME", "picture": "PROFILE_PICTURE", }userinfo endpoint response subA unique ID that identifies the user in your system. emailEmail address of the user. given_nameOptional: First name of the user. family_nameOptional: Last name of the user. nameOptional: Full name of the user. pictureOptional: Profile picture of the user.
Convalidare l'implementazione
Puoi convalidare l'implementazione utilizzando lo strumento OAuth 2.0 Playground.
Nello strumento:
- Fai clic su Configurazione per aprire la finestra di configurazione di OAuth 2.0.
- Nel campo Flusso OAuth, seleziona Lato client.
- Nel campo Endpoint OAuth, seleziona Personalizzato.
- Specifica il tuo endpoint OAuth 2.0 e l'ID client che hai assegnato a Google nei campi corrispondenti.
- Nella sezione Passaggio 1, non selezionare alcun ambito Google. Lascia invece vuoto questo campo o digita un ambito valido per il tuo server (o una stringa arbitraria se non utilizzi gli ambiti OAuth). Al termine, fai clic su Autorizza API.
- Nelle sezioni Passaggio 2 e Passaggio 3, segui il flusso OAuth 2.0 e verifica che ogni passaggio funzioni come previsto.
Puoi convalidare l'implementazione utilizzando lo strumento Demo di collegamento dell'Account Google.
Nello strumento:
- Fai clic sul pulsante Accedi con Google.
- Scegli l'account che vuoi collegare.
- Inserisci l'ID servizio.
- (Facoltativo) Inserisci uno o più ambiti per i quali richiederai l'accesso.
- Fai clic su Avvia demo.
- Quando richiesto, conferma di poter acconsentire e rifiutare la richiesta di collegamento.
- Verifica di essere reindirizzato alla tua piattaforma.