खातों को लिंक करने के लिए, इंडस्ट्री के स्टैंडर्ड OAuth 2.0 ऑथराइज़ेशन कोड फ़्लो का इस्तेमाल किया जाता है.
एजेंट के लिए OAuth 2.1 और पीकेसीई
स्टेटलेस एआई एजेंट और मल्टी-मॉडल पाइपलाइन के लिए, OAuth 2.1 को लागू करने का सुझाव दिया जाता है.
- पीकेसीई (प्रूफ़ की फ़ॉर कोड एक्सचेंज): ऑथराइज़ेशन कोड फ़्लो को सुरक्षित करने के लिए, इसका इस्तेमाल करना ज़रूरी है. इससे इंटरसेप्शन हमलों को रोका जा सकता है.
- इंप्लिसिट फ़्लो नहीं: इंप्लिसिट फ़्लो, यूआरएल में ऐक्सेस टोकन दिखाता है, इससे एजेंट के एनवायरमेंट के लिए सुरक्षा से जुड़ा जोखिम पैदा होता है.
आपकी सेवा में, OAuth 2.0/2.1 के मुताबिक ऑथराइज़ेशन और टोकन एक्सचेंज एंडपॉइंट काम करने चाहिए.
प्रोजेक्ट बनाना
खाता जोड़ने की सुविधा का इस्तेमाल करने के लिए, अपना प्रोजेक्ट बनाने के लिए:
- Google API Console पर जाएं.
- प्रोजेक्ट बनाएं पर क्लिक करें.
- कोई नाम डालें या जनरेट किए गए सुझाव को स्वीकार करें.
- बाकी बचे फ़ील्ड की पुष्टि करें या उनमें बदलाव करें.
- बनाएं पर क्लिक करें.
अपना प्रोजेक्ट आईडी देखने के लिए:
- Google API Console पर जाएं.
- लैंडिंग पेज पर मौजूद टेबल में, अपना प्रोजेक्ट ढूंढें. प्रोजेक्ट आईडी, आईडी कॉलम में दिखता है.
उस स्क्रीन को कॉन्फ़िगर करना जहां OAuth के लिए सहमति दी जाती है
Google खाता जोड़ने की प्रोसेस में, सहमति वाली स्क्रीन शामिल होती है. इस स्क्रीन पर उपयोगकर्ताओं को यह जानकारी मिलती है कि कौनसे ऐप्लिकेशन उनके डेटा को ऐक्सेस करने का अनुरोध कर रहे हैं, वे किस तरह का डेटा मांग रहे हैं, और उन पर कौनसी शर्तें लागू होती हैं. Google API क्लाइंट आईडी जनरेट करने से पहले, आपको उस स्क्रीन को कॉन्फ़िगर करना होगा जहां OAuth के लिए सहमति दी जाती है.
- Google APIs कंसोल के, उस स्क्रीन वाले पेज को खोलें जहां OAuth के लिए सहमति दी जाती है.
- अगर आपसे पूछा जाए, तो वह प्रोजेक्ट चुनें जिसे आपने अभी बनाया है.
"OAuth के लिए सहमति वाली स्क्रीन" पेज पर, फ़ॉर्म भरें और “सेव करें” बटन पर क्लिक करें.
ऐप्लिकेशन का नाम: सहमति का अनुरोध करने वाले ऐप्लिकेशन का नाम. नाम से आपके ऐप्लिकेशन की सही जानकारी मिलनी चाहिए. साथ ही, यह नाम उपयोगकर्ताओं को अन्य जगहों पर दिखने वाले ऐप्लिकेशन के नाम से मेल खाना चाहिए. ऐप्लिकेशन का नाम, खाता जोड़ने के लिए सहमति वाली स्क्रीन पर दिखेगा.
ऐप्लिकेशन का लोगो: सहमति वाली स्क्रीन पर दिखने वाली इमेज. इससे उपयोगकर्ताओं को आपके ऐप्लिकेशन को पहचानने में मदद मिलेगी. लोगो, खाता जोड़ने के लिए सहमति वाली स्क्रीन और खाते की सेटिंग में दिखता है
सहायता के लिए ईमेल पता: ताकि उपयोगकर्ता, सहमति से जुड़े सवालों के लिए आपसे संपर्क कर सकें.
Google APIs के लिए स्कोप: स्कोप की मदद से, आपका ऐप्लिकेशन उपयोगकर्ता के निजी Google डेटा को ऐक्सेस कर सकता है. Google खाता जोड़ने के इस्तेमाल के मामले में, डिफ़ॉल्ट स्कोप (ईमेल, प्रोफ़ाइल, openid) काफ़ी है. आपको संवेदनशील स्कोप जोड़ने की ज़रूरत नहीं है. आम तौर पर, स्कोप के लिए अनुरोध, ऐक्सेस की ज़रूरत पड़ने पर ही करना चाहिए. पहले से अनुरोध करके रखना सही नहीं है. ज़्यादा जानें.
अनुमति वाले डोमेन: Google, आपको और आपके उपयोगकर्ताओं को सुरक्षित रखने के लिए, सिर्फ़ उन ऐप्लिकेशन को अनुमति वाले डोमेन का इस्तेमाल करने की अनुमति देता है जो OAuth का इस्तेमाल करके पुष्टि करते हैं. आपके ऐप्लिकेशन के लिंक, अनुमति वाले डोमेन पर होस्ट किए जाने चाहिए. ज़्यादा जानें.
ऐप्लिकेशन के होम पेज का लिंक: आपके ऐप्लिकेशन का होम पेज. यह अनुमति वाले डोमेन पर होस्ट किया जाना चाहिए.
ऐप्लिकेशन की निजता नीति का लिंक: यह Google खाता जोड़ने के लिए सहमति वाली स्क्रीन पर दिखता है. यह अनुमति वाले डोमेन पर होस्ट किया जाना चाहिए.
ऐप्लिकेशन की सेवा की शर्तों का लिंक (ज़रूरी नहीं): यह अनुमति वाले डोमेन पर होस्ट किया जाना चाहिए.
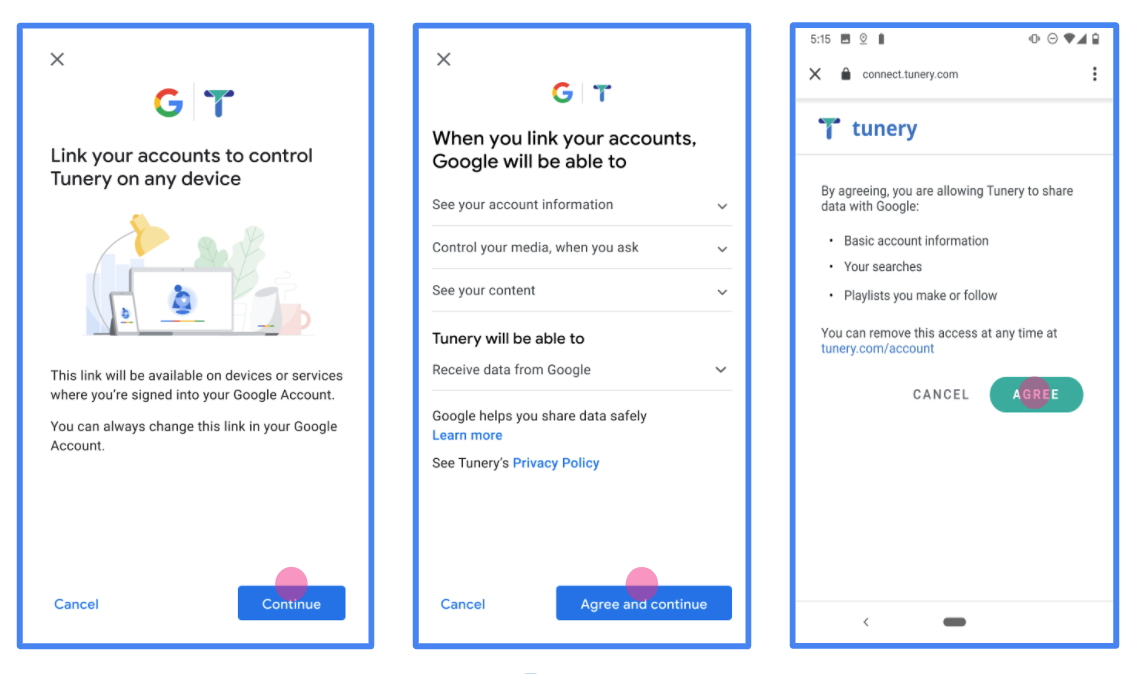
पहली इमेज. Tunery नाम के काल्पनिक ऐप्लिकेशन के लिए, Google खाता जोड़ने के लिए सहमति वाली स्क्रीन
"पुष्टि की स्थिति" देखें. अगर आपके ऐप्लिकेशन की पुष्टि की जानी है, तो "पुष्टि के लिए सबमिट करें" बटन पर क्लिक करके, अपने ऐप्लिकेशन को पुष्टि के लिए सबमिट करें. ज़्यादा जानकारी के लिए, OAuth की पुष्टि से जुड़ी ज़रूरी शर्तें देखें.
अपना OAuth सर्वर लागू करना
An OAuth 2.0 server implementation of the authorization code flow consists of two endpoints, which your service makes available by HTTPS. The first endpoint is the authorization endpoint, which is responsible for finding or obtaining consent from users for data access. The authorization endpoint presents a sign-in UI to your users that aren't already signed in and records consent to the requested access. The second endpoint is the token exchange endpoint, which is used to obtain encrypted strings, called tokens, that authorize a user to access your service.
When a Google application needs to call one of your service's APIs, Google uses these endpoints together to get permission from your users to call these APIs on their behalf.
Google Account Linking: OAuth Authorization Code Flow
The following sequence diagram details interactions between the User, Google, and your service's endpoints.
Roles and responsibilities
The following table defines the roles and responsibilities of the actors in the Google Account Linking (GAL) OAuth flow. Note that in GAL, Google acts as the OAuth Client, while your service acts as the Identity/Service Provider.
| Actor / Component | GAL Role | Responsibilities |
|---|---|---|
| Google App / Server | OAuth Client | Initiates the flow, receives the authorization code, exchanges it for tokens, and securely stores them to access your service's APIs. |
| Your Authorization Endpoint | Authorization Server | Authenticates your users and obtains their consent to share access to their data with Google. |
| Your Token Exchange Endpoint | Authorization Server | Validates authorization codes and refresh tokens, and issues access tokens to the Google Server. |
| Google Redirect URI | Callback Endpoint | Receives the user redirect from your authorization service with the
code and state values. |
An OAuth 2.0 authorization code flow session initiated by Google has the following flow:
- Google opens your authorization endpoint in the user's browser. If the flow started on a voice-only device for an Action, Google transfers the execution to a phone.
- The user signs in, if not signed in already, and grants Google permission to access their data with your API, if they haven't already granted permission.
- Your service creates an authorization code and returns it to Google. To do so, redirect the user's browser back to Google with the authorization code attached to the request.
- Google sends the authorization code to your token exchange endpoint, which verifies the authenticity of the code and returns an access token and a refresh token. The access token is a short-lived token that your service accepts as credentials to access APIs. The refresh token is a long-lived token that Google can store and use to acquire new access tokens when they expire.
- After the user has completed the account linking flow, every subsequent request sent from Google contains an access token.
Implementation Recipe
Follow these steps to implement the Authorization Code flow.
Step 1: Handle authorization requests
When Google initiates account linking, it redirects the user to your authorization endpoint. For detailed protocol contracts and parameter requirements, see the Authorization Endpoint.
To handle the request, perform the following actions:
Validate the request:
- Confirm that the
client_idmatches the Client ID assigned to Google. - Confirm that the
redirect_urimatches the expected Google redirect URL:none https://oauth-redirect.googleusercontent.com/r/YOUR_PROJECT_ID https://oauth-redirect-sandbox.googleusercontent.com/r/YOUR_PROJECT_ID - Verify that
response_typeiscode.
- Confirm that the
Authenticate the user:
- Check if the user is signed in to your service.
- If the user is not signed in, prompt them to complete your sign-in or sign-up flow.
Generate authorization code:
- Create a unique, non-guessable authorization code associated with the user and client.
- Set the code to expire in approximately 10 minutes.
Redirect back to Google:
- Redirect the browser to the URL provided in
redirect_uri. - Append the following query parameters:
code: The authorization code you generated.state: The unmodified state value received from Google.
- Redirect the browser to the URL provided in
Step 2: Handle token exchange requests
Your token exchange endpoint processes two types of requests: exchanging codes for tokens, and refreshing expired access tokens. For detailed protocol contracts and parameter requirements, see the Token Exchange Endpoint.
A. Exchange authorization codes for tokens
When Google receives the authorization code, it calls your token exchange endpoint (POST) to retrieve tokens.
Validate the request:
- Verify
client_idandclient_secret. - Verify the authorization code is valid and not expired.
- Confirm
redirect_urimatches the value used in Step 1. - If validation fails, return an HTTP
400 Bad Requestwith{"error": "invalid_grant"}.
- Verify
Issue tokens:
- Generate a long-lived
refresh_tokenand a short-livedaccess_token(typically 1 hour). - Return an HTTP
200 OKwith the standard JSON token response.
- Generate a long-lived
B. Refresh access tokens
When the access token expires, Google requests a new one using the refresh token.
Validate the request:
- Verify
client_id,client_secret, andrefresh_token. - If validation fails, return an HTTP
400 Bad Requestwith{"error": "invalid_grant"}.
- Verify
Issue new access token:
- Generate a new short-lived
access_token. - Return an HTTP
200 OKwith the JSON token response (optionally including a new refresh token).
- Generate a new short-lived
Handle userinfo requests
The userinfo endpoint is an OAuth 2.0 protected resource that return claims about the linked user. Implementing and hosting the userinfo endpoint is optional, except for the following use cases:
- Linked Account Sign-In with Google One Tap.
- Frictionless subscription on AndroidTV.
After the access token has been successfully retrieved from your token endpoint, Google sends a request to your userinfo endpoint to retrieve basic profile information about the linked user.
| userinfo endpoint request headers | |
|---|---|
Authorization header |
The access token of type Bearer. |
For example, if your userinfo endpoint is available at
https://myservice.example.com/userinfo, a request might look like the following:
GET /userinfo HTTP/1.1
Host: myservice.example.com
Authorization: Bearer ACCESS_TOKEN
For your userinfo endpoint to handle requests, do the following steps:
- Extract access token from the Authorization header and return information for the user associated with the access token.
- If the access token is invalid, return an HTTP 401 Unauthorized error with using the
WWW-AuthenticateResponse Header. Below is an example of a userinfo error response:HTTP/1.1 401 Unauthorized WWW-Authenticate: error="invalid_token", error_description="The Access Token expired"
If the access token is valid, return and HTTP 200 response with the following JSON object in the body of the HTTPS response:
{ "sub": "USER_UUID", "email": "EMAIL_ADDRESS", "given_name": "FIRST_NAME", "family_name": "LAST_NAME", "name": "FULL_NAME", "picture": "PROFILE_PICTURE", }userinfo endpoint response subA unique ID that identifies the user in your system. emailEmail address of the user. given_nameOptional: First name of the user. family_nameOptional: Last name of the user. nameOptional: Full name of the user. pictureOptional: Profile picture of the user.
लागू करने की पुष्टि करना
OAuth 2.0 Playground टूल का इस्तेमाल करके, लागू करने की पुष्टि की जा सकती है.
टूल में, यह तरीका अपनाएं:
- OAuth 2.0 कॉन्फ़िगरेशन विंडो खोलने के लिए, कॉन्फ़िगरेशन पर क्लिक करें.
- OAuth फ़्लो फ़ील्ड में, क्लाइंट-साइड चुनें.
- OAuth एंडपॉइंट फ़ील्ड में, कस्टम चुनें.
- अपने OAuth 2.0 एंडपॉइंट और Google को असाइन किया गया क्लाइंट आईडी, उससे जुड़े फ़ील्ड में डालें.
- पहला चरण सेक्शन में, कोई भी Google स्कोप न चुनें. इसके बजाय, इस फ़ील्ड को खाली छोड़ दें या अपने सर्वर के लिए मान्य स्कोप टाइप करें. अगर OAuth स्कोप का इस्तेमाल नहीं किया जाता है, तो कोई भी स्ट्रिंग टाइप करें. जब आपका काम पूरा हो जाए, तो एपीआई को अनुमति दें पर क्लिक करें.
- दूसरे चरण और तीसरे चरण सेक्शन में, OAuth 2.0 फ़्लो देखें. साथ ही, यह पुष्टि करें कि हर चरण उम्मीद के मुताबिक काम कर रहा है.
Google खाता लिंक करने की सुविधा का डेमो टूल का इस्तेमाल करके, लागू की गई सुविधा की पुष्टि की जा सकती है.
टूल में, यह तरीका अपनाएं:
- Google से साइन इन करें बटन पर क्लिक करें.
- वह खाता चुनें जिसे आपको लिंक करना है.
- सेवा आईडी डालें.
- विकल्प के तौर पर, एक या उससे ज़्यादा ऐसे स्कोप डालें जिनके लिए आपको ऐक्सेस का अनुरोध करना है.
- डेमो शुरू करें पर क्लिक करें.
- जब कहा जाए, तब पुष्टि करें कि आपके पास खाते को लिंक करने के अनुरोध को स्वीकार या अस्वीकार करने का विकल्प है.
- पुष्टि करें कि आपको अपने प्लैटफ़ॉर्म पर रीडायरेक्ट किया गया हो.