收集及管理 Google Chat 聯絡人

本教學課程說明如何建構 Google Chat 擴充應用程式,協助 Google Chat 使用者管理個人和商家聯絡人。如要收集資訊,Chat 應用程式會提示使用者在資訊卡訊息和對話方塊中填寫聯絡表單。

查看 Chat 應用程式的實際應用情形:

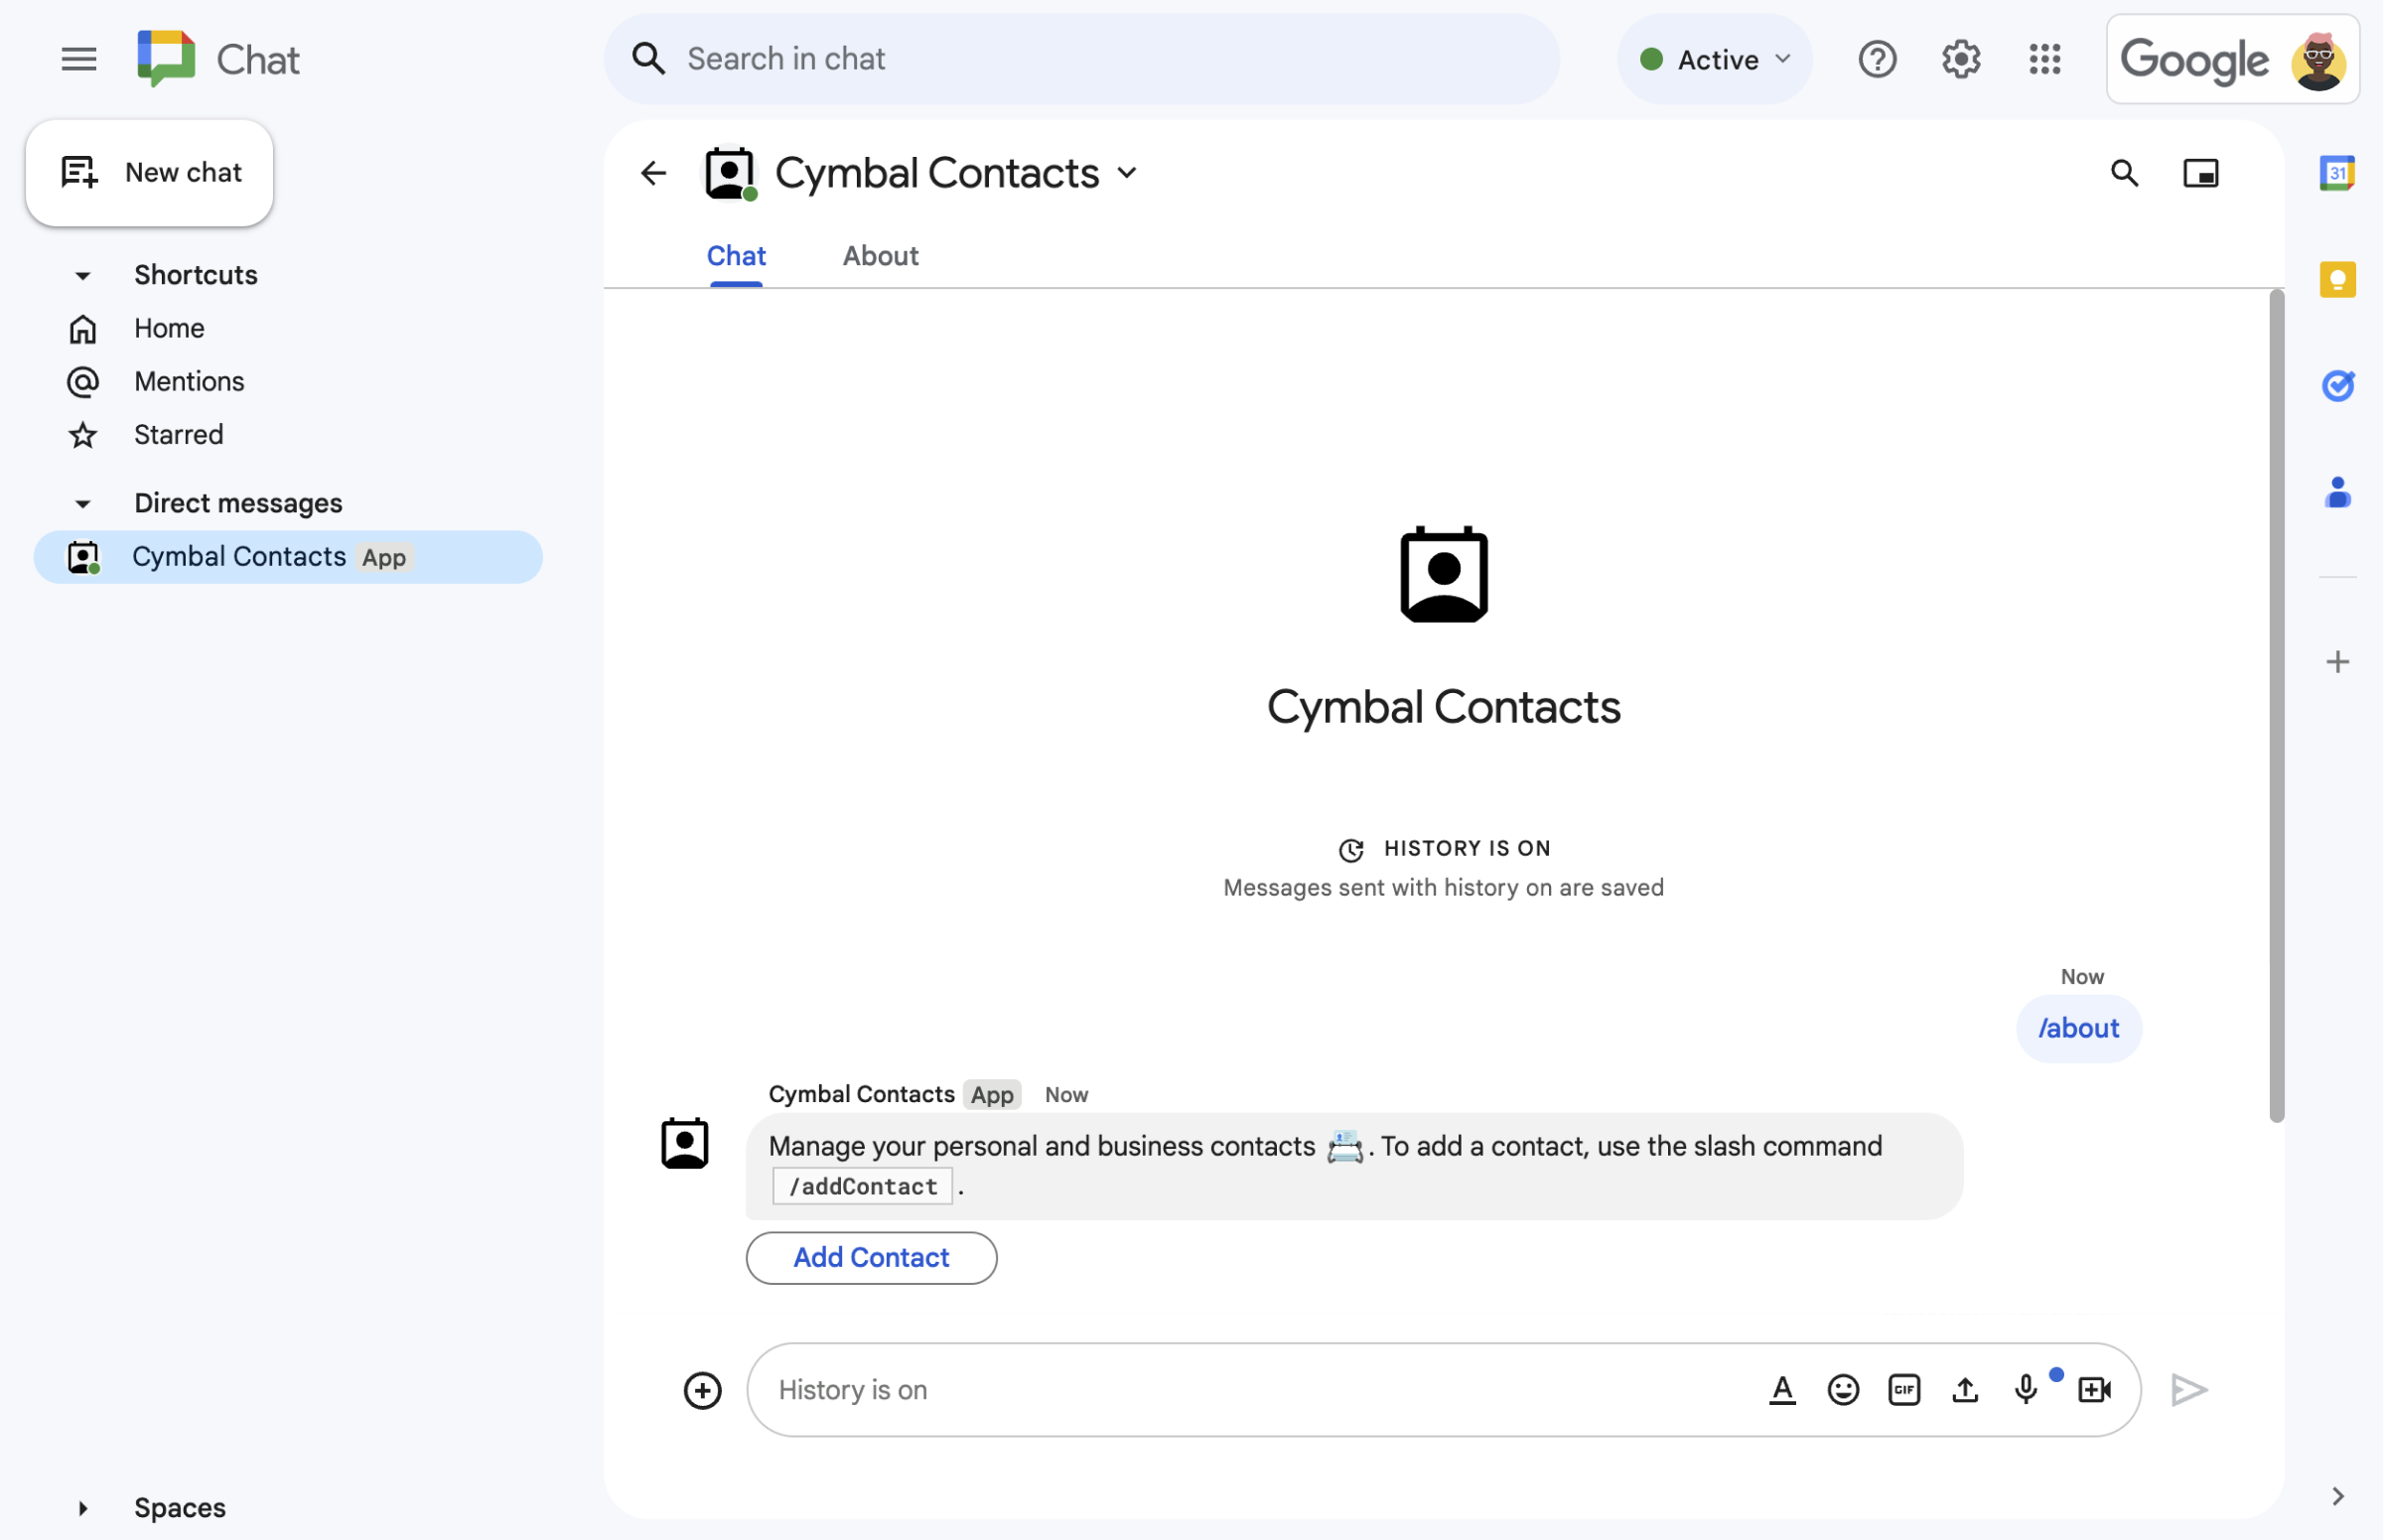
  • 透過斜線指令開啟聯絡表單。
    圖 1. Chat 應用程式會回應斜線指令 /about,並提供文字訊息和開啟聯絡表單的按鈕。
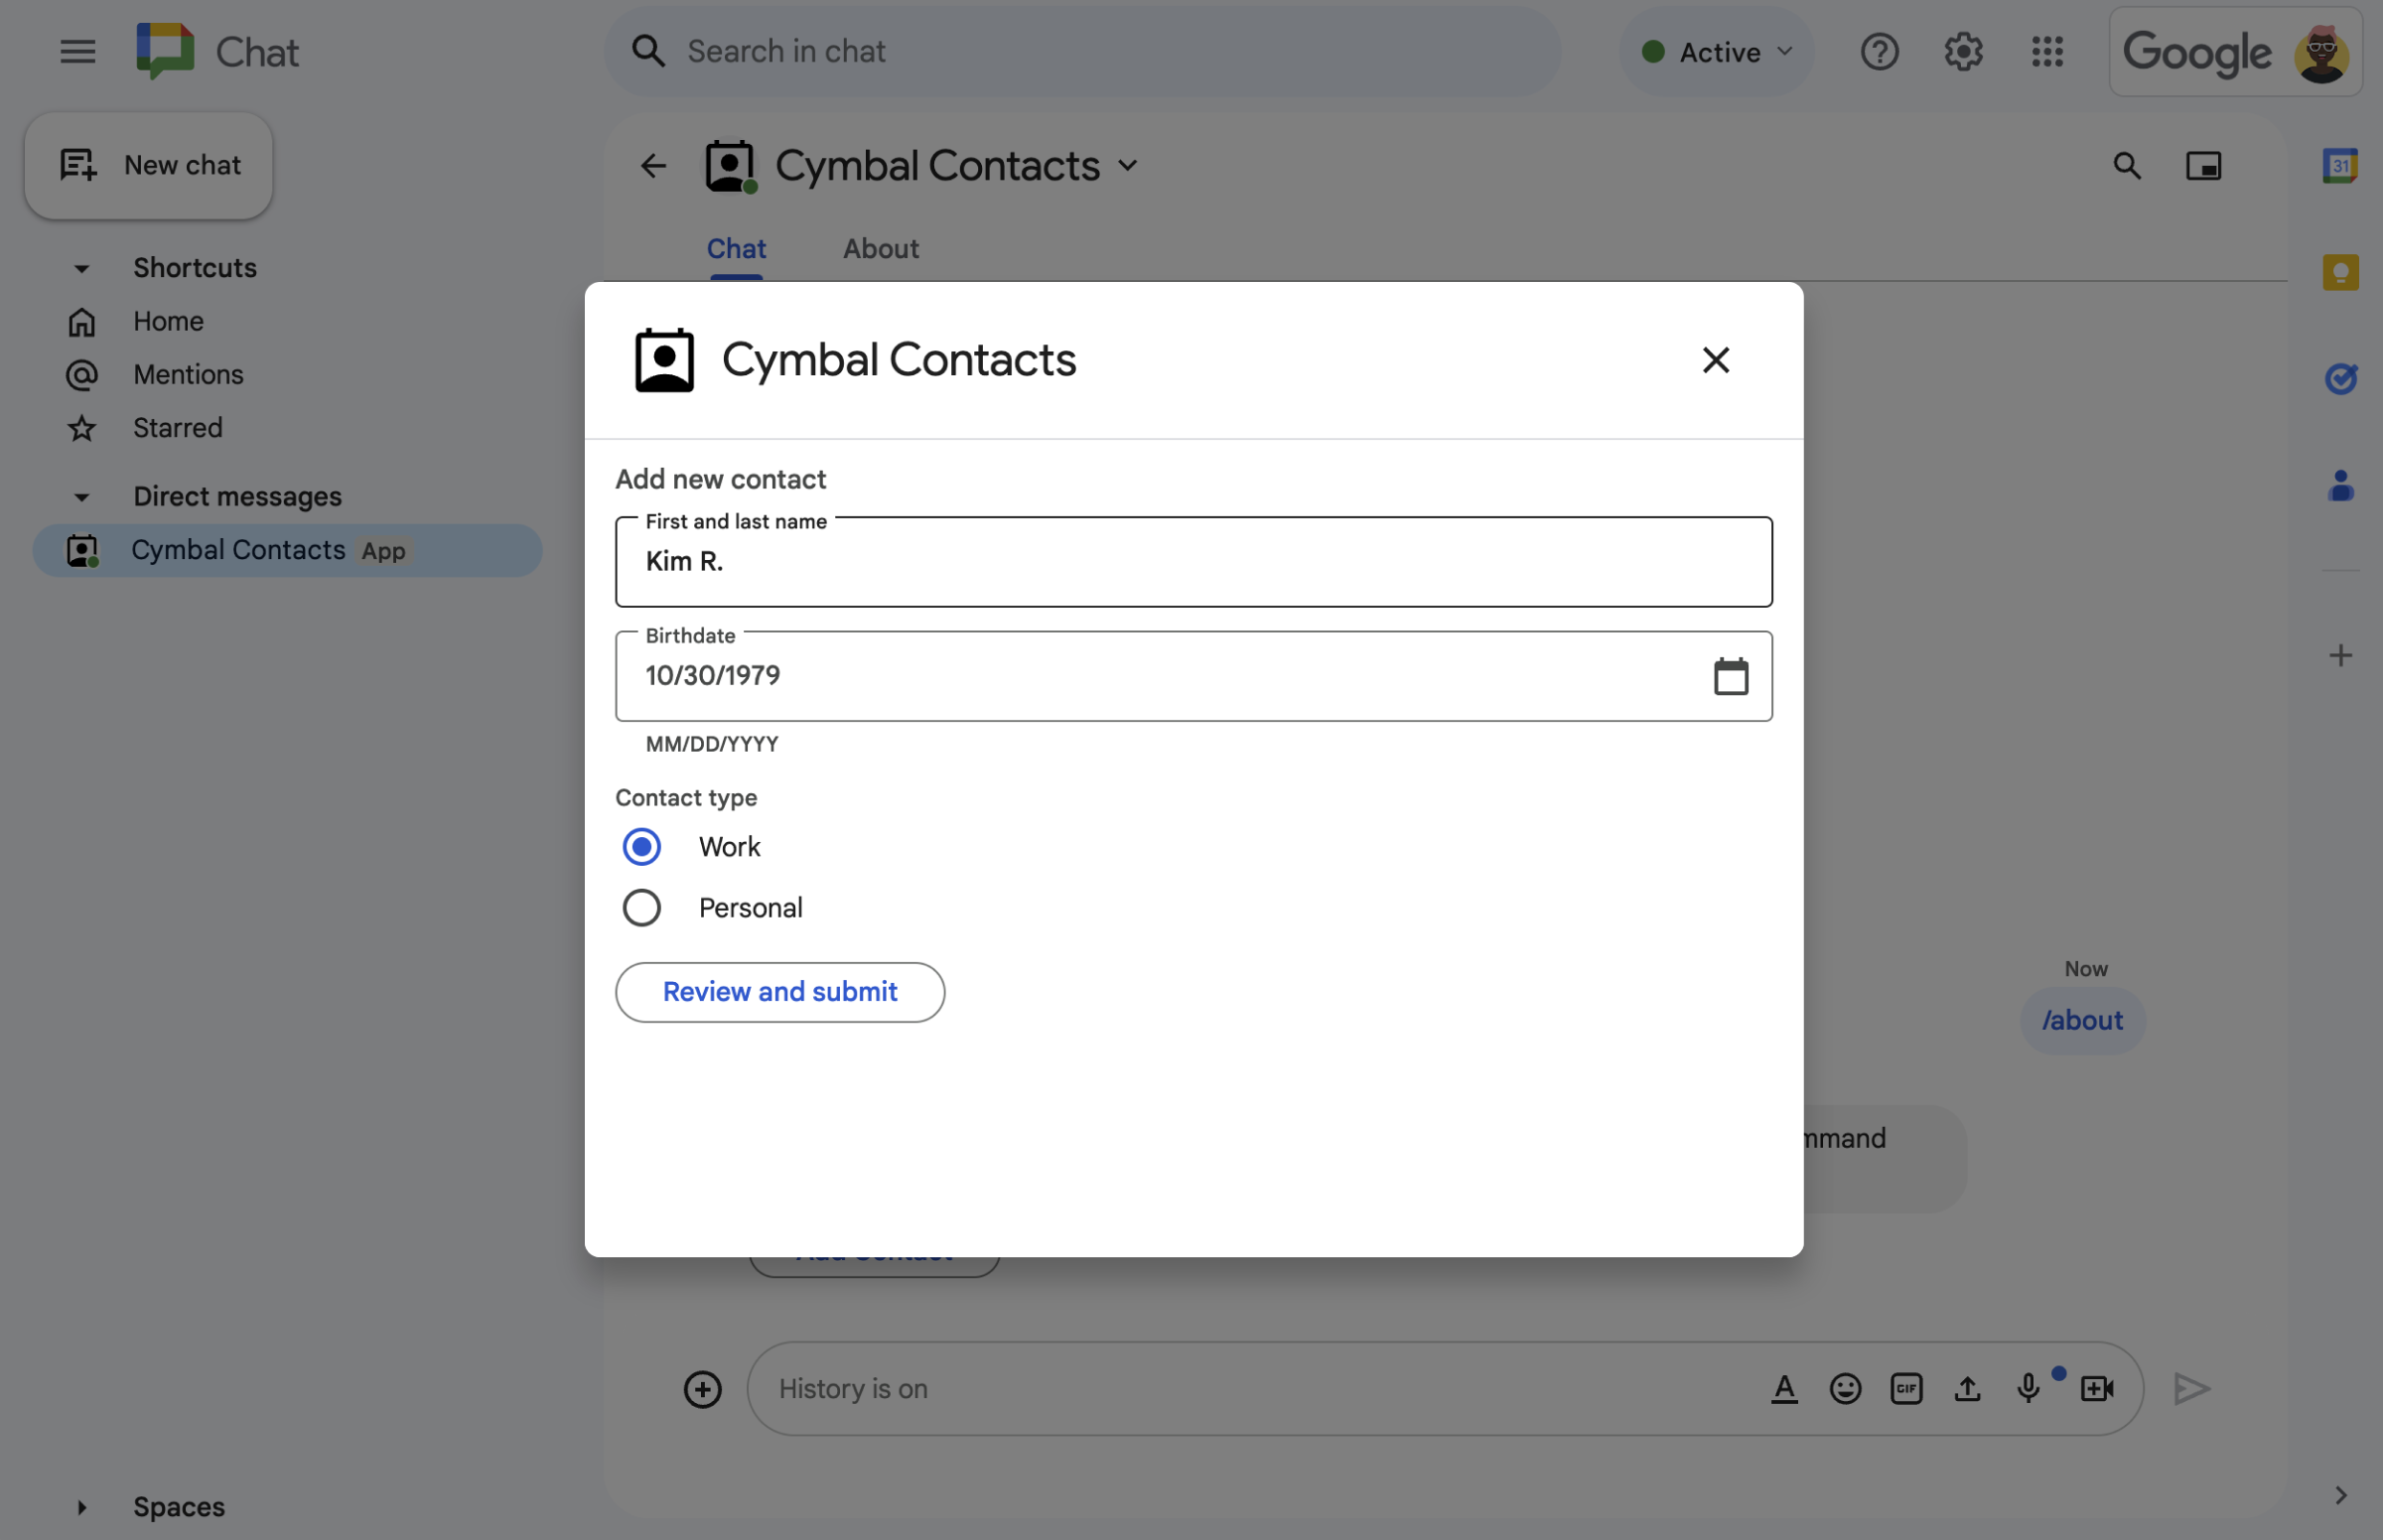
  • 對話方塊中的聯絡表單。
    圖 2. Chat 應用程式會開啟對話方塊,讓使用者輸入聯絡人資訊。
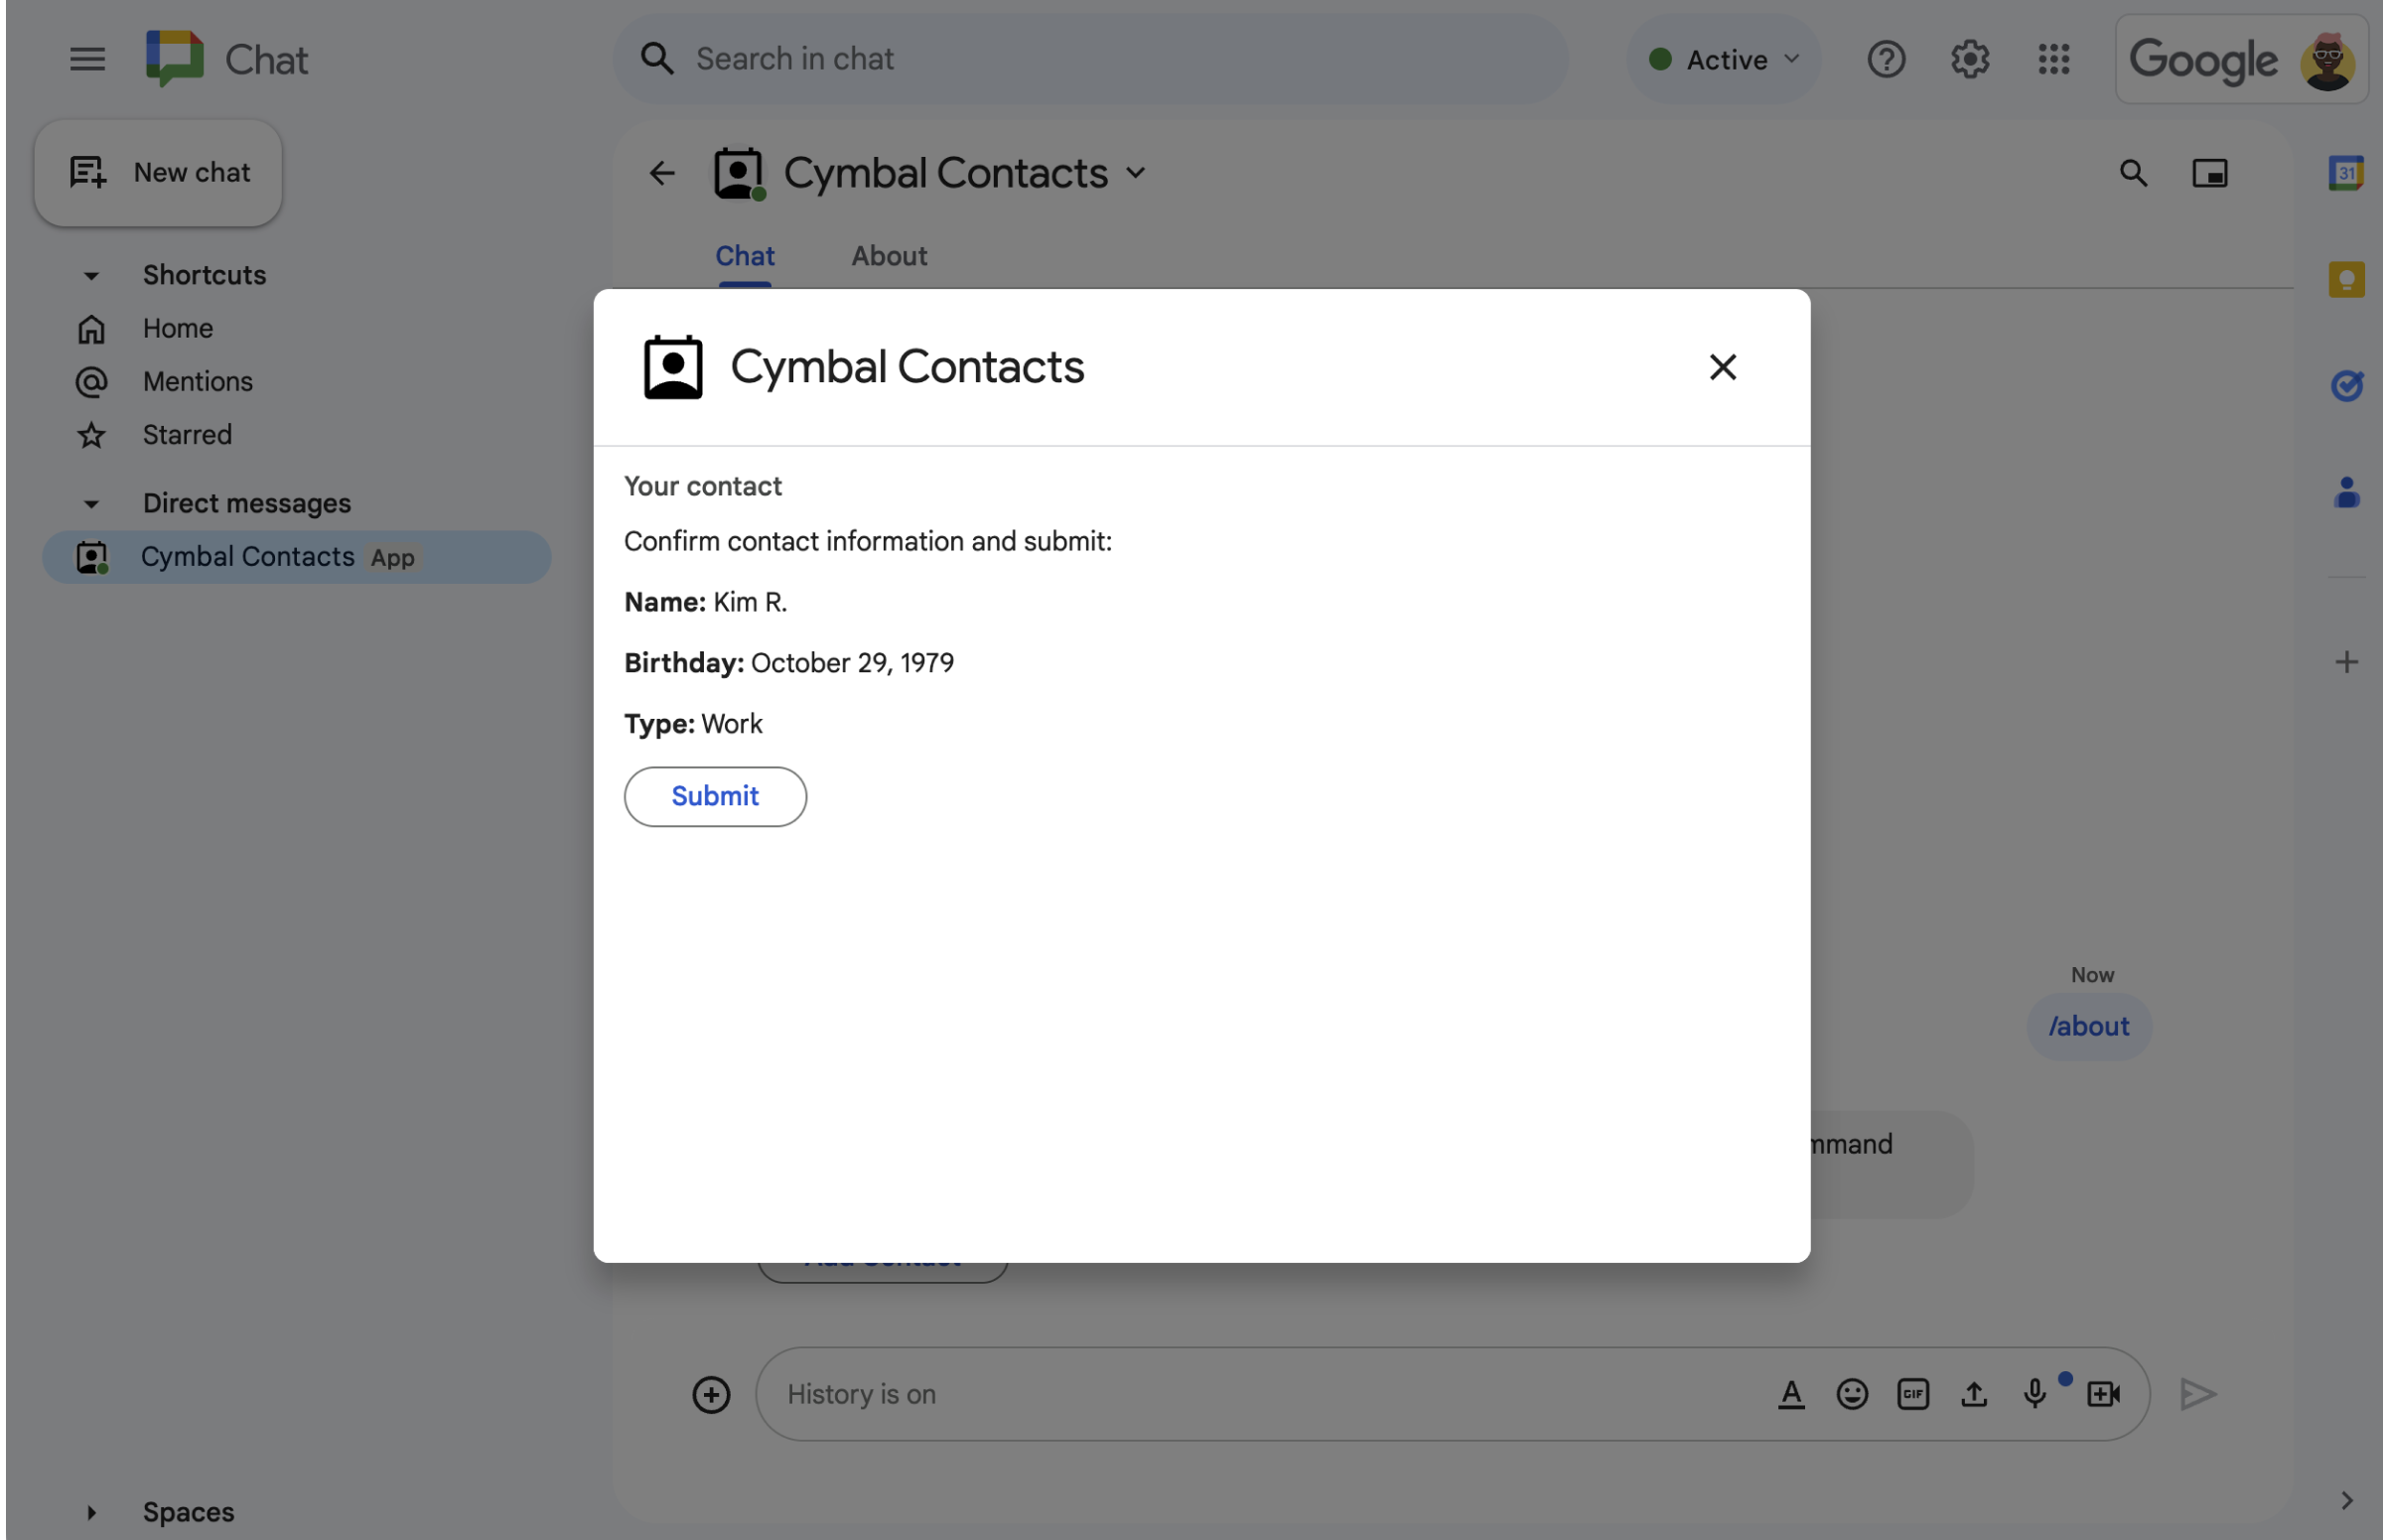
  • 確認並檢查對話方塊。
    圖 3. Chat 應用程式會傳回確認對話方塊,讓使用者在提交前檢查並確認資訊。
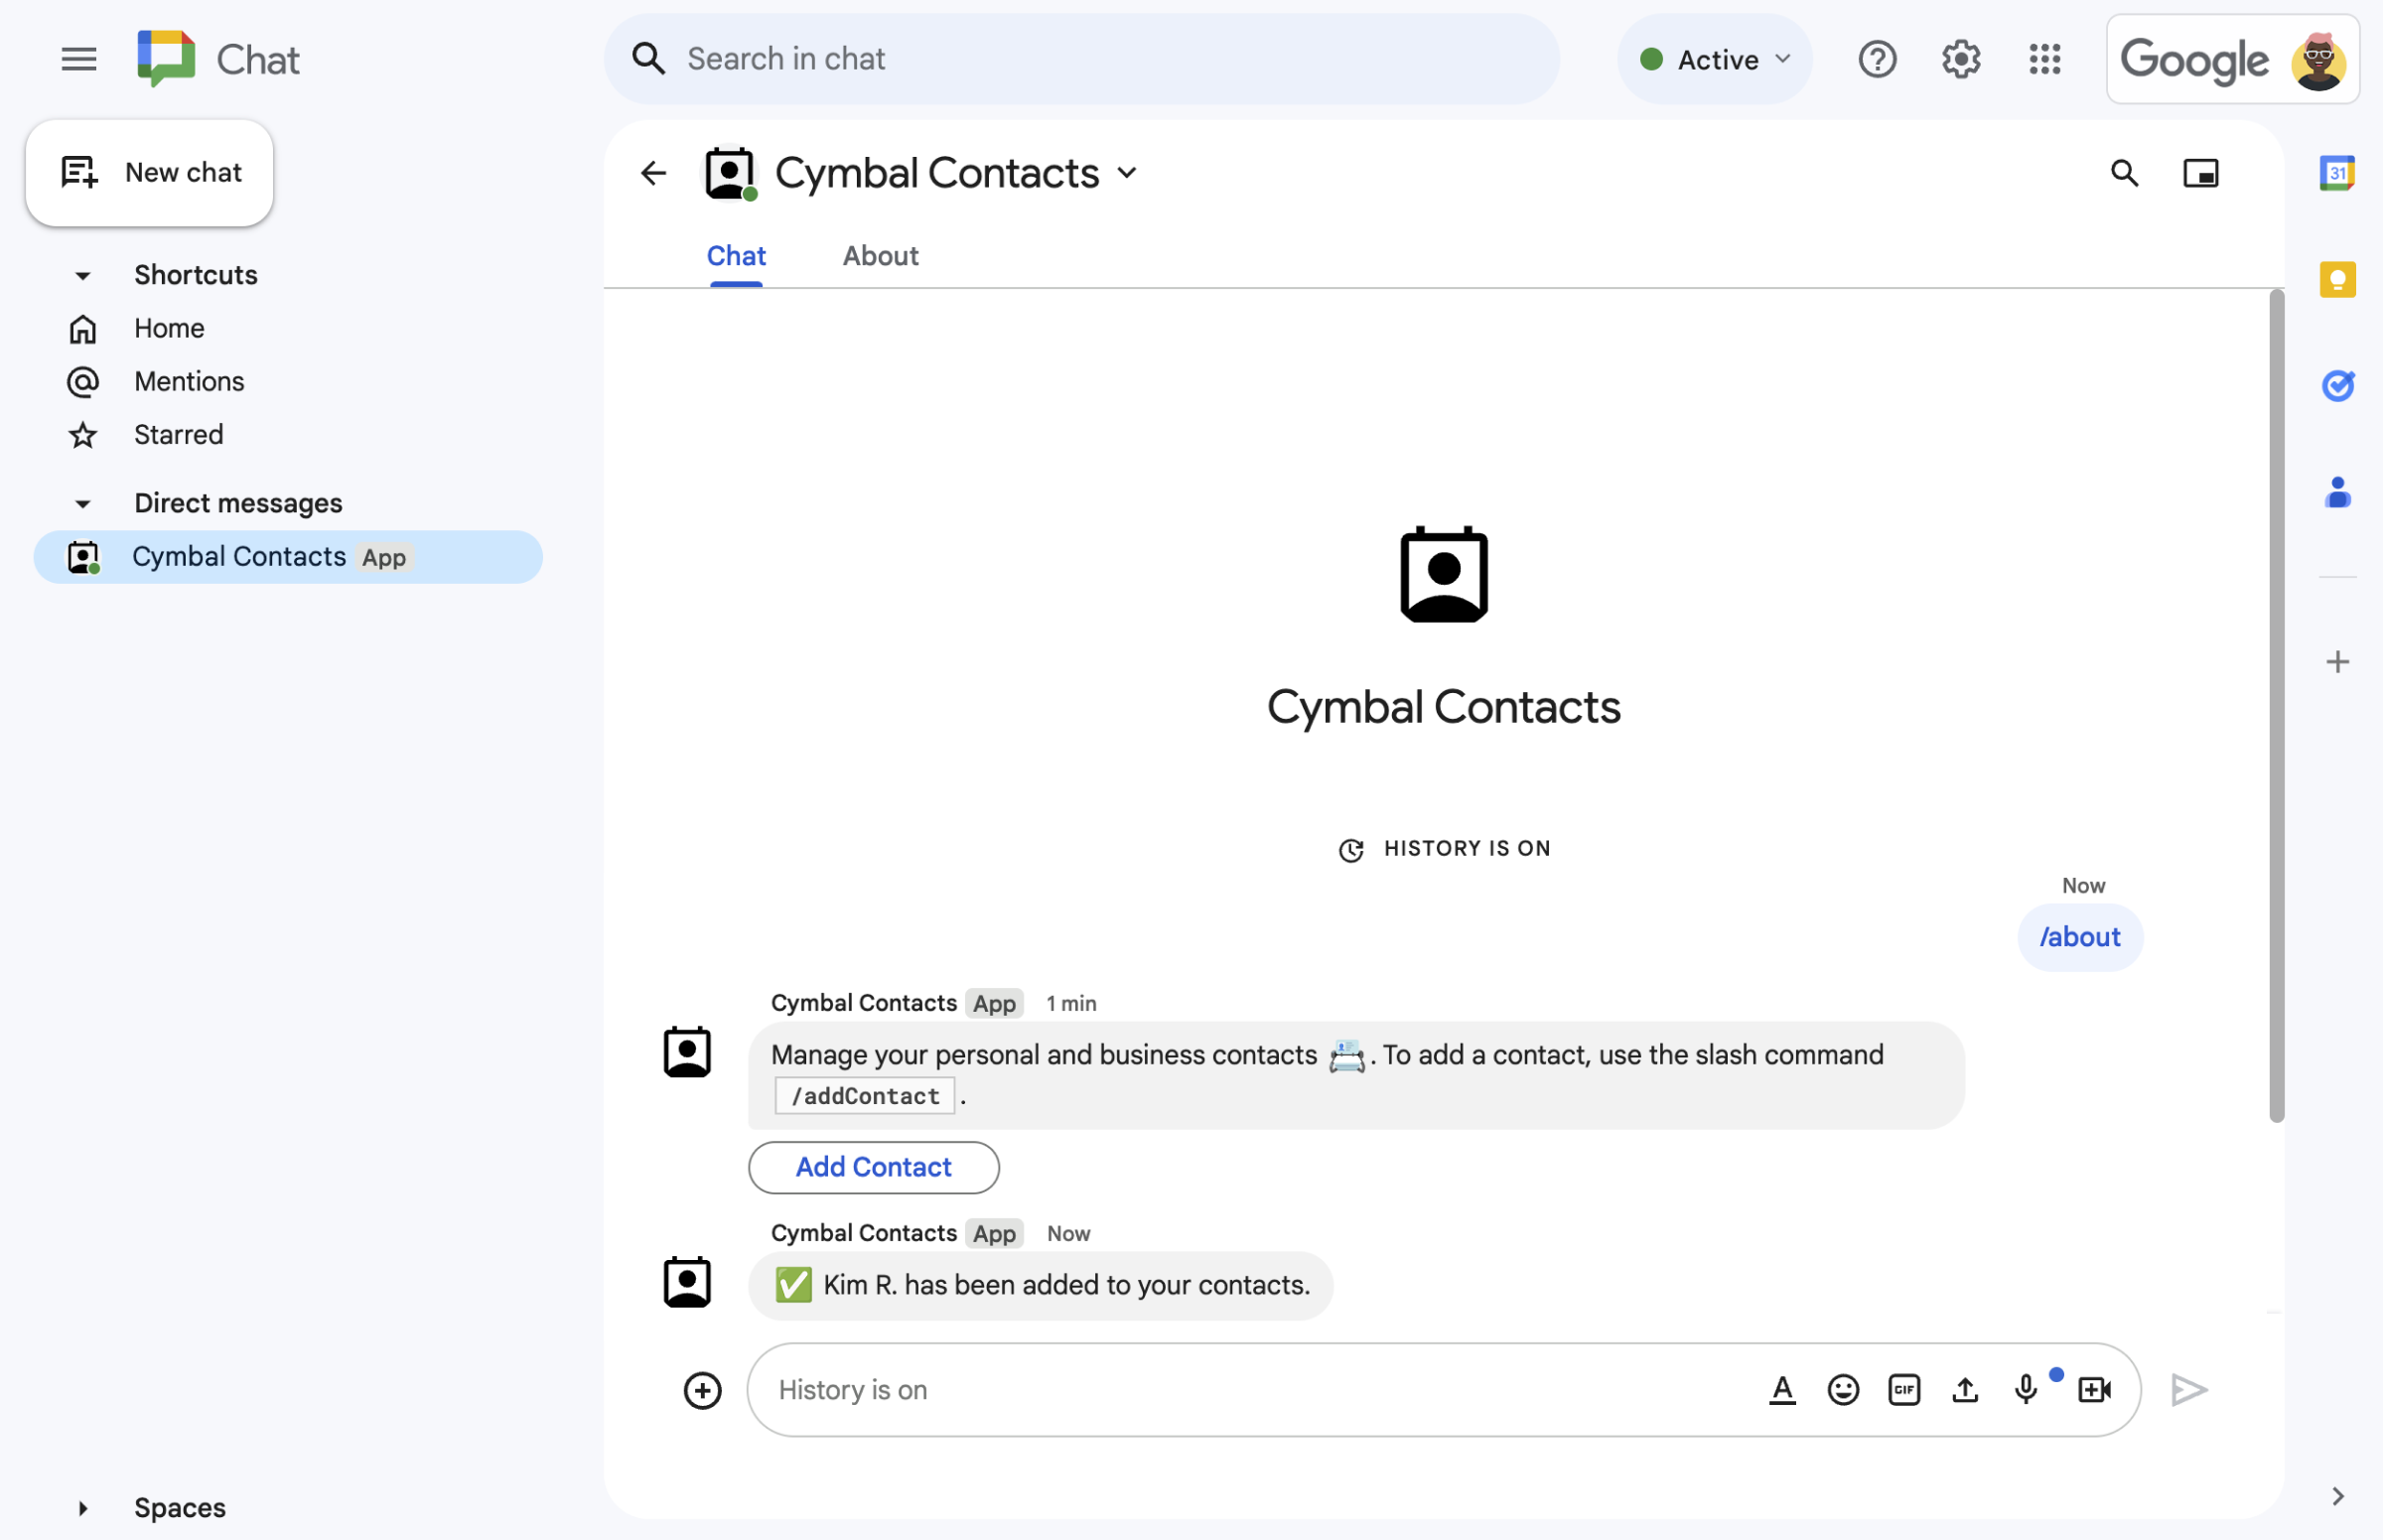
  • 確認新聯絡人的簡訊。
    圖 4. 使用者提交表單後,Chat 應用程式會傳送私人簡訊來確認提交。
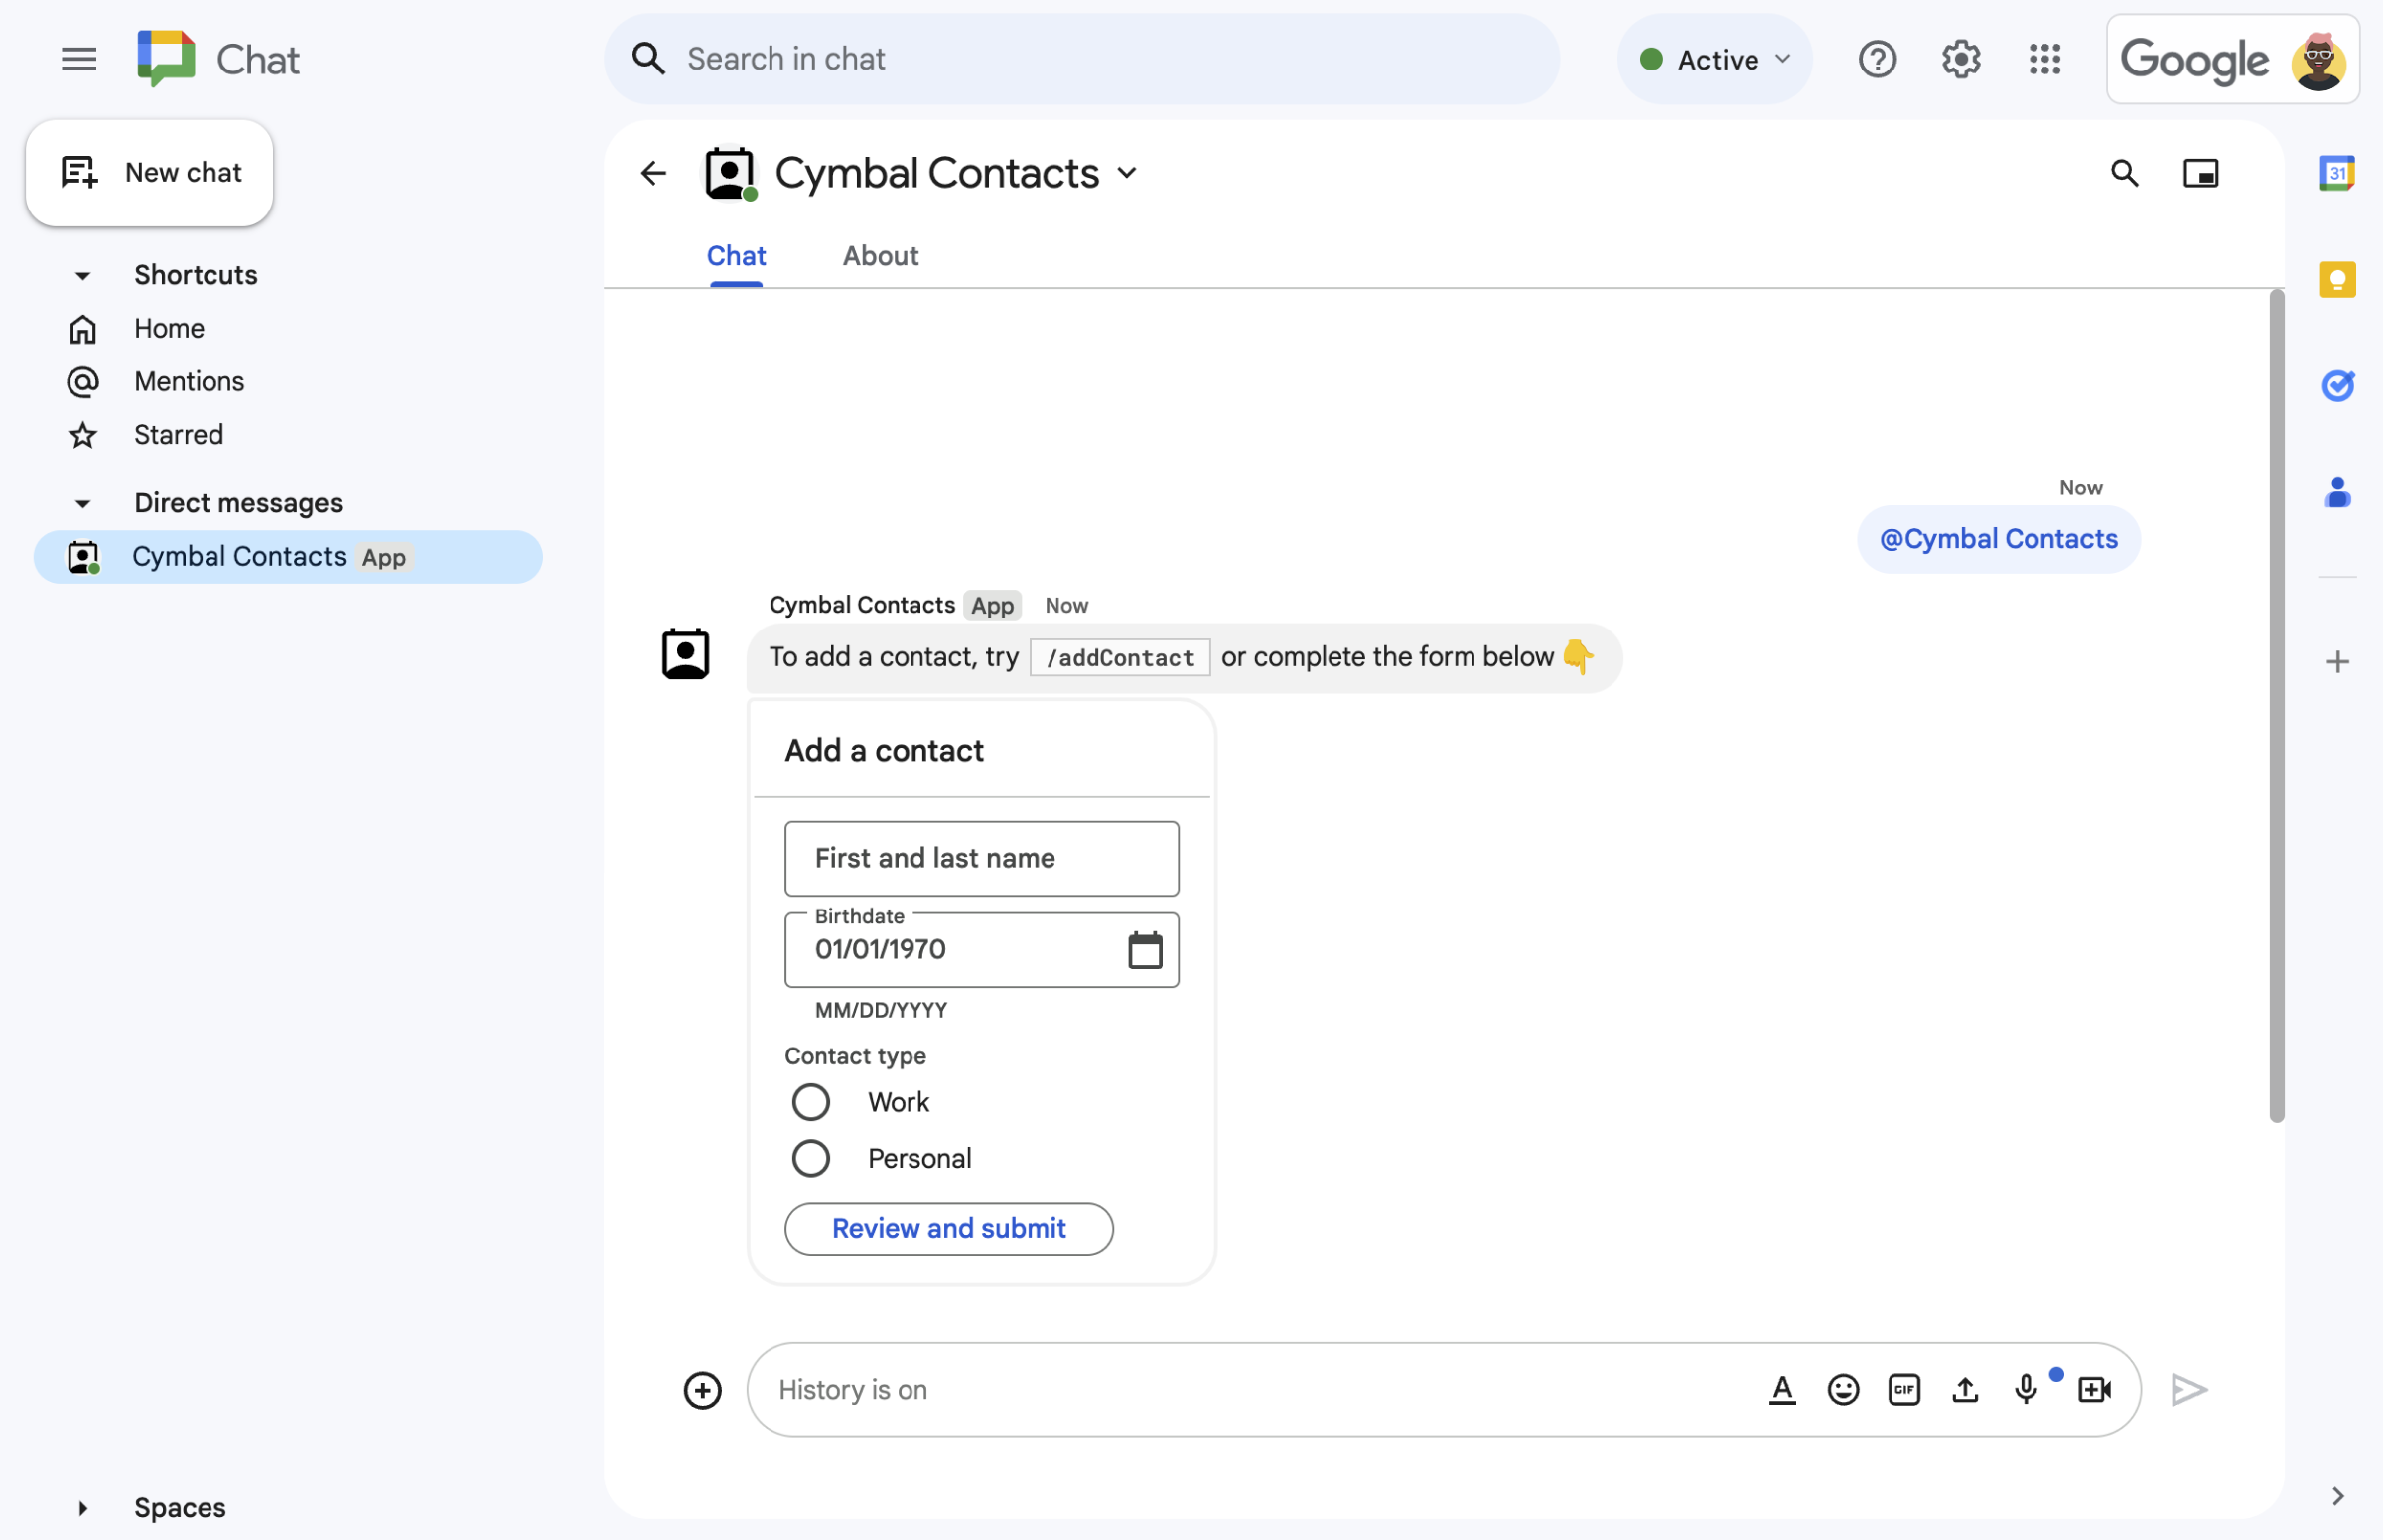
  • 名片訊息中的聯絡表單。
    圖 5. Chat 應用程式也會提示使用者從訊息中的資訊卡新增聯絡人。

必要條件

目標

架構

Chat 應用程式是以 Google Apps Script 內建 (做為擴充 Google Chat 的 Google Workspace 外掛程式),並會回應使用者互動 (onMessage、onAppCommand 和按鈕點擊,會叫用 openInitialDialog、openConfirmationDialog 和 submitForm),以便處理及回應 Chat 使用者。

以下說明使用者通常如何與 Chat 應用程式互動:

  1. 使用者開啟與 Chat 應用程式互傳的即時訊息,或將 Chat 應用程式新增至現有聊天室。

  2. Chat 應用程式會建構並顯示聯絡表單 (card 物件),提示使用者新增聯絡人。如要顯示聯絡表單,Chat 應用程式會透過下列方式回應使用者:

    • 回覆 @提及和即時訊息 (onMessage),並傳送內含聯絡表單的資訊卡訊息。
    • 回應斜線指令 /addContact (onAppCommand),開啟含有聯絡表單的對話方塊。
    • 回應斜線指令 /about (onAppCommand),並傳送含有「新增聯絡人」按鈕的訊息,使用者點選該按鈕即可叫用 openInitialDialog,並開啟含有聯絡表單的對話方塊。
  3. 看到聯絡表單後,使用者會在下列欄位和控制項中輸入聯絡資訊:

    • 姓名:接受字串的 textInput 小工具。
    • 生日:只能輸入日期的 dateTimePicker 小工具。
    • 聯絡人類型:一組圓形按鈕的 selectionInput 小工具,可供使用者選取並提交單一字串值 (Personal 或 Work)。
    • 「檢查並提交」按鈕:包含 button 小工具的陣列,使用者點按這個小工具即可提交輸入的值。buttonList
  4. Google Chat 應用程式會叫用 openConfirmationDialog 來處理使用者輸入的值,並在確認資訊卡中顯示這些值。

  5. 使用者查看確認資訊卡,然後按一下「提交」按鈕,叫用 submitForm 並完成聯絡資訊。

  6. Google Chat 應用程式會傳送私人簡訊,確認已提交要求。

準備環境

本節說明如何為 Chat 應用程式設定 Google Cloud 專案。

在 Google API 控制台中開啟雲端專案

如果尚未開啟,請開啟要用於這個範例的雲端專案:

  1. 在 Google API 控制台中,前往「選取專案」頁面。

    選取雲端專案

  2. 選取要使用的 Google Cloud 專案。或者,按一下「建立專案」,然後按照畫面上的指示操作。建立 Google Cloud 專案後,您可能需要為專案啟用計費功能。

設定驗證與授權

Google Chat 應用程式需要設定 OAuth 同意畫面,使用者才能在 Google Workspace 應用程式 (包括 Google Chat) 中授權應用程式。

在本教學課程中,您部署的 Chat 應用程式僅供測試和內部使用,因此同意畫面可以使用預留位置資訊。發布 Chat 應用程式前,請將所有預留位置資訊替換為實際資訊。

  1. 在 Google API 控制台中,依序前往「選單」 > 「Google Auth platform」(Google 驗證平台) > 「Branding」(品牌)。

    前往「品牌」

  2. 如果您已設定 Google 驗證平台,可以在「品牌」、「目標對象」和「資料存取權」中設定下列 OAuth 同意畫面設定。如果看到「尚未設定 Google 驗證平台」訊息,請按一下「開始使用」:

    1. 在「App Information」(應用程式資訊) 下方的「App name」(應用程式名稱) 中,輸入 Contact Manager。
    2. 在「User support email」(使用者支援電子郵件) 中,選取您的電子郵件地址或適當的 Google 群組。
    3. 點選 [下一步]。
    4. 在「目標對象」下方,選取「內部」。如果無法選取「內部」,請選取「外部」。
    5. 點選 [下一步]。
    6. 在「Contact Information」(聯絡資訊) 下方,輸入可接收專案異動通知的電子郵件地址。
    7. 點選 [下一步]。
    8. 在「完成」部分,請詳閱《Google API 服務使用者資料政策》,然後選取「我同意《Google API 服務:使用者資料政策》」。
    9. 按一下「繼續」。
    10. 點選「建立」。
    11. 如果為使用者類型選取「外部」,請新增測試使用者:
      1. 按一下「目標對象」。
      2. 在「測試使用者」下方,按一下「新增使用者」。
      3. 輸入您的電子郵件地址和任何其他授權測試使用者,然後按一下「儲存」。

建立及部署 Chat 擴充應用程式

在下一節中,您將建立及更新 Apps Script 專案,並加入 Chat 應用程式的應用程式程式碼 (Code.gs 和 appsscript.json)。

您也可以選擇在 GitHub 上查看整個專案。

前往 GitHub 查看

以下簡要說明各個檔案:

Code.gs

處理所有應用程式邏輯,包括使用者互動 (onMessage、onAppCommand、openInitialDialog、openConfirmationDialog 和 submitForm),以及訊息和對話方塊中顯示在資訊卡上的表單輸入小工具。

查看 Code.gs 程式碼

apps-script/chat/contact-form-app/Code.gs
/**
 * Copyright 2025 Google LLC
 *
 * Licensed under the Apache License, Version 2.0 (the "License");
 * you may not use this file except in compliance with the License.
 * You may obtain a copy of the License at
 *
 * http://www.apache.org/licenses/LICENSE-2.0
 *
 * Unless required by applicable law or agreed to in writing, software
 * distributed under the License is distributed on an "AS IS" BASIS,
 * WITHOUT WARRANTIES OR CONDITIONS OF ANY KIND, either express or implied.
 * See the License for the specific language governing permissions and
 * limitations under the License.
 */

/**
 * Responds to a message in Google Chat.
 *
 * @param {Object} event The event object from the Google Workspace add-on.
 * @return {Object} response that handles dialogs.
 */
function onMessage(event) {
  // Reply with a message that contains a button to open the initial dialog
  return { hostAppDataAction: { chatDataAction: { createMessageAction: { message: {
    text: "To add a contact, use the `ADD CONTACT` button below.",
    accessoryWidgets: [
      { buttonList: { buttons: [{
        text: "ADD CONTACT",
        onClick: { action: {
          function: "openInitialDialog",
          interaction: "OPEN_DIALOG"
        }}
      }]}}
    ]
  }}}}};
}

/**
 * Opens the initial step of the dialog that lets users add contact details.
 *
 * @param {Object} event The event object from the Google Workspace add-on.
 * @return {Object} open the dialog.
 */
function openInitialDialog(event) {
  return { action: { navigations: [{ pushCard: { sections: [{ widgets: [
    { textInput: {
      name: "contactName",
      label: "First and last name",
      type: "SINGLE_LINE"
    }},
    { dateTimePicker: {
      name: "contactBirthdate",
      label: "Birthdate",
      type: "DATE_ONLY"
    }},
    { selectionInput: {
      name: "contactType",
      label: "Contact type",
      type: "RADIO_BUTTON",
      items: [
        { text: "Work", value: "Work", selected: false },
        { text: "Personal", value: "Personal", selected: false }
      ]
    }},
    { buttonList: { buttons: [{
      text: "NEXT",
      onClick: { action: { function : "openConfirmationDialog" }}
    }]}}
  ]}]}}]}};
}

/**
 * Opens the second step of the dialog that lets users confirm details.
 *
 * @param {Object} event The event object from the Google Workspace add-on.
 * @return {Object} update the dialog.
 */
function openConfirmationDialog(event) {
  // Retrieve the form input values
  const name = event.commonEventObject.formInputs["contactName"].stringInputs.value[0];
  const birthdate = event.commonEventObject.formInputs["contactBirthdate"].dateInput.msSinceEpoch;
  const type = event.commonEventObject.formInputs["contactType"].stringInputs.value[0];
  // Display the input values for confirmation
  return { action: { navigations: [{ pushCard: { sections: [{ widgets: [
    { textParagraph: { text: "Confirm contact information and submit:" }},
    { textParagraph: { text: "<b>Name:</b> " + name }},
    { textParagraph: { text: "<b>Birthday:</b> " + new Date(birthdate) }},
    { textParagraph: { text: "<b>Type:</b> " + type }},
    { buttonList: { buttons: [{
      text: "SUBMIT",
      onClick: { action: {
        function: "submitDialog",
        // Pass input values as parameters for last dialog step (submission)
        parameters: [
          { key: "contactName", value: name },
          { key: "contactBirthdate", value: birthdate },
          { key: "contactType", value: type }
        ]
      }}
    }]}}
  ]}]}}]}};
}

/**
 * Handles submission and closes the dialog.
 *
 * @param {Object} event The event object from the Google Workspace add-on.
 * @return {Object} close the dialog with a status in text notification or message.
 */
function submitDialog(event) {
  // Validate the parameters.
  if (!event.commonEventObject.parameters["contactName"]) {
    return { action: {
      navigations: [{ endNavigation: { action: "CLOSE_DIALOG"}}],
      notification: { text: "Failure, the contact name was missing!" }
    }};
  }

  return { hostAppDataAction: { chatDataAction: { createMessageAction: { message: {
    text: "✅ " + event.commonEventObject.parameters["contactName"] + " has been added to your contacts."
  }}}}};
}
appsscript.json

Apps Script 資訊清單:定義及設定 Chat 應用程式的 Apps Script 專案。

查看 appsscript.json 程式碼

apps-script/chat/contact-form-app/appsscript.json
{
  "timeZone": "America/Los_Angeles",
  "dependencies": {},
  "exceptionLogging": "STACKDRIVER",
  "runtimeVersion": "V8",
  "addOns": {
    "common": {
      "name": "Contact Form app",
      "logoUrl": "https://developers.google.com/workspace/add-ons/images/contact-icon.png"
    },
    "chat": {}
  }
}

建立 Apps Script 專案

如要從 Code.gs 和 appsscript.json 檔案建立 Apps Script 專案,請按照下列步驟操作:

  1. 前往 Google Apps Script,然後點選「新專案」。
  2. 為 Apps Script 專案命名:

    1. 按一下「未命名的專案」。

    2. 在「Project title」(專案名稱) 中輸入 Contact Manager - Google Chat app。

    3. 按一下 [重新命名]。

  3. 將 Code.gs 的內容替換為上方的 Code.gs 程式碼範例。

  4. 按一下「專案設定」圖示 專案設定圖示,然後選取「在編輯器中顯示『appsscript.json』資訊清單檔案」。

  5. 返回「編輯器」,將 appsscript.json 的內容替換為上述 appsscript.json 資訊清單程式碼,然後儲存專案。

日後如要使用特定 Google API 或發布應用程式,請務必將雲端專案與 Apps Script 專案建立關聯。本指南不需要這麼做。詳情請參閱 Google Cloud 專案指南。

建立 Apps Script 部署作業

現在所有程式碼都已就位,請部署 Apps Script 專案。在 Google Cloud 中設定 Chat 應用程式時,您會使用部署 ID。

  1. 在 Apps Script 中,開啟 Chat 應用程式的專案。

    前往 Apps Script

  2. 依序點選「部署」 >「新增部署」。

  3. 如果尚未選取「外掛程式」,請按一下「選取類型」旁的部署類型 專案設定圖示,然後選取「外掛程式」。

  4. 在「Description」(說明) 中,輸入這個版本的說明,例如 Test of Contact Manager。

  5. 按一下「部署」。Apps Script 會回報部署作業成功,並提供部署作業 ID。

  6. 按一下「複製」複製部署 ID,然後按一下「完成」。

在 Google API 控制台中設定 Chat 應用程式

本節說明如何在 Google API 控制台中設定 Google Chat API,並提供 Chat 應用程式的相關資訊,包括您剛從 Apps Script 專案建立的部署 ID。

  1. 在 Google API 控制台中,依序點選「選單」「API 和服務」「已啟用的 API 和服務」「Google Chat API」「設定」。

    前往 Chat API 設定

  2. 在「應用程式名稱」中輸入 Contact Manager。

  3. 在「顯示圖片網址」中輸入 https://developers.google.com/chat/images/contact-icon.png。

  4. 在「說明」中輸入 Manage your personal and business contacts。

  5. 將「啟用互動功能」切換鈕設為開啟。

  6. 在「功能」下方,選取「加入聊天室和群組對話」。

  7. 在「連線設定」下方,選取「Apps Script」。

  8. 在「部署作業 ID」中,貼上您在上一個部分建立 Apps Script 部署作業時複製的 Apps Script 部署作業 ID。

  9. 在「觸發條件」下方,設定可回應使用者互動的函式:

    • 在「Message」觸發條件中輸入 onMessage。
    • 在「應用程式指令」觸發條件中輸入 onAppCommand。
  10. 在「指令」下方,設定斜線指令 /about 和 /addContact:

    1. 按一下「新增指令」,設定第一個斜線指令。
    2. 在「Command ID」(指令 ID) 中,輸入 1。
    3. 在「說明」中輸入 Learn how to use this Chat app to manage your contacts。
    4. 在「指令類型」下方,選取 Slash command。
    5. 在「斜線指令名稱」中輸入 /about。
    6. 按一下「完成」。
    7. 按一下「新增指令」,即可設定其他斜線指令。
    8. 在「Command ID」(指令 ID) 中,輸入 2。
    9. 在「說明」中輸入 Submit information about a contact。
    10. 在「指令類型」下方,選取 Slash command。
    11. 在「斜線指令名稱」中輸入 /addContact。
    12. 選取「開啟對話方塊」。
    13. 按一下「完成」。
  11. 在「可見度」下方,選取「將這個即時通訊應用程式提供給 YOUR DOMAIN 中的特定使用者和群組」核取方塊,然後輸入電子郵件地址。

  12. 在「記錄」下方,選取「將錯誤記錄至 Logging」。

  13. 按一下 [儲存]。畫面會顯示「已儲存設定」訊息。

您可以在 Chat 中安裝及測試這個 Chat 應用程式。

測試 Chat 應用程式

如要測試 Chat 應用程式,請開啟與 Chat 應用程式互傳的即時訊息聊天室,然後傳送訊息:

  1. 使用您在新增為早鳥測試者時提供的 Google Workspace 帳戶,開啟 Google Chat。

    前往 Google Chat

  2. 按一下 「發起新即時通訊」。
  3. 在「新增 1 位以上使用者」欄位中,輸入 Chat 應用程式的名稱。
  4. 從結果中選取 Chat 應用程式。系統會開啟即時訊息。

  1. 在與 Chat 應用程式互傳的新即時訊息中, 輸入 /addContact 並按下 Enter 鍵。

  2. 在隨即開啟的對話方塊中,輸入聯絡資訊:

    1. 在「姓名」文字欄位中輸入名稱。
    2. 在「生日」日期挑選器中選取日期。
    3. 在「聯絡人類型」下方,選取「工作」或「個人」圓形按鈕。
  3. 按一下「檢查並提交」。

  4. 在確認對話方塊中,查看您提交的資訊,然後按一下「提交」。Chat 應用程式會回覆 ✅ CONTACT NAME has been added to your contacts. 文字訊息。

  5. 您也可以選擇透過下列方式測試及提交聯絡表單:

    • 使用 /about 斜線指令。即時通訊應用程式會回覆文字訊息,並顯示「Add a contact」的配件小工具按鈕。按一下按鈕即可開啟含有聯絡表單的對話方塊。
    • 傳送即時訊息給 Chat 應用程式,不必使用斜線指令,例如 Hello。Chat 應用程式會回覆文字和含有聯絡表單的資訊卡。

清除所用資源

為避免系統向您的 Google Cloud 帳戶收取本教學課程所用資源的費用,建議您刪除雲端專案。

  1. 在 Google API 控制台中,前往「管理資源」頁面。依序點選「選單」圖示 >「IAM 與管理」>「管理資源」。

    前往 Resource Manager

  2. 在專案清單中選取要刪除的專案,然後點選「Delete」(刪除) 。
  3. 在對話方塊中輸入專案 ID,然後按一下「Shut down」(關閉) 即可刪除專案。

非外掛程式的 Chat 應用程式:管理 Google Chat 聯絡人

下列操作說明和程式碼範例適用於非 Google Workspace 外掛程式的 Chat 應用程式 (在 GitHub 上查看)。

Apps Script 檔案

main.gs

處理所有應用程式邏輯,包括使用者傳送訊息給 Chat 應用程式、點選 Chat 應用程式訊息中的按鈕,或開啟及關閉對話方塊時的互動事件。

apps-script/contact-form-app/main.gs
/**
 * Copyright 2024 Google Inc.
 *
 * Licensed under the Apache License, Version 2.0 (the "License");
 * you may not use this file except in compliance with the License.
 * You may obtain a copy of the License at
 *
 * http://www.apache.org/licenses/LICENSE-2.0
 *
 * Unless required by applicable law or agreed to in writing, software
 * distributed under the License is distributed on an "AS IS" BASIS,
 * WITHOUT WARRANTIES OR CONDITIONS OF ANY KIND, either express or implied.
 * See the License for the specific language governing permissions and
 * limitations under the License.
 */

/**
 * Responds to a MESSAGE interaction event in Google Chat.
 *
 * @param {Object} event the MESSAGE interaction event from Chat API.
 * @return {Object} message response that opens a dialog or sends private
 *                          message with text and card.
 */
function onMessage(event) {
  if (event.message.slashCommand) {
    switch (event.message.slashCommand.commandId) {
      case 1:
        // If the slash command is "/about", responds with a text message and button
        // that opens a dialog.
        return {
          text: "Manage your personal and business contacts 📇. To add a " +
                  "contact, use the slash command `/addContact`.",
          accessoryWidgets: [{
            buttonList: { buttons: [{
              text: "Add Contact",
              onClick: { action: {
                function: "openInitialDialog",
                interaction: "OPEN_DIALOG"
              }}
            }]}
          }]
        }
      case 2:
        // If the slash command is "/addContact", opens a dialog.
        return openInitialDialog();
    }
  }

  // If user sends the Chat app a message without a slash command, the app responds
  // privately with a text and card to add a contact.
  return {
    privateMessageViewer: event.user,
    text: "To add a contact, try `/addContact` or complete the form below:",
    cardsV2: [{
      cardId: "addContactForm",
      card: {
        header: { title: "Add a contact" },
        sections:[{ widgets: CONTACT_FORM_WIDGETS.concat([{
          buttonList: { buttons: [{
            text: "Review and submit",
            onClick: { action: { function : "openConfirmation" }}
          }]}
        }])}]
      }
    }]
  };
}

/**
 * Responds to CARD_CLICKED interaction events in Google Chat.
 *
 * @param {Object} event the CARD_CLICKED interaction event from Google Chat.
 * @return {Object} message responses specific to the dialog handling.
 */
function onCardClick(event) {
  // Initial dialog form page
  if (event.common.invokedFunction === "openInitialDialog") {
    return openInitialDialog();
  // Confirmation dialog form page
  } else if (event.common.invokedFunction === "openConfirmation") {
    return openConfirmation(event);
  // Submission dialog form page
  } else if (event.common.invokedFunction === "submitForm") {
    return submitForm(event);
  }
}

/**
 * Opens the initial step of the dialog that lets users add contact details.
 *
 * @return {Object} a message with an action response to open a dialog.
 */
function openInitialDialog() {
  return { actionResponse: {
    type: "DIALOG",
    dialogAction: { dialog: { body: { sections: [{
      header: "Add new contact",
      widgets: CONTACT_FORM_WIDGETS.concat([{
        buttonList: { buttons: [{
          text: "Review and submit",
          onClick: { action: { function: "openConfirmation" }}
        }]}
      }])
    }]}}}
  }};
}

/**
 * Returns the second step as a dialog or card message that lets users confirm details.
 *
 * @param {Object} event the interactive event with form inputs.
 * @return {Object} returns a dialog or private card message.
 */
function openConfirmation(event) {
  const name = fetchFormValue(event, "contactName") ?? "";
  const birthdate = fetchFormValue(event, "contactBirthdate") ?? "";
  const type = fetchFormValue(event, "contactType") ?? "";
  const cardConfirmation = {
    header: "Your contact",
    widgets: [{
      textParagraph: { text: "Confirm contact information and submit:" }}, {
      textParagraph: { text: "<b>Name:</b> " + name }}, {
      textParagraph: {
        text: "<b>Birthday:</b> " + convertMillisToDateString(birthdate)
      }}, {
      textParagraph: { text: "<b>Type:</b> " + type }}, {
      buttonList: { buttons: [{
        text: "Submit",
        onClick: { action: {
          function: "submitForm",
          parameters: [{
            key: "contactName", value: name }, {
            key: "contactBirthdate", value: birthdate }, {
            key: "contactType", value: type
          }]
        }}
      }]}
    }]
  };

  // Returns a dialog with contact information that the user input.
  if (event.isDialogEvent) {
    return { action_response: {
      type: "DIALOG",
      dialogAction: { dialog: { body: { sections: [ cardConfirmation ]}}}
    }};
  }

  // Updates existing card message with contact information that the user input.
  return {
    actionResponse: { type: "UPDATE_MESSAGE" },
    privateMessageViewer: event.user,
    cardsV2: [{
      card: { sections: [cardConfirmation]}
    }]
  }
}

/**
  * Validates and submits information from a dialog or card message
  * and notifies status.
  *
  * @param {Object} event the interactive event with parameters.
  * @return {Object} a message response that opens a dialog or posts a private
  *                  message.
  */
function submitForm(event) {
  const contactName = event.common.parameters["contactName"];
  // Checks to make sure the user entered a contact name.
  // If no name value detected, returns an error message.
  const errorMessage = "Don't forget to name your new contact!";
  if (!contactName && event.dialogEventType === "SUBMIT_DIALOG") {
    return { actionResponse: {
      type: "DIALOG",
      dialogAction: { actionStatus: {
        statusCode: "INVALID_ARGUMENT",
        userFacingMessage: errorMessage
      }}
    }};
  }
  if (!contactName) {
    return {
      privateMessageViewer: event.user,
      text: errorMessage
    };
  }

  // The Chat app indicates that it received form data from the dialog or card.
  // Sends private text message that confirms submission.
  const confirmationMessage = "✅ " + contactName + " has been added to your contacts.";
  if (event.dialogEventType === "SUBMIT_DIALOG") {
    return {
      actionResponse: {
        type: "DIALOG",
        dialogAction: { actionStatus: {
          statusCode: "OK",
          userFacingMessage: "Success " + contactName
        }}
      }
    };
  }
  return {
    actionResponse: { type: "NEW_MESSAGE" },
    privateMessageViewer: event.user,
    text: confirmationMessage
  };
}

/**
 * Extracts form input value for a given widget.
 *
 * @param {Object} event the CARD_CLICKED interaction event from Google Chat.
 * @param {String} widgetName a unique ID for the widget, specified in the widget's name field.
 * @returns the value inputted by the user, null if no value can be found.
 */
function fetchFormValue(event, widgetName) {
  const formItem = event.common.formInputs[widgetName][""];
  // For widgets that receive StringInputs data, the value input by the user.
  if (formItem.hasOwnProperty("stringInputs")) {
    const stringInput = event.common.formInputs[widgetName][""].stringInputs.value[0];
    if (stringInput != null) {
      return stringInput;
    }
  // For widgets that receive dateInput data, the value input by the user.
  } else if (formItem.hasOwnProperty("dateInput")) {
    const dateInput = event.common.formInputs[widgetName][""].dateInput.msSinceEpoch;
     if (dateInput != null) {
       return dateInput;
     }
  }

  return null;
}

/**
 * Converts date in milliseconds since epoch to user-friendly string.
 *
 * @param {Object} millis the milliseconds since epoch time.
 * @return {string} Display-friend date (English US).
 */
function convertMillisToDateString(millis) {
  const date = new Date(millis);
  const options = { year: 'numeric', month: 'long', day: 'numeric' };
  return date.toLocaleDateString('en-US', options);
}
contactForm.gs

包含接收使用者表單資料的小工具。這些表單輸入小工具會顯示在訊息和對話方塊中的資訊卡。

apps-script/contact-form-app/contactForm.gs
/**
 * Copyright 2024 Google Inc.
 *
 * Licensed under the Apache License, Version 2.0 (the "License");
 * you may not use this file except in compliance with the License.
 * You may obtain a copy of the License at
 *
 * http://www.apache.org/licenses/LICENSE-2.0
 *
 * Unless required by applicable law or agreed to in writing, software
 * distributed under the License is distributed on an "AS IS" BASIS,
 * WITHOUT WARRANTIES OR CONDITIONS OF ANY KIND, either express or implied.
 * See the License for the specific language governing permissions and
 * limitations under the License.
 */

/**
 * The section of the contact card that contains the form input widgets. Used in a dialog and card message.
 * To add and preview widgets, use the Card Builder: https://addons.gsuite.google.com/uikit/builder
 */
const CONTACT_FORM_WIDGETS = [
  {
    "textInput": {
      "name": "contactName",
      "label": "First and last name",
      "type": "SINGLE_LINE"
    }
  },
  {
    "dateTimePicker": {
      "name": "contactBirthdate",
      "label": "Birthdate",
      "type": "DATE_ONLY"
    }
  },
  {
    "selectionInput": {
      "name": "contactType",
      "label": "Contact type",
      "type": "RADIO_BUTTON",
      "items": [
        {
          "text": "Work",
          "value": "Work",
          "selected": false
        },
        {
          "text": "Personal",
          "value": "Personal",
          "selected": false
        }
      ]
    }
  }
];
appsscript.json

定義及設定 Chat 擴充應用程式 (非外掛程式) 的 Apps Script 專案。

apps-script/contact-form-app/appsscript.json
{
  "timeZone": "America/Los_Angeles",
  "dependencies": {},
  "exceptionLogging": "STACKDRIVER",
  "runtimeVersion": "V8",
  "chat": {}
}

建立及設定 Apps Script 專案

  1. 開啟非外掛程式的 Chat 應用程式專用「在 Google Chat 中管理聯絡人」 Apps Script 專案,然後複製該專案。
  2. 在 Google API 控制台中設定 Chat API 時: 取消勾選「將這個 Chat 擴充應用程式建構為 Google Workspace 外掛程式」。系統會開啟對話方塊,要求您確認。在對話方塊中,按一下「停用」。