總覽
以下概略說明密碼金鑰註冊程序的主要步驟:
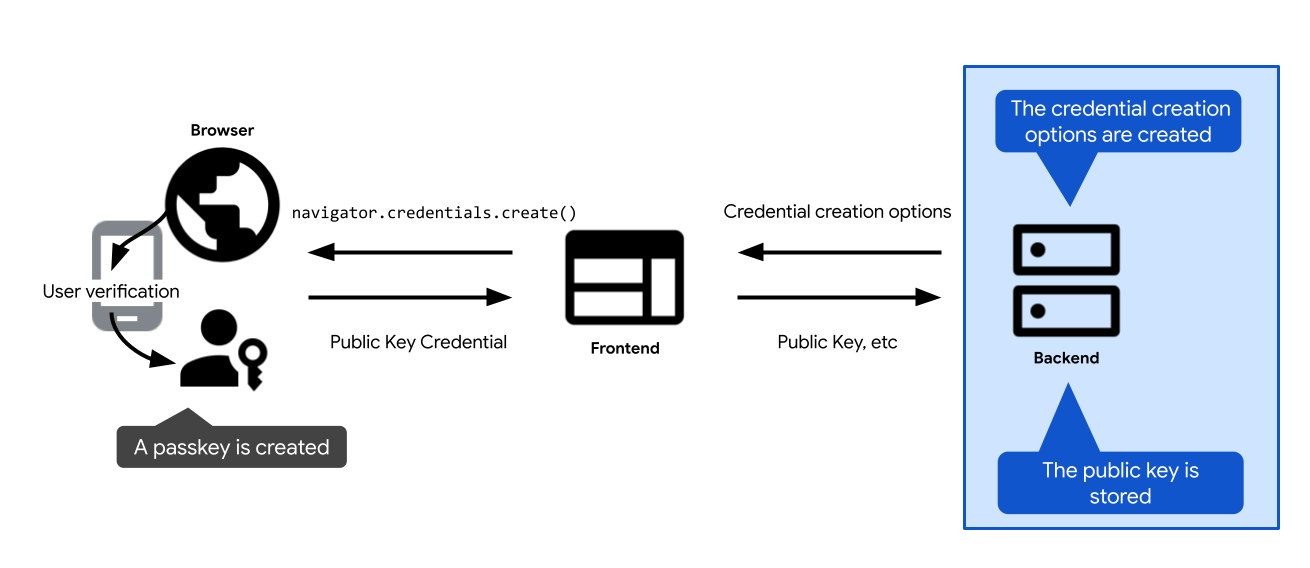
- 定義建立密碼金鑰的選項。將這些參數傳送給用戶端,以便傳遞至密碼金鑰建立呼叫:網頁上的 WebAuthn API 呼叫
navigator.credentials.create,以及 Android 上的credentialManager.createCredential。使用者確認建立密碼金鑰後,密碼金鑰建立呼叫會解析並傳回憑證PublicKeyCredential。 - 驗證憑證並儲存在伺服器上。
以下各節將深入探討每個步驟的具體細節。
建立憑證建立選項
您需要在伺服器上執行的第一個步驟是建立 PublicKeyCredentialCreationOptions 物件。
如要這麼做,請使用 FIDO 伺服器端程式庫。通常會提供公用程式函式,可為您建立這些選項。舉例來說,SimpleWebAuthn 提供 generateRegistrationOptions。
PublicKeyCredentialCreationOptions 應包含建立密碼金鑰所需的一切資訊:使用者資訊、RP 資訊,以及您要建立的憑證屬性設定。定義所有這些項目後,請視需要將這些項目傳遞至 FIDO 伺服器端程式庫中的函式,該函式負責建立 PublicKeyCredentialCreationOptions 物件。
部分 PublicKeyCredentialCreationOptions' 欄位可以是常數。其他項目應在伺服器上動態定義:
rpId:如要在伺服器上填入 RP ID,請使用可提供網頁應用程式主機名稱的伺服器端函式或變數,例如example.com。user.name和user.displayName:如要填入這些欄位,請使用已登入使用者的工作階段資訊 (或新使用者帳戶資訊,如果使用者在註冊時建立密碼金鑰)。user.name通常是電子郵件地址,且 RP 專屬。user.displayName是易記名稱。請注意,並非所有平台都會使用displayName。user.id:帳戶建立時產生的隨機專屬字串。這項資訊應為永久性質,不像使用者名稱可以編輯。使用者 ID 可識別帳戶,但不得包含任何個人識別資訊 (PII)。您的系統可能已有使用者 ID,但如有需要,請專為密碼金鑰建立 ID,確保其中不含任何 PII。excludeCredentials:現有憑證 ID 清單,可避免密碼金鑰供應商重複建立密碼金鑰。如要填入這個欄位,請在資料庫中查詢這位使用者的現有憑證。詳情請參閱「如果已有密碼金鑰,請禁止建立新的密碼金鑰」。challenge:如要註冊憑證,除非使用認證 (一種更進階的技術,可驗證密碼金鑰供應商的身分和發出的資料),否則驗證問題並不重要。不過,即使您不使用認證,挑戰仍為必填欄位。如需建立安全驗證問題的說明,請參閱「伺服器端密碼金鑰驗證」。
編碼和解碼
 伺服器傳送的
 PublicKeyCredentialCreationOptions。challenge、user.id 和 excludeCredentials.credentials 必須在伺服器端編碼為 base64URL,才能透過 HTTPS 傳送 PublicKeyCredentialCreationOptions。PublicKeyCredentialCreationOptions 包含 ArrayBuffer 欄位,因此 JSON.stringify() 不支援這些欄位。也就是說,目前如要透過 HTTPS 傳送 PublicKeyCredentialCreationOptions,必須在伺服器上使用 base64URL 手動編碼部分欄位,然後在用戶端解碼。
- 在伺服器上,編碼和解碼作業通常由 FIDO 伺服器端程式庫負責。
- 在用戶端,目前需要手動編碼和解碼。未來會更加輕鬆:我們將提供方法,將 JSON 格式的選項轉換為
PublicKeyCredentialCreationOptions。在 Chrome 中查看實作狀態。
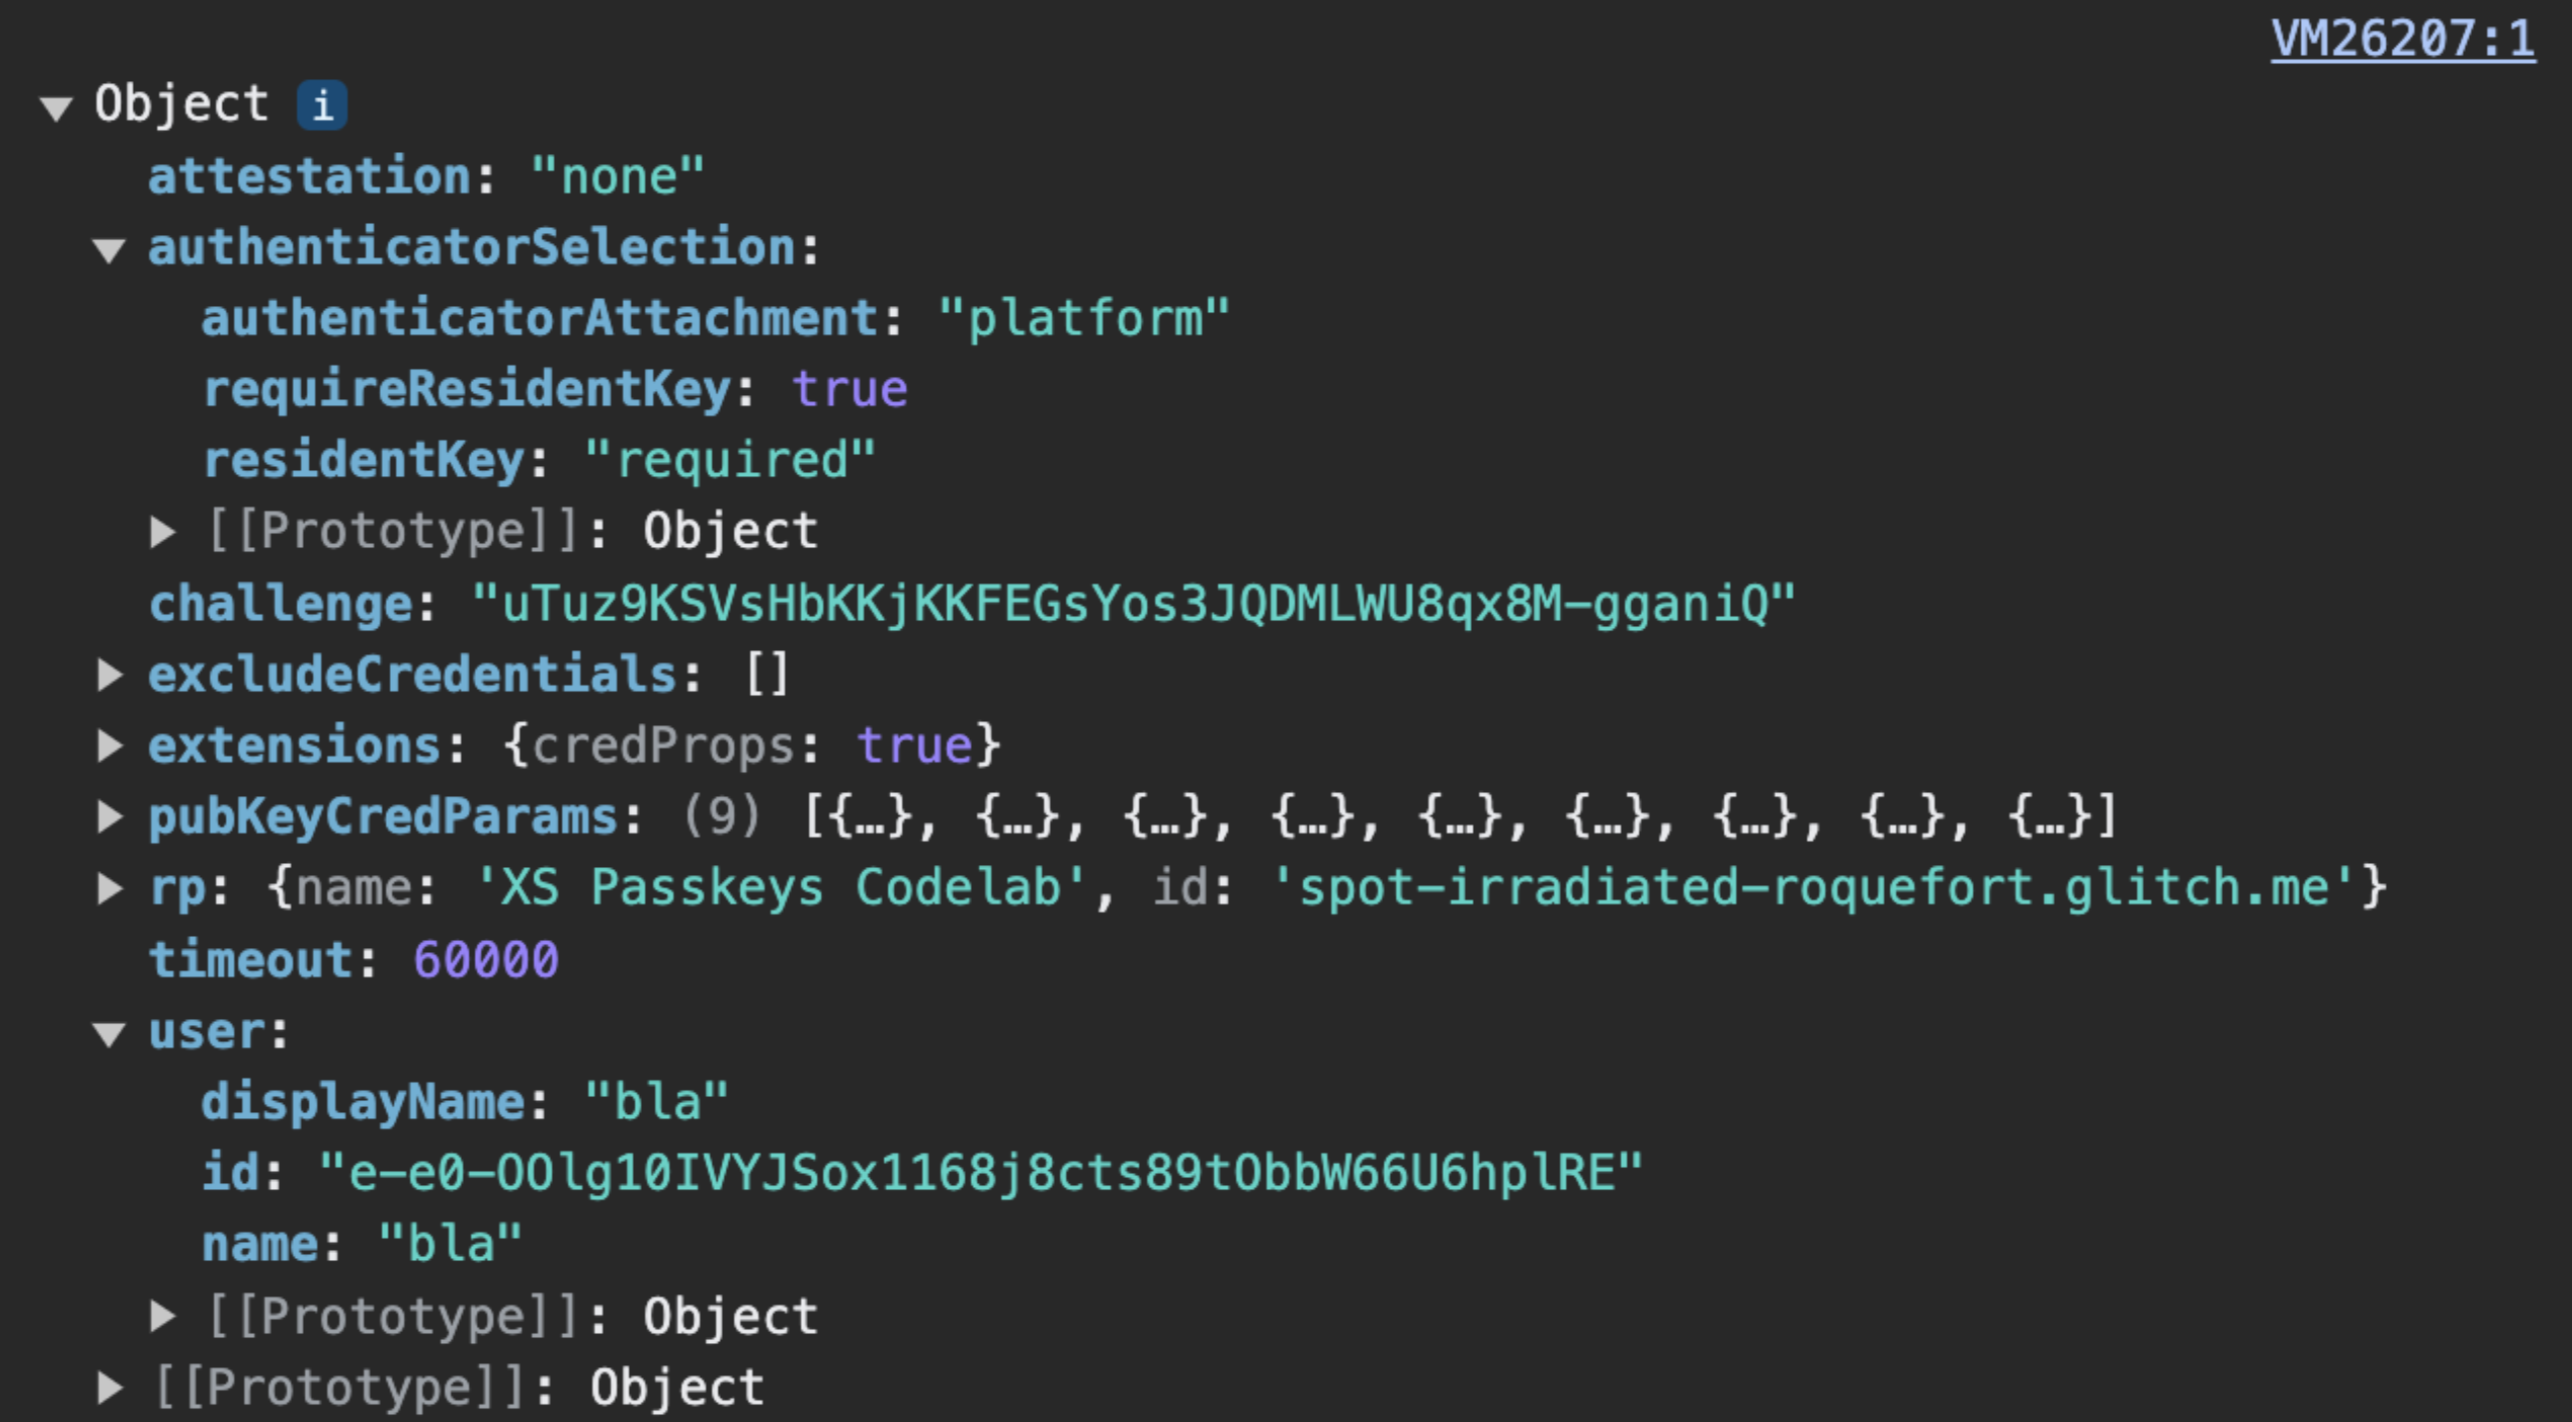
程式碼範例:建立憑證建立選項
我們在範例中使用 SimpleWebAuthn 程式庫。在這裡,我們會將公開金鑰憑證選項的建立作業交給 generateRegistrationOptions 函式。
import {
  generateRegistrationOptions,
  verifyRegistrationResponse,
  generateAuthenticationOptions,
  verifyAuthenticationResponse
} from '@simplewebauthn/server';
import { isoBase64URL } from '@simplewebauthn/server/helpers';

router.post('/registerRequest', csrfCheck, sessionCheck, async (req, res) => {
  const { user } = res.locals;
  // Ensure you nest verification function calls in try/catch blocks.
  // If something fails, throw an error with a descriptive error message.
  // Return that message with an appropriate error code to the client.
  try {
    // `excludeCredentials` prevents users from re-registering existing
    // credentials for a given passkey provider
    const excludeCredentials = [];
    const credentials = Credentials.findByUserId(user.id);
    if (credentials.length > 0) {
      for (const cred of credentials) {
        excludeCredentials.push({
          id: isoBase64URL.toBuffer(cred.id),
          type: 'public-key',
          transports: cred.transports,
        });
      }
    }

    // Generate registration options for WebAuthn create
    const options = await generateRegistrationOptions({
      rpName: process.env.RP_NAME,
      rpID: process.env.HOSTNAME,
      userID: user.id,
      userName: user.username,
      userDisplayName: user.displayName || '',
      attestationType: 'none',
      excludeCredentials,
      authenticatorSelection: {
        authenticatorAttachment: 'platform',
        requireResidentKey: true
      },
    });

    // Keep the challenge in the session
    req.session.challenge = options.challenge;

    return res.json(options);
  } catch (e) {
    console.error(e);
    return res.status(400).send({ error: e.message });
  }
});
儲存公開金鑰
navigator.credentials.create 會傳回 PublicKeyCredential 物件。如果 navigator.credentials.create 在用戶端上順利解析,表示已成功建立密碼金鑰。系統會傳回 PublicKeyCredential 物件。
PublicKeyCredential 物件包含 AuthenticatorAttestationResponse 物件,代表密碼金鑰供應商對用戶端建立密碼金鑰指令的回應。其中包含您 (RP) 稍後驗證使用者時所需的新憑證資訊。如要進一步瞭解「AuthenticatorAttestationResponse」,請參閱附錄:AuthenticatorAttestationResponse。
將 PublicKeyCredential 物件傳送至伺服器。收到後請驗證。
將這個驗證步驟交給 FIDO 伺服器端程式庫。通常會提供用於此用途的公用程式函式。舉例來說,SimpleWebAuthn 提供 verifyRegistrationResponse。請參閱附錄:驗證註冊回覆,瞭解幕後運作情形。
驗證成功後,請在資料庫中儲存憑證資訊,以便使用者日後透過與該憑證相關聯的密碼金鑰進行驗證。
請使用專用資料表,儲存與密碼金鑰相關聯的公開金鑰憑證。使用者只能有一個密碼,但可以有多個密碼金鑰,例如透過 Apple iCloud 鑰匙圈同步處理的密碼金鑰,以及透過 Google 密碼管理工具同步處理的密碼金鑰。
以下是可用於儲存憑證資訊的結構定義範例:
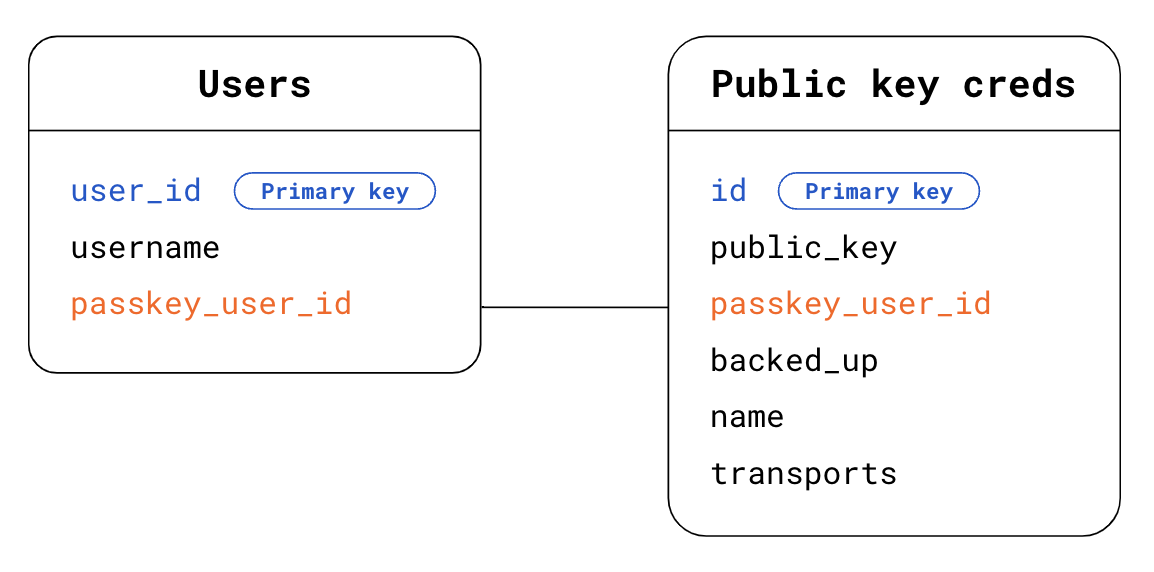
- 「Users」(使用者) 表格:
user_id:主要使用者 ID。使用者的隨機專屬永久 ID。將此做為「Users」資料表的主鍵。username:使用者定義的使用者名稱,可能可以編輯。passkey_user_id:不含個人識別資訊的密碼金鑰專屬使用者 ID,以user.id表示,位於註冊選項中。使用者稍後嘗試驗證時,驗證器會在userHandle的驗證回應中提供此passkey_user_id。建議您不要將passkey_user_id設為主要金鑰。主鍵廣泛用於系統中,因此往往會成為事實上的 PII。
- 「公開金鑰憑證」表格:
id:憑證 ID。將這個值做為「公開金鑰憑證」資料表的主鍵。public_key:憑證的公開金鑰。passkey_user_id:將此做為外鍵,與「Users」資料表建立連結。backed_up:如果密碼金鑰供應商會同步處理密碼金鑰,系統就會備份密碼金鑰。如果您日後想為擁有backed_up密碼金鑰的使用者停用密碼,儲存備份狀態就很有用。您可以檢查authenticatorData中的 BE 標記,或使用 FIDO 伺服器端程式庫功能 (通常可讓您輕鬆存取這項資訊),確認密碼金鑰是否已備份。儲存備份資格有助於解決潛在的使用者查詢。name:(選用) 憑證的顯示名稱,可讓使用者為憑證自訂名稱。transports:傳輸陣列。儲存傳輸方式有助於提升驗證使用者體驗。如果傳輸方式可用,瀏覽器就能相應運作,並顯示與密碼金鑰供應商用於與用戶端通訊的傳輸方式相符的 UI,特別是allowCredentials不為空白的重新驗證用途。
為提升使用者體驗,您也可以儲存其他資訊,包括密碼金鑰提供者、憑證建立時間和上次使用時間等項目。詳情請參閱「密碼金鑰使用者介面設計」。
範例程式碼:儲存憑證
我們在範例中使用 SimpleWebAuthn 程式庫。在這裡,我們將註冊回應驗證作業交給 verifyRegistrationResponse 函式。
import { isoBase64URL } from '@simplewebauthn/server/helpers';


router.post('/registerResponse', csrfCheck, sessionCheck, async (req, res) => {
  const expectedChallenge = req.session.challenge;
  const expectedOrigin = getOrigin(req.get('User-Agent'));
  const expectedRPID = process.env.HOSTNAME;
  const response = req.body;
  // This sample code is for registering a passkey for an existing,
  // signed-in user

  // Ensure you nest verification function calls in try/catch blocks.
  // If something fails, throw an error with a descriptive error message.
  // Return that message with an appropriate error code to the client.
  try {
    // Verify the credential
    const { verified, registrationInfo } = await verifyRegistrationResponse({
      response,
      expectedChallenge,
      expectedOrigin,
      expectedRPID,
      requireUserVerification: false,
    });

    if (!verified) {
      throw new Error('Verification failed.');
    }

    const {
      aaguid,
      credentialPublicKey,
      credentialID,
      credentialBackedUp
    } = registrationInfo;

    // Name the credential based on AAGUID
    const name =
      aaguid === undefined ||
      aaguid === '000000-0000-0000-0000-00000000' ?
        req.useragent?.platform : aaguids[aaguid].name;

    const base64CredentialID = isoBase64URL.fromBuffer(credentialID);
    const base64PublicKey = isoBase64URL.fromBuffer(credentialPublicKey);

    // Existing, signed-in user
    const { user } = res.locals;

    // Save the credential
    await Credentials.update({
      id: base64CredentialID,
      passkey_user_id: user.passkey_user_id,
      publicKey: base64PublicKey,
      name,
      aaguid,
      transports: response.response.transports,
      backed_up: credentialBackedUp,
      registered_at: new Date().getTime()
    });

    // Kill the challenge for this session
    delete req.session.challenge;

    return res.json(user);
  } catch (e) {
    delete req.session.challenge;

    console.error(e);
    return res.status(400).send({ error: e.message });
  }
});
附錄:AuthenticatorAttestationResponse
AuthenticatorAttestationResponse 包含兩個重要物件:
response.clientDataJSON是用戶端資料的 JSON 版本,在網路上是指瀏覽器看到的資料。其中包含 RP 來源、驗證問題和androidPackageName(如果用戶端是 Android 應用程式)。身為 RP,讀取clientDataJSON可讓您存取瀏覽器在create要求時看到的資訊。response.attestationObject包含兩項資訊:attestationStatement,除非您使用認證,否則這項資訊並不重要。authenticatorData是密碼金鑰提供者看到的資料。身為 RP,讀取authenticatorData可讓您存取密碼金鑰供應商在create要求時看到並傳回的資料。
authenticatorData包含與新建立密碼金鑰相關聯的公開金鑰憑證重要資訊:
- 公開金鑰憑證本身,以及該憑證的專屬憑證 ID。
- 與憑證相關聯的 RP ID。
- 說明建立密碼金鑰時使用者狀態的旗標:使用者是否實際在場,以及是否已成功驗證使用者身分 (請參閱 userVerification 深入說明)。
- AAGUID 是密碼金鑰提供者 (例如 Google 密碼管理工具) 的 ID。根據 AAGUID,您可以識別密碼金鑰供應商,並在密碼金鑰管理頁面中顯示名稱。(請參閱「使用 AAGUID 判斷密碼金鑰供應商」一文)
即使 authenticatorData 巢狀結構位於 attestationObject 內,無論您是否使用認證,實作密碼金鑰時都需要 authenticatorData 內含的資訊。authenticatorData 經過編碼,內含以二進位格式編碼的欄位。伺服器端程式庫通常會處理剖析和解碼作業。如果您未使用伺服器端程式庫,建議您運用getAuthenticatorData()用戶端,在伺服器端節省一些剖析和解碼工作。
附錄:驗證註冊回覆
在幕後,驗證註冊回應包含下列檢查:
- 確認 RP ID 與網站相符。
- 確認要求來源是網站的預期來源 (主要網站網址、Android 應用程式)。
- 如需驗證使用者,請確認使用者驗證標記
authenticatorData.uv為true。 - 使用者存在性旗標
authenticatorData.up通常應為true,但如果憑證是有條件建立,則應為false。 - 確認用戶端是否能提供您給予的驗證問題。如果您未使用認證,這項檢查並不重要。不過,實作這項檢查是最佳做法,可確保程式碼已準備就緒,方便您日後使用認證。
- 確認憑證 ID 尚未註冊給任何使用者。
- 確認密碼金鑰供應商用來建立憑證的演算法,是您列出的演算法 (位於
publicKeyCredentialCreationOptions.pubKeyCredParams的每個alg欄位中,通常是在伺服器端程式庫中定義,您無法查看)。確保使用者只能註冊您選擇允許的演算法。
如要瞭解詳情,請查看 SimpleWebAuthn 的原始碼 (適用於 verifyRegistrationResponse),或參閱規格中的完整驗證清單。