Обзор
Упрощенная функция входа через Google с использованием OAuth добавляет функцию входа через Google поверх существующей функции OAuth . Это обеспечивает удобную связь для пользователей Google, а также позволяет создавать учетные записи, что дает пользователю возможность создать новую учетную запись в вашем сервисе, используя свою учетную запись Google.
Для привязки учетной записи к OAuth и входа через Google выполните следующие общие шаги:
- Сначала попросите пользователя дать согласие на доступ к его профилю Google.
- Используйте информацию из их профиля, чтобы проверить, существует ли учетная запись пользователя.
- Для существующих пользователей необходимо связать учетные записи.
- Если вы не можете найти пользователя Google в своей системе аутентификации, проверьте токен идентификации, полученный от Google. Затем вы можете создать пользователя на основе информации профиля, содержащейся в токене идентификации.

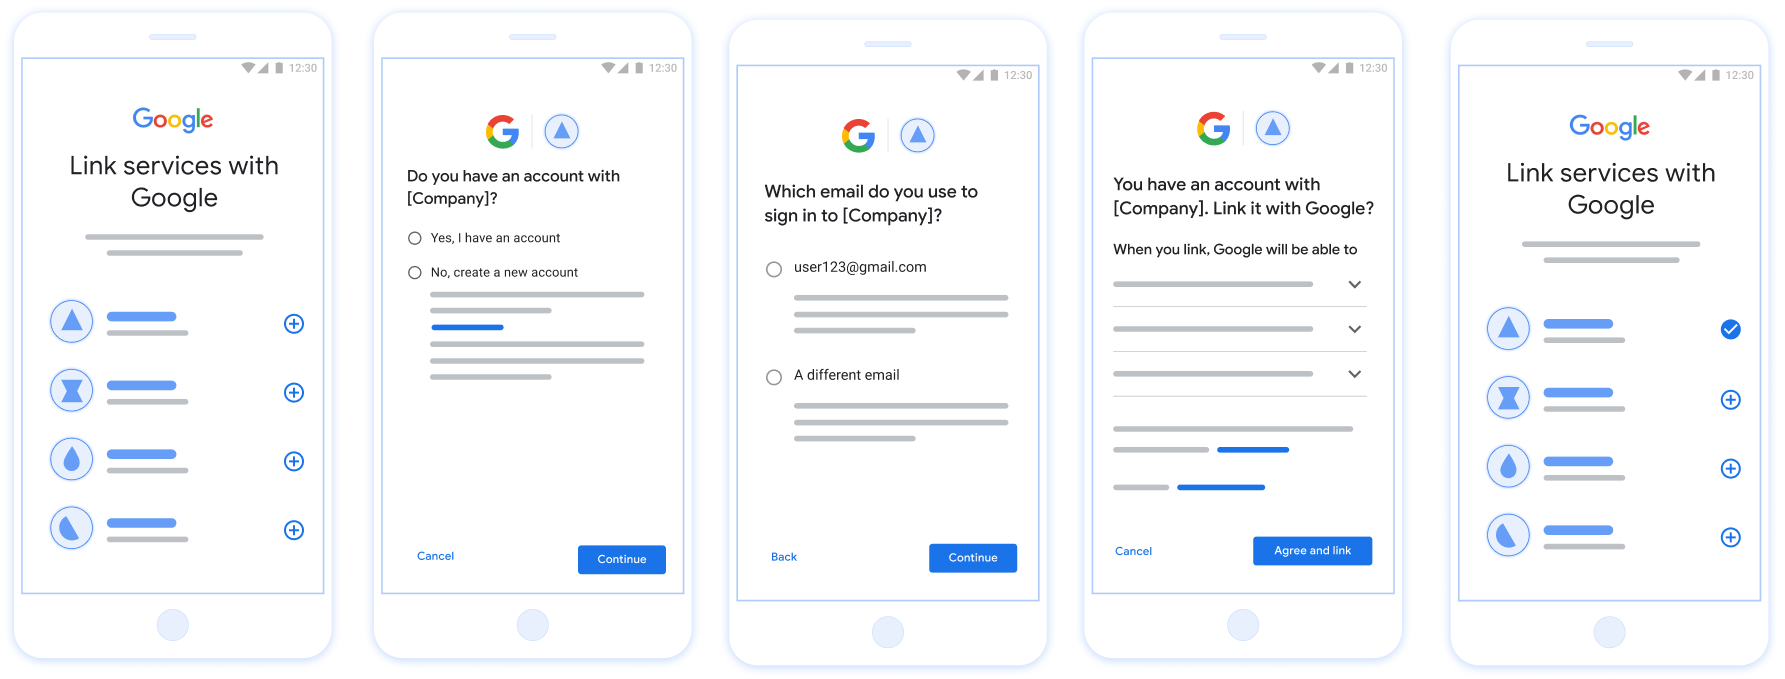
Рисунок 1. Привязка учетной записи на телефоне пользователя с помощью упрощенной привязки.
Упрощенная интеграция: OAuth + вход через Google Flow
На следующей диаграмме подробно описаны взаимодействия между пользователем, Google и вашей конечной точкой обмена токенами для упрощенной системы ссылок.
Роли и обязанности
В приведенной ниже таблице определены роли и обязанности участников процесса упрощенного связывания.
| Актер / Компонент | Роль GAL | Обязанности |
|---|---|---|
| Приложение/сервер Google | Клиент OAuth | Получает согласие пользователя на вход через Google, передает подтверждения личности (JWT) на ваш сервер и надежно хранит полученные токены. |
| Ваша конечная точка обмена токенов | Поставщик идентификационных данных / Сервер авторизации | Проверяет подлинность учетных записей, проверяет наличие существующих учетных записей, обрабатывает намерения привязки учетных записей ( check , get , create ) и выдает токены на основе запрошенных намерений. |
| Ваш API сервиса | Сервер ресурсов | Предоставляет доступ к пользовательским данным при предъявлении действительного токена доступа. |
Требования к упрощенной системе ссылок
- Реализуйте базовый процесс веб-аутентификации OAuth . Ваш сервис должен поддерживать авторизацию и обмен токенами , соответствующие стандарту OAuth 2.0.
- Ваша конечная точка обмена токенами должна поддерживать утверждения JSON Web Token (JWT) и реализовывать намерения
check,createиget.
Реализуйте свой OAuth-сервер.
Ваша конечная точка обмена токенов должна поддерживать интенты check , create и get . Выполните следующие шаги, чтобы завершить процесс привязки учетной записи и узнать, когда используются различные интенты:
- Есть ли у пользователя учетная запись в вашей системе аутентификации? (Пользователь принимает решение, выбирая «ДА» или «НЕТ»)
- ДА: Использует ли пользователь адрес электронной почты, связанный с его учетной записью Google, для входа на вашу платформу? (Пользователь принимает решение, выбирая ДА или НЕТ)
- ДА: Есть ли у пользователя соответствующая учетная запись в вашей системе аутентификации? (для подтверждения вызывается
check intent)- ДА: если запрос
get intentintent успешно завершается, то вызывается метод getIntent, и учетная запись связывается. - НЕТ: Создать новую учетную запись? (Пользователь принимает решение, выбирая ДА или НЕТ)
- ДА: если функция создания
create intentуспешно завершается, вызывается метод createint, и учетная запись связывается. - НЕТ: Запускается процесс Web OAuth, пользователь перенаправляется в свой браузер, и ему предоставляется возможность перейти по другой ссылке, указав другой адрес электронной почты.
- ДА: если функция создания
- ДА: если запрос
- НЕТ: Запускается процесс Web OAuth , пользователь перенаправляется в свой браузер, и ему предоставляется возможность перейти по другой ссылке, указав другой адрес электронной почты.
- ДА: Есть ли у пользователя соответствующая учетная запись в вашей системе аутентификации? (для подтверждения вызывается
- НЕТ: Есть ли у пользователя соответствующая учетная запись в вашей системе аутентификации? (для подтверждения вызывается
check intent)- ДА: если запрос
get intentintent успешно завершается, то вызывается метод getIntent, и учетная запись связывается. - НЕТ: если функция создания намерения успешно завершается, вызывается метод
create intent, и учетная запись связывается.
- ДА: если запрос
- ДА: Использует ли пользователь адрес электронной почты, связанный с его учетной записью Google, для входа на вашу платформу? (Пользователь принимает решение, выбирая ДА или НЕТ)
Проверить существующую учетную запись пользователя (проверить намерение)
После того как пользователь дает согласие на доступ к своему профилю Google, Google отправляет запрос, содержащий подписанное подтверждение личности пользователя Google. Утверждение содержит информацию, включающую идентификатор аккаунта Google, имя и адрес электронной почты пользователя. Конечная точка обмена токенами, настроенная для вашего проекта, обрабатывает этот запрос.
Если соответствующая учетная запись Google уже присутствует в вашей системе аутентификации, ваша конечная точка обмена токенами отвечает account_found=true . Если учетная запись Google не соответствует существующему пользователю, ваша конечная точка обмена токенами возвращает ошибку HTTP 404 Not Found с account_found=false .
Запрос имеет следующую форму:
POST /token HTTP/1.1 Host: oauth2.example.com Content-Type: application/x-www-form-urlencoded grant_type=urn:ietf:params:oauth:grant-type:jwt-bearer&intent=check&assertion=JWT&scope=SCOPES&client_id=GOOGLE_CLIENT_ID&client_secret=GOOGLE_CLIENT_SECRET
Конечная точка обмена токенами должна иметь возможность обрабатывать следующие параметры:
| Параметры конечной точки токена | |
|---|---|
intent | Для этих запросов значение этого параметра — check . |
grant_type | Тип обмениваемого токена. Для этих запросов этот параметр имеет значение urn:ietf:params:oauth:grant-type:jwt-bearer . |
assertion | Веб-токен JSON (JWT), который обеспечивает подписанное подтверждение личности пользователя Google. JWT содержит информацию, включающую идентификатор учетной записи Google, имя и адрес электронной почты пользователя. |
client_id | Идентификатор клиента, который вы назначили Google. |
client_secret | Секрет клиента, который вы передали Google. |
Чтобы ответить на запросы о намерении check , ваша конечная точка обмена токенами должна выполнить следующие шаги:
- Проверьте и декодируйте утверждение JWT.
- Проверьте, присутствует ли уже учетная запись Google в вашей системе аутентификации.
Validate and decode the JWT assertion
You can validate and decode the JWT assertion by using a JWT-decoding library for your language. Use Google's public keys, available in JWK or PEM formats, to verify the token's signature.
When decoded, the JWT assertion looks like the following example:
{ "sub": "1234567890", // The unique ID of the user's Google Account "iss": "https://accounts.google.com", // The assertion's issuer "aud": "123-abc.apps.googleusercontent.com", // Your server's client ID "iat": 233366400, // Unix timestamp of the assertion's creation time "exp": 233370000, // Unix timestamp of the assertion's expiration time "name": "Jan Jansen", "given_name": "Jan", "family_name": "Jansen", "email": "jan@gmail.com", // If present, the user's email address "email_verified": true, // true, if Google has verified the email address "hd": "example.com", // If present, the host domain of the user's GSuite email address // If present, a URL to user's profile picture "picture": "https://lh3.googleusercontent.com/a-/AOh14GjlTnZKHAeb94A-FmEbwZv7uJD986VOF1mJGb2YYQ", "locale": "en_US" // User's locale, from browser or phone settings }
In addition to verifying the token's signature, verify that the assertion's
issuer (iss field) is https://accounts.google.com, that the audience
(aud field) is your assigned client ID, and that the token has not expired
(exp field).
Using the email, email_verified and hd fields you can determine if
Google hosts and is authoritative for an email address. In cases where Google is
authoritative the user is currently known to be the legitimate account owner
and you may skip password or other challenges methods. Otherwise, these methods
can be used to verify the account prior to linking.
Cases where Google is authoritative:
emailhas a@gmail.comsuffix, this is a Gmail account.email_verifiedis true andhdis set, this is a G Suite account.
Users may register for Google Accounts without using Gmail or G Suite. When
email does not contain a @gmail.com suffix and hd is absent Google is not
authoritative and password or other challenge methods are recommended to verify
the user. email_verified can also be true as Google initially verified the
user when the Google account was created, however ownership of the third party
email account may have since changed.
Проверьте, присутствует ли учетная запись Google в вашей системе аутентификации.
Проверьте, верно ли одно из следующих условий:
- Идентификатор аккаунта Google, указанный в
subутверждения, находится в вашей базе данных пользователей. - Адрес электронной почты в утверждении соответствует пользователю в вашей базе данных пользователей.
Если любое из условий верно, пользователь уже зарегистрировался. В этом случае верните ответ, подобный следующему:
HTTP/1.1 200 Success
Content-Type: application/json;charset=UTF-8
{
"account_found":"true",
}
Если ни идентификатор аккаунта Google, ни адрес электронной почты, указанные в утверждении, не соответствуют пользователю в вашей базе данных, значит, пользователь еще не зарегистрировался. В этом случае ваша конечная точка обмена токенами должна ответить ошибкой HTTP 404, в которой указано "account_found": "false" , как в следующем примере:
HTTP/1.1 404 Not found
Content-Type: application/json;charset=UTF-8
{
"account_found":"false",
}
Handle automatic linking (get intent)
After the user gives consent to access their Google profile, Google sends a request that contains a signed assertion of the Google user's identity. The assertion contains information that includes the user's Google Account ID, name, and email address. The token exchange endpoint configured for your project handles that request.
If the corresponding Google Account is already present in your authentication
system, your token exchange endpoint returns a token for the user. If the
Google Account doesn't match an existing user, your token exchange endpoint
returns a linking_error error and optional login_hint.
The request has the following form:
POST /token HTTP/1.1 Host: oauth2.example.com Content-Type: application/x-www-form-urlencoded grant_type=urn:ietf:params:oauth:grant-type:jwt-bearer&intent=get&assertion=JWT&scope=SCOPES&client_id=GOOGLE_CLIENT_ID&client_secret=GOOGLE_CLIENT_SECRET
Your token exchange endpoint must be able to handle the following parameters:
| Token endpoint parameters | |
|---|---|
intent |
For these requests, the value of this parameter is get. |
grant_type |
The type of token being exchanged. For these requests, this
parameter has the value urn:ietf:params:oauth:grant-type:jwt-bearer. |
assertion |
A JSON Web Token (JWT) that provides a signed assertion of the Google user's identity. The JWT contains information that includes the user's Google Account ID, name, and email address. |
scope |
Optional: Any scopes that you've configured Google to request from users. |
client_id |
The client ID you assigned to Google. |
client_secret |
The client secret you assigned to Google. |
To respond to the get intent requests, your token exchange endpoint must perform the following steps:
- Validate and decode the JWT assertion.
- Check if the Google account is already present in your authentication system.
Validate and decode the JWT assertion
You can validate and decode the JWT assertion by using a JWT-decoding library for your language. Use Google's public keys, available in JWK or PEM formats, to verify the token's signature.
When decoded, the JWT assertion looks like the following example:
{ "sub": "1234567890", // The unique ID of the user's Google Account "iss": "https://accounts.google.com", // The assertion's issuer "aud": "123-abc.apps.googleusercontent.com", // Your server's client ID "iat": 233366400, // Unix timestamp of the assertion's creation time "exp": 233370000, // Unix timestamp of the assertion's expiration time "name": "Jan Jansen", "given_name": "Jan", "family_name": "Jansen", "email": "jan@gmail.com", // If present, the user's email address "email_verified": true, // true, if Google has verified the email address "hd": "example.com", // If present, the host domain of the user's GSuite email address // If present, a URL to user's profile picture "picture": "https://lh3.googleusercontent.com/a-/AOh14GjlTnZKHAeb94A-FmEbwZv7uJD986VOF1mJGb2YYQ", "locale": "en_US" // User's locale, from browser or phone settings }
In addition to verifying the token's signature, verify that the assertion's
issuer (iss field) is https://accounts.google.com, that the audience
(aud field) is your assigned client ID, and that the token has not expired
(exp field).
Using the email, email_verified and hd fields you can determine if
Google hosts and is authoritative for an email address. In cases where Google is
authoritative the user is currently known to be the legitimate account owner
and you may skip password or other challenges methods. Otherwise, these methods
can be used to verify the account prior to linking.
Cases where Google is authoritative:
emailhas a@gmail.comsuffix, this is a Gmail account.email_verifiedis true andhdis set, this is a G Suite account.
Users may register for Google Accounts without using Gmail or G Suite. When
email does not contain a @gmail.com suffix and hd is absent Google is not
authoritative and password or other challenge methods are recommended to verify
the user. email_verified can also be true as Google initially verified the
user when the Google account was created, however ownership of the third party
email account may have since changed.
Check if the Google account is already present in your authentication system
Check whether either of the following conditions are true:
- The Google Account ID, found in the assertion's
subfield, is in your user database. - The email address in the assertion matches a user in your user database.
If an account is found for the user, issue an access token and return the values in a JSON object in the body of your HTTPS response, like in the following example:
{ "token_type": "Bearer", "access_token": "ACCESS_TOKEN", "refresh_token": "REFRESH_TOKEN", "expires_in": SECONDS_TO_EXPIRATION }
In some cases, account linking based on ID token might fail for the user. If it
does so for any reason, your token exchange endpoint needs to reply with a HTTP
401 error that specifies error=linking_error, as the following example shows:
HTTP/1.1 401 Unauthorized
Content-Type: application/json;charset=UTF-8
{
"error":"linking_error",
"login_hint":"foo@bar.com"
}
When Google receives a 401 error response with linking_error, Google sends
the user to your authorization endpoint with login_hint as a parameter. The
user completes account linking using the OAuth linking flow in their browser.
Handle account creation using Sign in with Google (create intent)
When a user needs to create an account on your service, Google makes a request
to your token exchange endpoint that specifies intent=create.
The request has the following form:
POST /token HTTP/1.1 Host: oauth2.example.com Content-Type: application/x-www-form-urlencoded response_type=token&grant_type=urn:ietf:params:oauth:grant-type:jwt-bearer&scope=SCOPES&intent=create&assertion=JWT&client_id=GOOGLE_CLIENT_ID&client_secret=GOOGLE_CLIENT_SECRET
Your token exchange endpoint must able to handle the following parameters:
| Token endpoint parameters | |
|---|---|
intent |
For these requests, the value of this parameter is create. |
grant_type |
The type of token being exchanged. For these requests, this
parameter has the value urn:ietf:params:oauth:grant-type:jwt-bearer. |
assertion |
A JSON Web Token (JWT) that provides a signed assertion of the Google user's identity. The JWT contains information that includes the user's Google Account ID, name, and email address. |
client_id |
The client ID you assigned to Google. |
client_secret |
The client secret you assigned to Google. |
The JWT within the assertion parameter contains the user's Google Account ID,
name, and email address, which you can use to create a new account on your
service.
To respond to the create intent requests, your token exchange endpoint must perform the following steps:
- Validate and decode the JWT assertion.
- Validate user information and create new account.
Validate and decode the JWT assertion
You can validate and decode the JWT assertion by using a JWT-decoding library for your language. Use Google's public keys, available in JWK or PEM formats, to verify the token's signature.
When decoded, the JWT assertion looks like the following example:
{ "sub": "1234567890", // The unique ID of the user's Google Account "iss": "https://accounts.google.com", // The assertion's issuer "aud": "123-abc.apps.googleusercontent.com", // Your server's client ID "iat": 233366400, // Unix timestamp of the assertion's creation time "exp": 233370000, // Unix timestamp of the assertion's expiration time "name": "Jan Jansen", "given_name": "Jan", "family_name": "Jansen", "email": "jan@gmail.com", // If present, the user's email address "email_verified": true, // true, if Google has verified the email address "hd": "example.com", // If present, the host domain of the user's GSuite email address // If present, a URL to user's profile picture "picture": "https://lh3.googleusercontent.com/a-/AOh14GjlTnZKHAeb94A-FmEbwZv7uJD986VOF1mJGb2YYQ", "locale": "en_US" // User's locale, from browser or phone settings }
In addition to verifying the token's signature, verify that the assertion's
issuer (iss field) is https://accounts.google.com, that the audience
(aud field) is your assigned client ID, and that the token has not expired
(exp field).
Using the email, email_verified and hd fields you can determine if
Google hosts and is authoritative for an email address. In cases where Google is
authoritative the user is currently known to be the legitimate account owner
and you may skip password or other challenges methods. Otherwise, these methods
can be used to verify the account prior to linking.
Cases where Google is authoritative:
emailhas a@gmail.comsuffix, this is a Gmail account.email_verifiedis true andhdis set, this is a G Suite account.
Users may register for Google Accounts without using Gmail or G Suite. When
email does not contain a @gmail.com suffix and hd is absent Google is not
authoritative and password or other challenge methods are recommended to verify
the user. email_verified can also be true as Google initially verified the
user when the Google account was created, however ownership of the third party
email account may have since changed.
Validate user information and create new account
Check whether either of the following conditions are true:
- The Google Account ID, found in the assertion's
subfield, is in your user database. - The email address in the assertion matches a user in your user database.
If either condition is true, prompt the user to link their existing account
with their Google Account. To do so, respond to the request with an HTTP 401 error
that specifies error=linking_error and gives the user's email address as the
login_hint. The following is a sample response:
HTTP/1.1 401 Unauthorized
Content-Type: application/json;charset=UTF-8
{
"error":"linking_error",
"login_hint":"foo@bar.com"
}
When Google receives a 401 error response with linking_error, Google sends
the user to your authorization endpoint with login_hint as a parameter. The
user completes account linking using the OAuth linking flow in their browser.
If neither condition is true, create a new user account with the information provided in the JWT. New accounts don't typically have a password set. It's recommended that you add Sign in with Google to other platforms to enable users to sign in with Google across the surfaces of your application. Alternatively, you can email the user a link that starts your password recovery flow to allow the user to set a password to sign in on other platforms.
When the creation is completed, issue an access token and return the values in a JSON object in the body of your HTTPS response, like in the following example:
{ "token_type": "Bearer", "access_token": "ACCESS_TOKEN", "refresh_token": "REFRESH_TOKEN", "expires_in": SECONDS_TO_EXPIRATION }
Получите свой идентификатор клиента Google API.
В процессе регистрации привязки учетной записи вам потребуется указать свой идентификатор клиента Google API. Чтобы получить свой идентификатор клиента API, используя проект, созданный вами при выполнении шагов по привязке OAuth , выполните следующие действия:
- Перейдите на страницу «Клиенты» .
Создайте или выберите проект Google API.
Если для вашего проекта отсутствует идентификатор клиента (Client ID) для типа веб-приложения, нажмите «Создать клиент» (Create Client) , чтобы его создать. Обязательно укажите домен вашего сайта в поле «Разрешенные источники JavaScript» . При локальном тестировании или разработке необходимо добавить в поле « Разрешенные источники JavaScript» как
http://localhostтак иhttp://localhost:<port_number>.
Проверьте правильность вашей реализации.
Вы можете проверить свою реализацию, используя инструмент OAuth 2.0 Playground .
В инструменте выполните следующие действия:
- Нажмите конфигурации », чтобы открыть окно «Конфигурация OAuth 2.0».
- В поле «Процесс аутентификации OAuth» выберите «На стороне клиента» .
- В поле «Конечные точки OAuth» выберите «Пользовательские» .
- Укажите в соответствующих полях вашу конечную точку OAuth 2.0 и идентификатор клиента, который вы присвоили Google.
- В разделе «Шаг 1» не выбирайте никаких областей действия Google. Вместо этого оставьте это поле пустым или введите область действия, действительную для вашего сервера (или произвольную строку, если вы не используете области действия OAuth). После завершения нажмите «Авторизовать API» .
- В разделах «Шаг 2» и «Шаг 3» пройдите весь процесс аутентификации OAuth 2.0 и убедитесь, что каждый шаг работает должным образом.
Вы можете проверить работоспособность своей реализации, используя демонстрационный инструмент для привязки учетных записей Google .
В инструменте выполните следующие действия:
- Нажмите кнопку « Войти через Google» .
- Выберите учетную запись, которую хотите связать.
- Введите идентификатор службы.
- При желании укажите одну или несколько областей доступа, к которым вы запрашиваете доступ.
- Нажмите «Начать демонстрацию» .
- При появлении запроса подтвердите свое согласие и отклоните запрос на привязку.
- Убедитесь, что вас перенаправили на вашу платформу.