1. 시작하기 전에
웹사이트에서 일반적으로 흔하게 볼 수 있는 기능 중 하나는 비즈니스, 시설 등 실제 장소를 보유한 법인의 위치 하나 이상을 강조하는 Google 지도입니다. 이러한 지도의 구현 방식은 위치의 수, 변경 빈도 등의 요건에 따라 크게 달라질 수 있습니다.
이 Codelab에서는 가장 간단한 사용 사례, 즉 거의 변경되지 않으며 위치 개수가 적은 경우(예: 체인점을 보유하고 있는 비즈니스용 매장 검색 기능)를 살펴봅니다. 이 경우, 어떠한 서버 측 프로그래밍 없이 상대적 비첨단 기술 접근 방식을 사용할 수 있습니다. 그렇다고 해서 창의성을 발휘할 수 없는 것은 아닙니다. GeoJSON 데이터 형식을 사용함으로써 지도에서 각 매장에 대한 임의 정보를 저장 및 렌더링할 뿐만 아니라 지도의 전반적인 스타일과 마커를 맞춤설정할 수도 있습니다.
마지막으로, Cloud Shell을 사용하여 매장 검색 기능을 개발하고 호스팅할 수도 있습니다. 이 도구를 반드시 사용할 필요는 없지만, 사용하는 경우에는 웹브라우저를 실행하는 모든 기기에서 매장 검색 기능을 개발하고 이를 일반 사용자에게 온라인으로 제공할 수 있습니다.
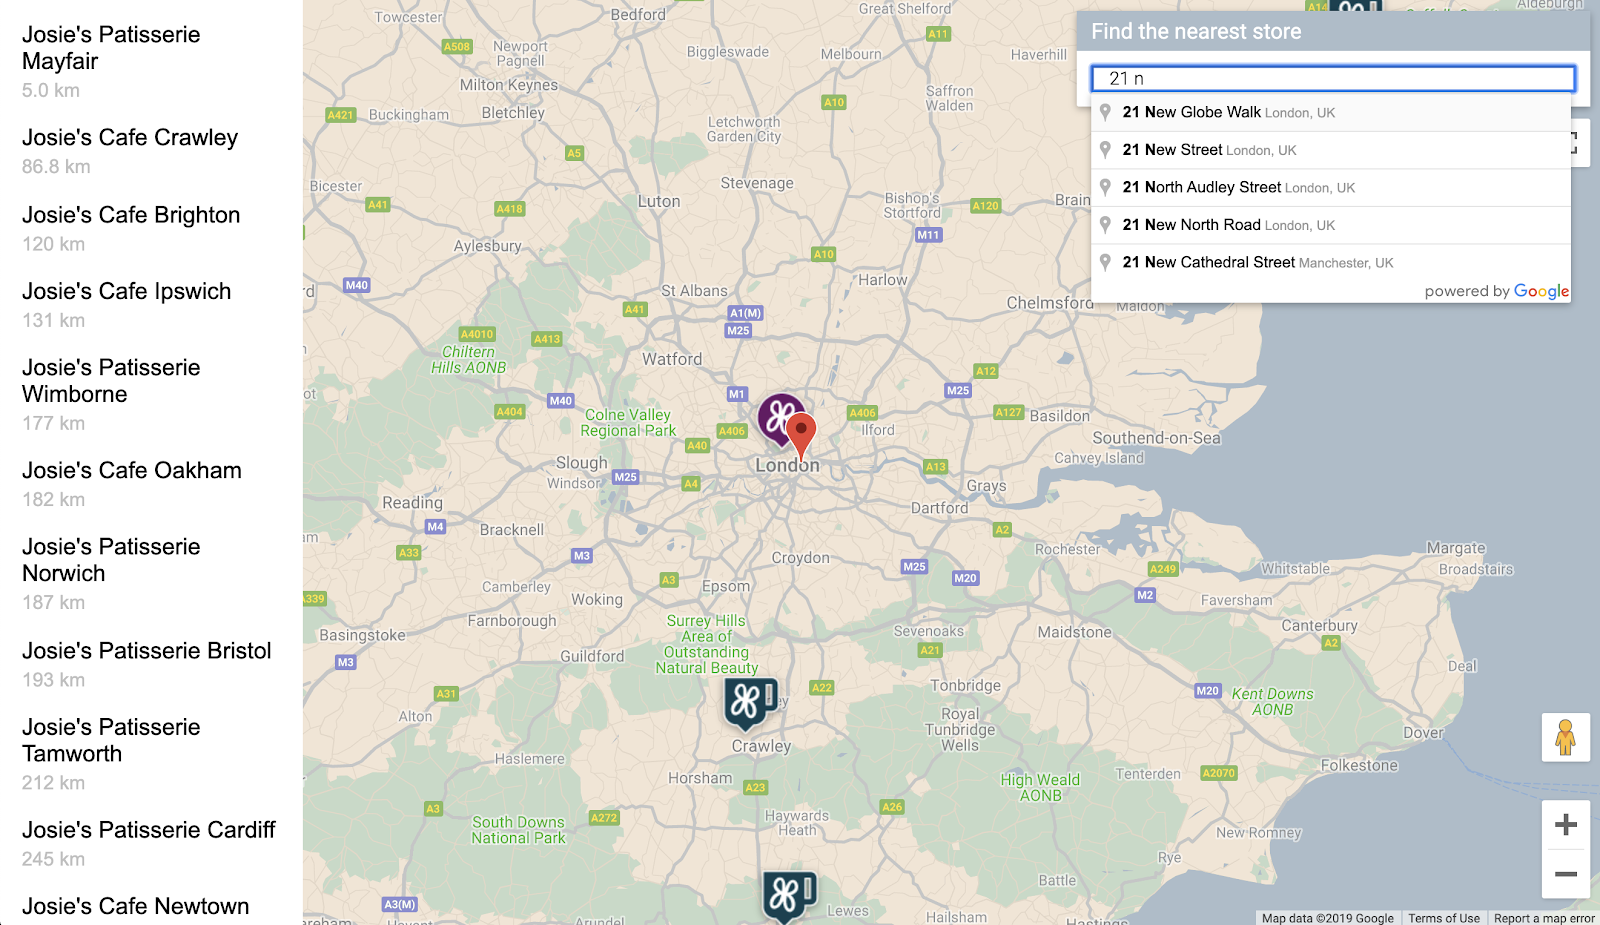
기본 요건
- HTML 및 자바스크립트 관련 기본 지식
처리할 작업
- 매장 위치 집합과 GeoJSON 형식으로 저장된 정보가 포함된 지도를 표시합니다.
- 마커와 지도 자체를 맞춤설정합니다.
- 매장의 마커가 클릭되었을 때 매장에 관한 추가 정보를 표시합니다.
- Place Autocomplete 검색창을 웹페이지에 추가합니다.
- 사용자가 제공한 출발지와 가장 가까운 매장 위치를 파악합니다.
2. 설정하기
다음 섹션의 3단계에서 이 Codelab의 다음 3가지 API를 사용 설정합니다.
- Maps JavaScript API
- Places API
- Distance Matrix API
Google Maps Platform 시작하기
Google Maps Platform을 처음 사용한다면 Google Maps Platform 시작하기 가이드를 따르거나 Google Maps Platform 시작하기 재생목록을 시청하여 다음 단계를 완료하세요.
- 결제 계정 만들기
- 프로젝트를 만듭니다.
- 이전 섹션에 표시된 Google Maps Platform API와 SDK를 사용 설정합니다.
- API 키를 생성합니다.
Cloud Shell 활성화하기
이 Codelab은 Google Cloud에서 실행되는 제품 및 리소스에 대한 액세스 권한을 제공하는 Google Cloud의 명령줄 환경인 Cloud Shell을 사용하므로 프로젝트를 웹브라우저에서 완전하게 호스팅하고 실행할 수 있습니다.
Cloud Console에서 Cloud Shell을 활성화하려면 Cloud Shell 활성화  를 클릭합니다(환경을 프로비저닝하고 연결하는 데 몇 분 정도 소요됩니다).

이렇게 하면 소개 전면 광고가 표시된 후 브라우저 아래쪽에 새 셸이 열립니다.

Cloud Shell에 연결되면 인증이 이미 완료되어 있고 프로젝트도 이미 설정 단계에서 선택한 프로젝트 ID로 설정되어 있음을 확인할 수 있습니다.
$ gcloud auth list
Credentialed Accounts:
ACTIVE  ACCOUNT
  *     <myaccount>@<mydomain>.com
$ gcloud config list project
[core]
project = <YOUR_PROJECT_ID>
어떤 이유로 프로젝트가 설정되지 않은 경우 다음 명령어를 실행합니다.
$ gcloud config set project <YOUR_PROJECT_ID>
3. 지도로 'Hello, World!'
지도를 사용하여 개발하기
Cloud Shell에서 나머지 Codelab의 기본 토대 역할을 하는 HTML 페이지를 만듭니다.
- Cloud Shell 툴바에서 편집기 실행
 을 클릭하여 새 탭에서 코드 편집기를 엽니다.
이 웹 기반 코드 편집기를 사용하면 Cloud Shell에서 파일을 손쉽게 수정할 수 있습니다.

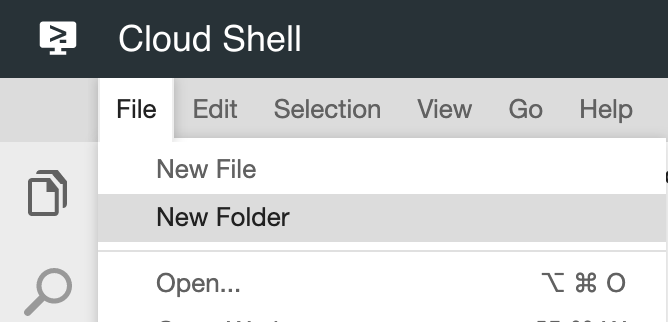
- 파일 > 새 폴더를 클릭하여 코드 편집기에서 앱의 새
store-locator디렉터리를 만듭니다.
- 새 폴더 이름을
store-locator로 지정합니다.
다음으로, 지도가 포함된 웹페이지를 만듭니다.
store-locator디렉터리에 이름이index.html인 파일을 만듭니다.
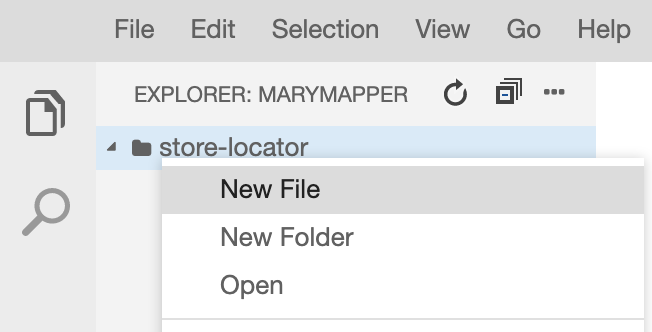
index.html파일에 다음 콘텐츠를 삽입합니다.
index.html
<html>

<head>
    <title>Store Locator</title>
    <style>
        #map {
            height: 100%;
        }

        html,
        body {
            height: 100%;
            margin: 0;
            padding: 0;
        }
    </style>
</head>

<body>
    <!-- The div to hold the map -->
    <div id="map"></div>

    <script src="app.js"></script>
    <script async defer src="https://maps.googleapis.com/maps/api/js?key=YOUR_API_KEY&libraries=places&callback=initMap&solution_channel=GMP_codelabs_simplestorelocator_v1_a">
    </script>
</body>

</html>
이는 지도를 표시하는 HTML 페이지로, 지도가 전체 페이지에서 표시되도록 하는 일부 CSS(지도를 고정하는 <div> 태그와 <script> 태그 쌍)가 포함되어 있습니다. 첫 번째 스크립트 태그는 모든 자바스크립트 코드를 포함하는 app.js라는 자바스크립트 파일을 로드합니다. 두 번째 스크립트 태그는 API 키를 로드하고, 나중에 추가될 자동 완성 기능에 필요한 장소 라이브러리를 사용하고, Maps JavaScript API가 로드된 후 실행되는 자바스크립트 함수의 이름을 initMap으로 지정합니다.
- 코드 스니펫의 텍스트
YOUR_API_KEY를 이전에 이 Codelab에서 생성한 API 키로 바꿉니다. - 마지막으로, 다음 코드를 사용하여
app.js라는 다른 파일을 만듭니다.
app.js
function initMap() {
   // Create the map.
    const map = new google.maps.Map(document.getElementById('map'), {
        zoom: 7,
        center: { lat: 52.632469, lng: -1.689423 },
    });

}
이는 지도를 생성하는 데 필요한 최소한의 코드입니다. 개발자는 <div> 태그에 대한 참조를 전달하여 지도를 고정하며, 중심과 확대/축소 수준을 지정합니다.
이 앱을 테스트하려면 Cloud Shell에서 간단한 Python HTTP 서버를 실행하면 됩니다.
- Cloud Shell로 이동하여 다음을 입력합니다.
$ cd store-locator
$ python -m SimpleHTTPServer 8080
localhost 포트 8080에서 수신 대기하는 웹 앱과 함께 Cloud Shell에서 간단한 HTTP 서버가 실행되고 있음을 보여주는 로그 출력의 일부 줄이 표시됩니다.
- Cloud Console 툴바의 웹 미리보기
 를 클릭하고 포트 8080에서 미리 보기를 선택하여 이 앱에서 웹브라우저 탭을 엽니다.
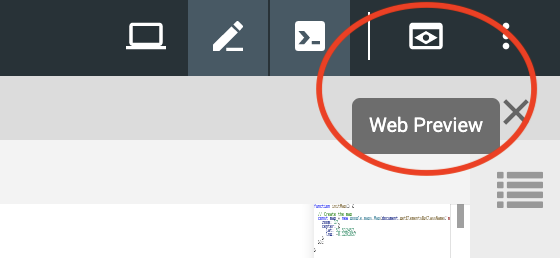
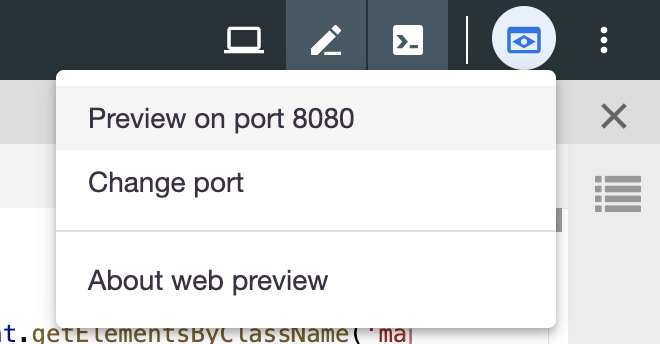
이 메뉴 항목을 클릭하면 웹브라우저에 새로운 탭이 열리고 간단한 Python HTTP 서버에서 제공되는 HTML 콘텐츠가 표시됩니다. 모든 과정이 성공적으로 진행되었다면 영국 런던을 중심으로 한 지도가 표시됩니다.
간단한 HTTP 서버를 중지하려면 Cloud Shell에서 Control+C를 누릅니다.
4. GeoJSON을 사용하여 지도 채우기
이제 매장 데이터를 살펴보겠습니다. GeoJSON은 지도에서 점, 선 또는 다각형과 같은 간단한 지형 지물을 나타내는 데이터 형식입니다. 지형지물에는 임의의 데이터도 포함될 수 있습니다. 이에 따라 GeoJSON은 매장을 표시하기에 적합한 방법이 되며 매장의 이름, 영업시간, 전화번호 등 약간의 추가 데이터가 포함된 점으로 지도에 표시됩니다. 무엇보다도, GeoJSON은 Google 지도에서 최고 수준의 지원을 제공합니다. 즉, 개발자가 GeoJSON 문서를 Google 지도에 전송하면 GeoJSON이 지도에 이를 적절히 렌더링합니다.
stores.json이라는 새 파일을 만들고 다음 코드에 붙여넣습니다.
stores.json
{
    "type": "FeatureCollection",
    "features": [{
            "geometry": {
                "type": "Point",
                "coordinates": [-0.1428115,
                    51.5125168
                ]
            },
            "type": "Feature",
            "properties": {
                "category": "patisserie",
                "hours": "10am - 6pm",
                "description": "Modern twists on classic pastries. We're part of a larger chain of patisseries and cafes.",
                "name": "Josie's Patisserie Mayfair",
                "phone": "+44 20 1234 5678",
                "storeid": "01"
            }
        },
        {
            "geometry": {
                "type": "Point",
                "coordinates": [-2.579623,
                    51.452251
                ]
            },
            "type": "Feature",
            "properties": {
                "category": "patisserie",
                "hours": "10am - 6pm",
                "description": "Come and try our award-winning cakes and pastries. We're part of a larger chain of patisseries and cafes.",
                "name": "Josie's Patisserie Bristol",
                "phone": "+44 117 121 2121",
                "storeid": "02"
            }
        },
        {
            "geometry": {
                "type": "Point",
                "coordinates": [
                    1.273459,
                    52.638072
                ]
            },
            "type": "Feature",
            "properties": {
                "category": "patisserie",
                "hours": "10am - 6pm",
                "description": "Whatever the occasion, whether it's a birthday or a wedding, Josie's Patisserie has the perfect treat for you. We're part of a larger chain of patisseries and cafes.",
                "name": "Josie's Patisserie Norwich",
                "phone": "+44 1603 123456",
                "storeid": "03"
            }
        },
        {
            "geometry": {
                "type": "Point",
                "coordinates": [-1.9912838,
                    50.8000418
                ]
            },
            "type": "Feature",
            "properties": {
                "category": "patisserie",
                "hours": "10am - 6pm",
                "description": "A gourmet patisserie that will delight your senses. We're part of a larger chain of patisseries and cafes.",
                "name": "Josie's Patisserie Wimborne",
                "phone": "+44 1202 343434",
                "storeid": "04"
            }
        },
        {
            "geometry": {
                "type": "Point",
                "coordinates": [-2.985933,
                    53.408899
                ]
            },
            "type": "Feature",
            "properties": {
                "category": "patisserie",
                "hours": "10am - 6pm",
                "description": "Spoil yourself or someone special with our classic pastries. We're part of a larger chain of patisseries and cafes.",
                "name": "Josie's Patisserie Liverpool",
                "phone": "+44 151 444 4444",
                "storeid": "05"
            }
        },
        {
            "geometry": {
                "type": "Point",
                "coordinates": [-1.689423,
                    52.632469
                ]
            },
            "type": "Feature",
            "properties": {
                "category": "patisserie",
                "hours": "10am - 6pm",
                "description": "Come and feast your eyes and tastebuds on our delicious pastries and cakes. We're part of a larger chain of patisseries and cafes.",
                "name": "Josie's Patisserie Tamworth",
                "phone": "+44 5555 55555",
                "storeid": "06"
            }
        },
        {
            "geometry": {
                "type": "Point",
                "coordinates": [-3.155305,
                    51.479756
                ]
            },
            "type": "Feature",
            "properties": {
                "category": "patisserie",
                "hours": "10am - 6pm",
                "description": "Josie's Patisserie is family-owned, and our delectable pastries, cakes, and great coffee are renowed. We're part of a larger chain of patisseries and cafes.",
                "name": "Josie's Patisserie Cardiff",
                "phone": "+44 29 6666 6666",
                "storeid": "07"
            }
        },
        {
            "geometry": {
                "type": "Point",
                "coordinates": [-0.725019,
                    52.668891
                ]
            },
            "type": "Feature",
            "properties": {
                "category": "cafe",
                "hours": "8am - 9:30pm",
                "description": "Oakham's favorite spot for fresh coffee and delicious cakes. We're part of a larger chain of patisseries and cafes.",
                "name": "Josie's Cafe Oakham",
                "phone": "+44 7777 777777",
                "storeid": "08"
            }
        },
        {
            "geometry": {
                "type": "Point",
                "coordinates": [-2.477653,
                    53.735405
                ]
            },
            "type": "Feature",
            "properties": {
                "category": "cafe",
                "hours": "8am - 9:30pm",
                "description": "Enjoy freshly brewed coffe, and home baked cakes in our homely cafe. We're part of a larger chain of patisseries and cafes.",
                "name": "Josie's Cafe Blackburn",
                "phone": "+44 8888 88888",
                "storeid": "09"
            }
        },
        {
            "geometry": {
                "type": "Point",
                "coordinates": [-0.211363,
                    51.108966
                ]
            },
            "type": "Feature",
            "properties": {
                "category": "cafe",
                "hours": "8am - 9:30pm",
                "description": "A delicious array of pastries with many flavours, and fresh coffee in an snug cafe. We're part of a larger chain of patisseries and cafes.",
                "name": "Josie's Cafe Crawley",
                "phone": "+44 1010 101010",
                "storeid": "10"
            }
        },
        {
            "geometry": {
                "type": "Point",
                "coordinates": [-0.123559,
                    50.832679
                ]
            },
            "type": "Feature",
            "properties": {
                "category": "cafe",
                "hours": "8am - 9:30pm",
                "description": "Grab a freshly brewed coffee, a decadent cake and relax in our idyllic cafe. We're part of a larger chain of patisseries and cafes.",
                "name": "Josie's Cafe Brighton",
                "phone": "+44 1313 131313",
                "storeid": "11"
            }
        },
        {
            "geometry": {
                "type": "Point",
                "coordinates": [-3.319575,
                    52.517827
                ]
            },
            "type": "Feature",
            "properties": {
                "category": "cafe",
                "hours": "8am - 9:30pm",
                "description": "Come in and unwind at this idyllic cafe with fresh coffee and home made cakes. We're part of a larger chain of patisseries and cafes.",
                "name": "Josie's Cafe Newtown",
                "phone": "+44 1414 141414",
                "storeid": "12"
            }
        },
        {
            "geometry": {
                "type": "Point",
                "coordinates": [
                    1.158167,
                    52.071634
                ]
            },
            "type": "Feature",
            "properties": {
                "category": "cafe",
                "hours": "8am - 9:30pm",
                "description": "Fresh coffee and delicious cakes in an snug cafe. We're part of a larger chain of patisseries and cafes.",
                "name": "Josie's Cafe Ipswich",
                "phone": "+44 1717 17171",
                "storeid": "13"
            }
        }
    ]
}
많은 데이터이지만, 이를 잘 살펴보면 모든 매장에 동일한 구조가 사용된다는 점을 확인할 수 있습니다. 각 저장소는 properties 키 아래에 포함된 추가 데이터 및 좌표와 함께 GeoJSON Point로 표시됩니다. 흥미롭게도, GeoJSON을 통해 properties 키 아래에 임의로 이름이 지정된 키를 포함할 수 있습니다. 이 Codelab에서 이러한 키는 category, hours, description, name, phone입니다.
- 이제
stores.js의 GeoJSON을 지도에 로드하도록app.js를 수정합니다.
app.js
function initMap() {
  // Create the map.
  const map = new google.maps.Map(document.getElementById('map'), {
    zoom: 7,
    center: {lat: 52.632469, lng: -1.689423},
  });

  // Load the stores GeoJSON onto the map.
  map.data.loadGeoJson('stores.json', {idPropertyName: 'storeid'});

  const apiKey = 'YOUR_API_KEY';
  const infoWindow = new google.maps.InfoWindow();

  // Show the information for a store when its marker is clicked.
  map.data.addListener('click', (event) => {
    const category = event.feature.getProperty('category');
    const name = event.feature.getProperty('name');
    const description = event.feature.getProperty('description');
    const hours = event.feature.getProperty('hours');
    const phone = event.feature.getProperty('phone');
    const position = event.feature.getGeometry().get();
    const content = `
      <h2>${name}</h2><p>${description}</p>
      <p><b>Open:</b> ${hours}<br/><b>Phone:</b> ${phone}</p>
    `;

    infoWindow.setContent(content);
    infoWindow.setPosition(position);
    infoWindow.setOptions({pixelOffset: new google.maps.Size(0, -30)});
    infoWindow.open(map);
  });
}
코드 예시에서는 loadGeoJson을 호출하고 JSON 파일의 이름을 전달하여 GeoJSON을 지도에 로드했습니다. 또한 마커가 클릭될 때마다 실행될 함수를 정의했습니다. 그러면 함수는 마커가 클릭된 매장의 추가 데이터에 액세스하고 표시된 정보 창의 정보를 사용할 수 있습니다. 이 앱을 테스트하려면 이전과 동일한 명령어를 사용하여 간단한 Python HTTP 서버를 실행하면 됩니다.
- Cloud Shell로 돌아가서 다음을 입력합니다.
$ python -m SimpleHTTPServer 8080
- 웹 미리보기
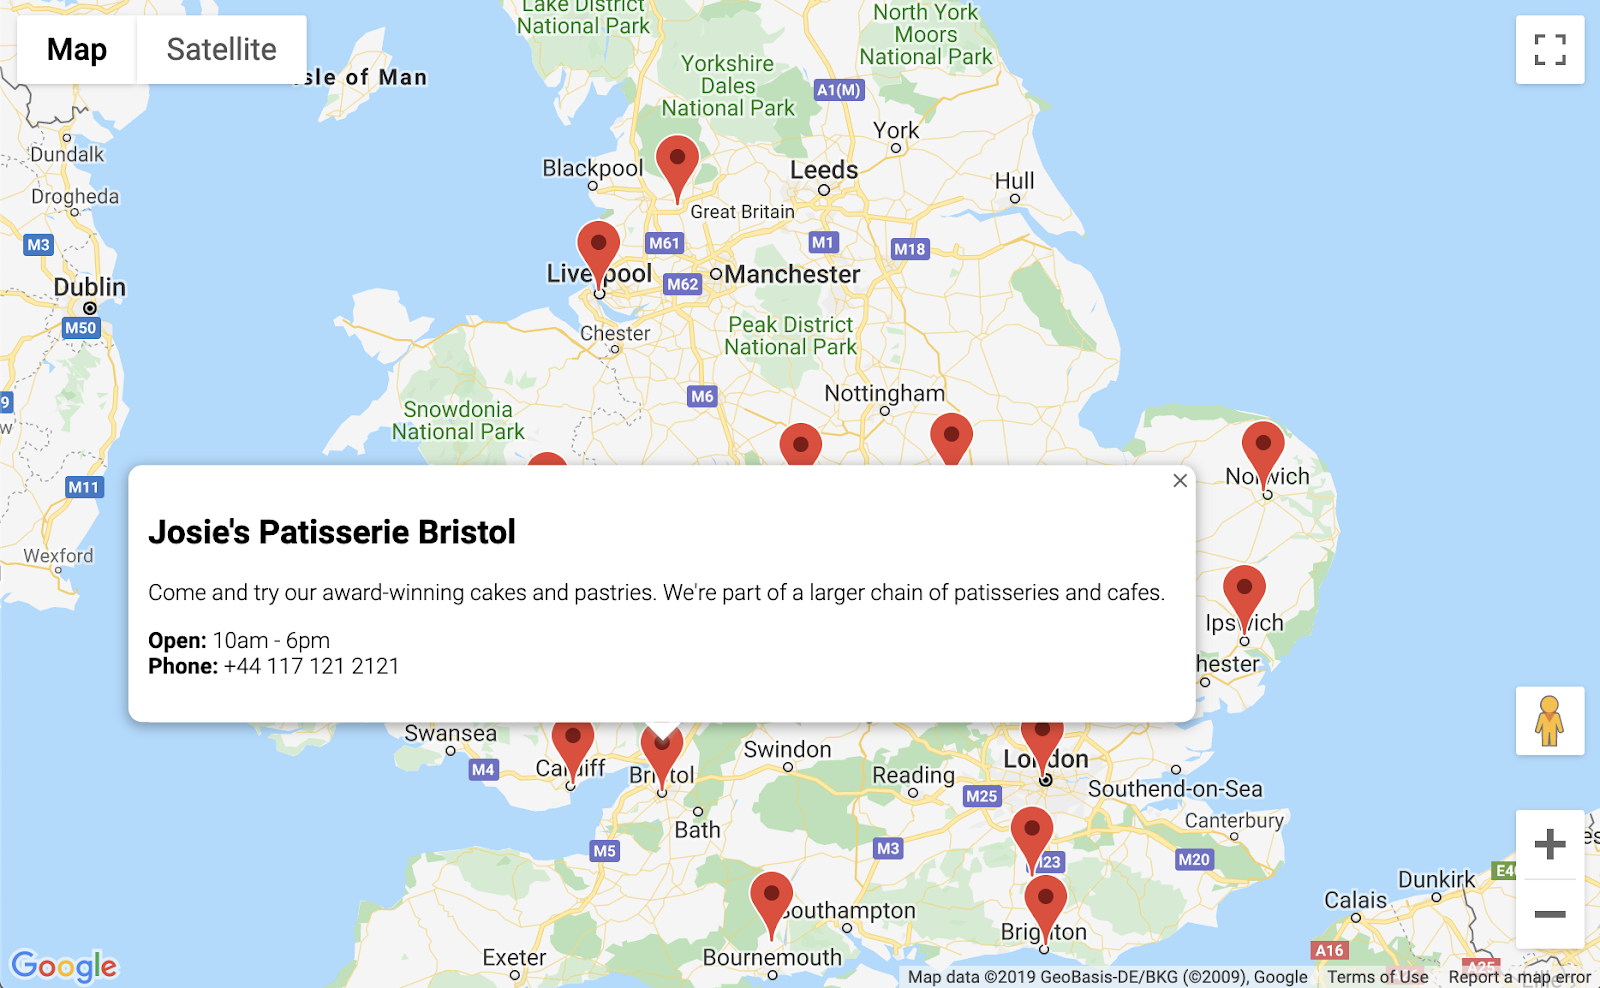
 > 포트 8080 미리 보기를 다시 클릭하면 아래 예시와 같이 각 매장에 관한 세부정보를 확인하기 위해 클릭할 수 있는 마커가 전부 표시됩니다. 이렇게 표시되면 성공적으로 진행하고 있는 것입니다.
5. 지도 맞춤설정하기
이제 마무리 단계입니다. 클릭했을 때 표시되는 추가 정보와 모든 매장 마커가 포함되어 있는 지도를 보유하고 있습니다. 하지만 평범한 Google 지도처럼 보이기 때문에 특색이 없어 보입니다. 맞춤 지도 스타일, 마커, 로고, 스트리트 뷰 이미지를 사용하여 특색 있게 꾸며보세요.
다음은 맞춤 스타일 지정이 추가된 app.js의 새 버전입니다.
app.js
const mapStyle = [{
  'featureType': 'administrative',
  'elementType': 'all',
  'stylers': [{
    'visibility': 'on',
  },
  {
    'lightness': 33,
  },
  ],
},
{
  'featureType': 'landscape',
  'elementType': 'all',
  'stylers': [{
    'color': '#f2e5d4',
  }],
},
{
  'featureType': 'poi.park',
  'elementType': 'geometry',
  'stylers': [{
    'color': '#c5dac6',
  }],
},
{
  'featureType': 'poi.park',
  'elementType': 'labels',
  'stylers': [{
    'visibility': 'on',
  },
  {
    'lightness': 20,
  },
  ],
},
{
  'featureType': 'road',
  'elementType': 'all',
  'stylers': [{
    'lightness': 20,
  }],
},
{
  'featureType': 'road.highway',
  'elementType': 'geometry',
  'stylers': [{
    'color': '#c5c6c6',
  }],
},
{
  'featureType': 'road.arterial',
  'elementType': 'geometry',
  'stylers': [{
    'color': '#e4d7c6',
  }],
},
{
  'featureType': 'road.local',
  'elementType': 'geometry',
  'stylers': [{
    'color': '#fbfaf7',
  }],
},
{
  'featureType': 'water',
  'elementType': 'all',
  'stylers': [{
    'visibility': 'on',
  },
  {
    'color': '#acbcc9',
  },
  ],
},
];

function initMap() {
  // Create the map.
  const map = new google.maps.Map(document.getElementById('map'), {
    zoom: 7,
    center: {lat: 52.632469, lng: -1.689423},
    styles: mapStyle,
  });

  // Load the stores GeoJSON onto the map.
  map.data.loadGeoJson('stores.json', {idPropertyName: 'storeid'});

  // Define the custom marker icons, using the store's "category".
  map.data.setStyle((feature) => {
    return {
      icon: {
        url: `img/icon_${feature.getProperty('category')}.png`,
        scaledSize: new google.maps.Size(64, 64),
      },
    };
  });

  const apiKey = 'YOUR_API_KEY';
  const infoWindow = new google.maps.InfoWindow();

  // Show the information for a store when its marker is clicked.
  map.data.addListener('click', (event) => {
    const category = event.feature.getProperty('category');
    const name = event.feature.getProperty('name');
    const description = event.feature.getProperty('description');
    const hours = event.feature.getProperty('hours');
    const phone = event.feature.getProperty('phone');
    const position = event.feature.getGeometry().get();
    const content = `
      <img style="float:left; width:200px; margin-top:30px" src="img/logo_${category}.png">
      <div style="margin-left:220px; margin-bottom:20px;">
        <h2>${name}</h2><p>${description}</p>
        <p><b>Open:</b> ${hours}<br/><b>Phone:</b> ${phone}</p>
        <p><img src="https://maps.googleapis.com/maps/api/streetview?size=350x120&location=${position.lat()},${position.lng()}&key=${apiKey}&solution_channel=GMP_codelabs_simplestorelocator_v1_a"></p>
      </div>
      `;

    infoWindow.setContent(content);
    infoWindow.setPosition(position);
    infoWindow.setOptions({pixelOffset: new google.maps.Size(0, -30)});
    infoWindow.open(map);
  });

}
추가한 내용은 다음과 같습니다.
mapStyle변수는 지도의 스타일을 지정하는 데 필요한 모든 정보를 포함합니다. (원하는 경우 나만의 스타일을 생성할 수도 있습니다.)map.data.setStyle메서드를 통해 각category에 대해 GeoJSON의 다른 마커인 맞춤 마커를 적용했습니다.- 로고(GeoJSON의
category를 다시 사용) 및 매장 위치의 스트리트 뷰 이미지를 포함하도록content변수를 수정했습니다.
이를 배포하기 전에 완료해야 할 여러 단계가 있습니다.
app.js의'YOUR_API_KEY'문자열을 이전 API 키로 바꿔(index.html에 붙여넣은 것과 동일하며 따옴표는 그대로 유지)apiKey변수에 올바른 값을 설정합니다.- Cloud Shell에서 다음 명령어를 실행하여 마커 및 로고 그래픽을 다운로드합니다. 현재 위치가
store-locator디렉터리여야 합니다. 간단한 HTTP 서버가 실행 중인 경우Control+C를 사용하여 중지합니다.
$ mkdir -p img; cd img
$ wget https://github.com/googlecodelabs/google-maps-simple-store-locator/raw/master/src/img/icon_cafe.png
$ wget https://github.com/googlecodelabs/google-maps-simple-store-locator/raw/master/src/img/icon_patisserie.png
$ wget https://github.com/googlecodelabs/google-maps-simple-store-locator/raw/master/src/img/logo_cafe.png
$ wget https://github.com/googlecodelabs/google-maps-simple-store-locator/raw/master/src/img/logo_patisserie.png
- 다음 명령어를 실행하여 완성된 매장 검색 기능을 미리 봅니다.
$ python -m SimpleHTTPServer 8080
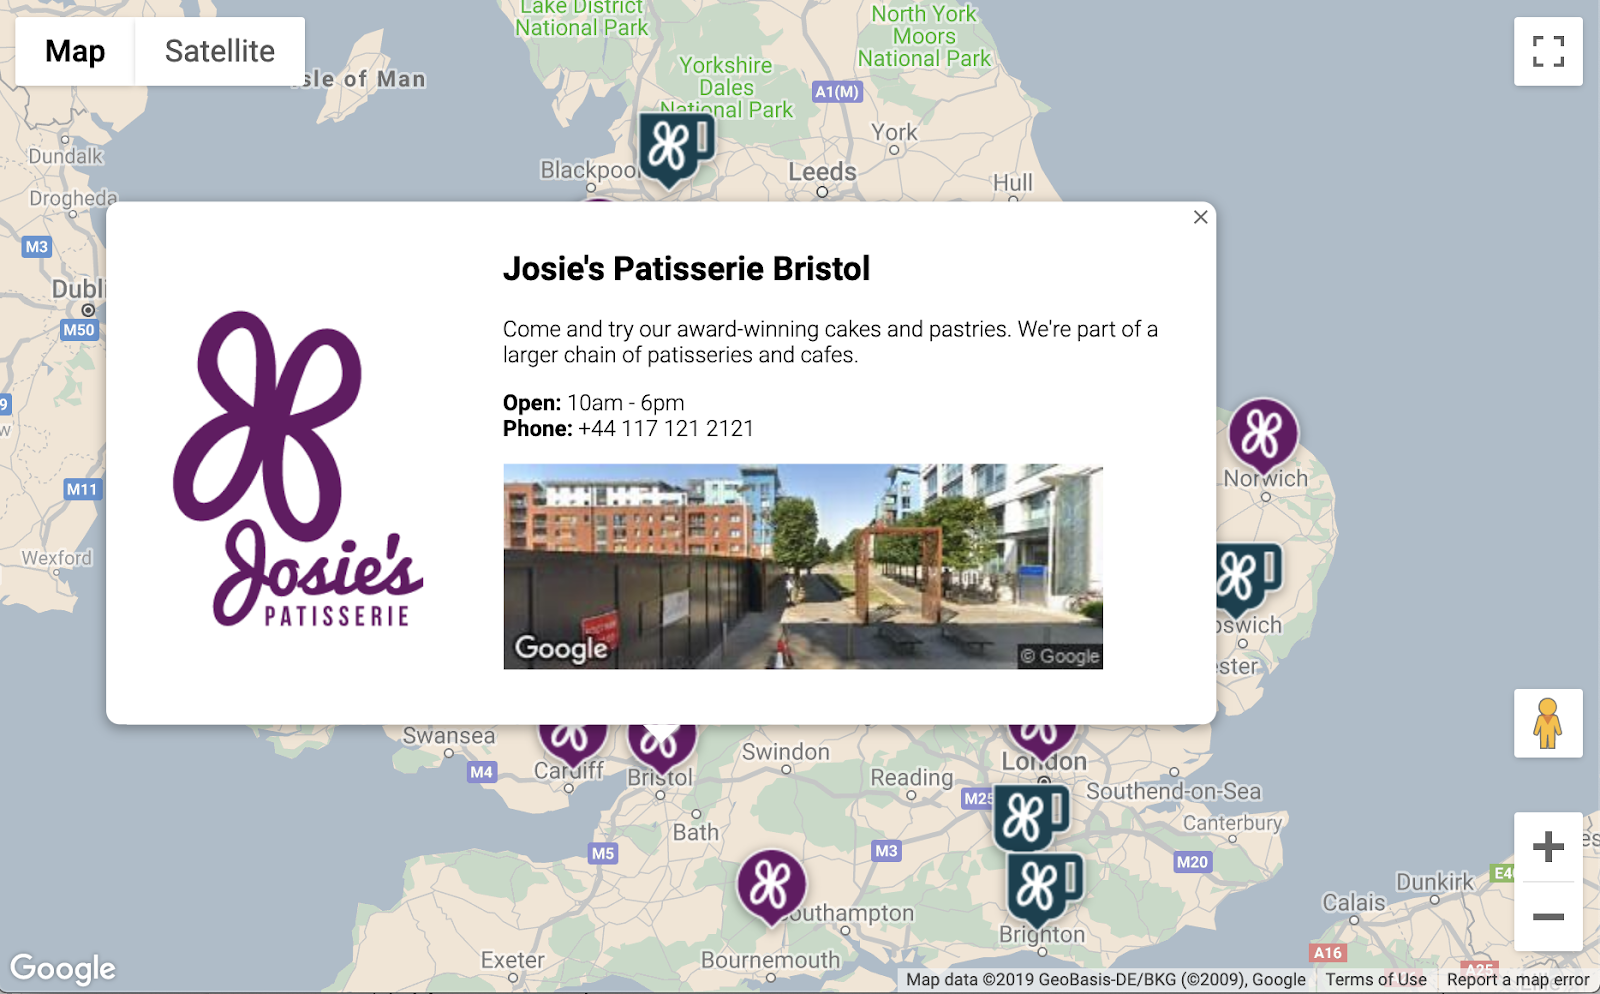
미리보기를 새로고침하면 맞춤 스타일 지정, 맞춤 마커 이미지, 개선된 정보 창 형식, 각 위치의 스트리트 뷰 이미지 등을 포함한 다음과 같은 지도가 표시됩니다.
6. 사용자 입력 가져오기
일반적으로 매장 검색 기능 사용자는 자신의 위치 또는 여정을 시작할 주소에서 가장 가까운 매장을 알고 싶어 합니다. 사용자가 쉽게 시작 주소를 입력할 수 있도록 Place Autocomplete 검색창을 추가합니다. Place Autocomplete는 다른 Google 검색창에서 Autocomplete가 작동하는 방식과 비슷한 자동 완성(typeahead) 기능을 제공하지만, 예상 검색어가 모두 Google Maps Platform의 장소라는 점이 다릅니다.
index.html수정으로 돌아가서 자동 완성 검색창 및 관련 결과 측면 패널의 스타일 지정을 추가합니다. 이전 코드 위에 붙여넣은 경우 잊지 말고 API 키를 바꿔야 합니다.
index.html
<html>

<head>
  <title>Store Locator</title>
  <style>
    #map {
      height: 100%;
    }

    html,
    body {
      height: 100%;
      margin: 0;
      padding: 0;
    }

    /* Styling for Autocomplete search bar */
    #pac-card {
      background-color: #fff;
      border-radius: 2px 0 0 2px;
      box-shadow: 0 2px 6px rgba(0, 0, 0, 0.3);
      box-sizing: border-box;
      font-family: Roboto;
      margin: 10px 10px 0 0;
      -moz-box-sizing: border-box;
      outline: none;
    }

    #pac-container {
      padding-top: 12px;
      padding-bottom: 12px;
      margin-right: 12px;
    }

    #pac-input {
      background-color: #fff;
      font-family: Roboto;
      font-size: 15px;
      font-weight: 300;
      margin-left: 12px;
      padding: 0 11px 0 13px;
      text-overflow: ellipsis;
      width: 400px;
    }

    #pac-input:focus {
      border-color: #4d90fe;
    }

    #title {
      color: #fff;
      background-color: #acbcc9;
      font-size: 18px;
      font-weight: 400;
      padding: 6px 12px;
    }

    .hidden {
      display: none;
    }

    /* Styling for an info pane that slides out from the left.
     * Hidden by default. */
    #panel {
      height: 100%;
      width: null;
      background-color: white;
      position: fixed;
      z-index: 1;
      overflow-x: hidden;
      transition: all .2s ease-out;
    }

    .open {
      width: 250px;
    }

    .place {
      font-family: 'open sans', arial, sans-serif;
      font-size: 1.2em;
      font-weight: 500;
      margin-block-end: 0px;
      padding-left: 18px;
      padding-right: 18px;
    }

    .distanceText {
      color: silver;
      font-family: 'open sans', arial, sans-serif;
      font-size: 1em;
      font-weight: 400;
      margin-block-start: 0.25em;
      padding-left: 18px;
      padding-right: 18px;
    }
  </style>
</head>

<body>
  <!-- The div to hold the map -->
  <div id="map"></div>

  <script src="app.js"></script>
  <script async defer src="https://maps.googleapis.com/maps/api/js?key=YOUR_API_KEY&libraries=places&callback=initMap&solution_channel=GMP_codelabs_simplestorelocator_v1_a">
  </script>
</body>

</html>
자동 완성 검색창과 슬라이드 아웃 패널은 기본적으로 숨겨져 있다가 필요할 때만 표시됩니다.
- 이제
app.js의initMap함수 끝(닫는 중괄호 바로 앞)에 Autocomplete 위젯을 추가합니다.
app.js
  // Build and add the search bar
  const card = document.createElement('div');
  const titleBar = document.createElement('div');
  const title = document.createElement('div');
  const container = document.createElement('div');
  const input = document.createElement('input');
  const options = {
    types: ['address'],
    componentRestrictions: {country: 'gb'},
  };

  card.setAttribute('id', 'pac-card');
  title.setAttribute('id', 'title');
  title.textContent = 'Find the nearest store';
  titleBar.appendChild(title);
  container.setAttribute('id', 'pac-container');
  input.setAttribute('id', 'pac-input');
  input.setAttribute('type', 'text');
  input.setAttribute('placeholder', 'Enter an address');
  container.appendChild(input);
  card.appendChild(titleBar);
  card.appendChild(container);
  map.controls[google.maps.ControlPosition.TOP_RIGHT].push(card);

  // Make the search bar into a Places Autocomplete search bar and select
  // which detail fields should be returned about the place that
  // the user selects from the suggestions.
  const autocomplete = new google.maps.places.Autocomplete(input, options);

  autocomplete.setFields(
      ['address_components', 'geometry', 'name']);
이 코드는 주소만 반환하기 위해 Autocomplete 제안을 제한하고(Place Autocomplete가 시설 이름 및 기관 위치와 일치할 수 있으므로), 반환되는 주소를 영국 내 주소로만 제한합니다. 이러한 선택 사양을 추가하면 사용자가 찾는 주소가 나올 때까지 예상 검색어의 범위를 좁히기 위해 입력해야 하는 문자 수가 줄어듭니다. 그런 다음, 생성한 자동 완성 div를 지도의 오른쪽 상단으로 이동하여 응답에서 각 장소에 대해 반환해야 하는 필드를 지정합니다.
- 서버를 다시 시작하고, 다음 명령어를 실행하여 미리보기를 새로고침합니다.
$ python -m SimpleHTTPServer 8080
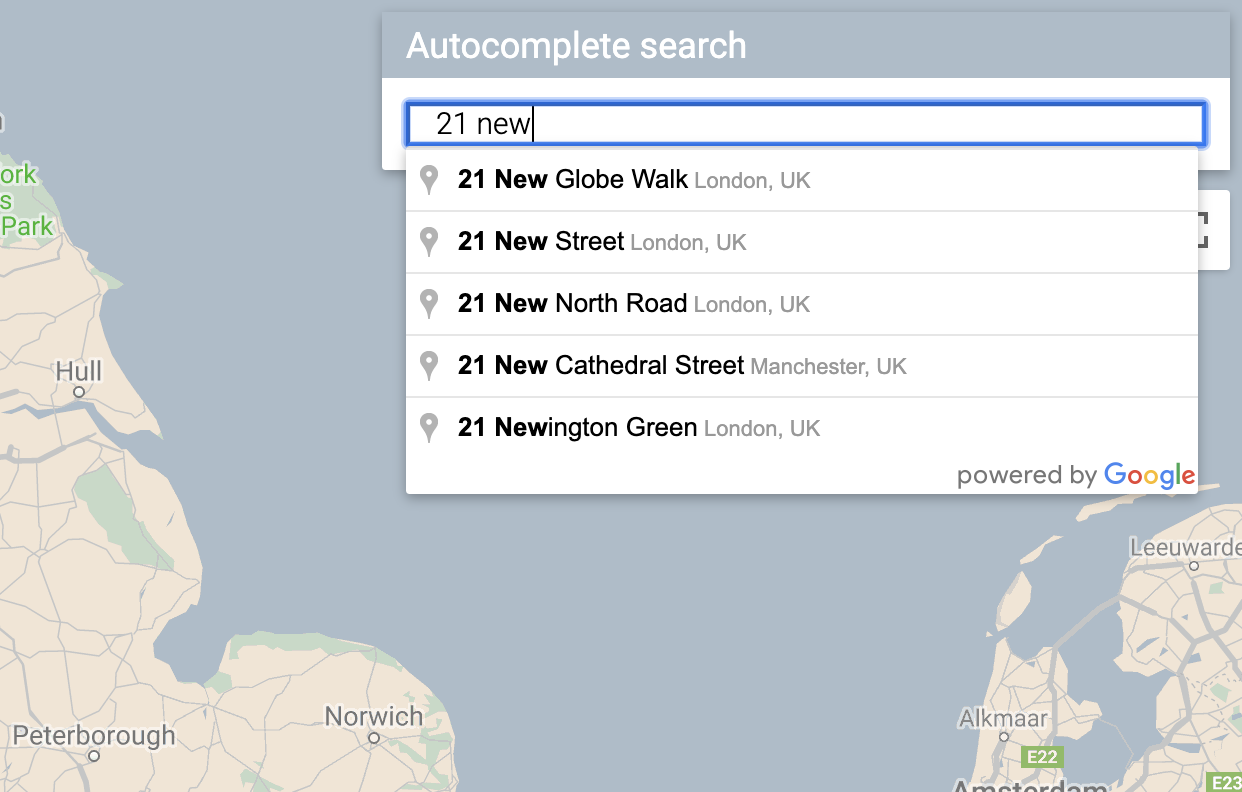
이제 지도의 오른쪽 상단에 Autocomplete 위젯이 표시됩니다. 이 위젯은 입력한 내용과 일치하는 영국 주소를 표시합니다.
이제 사용자가 자동 완성 위젯에서 예상 검색어를 선택하는 경우를 처리하고, 이 위치를 매장까지의 거리를 계산하기 위한 기준으로 사용해야 합니다.
- 방금 붙여넣은 코드 뒤에 있는
app.js의initMap끝에 다음 코드를 추가합니다.
app.js
 // Set the origin point when the user selects an address
  const originMarker = new google.maps.Marker({map: map});
  originMarker.setVisible(false);
  let originLocation = map.getCenter();

  autocomplete.addListener('place_changed', async () => {
    originMarker.setVisible(false);
    originLocation = map.getCenter();
    const place = autocomplete.getPlace();

    if (!place.geometry) {
      // User entered the name of a Place that was not suggested and
      // pressed the Enter key, or the Place Details request failed.
      window.alert('No address available for input: \'' + place.name + '\'');
      return;
    }

    // Recenter the map to the selected address
    originLocation = place.geometry.location;
    map.setCenter(originLocation);
    map.setZoom(9);
    console.log(place);

    originMarker.setPosition(originLocation);
    originMarker.setVisible(true);

    // Use the selected address as the origin to calculate distances
    // to each of the store locations
    const rankedStores = await calculateDistances(map.data, originLocation);
    showStoresList(map.data, rankedStores);

    return;
  });
이 코드는 리스너를 추가하여 사용자가 추천 주소 중 하나를 클릭하면 지도가 선택한 주소를 중심으로 재정렬되고 출발지가 거리 계산 기준으로 설정되게 합니다. 다음 단계에서 거리 계산을 구현합니다.
7. 가장 가까운 매장 표시하기
Directions API는 Google 지도 앱에서 경로를 요청할 때와 마찬가지로, 단일 출발지와 단일 목적지를 입력하여 두 지점 간의 경로를 수신하는 방식으로 작동합니다. Distance Matrix API는 여기에서 더 나아가 이동 시간 및 거리를 기반으로 가능한 여러 출발지와 목적지 간 최적의 쌍을 식별합니다. 이 경우에는 사용자가 선택한 주소와 가장 가까운 매장을 찾을 수 있도록 하나의 출발지와 더불어 일련의 매장 위치를 목적지로 제공합니다.
app.js에calculateDistances라는 새 함수를 추가합니다.
app.js
async function calculateDistances(data, origin) {
  const stores = [];
  const destinations = [];

  // Build parallel arrays for the store IDs and destinations
  data.forEach((store) => {
    const storeNum = store.getProperty('storeid');
    const storeLoc = store.getGeometry().get();

    stores.push(storeNum);
    destinations.push(storeLoc);
  });

  // Retrieve the distances of each store from the origin
  // The returned list will be in the same order as the destinations list
  const service = new google.maps.DistanceMatrixService();
  const getDistanceMatrix =
    (service, parameters) => new Promise((resolve, reject) => {
      service.getDistanceMatrix(parameters, (response, status) => {
        if (status != google.maps.DistanceMatrixStatus.OK) {
          reject(response);
        } else {
          const distances = [];
          const results = response.rows[0].elements;
          for (let j = 0; j < results.length; j++) {
            const element = results[j];
            const distanceText = element.distance.text;
            const distanceVal = element.distance.value;
            const distanceObject = {
              storeid: stores[j],
              distanceText: distanceText,
              distanceVal: distanceVal,
            };
            distances.push(distanceObject);
          }

          resolve(distances);
        }
      });
    });

  const distancesList = await getDistanceMatrix(service, {
    origins: [origin],
    destinations: destinations,
    travelMode: 'DRIVING',
    unitSystem: google.maps.UnitSystem.METRIC,
  });

  distancesList.sort((first, second) => {
    return first.distanceVal - second.distanceVal;
  });

  return distancesList;
}
이 함수는 전달된 출발지를 단일 출발지로 사용하고 매장 위치를 일련의 목적지로 사용하여 Distance Matrix API를 호출합니다. 그런 다음 매장의 ID, 사람이 읽을 수 있는 문자열로 표현된 거리, 미터 단위의 거리를 숫자 값으로 저장하여 객체 배열을 만들고 이 배열을 정렬합니다.
사용자는 가장 가까운 지점에서 가장 먼 지점 순으로 정렬된 매장 목록을 확인할 수 있습니다. calculateDistances 함수에서 반환된 목록을 통해 각 매장의 측면 패널 목록을 채워 매장의 표시 순서를 알립니다.
app.js에showStoresList라는 새 함수를 추가합니다.
app.js
function showStoresList(data, stores) {
  if (stores.length == 0) {
    console.log('empty stores');
    return;
  }

  let panel = document.createElement('div');
  // If the panel already exists, use it. Else, create it and add to the page.
  if (document.getElementById('panel')) {
    panel = document.getElementById('panel');
    // If panel is already open, close it
    if (panel.classList.contains('open')) {
      panel.classList.remove('open');
    }
  } else {
    panel.setAttribute('id', 'panel');
    const body = document.body;
    body.insertBefore(panel, body.childNodes[0]);
  }

  // Clear the previous details
  while (panel.lastChild) {
    panel.removeChild(panel.lastChild);
  }

  stores.forEach((store) => {
    // Add store details with text formatting
    const name = document.createElement('p');
    name.classList.add('place');
    const currentStore = data.getFeatureById(store.storeid);
    name.textContent = currentStore.getProperty('name');
    panel.appendChild(name);
    const distanceText = document.createElement('p');
    distanceText.classList.add('distanceText');
    distanceText.textContent = store.distanceText;
    panel.appendChild(distanceText);
  });

  // Open the panel
  panel.classList.add('open');

  return;
}
- 서버를 다시 시작하고, 다음 명령어를 실행하여 미리보기를 새로고침합니다.
$ python -m SimpleHTTPServer 8080
- 마지막으로 Autocomplete 검색창에 영국 주소를 입력한 후 제안된 검색어 중 하나를 클릭합니다.
그러면 지도가 이 주소를 중심으로 표시되며 선택한 주소로부터의 거리를 순서대로 나열한 사이드바가 표시됩니다. 아래 그림 예시를 참고하세요.

8. 선택사항: 웹페이지 호스팅하기
지금까지의 단계를 잘 따랐다면 Python HTTP 서버를 적극적으로 실행하는 경우에만 지도가 표시됩니다. 활성 Cloud Shell 세션 이외에서 지도를 보거나 지도의 URL을 다른 사람들과 공유할 수 있으려면 Cloud Storage를 사용하여 웹페이지를 호스팅해 보세요. Cloud Storage는 Google의 인프라 상에 데이터를 저장하고 액세스하기 위한 온라인 파일 스토리지 웹 서비스입니다. 이 서비스는 Google Cloud의 성능 및 확장성을 고급 보안 및 공유 기능과 결합합니다. 또한 무료 등급을 제공하여 간단한 매장 검색 기능을 호스팅하는 데 적합합니다.
Cloud Storage를 사용하면 파일이 컴퓨터의 디렉터리와 비슷한 버킷에 저장됩니다. 웹페이지를 호스팅하려면 먼저 버킷을 만들어야 합니다. 버킷에 고유한 이름을 지정해야 하며, 버킷 이름의 일부로 사용자 이름을 사용할 수도 있습니다.
- 이름을 정한 후 Cloud Shell에서 다음 명령어를 실행합니다.
$ gsutil mb gs://yourname-store-locator
gsutil은 Cloud Storage와 상호작용하기 위한 도구입니다. mb 명령어는 '버킷 만들기'를 의미합니다. 사용하는 명령어를 포함하여 사용 가능한 모든 명령어에 관한 자세한 내용은 gsutil 도구를 참고하세요.
기본적으로 Cloud Storage에 호스팅되는 버킷과 파일은 비공개입니다. 하지만 매장 검색 기능의 경우, 모든 사용자가 인터넷을 통해 액세스할 수 있도록 모든 파일을 공개하는 것이 좋습니다. 업로드한 후에 각 파일을 공개할 수도 있지만 이렇게 하면 프로세스가 길어지고 지루해질 수 있습니다. 이렇게 하는 대신 생성한 버킷에 기본 액세스 수준을 설정하기만 하면 업로드하는 모든 파일이 해당 액세스 수준을 상속합니다.
yourname-store-locator를 선택한 버킷 이름으로 바꿔 다음 명령어를 실행합니다.
$ gsutil defacl ch -u AllUsers:R gs://yourname-store-locator
- 이제 다음 명령어를 사용하여 현재 디렉터리(현재
index.html및app.js파일만)에 있는 모든 파일을 업로드할 수 있습니다.
$ gsutil -h "Cache-Control:no-cache" cp * gs://yourname-store-locator
이제 온라인 지도가 포함된 웹페이지가 만들어졌습니다. 확인하려는 URL은 http://storage.googleapis.com/yourname-store-locator/index.html이며, 다시 yourname-store-locator 부분을 이전에 선택한 버킷 이름으로 다시 바꿉니다.
삭제하기
이 프로젝트에서 생성한 모든 리소스를 삭제하는 가장 간단한 방법은 이 튜토리얼 시작 부분에서 생성한 Google Cloud 프로젝트를 종료하는 것입니다.
- Cloud Console에서 설정 페이지를 엽니다.
- 프로젝트 선택을 클릭합니다.
- 이 튜토리얼 시작 부분에서 만든 프로젝트를 선택하고 열기를 클릭합니다.
- 프로젝트 ID를 입력하고 종료를 클릭합니다.
9. 축하합니다
축하합니다. 이 Codelab을 완료했습니다.
학습한 내용
- Maps JavaScript API를 사용하여 맞춤 스타일 지도 추가하기
- GeoJSON 형식으로 지도에 데이터 영역 로드하기
- Street View Static API를 사용하여 웹페이지에 스트리트 뷰 이미지 표시하기
- 장소 라이브러리를 사용하여 페이지에 Place Autocomplete 검색창 추가하기
- Distance Matrix 서비스를 사용하여 단일 API 호출을 통해 여러 거리 계산하기
- 브라우저 기반 Cloud Shell 명령줄 인터페이스를 사용하여 Google Cloud Platform에서 웹 개발 프로젝트 관리 및 테스트하기
- Cloud Storage를 사용하여 웹사이트 호스팅하기
자세히 알아보기
- 뉴욕시 지하철 매핑하기 Codelab에서 Google App Engine을 사용하여 웹 지도를 호스팅하는 또 다른 방법을 알아보세요.
- 주변 비즈니스 검색 구축하기 서비스와 같이 더 많은 Google Maps Platform Codelab을 살펴보세요.
- 아래 질문에 답하여 Google에서 가장 유용한 콘텐츠를 만들 수 있도록 도와주세요.
다른 Codelab에서 어떤 내용을 다뤘으면 하시나요?
원하는 Codelab이 위에 나와 있지 않나요? 여기에서 새로운 문제로 요청하기
코드에 대해 자세히 살펴보려면 https://github.com/googlecodelabs/google-maps-simple-store-locator 페이지에서 소스 코드 저장소를 참고하세요.
