Mantenha tudo organizado com as coleções
Salve e categorize o conteúdo com base nas suas preferências.
Todas as chamadas da Google Ad Manager API devem ser autorizadas por meio do OAuth2, um padrão aberto que
permite que os usuários concedam permissões a aplicativos de terceiros, para que o
pode interagir com serviços da Web em nome do usuário. O OAuth2 ativa
seu aplicativo cliente da API Ad Manager para acessar a conta do Ad Manager de um usuário
sem ter que lidar ou armazenar o nome de usuário ou a senha do usuário.
Gerar as credenciais do OAuth2
Siga as etapas abaixo para gerar as credenciais do OAuth2.
1. Determinar o tipo de autenticação
Verifique na tabela abaixo qual tipo de autenticação é mais apropriado.
para seu aplicativo da API Ad Manager:
Escolher o tipo de autenticação do OAuth2
Conta de serviço
Escolha essa opção se você só precisar de acesso aos seus próprios dados do Ad Manager.
No menu suspenso do projeto, escolha Criar um novo projeto e insira um nome.
do projeto e, opcionalmente, editar o ID do projeto fornecido. Clique em
Criar.
Na página "Credenciais", selecione Criar credenciais e, em seguida,
Selecione Chave da conta de serviço.
No menu suspenso do projeto, escolha Criar um novo projeto e insira um nome.
do projeto (e, opcionalmente, editar o ID fornecido) e clique em
Criar.
Na página "Credenciais", selecione Criar credenciais e, em seguida,
Selecione o ID do cliente OAuth.
Pode ser solicitado que você defina um nome de produto no
Página "Tela de consentimento" Se sim, clique em Configurar tela de consentimento.
forneça as informações solicitadas e clique em Salvar para retornar à
Página de credenciais.
Selecione Aplicativo da Web para o Tipo de aplicativo. Siga o
para inserir origens do JavaScript, URIs de redirecionamento ou ambos.
Clique em Criar.
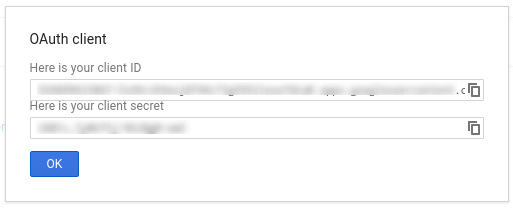
Na página exibida, copie o ID e a chave secreta do cliente.
para a área de transferência, já que você vai precisar delas para configurar o cliente
biblioteca.
3. Configurar a rede do Ad Manager
Se você for um desenvolvedor terceirizado, peça para seu cliente fazer isso
etapa por você.
Clique no botão Adicionar um usuário da conta de serviço.
Preencha o formulário usando o e-mail da conta de serviço. A
o usuário da conta de serviço precisa receber permissões para acessar o
entidades como se o usuário da conta de serviço acessasse as entidades na
na interface.
Clique no botão Salvar. Uma mensagem será exibida confirmando
a adição da conta de serviço.
Para visualizar os usuários da conta de serviço, acesse a guia "Usuários" e, em seguida,
clique no filtro Conta de serviço.
Nossas bibliotecas cliente cuidam automaticamente dos detalhes descritos abaixo para que
continue lendo se estiver interessado nos bastidores.
Esta seção é destinada a usuários avançados que já estejam familiarizados
com a especificação OAuth2 e
saber como usar o OAuth2 com as APIs do Google;
Cabeçalho de solicitação HTTP
O cabeçalho HTTP de cada solicitação à API Ad Manager precisa incluir um cabeçalho de
neste formato:
Um único token de acesso pode conceder diferentes graus de acesso a várias APIs. Um
chamada scope controla o conjunto de recursos e
as operações permitidas por um token de acesso. Durante a solicitação do token de acesso, o
aplicativo envia um ou mais valores no parâmetro scope.
O Ad Manager tem apenas um escopo, mostrado abaixo. É necessário realizar a autorização
no nível do usuário dentro do produto.
Escopo
Permissões
https://www.googleapis.com/auth/dfp
Visualize e gerencie suas campanhas no Ad Manager.
[[["Fácil de entender","easyToUnderstand","thumb-up"],["Meu problema foi resolvido","solvedMyProblem","thumb-up"],["Outro","otherUp","thumb-up"]],[["Não contém as informações de que eu preciso","missingTheInformationINeed","thumb-down"],["Muito complicado / etapas demais","tooComplicatedTooManySteps","thumb-down"],["Desatualizado","outOfDate","thumb-down"],["Problema na tradução","translationIssue","thumb-down"],["Problema com as amostras / o código","samplesCodeIssue","thumb-down"],["Outro","otherDown","thumb-down"]],["Última atualização 2025-08-31 UTC."],[[["\u003cp\u003eAll Google Ad Manager API calls require OAuth2 authorization for secure access to user data without storing sensitive login information.\u003c/p\u003e\n"],["\u003cp\u003eChoose between Service Account or Web Application authentication type based on your application's needs.\u003c/p\u003e\n"],["\u003cp\u003eGenerate OAuth2 credentials by following instructions for your chosen authentication type via the Google API Console.\u003c/p\u003e\n"],["\u003cp\u003eConfigure your Ad Manager network settings and client library according to provided guidelines for the specific authentication method and programming language.\u003c/p\u003e\n"],["\u003cp\u003eClient libraries handle most OAuth2 complexities but you can delve into the background details concerning HTTP headers and scopes if needed.\u003c/p\u003e\n"]]],["Google Ad Manager API access requires OAuth2 authorization. First, choose between \"Service account\" for personal data or \"Web application\" for user-authorized access. Then, create OAuth2 credentials via the Google API Console, either generating a JSON key for service accounts or a client ID and secret for web applications. Next, configure the Ad Manager network to allow API access, adding the service account email if applicable. Lastly, configure and use a client library, or implement the OAuth2 flow directly, including the access token in the HTTP header.\n"],null,["# Authentication\n\nAll Google Ad Manager API calls must be authorized through [OAuth2](http://oauth.net/2/) an open standard that\nallows users to grant permissions to third-party applications, so the\napplication can interact with web services on the user's behalf. OAuth2 enables\nyour Ad Manager API client application to access a user's Ad Manager account\nwithout having to handle or store the user's username or password.\n\nGenerate OAuth2 credentials\n---------------------------\n\nPerform the following steps to generate the OAuth2 credentials.\n\n### 1. Determine your authentication type\n\nCheck the table below to see which **authentication type** is most appropriate\nfor your Ad Manager API application:\n\n| Choose your OAuth2 authentication type ||\n|---------------------|-----------------------------------------------------------------------------------------------------------------------------------------------------------------------------------|\n| **Service account** | Choose this if you only need access to your own Ad Manager data. [Learn more.](/identity/protocols/OAuth2ServiceAccount) |\n| **Web application** | Choose this if you want to authenticate as any user who grants permission to your application to access their Ad Manager data. [Learn more.](/identity/protocols/OAuth2WebServer) |\n\n### 2. Create OAuth2 credentials\n\nOnce you've determined your authentication type, click the corresponding tab\nbelow and follow the instructions to generate the OAuth2 credentials:\nService Account\n\n1. Open the [Google API Console Credentials page](https://console.cloud.google.com/apis/credentials).\n2. From the project drop-down, choose **Create a new project** , enter a name for the project, and optionally, edit the provided Project ID. Click **Create**.\n3. On the Credentials page, select **Create credentials** , then select **Service account key**.\n4. Select [New service account](//console.developers.google.com/apis/credentials/serviceaccountkey), and select **JSON**.\n5. Click **Create** to download a file containing a private key.\nWeb application\n\n1. Open the [Google API Console Credentials page](https://console.cloud.google.com/apis/credentials).\n2. From the project drop-down, choose **Create a new project** , enter a name for the project (and optionally, edit the provided Project ID), and click **Create**.\n3. On the Credentials page, select **Create credentials** , then select **OAuth client ID**.\n4. You may be prompted to set a product name on the Consent Screen page; if so, click **Configure consent screen** , supply the requested information, and click **Save** to return to the Credentials page.\n5. Select **Web Application** for the **Application Type**. Follow the instructions to enter JavaScript origins, redirect URIs, or both.\n6. Click **Create**.\n7. On the page that appears, copy the **client ID** and **client secret** to your clipboard, as you will need them when you configure your client library.\n\n### 3. Configure your Ad Manager network\n\nIf you are a third-party developer, you may need to have your client do this\nstep for you.\nService Account\n\n1. Go to your [Ad Manager network](//admanager.google.com).\n2. Click the **Admin** tab.\n3. Ensure that **API access** is enabled.\n4. Click the **Add a service account user** button.\n5. Fill in the form using the service account email. The service account user must be granted with permissions to access the entities as if that service account user would access the entities on the UI.\n6. Click on the **Save** button. A message should appear, confirming the addition of your service account.\n7. View existing service account users by going to the Users tab and then clicking the **Service Account** filter.\nWeb application\n\n1. Go to your [Ad Manager network](//admanager.google.com).\n2. Click the **Admin** tab.\n3. Ensure that **API access** is enabled.\n\n### 4. Configure and use a client library\n\nFollow the appropriate guide below to use the credentials in your client library: \n\n### Java\n\n- [Service account flow](//github.com/googleads/googleads-java-lib/wiki/API-access-using-own-credentials-(server-to-server-flow)#step-2---setting-up-the-client-library)\n- [Web app flow](//github.com/googleads/googleads-java-lib/wiki/API-access-on-behalf-of-your-clients-(web-flow)#step-2---setting-up-the-client-library)\n\n### .NET\n\n- [Service account flow](//github.com/googleads/googleads-dotnet-lib/wiki/API-access-using-own-credentials-(server-to-server-flow)#step-2---setting-up-the-client-library)\n- [Web app flow](//github.com/googleads/googleads-dotnet-lib/wiki/API-access-on-behalf-of-your-clients-(web-flow)#step-2---setting-up-the-client-library)\n\n### Python\n\n- [Service account flow](//github.com/googleads/googleads-python-lib/wiki/API-access-using-own-credentials-(server-to-server-flow)#step-2---setting-up-the-client-library)\n- [Web app flow](//github.com/googleads/googleads-python-lib/wiki/API-access-on-behalf-of-your-clients-(web-flow)#step-2---setting-up-the-client-library)\n\n### PHP\n\n- [Service account flow](https://github.com/googleads/googleads-php-lib/wiki/API-access-using-own-credentials-(server-to-server-flow))\n- [Web app flow](https://github.com/googleads/googleads-php-lib/wiki/API-access-on-behalf-of-your-clients-(web-flow))\n\n### Ruby\n\n- [Service account flow](//github.com/googleads/google-api-ads-ruby/wiki/API-access-using-own-credentials-(server-to-server-flow)#step-2---setting-up-the-client-library)\n- [Web app flow](//github.com/googleads/google-api-ads-ruby/wiki/API-access-on-behalf-of-your-clients-(web-flow)#step-2---setting-up-the-client-library)\n\n\u003cbr /\u003e\n\nIf you choose not to use one of our client libraries, you'll need to implement\nthe OAuth2 [service account](/identity/protocols/OAuth2ServiceAccount) or [web\napp](/identity/protocols/OAuth2WebServer) flow yourself.\n\nBehind the scenes\n-----------------\n\nOur client libraries automatically take care of the details covered below so\nonly read on if you're interested in what's happening behind the scenes.\nThis section is intended for advanced users who are already familiar\nwith the [OAuth2 specification](http://tools.ietf.org/html/rfc6749) and\nknow how to [use OAuth2 with Google APIs](/accounts/docs/OAuth2).\n\n#### HTTP request header\n\nThe HTTP header in every request to the Ad Manager API must include an access\ntoken in this form: \n\n```actionscript-3\nAuthorization: Bearer ACCESS_TOKEN\n```\n\nFor example: \n\n```http\nPOST ... HTTP/1.1\nHost: ...\nAuthorization: Bearer 1/fFAGRNJru1FTz70BzhT3Zg\nContent-Type: text/xml;charset=UTF-8\nContent-Length: ...\n\n\u003c?xml version=\"1.0\"?\u003e\n\u003csoap:Envelope xmlns:soap=\"http://www.w3.org/2001/12/soap-envelope\"\u003e\n…\n\u003c/soap:Envelope\u003e\n```\n\n#### Scope\n\nA single access token can grant varying degrees of access to multiple APIs. A\nvariable parameter called `scope` controls the set of resources and\noperations that an access token permits. During the access token request, your\napplication sends one or more values in the `scope` parameter.\n\nAd Manager has only one scope, shown below. Authorization should be performed\nat the user level within the product.\n\n| Scope | Permissions |\n|---------------------------------------|-----------------------------------------------|\n| `https://www.googleapis.com/auth/dfp` | View and manage your campaigns on Ad Manager. |"]]