Mantieni tutto organizzato con le raccolte
Salva e classifica i contenuti in base alle tue preferenze.
Tutte le chiamate API di Google Ad Manager devono essere autorizzate tramite OAuth2, uno standard aperto che
consente agli utenti di concedere autorizzazioni ad applicazioni di terze parti, quindi
un'applicazione può interagire con i servizi web per conto dell'utente. Attivazione di OAuth2
l'applicazione client dell'API Ad Manager per accedere all'account Ad Manager di un utente
senza dover gestire o archiviare il nome utente o la password dell'utente.
Genera credenziali OAuth2
Per generare le credenziali OAuth2, segui questi passaggi.
1. Determinare il tipo di autenticazione
Consulta la tabella che segue per stabilire quale tipo di autenticazione è più appropriato
per la tua applicazione API Ad Manager:
Scegli il tipo di autenticazione OAuth2
Account di servizio
Scegli questa opzione se hai bisogno di accedere solo ai tuoi dati di Ad Manager.
Scegli questa opzione se desideri autenticarti come qualsiasi utente che concede
concedere alla tua applicazione l'autorizzazione ad accedere ai relativi dati di Ad Manager.
Dopo aver determinato il tipo di autenticazione, fai clic sulla scheda corrispondente
di seguito e segui le istruzioni per generare le credenziali OAuth2:
Dal menu a discesa del progetto, scegli Crea un nuovo progetto e inserisci un nome
per il progetto e, facoltativamente, modificare l'ID progetto fornito. Clic
Crea.
Nella pagina Credenziali, seleziona Crea credenziali, quindi
Seleziona Chiave account di servizio.
Dal menu a discesa del progetto, scegli Crea un nuovo progetto e inserisci un nome
del progetto (e, facoltativamente, modifica l'ID progetto fornito) e fai clic su
Crea.
Nella pagina Credenziali, seleziona Crea credenziali, quindi
Seleziona ID client OAuth.
È possibile che ti venga chiesto di impostare il nome di un prodotto
pagina della schermata per il consenso; In questo caso, fai clic su Configura schermata per il consenso
fornisci le informazioni richieste e fai clic su Salva per tornare
pagina Credenziali.
Seleziona Web Application (Applicazione web) come Application Type (Tipo di applicazione). Segui le
istruzioni per inserire origini JavaScript, URI di reindirizzamento o entrambi.
Fai clic su Crea.
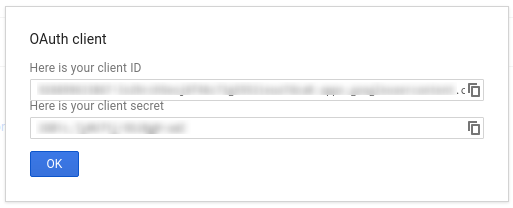
Copia l'ID client e il client secret nella pagina visualizzata.
negli appunti, perché ti serviranno durante la configurazione
libreria.
3. Configurare la rete Ad Manager
Se sei uno sviluppatore di terze parti, potresti dover chiedere al tuo cliente di farlo.
passaggio per te.
Fai clic sul pulsante Aggiungi utente con account di servizio.
Compila il modulo utilizzando l'indirizzo email dell'account di servizio. La
all'account di servizio dell'utente deve disporre delle autorizzazioni per accedere
come se l'utente dell'account di servizio accedesse alle entità
l'interfaccia utente.
Fai clic sul pulsante Salva. Viene visualizzato un messaggio di conferma
l'aggiunta dell'account di servizio.
Per vedere gli utenti con account di servizio esistenti, vai alla scheda Utenti e poi
facendo clic sul filtro Account di servizio.
Le nostre librerie client si occupano automaticamente dei dettagli descritti di seguito,
Continua a leggere se ti interessa scoprire cosa succede dietro le quinte.
Questa sezione è rivolta agli utenti avanzati che hanno già familiarità
con la specifica OAuth2 e
scopri come utilizzare OAuth2 con le API di Google.
Intestazione richiesta HTTP
L'intestazione HTTP in ogni richiesta all'API Ad Manager deve includere un accesso
in questo modulo:
Un singolo token di accesso può concedere diversi gradi di accesso a più API. R
un parametro della variabile denominato scope controlla l'insieme di risorse
operazioni consentite da un token di accesso. Durante la richiesta del token di accesso,
applicazione invia uno o più valori nel parametro scope.
Ad Manager ha un solo ambito, mostrato di seguito. L'autorizzazione deve essere eseguita
a livello di utente all'interno del prodotto.
Ambito
Autorizzazioni
https://www.googleapis.com/auth/dfp
Visualizza e gestisci le tue campagne su Ad Manager.
[[["Facile da capire","easyToUnderstand","thumb-up"],["Il problema è stato risolto","solvedMyProblem","thumb-up"],["Altra","otherUp","thumb-up"]],[["Mancano le informazioni di cui ho bisogno","missingTheInformationINeed","thumb-down"],["Troppo complicato/troppi passaggi","tooComplicatedTooManySteps","thumb-down"],["Obsoleti","outOfDate","thumb-down"],["Problema di traduzione","translationIssue","thumb-down"],["Problema relativo a esempi/codice","samplesCodeIssue","thumb-down"],["Altra","otherDown","thumb-down"]],["Ultimo aggiornamento 2025-08-31 UTC."],[[["\u003cp\u003eAll Google Ad Manager API calls require OAuth2 authorization for secure access to user data without storing sensitive login information.\u003c/p\u003e\n"],["\u003cp\u003eChoose between Service Account or Web Application authentication type based on your application's needs.\u003c/p\u003e\n"],["\u003cp\u003eGenerate OAuth2 credentials by following instructions for your chosen authentication type via the Google API Console.\u003c/p\u003e\n"],["\u003cp\u003eConfigure your Ad Manager network settings and client library according to provided guidelines for the specific authentication method and programming language.\u003c/p\u003e\n"],["\u003cp\u003eClient libraries handle most OAuth2 complexities but you can delve into the background details concerning HTTP headers and scopes if needed.\u003c/p\u003e\n"]]],["Google Ad Manager API access requires OAuth2 authorization. First, choose between \"Service account\" for personal data or \"Web application\" for user-authorized access. Then, create OAuth2 credentials via the Google API Console, either generating a JSON key for service accounts or a client ID and secret for web applications. Next, configure the Ad Manager network to allow API access, adding the service account email if applicable. Lastly, configure and use a client library, or implement the OAuth2 flow directly, including the access token in the HTTP header.\n"],null,["# Authentication\n\nAll Google Ad Manager API calls must be authorized through [OAuth2](http://oauth.net/2/) an open standard that\nallows users to grant permissions to third-party applications, so the\napplication can interact with web services on the user's behalf. OAuth2 enables\nyour Ad Manager API client application to access a user's Ad Manager account\nwithout having to handle or store the user's username or password.\n\nGenerate OAuth2 credentials\n---------------------------\n\nPerform the following steps to generate the OAuth2 credentials.\n\n### 1. Determine your authentication type\n\nCheck the table below to see which **authentication type** is most appropriate\nfor your Ad Manager API application:\n\n| Choose your OAuth2 authentication type ||\n|---------------------|-----------------------------------------------------------------------------------------------------------------------------------------------------------------------------------|\n| **Service account** | Choose this if you only need access to your own Ad Manager data. [Learn more.](/identity/protocols/OAuth2ServiceAccount) |\n| **Web application** | Choose this if you want to authenticate as any user who grants permission to your application to access their Ad Manager data. [Learn more.](/identity/protocols/OAuth2WebServer) |\n\n### 2. Create OAuth2 credentials\n\nOnce you've determined your authentication type, click the corresponding tab\nbelow and follow the instructions to generate the OAuth2 credentials:\nService Account\n\n1. Open the [Google API Console Credentials page](https://console.cloud.google.com/apis/credentials).\n2. From the project drop-down, choose **Create a new project** , enter a name for the project, and optionally, edit the provided Project ID. Click **Create**.\n3. On the Credentials page, select **Create credentials** , then select **Service account key**.\n4. Select [New service account](//console.developers.google.com/apis/credentials/serviceaccountkey), and select **JSON**.\n5. Click **Create** to download a file containing a private key.\nWeb application\n\n1. Open the [Google API Console Credentials page](https://console.cloud.google.com/apis/credentials).\n2. From the project drop-down, choose **Create a new project** , enter a name for the project (and optionally, edit the provided Project ID), and click **Create**.\n3. On the Credentials page, select **Create credentials** , then select **OAuth client ID**.\n4. You may be prompted to set a product name on the Consent Screen page; if so, click **Configure consent screen** , supply the requested information, and click **Save** to return to the Credentials page.\n5. Select **Web Application** for the **Application Type**. Follow the instructions to enter JavaScript origins, redirect URIs, or both.\n6. Click **Create**.\n7. On the page that appears, copy the **client ID** and **client secret** to your clipboard, as you will need them when you configure your client library.\n\n### 3. Configure your Ad Manager network\n\nIf you are a third-party developer, you may need to have your client do this\nstep for you.\nService Account\n\n1. Go to your [Ad Manager network](//admanager.google.com).\n2. Click the **Admin** tab.\n3. Ensure that **API access** is enabled.\n4. Click the **Add a service account user** button.\n5. Fill in the form using the service account email. The service account user must be granted with permissions to access the entities as if that service account user would access the entities on the UI.\n6. Click on the **Save** button. A message should appear, confirming the addition of your service account.\n7. View existing service account users by going to the Users tab and then clicking the **Service Account** filter.\nWeb application\n\n1. Go to your [Ad Manager network](//admanager.google.com).\n2. Click the **Admin** tab.\n3. Ensure that **API access** is enabled.\n\n### 4. Configure and use a client library\n\nFollow the appropriate guide below to use the credentials in your client library: \n\n### Java\n\n- [Service account flow](//github.com/googleads/googleads-java-lib/wiki/API-access-using-own-credentials-(server-to-server-flow)#step-2---setting-up-the-client-library)\n- [Web app flow](//github.com/googleads/googleads-java-lib/wiki/API-access-on-behalf-of-your-clients-(web-flow)#step-2---setting-up-the-client-library)\n\n### .NET\n\n- [Service account flow](//github.com/googleads/googleads-dotnet-lib/wiki/API-access-using-own-credentials-(server-to-server-flow)#step-2---setting-up-the-client-library)\n- [Web app flow](//github.com/googleads/googleads-dotnet-lib/wiki/API-access-on-behalf-of-your-clients-(web-flow)#step-2---setting-up-the-client-library)\n\n### Python\n\n- [Service account flow](//github.com/googleads/googleads-python-lib/wiki/API-access-using-own-credentials-(server-to-server-flow)#step-2---setting-up-the-client-library)\n- [Web app flow](//github.com/googleads/googleads-python-lib/wiki/API-access-on-behalf-of-your-clients-(web-flow)#step-2---setting-up-the-client-library)\n\n### PHP\n\n- [Service account flow](https://github.com/googleads/googleads-php-lib/wiki/API-access-using-own-credentials-(server-to-server-flow))\n- [Web app flow](https://github.com/googleads/googleads-php-lib/wiki/API-access-on-behalf-of-your-clients-(web-flow))\n\n### Ruby\n\n- [Service account flow](//github.com/googleads/google-api-ads-ruby/wiki/API-access-using-own-credentials-(server-to-server-flow)#step-2---setting-up-the-client-library)\n- [Web app flow](//github.com/googleads/google-api-ads-ruby/wiki/API-access-on-behalf-of-your-clients-(web-flow)#step-2---setting-up-the-client-library)\n\n\u003cbr /\u003e\n\nIf you choose not to use one of our client libraries, you'll need to implement\nthe OAuth2 [service account](/identity/protocols/OAuth2ServiceAccount) or [web\napp](/identity/protocols/OAuth2WebServer) flow yourself.\n\nBehind the scenes\n-----------------\n\nOur client libraries automatically take care of the details covered below so\nonly read on if you're interested in what's happening behind the scenes.\nThis section is intended for advanced users who are already familiar\nwith the [OAuth2 specification](http://tools.ietf.org/html/rfc6749) and\nknow how to [use OAuth2 with Google APIs](/accounts/docs/OAuth2).\n\n#### HTTP request header\n\nThe HTTP header in every request to the Ad Manager API must include an access\ntoken in this form: \n\n```actionscript-3\nAuthorization: Bearer ACCESS_TOKEN\n```\n\nFor example: \n\n```http\nPOST ... HTTP/1.1\nHost: ...\nAuthorization: Bearer 1/fFAGRNJru1FTz70BzhT3Zg\nContent-Type: text/xml;charset=UTF-8\nContent-Length: ...\n\n\u003c?xml version=\"1.0\"?\u003e\n\u003csoap:Envelope xmlns:soap=\"http://www.w3.org/2001/12/soap-envelope\"\u003e\n…\n\u003c/soap:Envelope\u003e\n```\n\n#### Scope\n\nA single access token can grant varying degrees of access to multiple APIs. A\nvariable parameter called `scope` controls the set of resources and\noperations that an access token permits. During the access token request, your\napplication sends one or more values in the `scope` parameter.\n\nAd Manager has only one scope, shown below. Authorization should be performed\nat the user level within the product.\n\n| Scope | Permissions |\n|---------------------------------------|-----------------------------------------------|\n| `https://www.googleapis.com/auth/dfp` | View and manage your campaigns on Ad Manager. |"]]