نمای کلی
ورود با گوگل مبتنی بر OAuth لینکدهی ساده، ورود با گوگل را علاوه بر لینکدهی OAuth اضافه میکند. این یک تجربه لینکدهی یکپارچه برای کاربران گوگل فراهم میکند و همچنین امکان ایجاد حساب کاربری را فراهم میکند که به کاربر اجازه میدهد با استفاده از حساب گوگل خود، یک حساب کاربری جدید در سرویس شما ایجاد کند.
برای انجام لینک کردن حساب کاربری با OAuth و ورود با گوگل، این مراحل کلی را دنبال کنید:
- ابتدا، از کاربر بخواهید که برای دسترسی به پروفایل گوگل خود رضایت دهد.
- از اطلاعات موجود در پروفایل آنها برای بررسی وجود حساب کاربری استفاده کنید.
- برای کاربران موجود، حسابها را پیوند دهید.
- اگر در سیستم احراز هویت خود نمیتوانید کاربر گوگل را پیدا کنید، شناسه توکن دریافتی از گوگل را اعتبارسنجی کنید. سپس میتوانید بر اساس اطلاعات پروفایل موجود در شناسه توکن، یک کاربر ایجاد کنید.

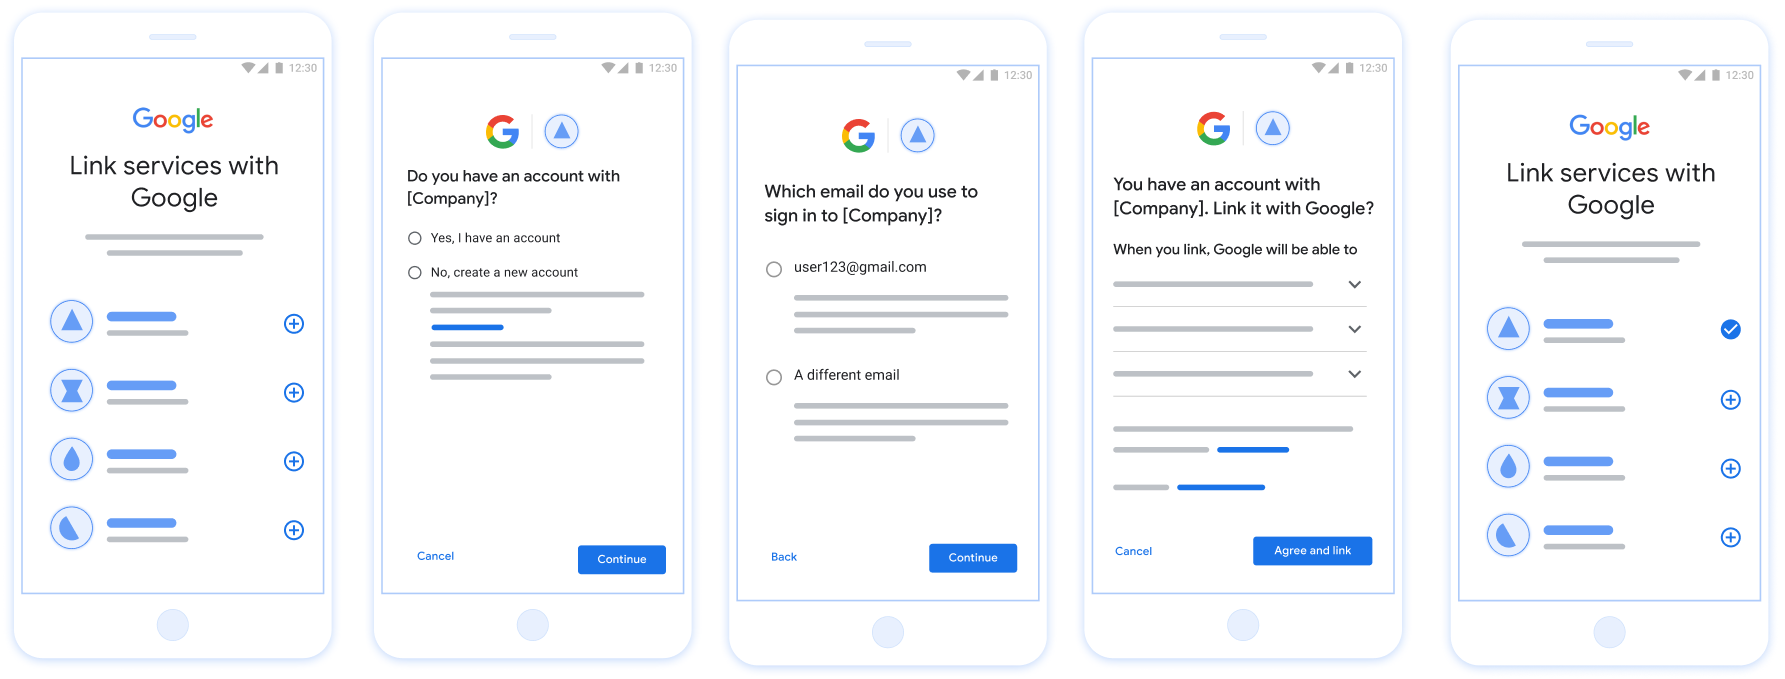
شکل ۱. اتصال حساب کاربری روی گوشی کاربر با استفاده از قابلیت اتصال ساده
لینکدهی ساده: OAuth + ورود با Google Flow
نمودار توالی زیر، تعاملات بین کاربر، گوگل و نقطه پایانی تبادل توکن شما را برای لینکسازی سادهشده (Streamlined Linking) به تفصیل نشان میدهد.
نقشها و مسئولیتها
جدول زیر نقشها و مسئولیتهای بازیگران در جریان پیوند ساده را تعریف میکند.
| بازیگر / جزء | نقش GAL | مسئولیتها |
|---|---|---|
| برنامه/سرور گوگل | کلاینت OAuth | رضایت کاربر را برای ورود با گوگل دریافت میکند، اطلاعات احراز هویت (JWT) را به سرور شما ارسال میکند و توکنهای حاصل را به طور ایمن ذخیره میکند. |
| نقطه پایانی تبادل توکن شما | ارائه دهنده هویت / سرور مجوز | اعتبارسنجی ادعاهای هویت، بررسی حسابهای کاربری موجود، مدیریت اهداف اتصال حساب کاربری ( check ، get ، create ) و صدور توکنها بر اساس اهداف درخواستی. |
| API سرویس شما | سرور منابع | دسترسی به دادههای کاربر را در صورت ارائه یک توکن دسترسی معتبر فراهم میکند. |
الزامات مربوط به لینکسازی ساده
- جریان لینکدهی اولیه OAuth وب را پیادهسازی کنید. سرویس شما باید از نقاط پایانی مجوزدهی و تبادل توکن سازگار با OAuth 2.0 پشتیبانی کند.
- نقطه پایانی تبادل توکن شما باید از ادعاهای JSON Web Token (JWT) پشتیبانی کند و اهداف
check،createوgetرا پیادهسازی کند.
سرور OAuth خود را پیادهسازی کنید
نقطه پایانی تبادل توکن شما باید از اهداف check ، create و get پشتیبانی کند. برای تکمیل جریان اتصال حساب و یادگیری زمان استفاده از اهداف مختلف، این مراحل را دنبال کنید:
- آیا کاربر در سیستم احراز هویت شما حساب کاربری دارد؟ (کاربر با انتخاب بله یا خیر تصمیم میگیرد)
- بله: آیا کاربر از ایمیل مرتبط با حساب گوگل خود برای ورود به پلتفرم شما استفاده میکند؟ (کاربر با انتخاب بله یا خیر تصمیم میگیرد)
- بله: آیا کاربر در سیستم احراز هویت شما حساب کاربری منطبقی دارد؟ (
check intent، تأیید است)- بله: اگر get intent با موفقیت برگردد،
get intentفراخوانی میشود و حساب کاربری مرتبط میشود. - خیر: ایجاد حساب کاربری جدید؟ (کاربر با انتخاب بله یا خیر تصمیم میگیرد)
- بله: در صورت موفقیت آمیز بودن
create intent، تابع create intent فراخوانی شده و حساب کاربری لینک میشود. - خیر: جریان Web OAuth فعال میشود، کاربر به مرورگر خود هدایت میشود و به کاربر این امکان داده میشود که با یک ایمیل دیگر لینک دهد.
- بله: در صورت موفقیت آمیز بودن
- بله: اگر get intent با موفقیت برگردد،
- خیر: جریان Web OAuth فعال میشود، کاربر به مرورگر خود هدایت میشود و به کاربر این امکان داده میشود که با یک ایمیل دیگر لینک دهد.
- بله: آیا کاربر در سیستم احراز هویت شما حساب کاربری منطبقی دارد؟ (
- خیر: آیا کاربر در سیستم احراز هویت شما حساب کاربری منطبقی دارد؟ (منظور
check intent، تأیید است)- بله: اگر get intent با موفقیت برگردد،
get intentفراخوانی میشود و حساب کاربری مرتبط میشود. - خیر: در صورت موفقیت آمیز بودن
create intentتابع create intent فراخوانی شده و حساب کاربری لینک میشود.
- بله: اگر get intent با موفقیت برگردد،
- بله: آیا کاربر از ایمیل مرتبط با حساب گوگل خود برای ورود به پلتفرم شما استفاده میکند؟ (کاربر با انتخاب بله یا خیر تصمیم میگیرد)
Check for an existing user account (check intent)
After the user gives consent to access their Google profile, Google sends a request that contains a signed assertion of the Google user's identity. The assertion contains information that includes the user's Google Account ID, name, and email address. The token exchange endpoint configured for your project handles that request.
If the corresponding Google account is already present in your authentication
system, your token exchange endpoint responds with account_found=true. If the
Google account doesn't match an existing user, your token exchange endpoint
returns an HTTP 404 Not Found error with account_found=false.
The request has the following form:
POST /token HTTP/1.1 Host: oauth2.example.com Content-Type: application/x-www-form-urlencoded grant_type=urn:ietf:params:oauth:grant-type:jwt-bearer&intent=check&assertion=JWT&scope=SCOPES&client_id=GOOGLE_CLIENT_ID&client_secret=GOOGLE_CLIENT_SECRET
Your token exchange endpoint must be able to handle the following parameters:
| Token endpoint parameters | |
|---|---|
intent |
For these requests, the value of this parameter is
check. |
grant_type |
The type of token being exchanged. For these requests, this
parameter has the value urn:ietf:params:oauth:grant-type:jwt-bearer. |
assertion |
A JSON Web Token (JWT) that provides a signed assertion of the Google user's identity. The JWT contains information that includes the user's Google Account ID, name, and email address. |
client_id |
The client ID you assigned to Google. |
client_secret |
The client secret you assigned to Google. |
To respond to the check intent requests, your token exchange endpoint must perform the following steps:
- Validate and decode the JWT assertion.
- Check if the Google account is already present in your authentication system.
Validate and decode the JWT assertion
You can validate and decode the JWT assertion by using a JWT-decoding library for your language. Use Google's public keys, available in JWK or PEM formats, to verify the token's signature.
When decoded, the JWT assertion looks like the following example:
{ "sub": "1234567890", // The unique ID of the user's Google Account "iss": "https://accounts.google.com", // The assertion's issuer "aud": "123-abc.apps.googleusercontent.com", // Your server's client ID "iat": 233366400, // Unix timestamp of the assertion's creation time "exp": 233370000, // Unix timestamp of the assertion's expiration time "name": "Jan Jansen", "given_name": "Jan", "family_name": "Jansen", "email": "jan@gmail.com", // If present, the user's email address "email_verified": true, // true, if Google has verified the email address "hd": "example.com", // If present, the host domain of the user's GSuite email address // If present, a URL to user's profile picture "picture": "https://lh3.googleusercontent.com/a-/AOh14GjlTnZKHAeb94A-FmEbwZv7uJD986VOF1mJGb2YYQ", "locale": "en_US" // User's locale, from browser or phone settings }
In addition to verifying the token's signature, verify that the assertion's
issuer (iss field) is https://accounts.google.com, that the audience
(aud field) is your assigned client ID, and that the token has not expired
(exp field).
Using the email, email_verified and hd fields you can determine if
Google hosts and is authoritative for an email address. In cases where Google is
authoritative the user is currently known to be the legitimate account owner
and you may skip password or other challenges methods. Otherwise, these methods
can be used to verify the account prior to linking.
Cases where Google is authoritative:
emailhas a@gmail.comsuffix, this is a Gmail account.email_verifiedis true andhdis set, this is a G Suite account.
Users may register for Google Accounts without using Gmail or G Suite. When
email does not contain a @gmail.com suffix and hd is absent Google is not
authoritative and password or other challenge methods are recommended to verify
the user. email_verified can also be true as Google initially verified the
user when the Google account was created, however ownership of the third party
email account may have since changed.
Check if the Google account is already present in your authentication system
Check whether either of the following conditions are true:
- The Google Account ID, found in the assertion's
subfield, is in your user database. - The email address in the assertion matches a user in your user database.
If either condition is true, the user has already signed up. In that case, return a response like the following:
HTTP/1.1 200 Success
Content-Type: application/json;charset=UTF-8
{
"account_found":"true",
}
If neither the Google Account ID nor the email address specified in the
assertion matches a user in your database, the user hasn't signed up yet. In
this case, your token exchange endpoint needs to reply with a HTTP 404 error
that specifies "account_found": "false", as in the following example:
HTTP/1.1 404 Not found
Content-Type: application/json;charset=UTF-8
{
"account_found":"false",
}
Handle automatic linking (get intent)
After the user gives consent to access their Google profile, Google sends a request that contains a signed assertion of the Google user's identity. The assertion contains information that includes the user's Google Account ID, name, and email address. The token exchange endpoint configured for your project handles that request.
If the corresponding Google Account is already present in your authentication
system, your token exchange endpoint returns a token for the user. If the
Google Account doesn't match an existing user, your token exchange endpoint
returns a linking_error error and optional login_hint.
The request has the following form:
POST /token HTTP/1.1 Host: oauth2.example.com Content-Type: application/x-www-form-urlencoded grant_type=urn:ietf:params:oauth:grant-type:jwt-bearer&intent=get&assertion=JWT&scope=SCOPES&client_id=GOOGLE_CLIENT_ID&client_secret=GOOGLE_CLIENT_SECRET
Your token exchange endpoint must be able to handle the following parameters:
| Token endpoint parameters | |
|---|---|
intent |
For these requests, the value of this parameter is get. |
grant_type |
The type of token being exchanged. For these requests, this
parameter has the value urn:ietf:params:oauth:grant-type:jwt-bearer. |
assertion |
A JSON Web Token (JWT) that provides a signed assertion of the Google user's identity. The JWT contains information that includes the user's Google Account ID, name, and email address. |
scope |
Optional: Any scopes that you've configured Google to request from users. |
client_id |
The client ID you assigned to Google. |
client_secret |
The client secret you assigned to Google. |
To respond to the get intent requests, your token exchange endpoint must perform the following steps:
- Validate and decode the JWT assertion.
- Check if the Google account is already present in your authentication system.
Validate and decode the JWT assertion
You can validate and decode the JWT assertion by using a JWT-decoding library for your language. Use Google's public keys, available in JWK or PEM formats, to verify the token's signature.
When decoded, the JWT assertion looks like the following example:
{ "sub": "1234567890", // The unique ID of the user's Google Account "iss": "https://accounts.google.com", // The assertion's issuer "aud": "123-abc.apps.googleusercontent.com", // Your server's client ID "iat": 233366400, // Unix timestamp of the assertion's creation time "exp": 233370000, // Unix timestamp of the assertion's expiration time "name": "Jan Jansen", "given_name": "Jan", "family_name": "Jansen", "email": "jan@gmail.com", // If present, the user's email address "email_verified": true, // true, if Google has verified the email address "hd": "example.com", // If present, the host domain of the user's GSuite email address // If present, a URL to user's profile picture "picture": "https://lh3.googleusercontent.com/a-/AOh14GjlTnZKHAeb94A-FmEbwZv7uJD986VOF1mJGb2YYQ", "locale": "en_US" // User's locale, from browser or phone settings }
In addition to verifying the token's signature, verify that the assertion's
issuer (iss field) is https://accounts.google.com, that the audience
(aud field) is your assigned client ID, and that the token has not expired
(exp field).
Using the email, email_verified and hd fields you can determine if
Google hosts and is authoritative for an email address. In cases where Google is
authoritative the user is currently known to be the legitimate account owner
and you may skip password or other challenges methods. Otherwise, these methods
can be used to verify the account prior to linking.
Cases where Google is authoritative:
emailhas a@gmail.comsuffix, this is a Gmail account.email_verifiedis true andhdis set, this is a G Suite account.
Users may register for Google Accounts without using Gmail or G Suite. When
email does not contain a @gmail.com suffix and hd is absent Google is not
authoritative and password or other challenge methods are recommended to verify
the user. email_verified can also be true as Google initially verified the
user when the Google account was created, however ownership of the third party
email account may have since changed.
Check if the Google account is already present in your authentication system
Check whether either of the following conditions are true:
- The Google Account ID, found in the assertion's
subfield, is in your user database. - The email address in the assertion matches a user in your user database.
If an account is found for the user, issue an access token and return the values in a JSON object in the body of your HTTPS response, like in the following example:
{ "token_type": "Bearer", "access_token": "ACCESS_TOKEN", "refresh_token": "REFRESH_TOKEN", "expires_in": SECONDS_TO_EXPIRATION }
In some cases, account linking based on ID token might fail for the user. If it
does so for any reason, your token exchange endpoint needs to reply with a HTTP
401 error that specifies error=linking_error, as the following example shows:
HTTP/1.1 401 Unauthorized
Content-Type: application/json;charset=UTF-8
{
"error":"linking_error",
"login_hint":"foo@bar.com"
}
When Google receives a 401 error response with linking_error, Google sends
the user to your authorization endpoint with login_hint as a parameter. The
user completes account linking using the OAuth linking flow in their browser.
Handle account creation using Sign in with Google (create intent)
When a user needs to create an account on your service, Google makes a request
to your token exchange endpoint that specifies intent=create.
The request has the following form:
POST /token HTTP/1.1 Host: oauth2.example.com Content-Type: application/x-www-form-urlencoded response_type=token&grant_type=urn:ietf:params:oauth:grant-type:jwt-bearer&scope=SCOPES&intent=create&assertion=JWT&client_id=GOOGLE_CLIENT_ID&client_secret=GOOGLE_CLIENT_SECRET
Your token exchange endpoint must able to handle the following parameters:
| Token endpoint parameters | |
|---|---|
intent |
For these requests, the value of this parameter is create. |
grant_type |
The type of token being exchanged. For these requests, this
parameter has the value urn:ietf:params:oauth:grant-type:jwt-bearer. |
assertion |
A JSON Web Token (JWT) that provides a signed assertion of the Google user's identity. The JWT contains information that includes the user's Google Account ID, name, and email address. |
client_id |
The client ID you assigned to Google. |
client_secret |
The client secret you assigned to Google. |
The JWT within the assertion parameter contains the user's Google Account ID,
name, and email address, which you can use to create a new account on your
service.
To respond to the create intent requests, your token exchange endpoint must perform the following steps:
- Validate and decode the JWT assertion.
- Validate user information and create new account.
Validate and decode the JWT assertion
You can validate and decode the JWT assertion by using a JWT-decoding library for your language. Use Google's public keys, available in JWK or PEM formats, to verify the token's signature.
When decoded, the JWT assertion looks like the following example:
{ "sub": "1234567890", // The unique ID of the user's Google Account "iss": "https://accounts.google.com", // The assertion's issuer "aud": "123-abc.apps.googleusercontent.com", // Your server's client ID "iat": 233366400, // Unix timestamp of the assertion's creation time "exp": 233370000, // Unix timestamp of the assertion's expiration time "name": "Jan Jansen", "given_name": "Jan", "family_name": "Jansen", "email": "jan@gmail.com", // If present, the user's email address "email_verified": true, // true, if Google has verified the email address "hd": "example.com", // If present, the host domain of the user's GSuite email address // If present, a URL to user's profile picture "picture": "https://lh3.googleusercontent.com/a-/AOh14GjlTnZKHAeb94A-FmEbwZv7uJD986VOF1mJGb2YYQ", "locale": "en_US" // User's locale, from browser or phone settings }
In addition to verifying the token's signature, verify that the assertion's
issuer (iss field) is https://accounts.google.com, that the audience
(aud field) is your assigned client ID, and that the token has not expired
(exp field).
Using the email, email_verified and hd fields you can determine if
Google hosts and is authoritative for an email address. In cases where Google is
authoritative the user is currently known to be the legitimate account owner
and you may skip password or other challenges methods. Otherwise, these methods
can be used to verify the account prior to linking.
Cases where Google is authoritative:
emailhas a@gmail.comsuffix, this is a Gmail account.email_verifiedis true andhdis set, this is a G Suite account.
Users may register for Google Accounts without using Gmail or G Suite. When
email does not contain a @gmail.com suffix and hd is absent Google is not
authoritative and password or other challenge methods are recommended to verify
the user. email_verified can also be true as Google initially verified the
user when the Google account was created, however ownership of the third party
email account may have since changed.
Validate user information and create new account
Check whether either of the following conditions are true:
- The Google Account ID, found in the assertion's
subfield, is in your user database. - The email address in the assertion matches a user in your user database.
If either condition is true, prompt the user to link their existing account
with their Google Account. To do so, respond to the request with an HTTP 401 error
that specifies error=linking_error and gives the user's email address as the
login_hint. The following is a sample response:
HTTP/1.1 401 Unauthorized
Content-Type: application/json;charset=UTF-8
{
"error":"linking_error",
"login_hint":"foo@bar.com"
}
When Google receives a 401 error response with linking_error, Google sends
the user to your authorization endpoint with login_hint as a parameter. The
user completes account linking using the OAuth linking flow in their browser.
If neither condition is true, create a new user account with the information provided in the JWT. New accounts don't typically have a password set. It's recommended that you add Sign in with Google to other platforms to enable users to sign in with Google across the surfaces of your application. Alternatively, you can email the user a link that starts your password recovery flow to allow the user to set a password to sign in on other platforms.
When the creation is completed, issue an access token and refresh token and return the values in a JSON object in the body of your HTTPS response, like in the following example:
{ "token_type": "Bearer", "access_token": "ACCESS_TOKEN", "refresh_token": "REFRESH_TOKEN", "expires_in": SECONDS_TO_EXPIRATION }
شناسه کلاینت API گوگل خود را دریافت کنید
در طول فرآیند ثبت نام اتصال حساب کاربری، از شما خواسته میشود که شناسه کلاینت API گوگل خود را ارائه دهید. برای دریافت شناسه کلاینت API خود، از پروژهای که هنگام تکمیل مراحل اتصال OAuth ایجاد کردهاید، استفاده کنید. برای انجام این کار، مراحل زیر را انجام دهید:
- به صفحه مشتریان بروید.
یک پروژه Google APIs ایجاد یا انتخاب کنید.
اگر پروژه شما برای نوع برنامه وب، شناسه کلاینت ندارد، برای ایجاد آن روی «ایجاد کلاینت» کلیک کنید. حتماً دامنه سایت خود را در کادر «منشأ جاوا اسکریپت مجاز» (Authorized JavaScript origins) وارد کنید. هنگام انجام آزمایشها یا توسعه محلی، باید هم
http://localhostو همhttp://localhost:<port_number>را به فیلد «منشأ جاوا اسکریپت مجاز» اضافه کنید.
اعتبارسنجی پیادهسازی شما
شما میتوانید پیادهسازی خود را با استفاده از ابزار OAuth 2.0 Playground اعتبارسنجی کنید.
در ابزار، مراحل زیر را انجام دهید:
- برای باز کردن پنجره پیکربندی OAuth 2.0، پیکربندی کلیک کنید.
- در فیلد جریان OAuth ، گزینه Client-side را انتخاب کنید.
- در فیلد OAuth Endpoints ، گزینه Custom را انتخاب کنید.
- نقطه پایانی OAuth 2.0 خود و شناسه کلاینتی که به گوگل اختصاص دادهاید را در فیلدهای مربوطه مشخص کنید.
- در بخش مرحله ۱ ، هیچ محدوده گوگلی را انتخاب نکنید. در عوض، این فیلد را خالی بگذارید یا یک محدوده معتبر برای سرور خود تایپ کنید (یا اگر از محدودههای OAuth استفاده نمیکنید، یک رشته دلخواه). وقتی کارتان تمام شد، روی Authorize APIs کلیک کنید.
- در بخشهای مرحله ۲ و مرحله ۳ ، جریان OAuth 2.0 را بررسی کنید و تأیید کنید که هر مرحله طبق برنامه عمل میکند.
شما میتوانید پیادهسازی خود را با استفاده از ابزار Google Account Linking Demo اعتبارسنجی کنید.
در ابزار، مراحل زیر را انجام دهید:
- روی دکمه ورود با گوگل کلیک کنید.
- حسابی را که میخواهید پیوند دهید انتخاب کنید.
- شناسه سرویس را وارد کنید.
- به صورت اختیاری یک یا چند محدودهای را که برای دسترسی به آنها درخواست خواهید کرد، وارد کنید.
- روی شروع نسخه نمایشی کلیک کنید.
- وقتی از شما خواسته شد، تأیید کنید که میتوانید درخواست پیوند را تأیید یا رد کنید.
- تأیید کنید که به پلتفرم خود هدایت میشوید.