קישור יעיל באמצעות OAuth וכניסה באמצעות חשבון Google

סקירה כללית

קישור יעיל באמצעות כניסה מבוססת-OAuth עם חשבון Google מוסיף כניסה באמצעות חשבון Google על גבי קישור OAuth. האפשרות הזו מספקת חוויית קישור חלקה למשתמשי Google, והיא גם מאפשרת יצירת חשבון, כך שהמשתמש יכול ליצור חשבון חדש בשירות שלכם באמצעות חשבון Google שלו.

כדי לקשר חשבונות באמצעות OAuth ו'כניסה באמצעות חשבון Google', צריך לבצע את השלבים הכלליים הבאים:

  1. קודם צריך לבקש מהמשתמש לתת הסכמה לגישה לפרופיל שלו ב-Google.
  2. משתמשים במידע בפרופיל כדי לבדוק אם חשבון המשתמש קיים.
  3. למשתמשים קיימים, מקשרים את החשבונות.
  4. אם לא מצאתם התאמה למשתמש Google במערכת האימות שלכם, צריך לאמת את אסימון הזהות שהתקבל מ-Google. לאחר מכן תוכלו ליצור משתמש על סמך פרטי הפרופיל שכלולים באסימון המזהה.
איור שמראה את השלבים שמשתמש צריך לבצע כדי לקשר את חשבון Google שלו באמצעות תהליך הקישור הפשוט. בצילום המסך הראשון אפשר לראות איך משתמש יכול לבחור את האפליקציה שלכם לקישור. בצילום המסך השני, המשתמש יכול לאשר אם יש לו חשבון קיים בשירות שלכם או לא. בצילום המסך השלישי, המשתמש יכול לבחור את חשבון Google שהוא רוצה לקשר. בצילום המסך הרביעי מוצג אישור לקישור חשבון Google לאפליקציה. בצילום המסך החמישי מוצג חשבון משתמש שמקושר בהצלחה באפליקציית Google.

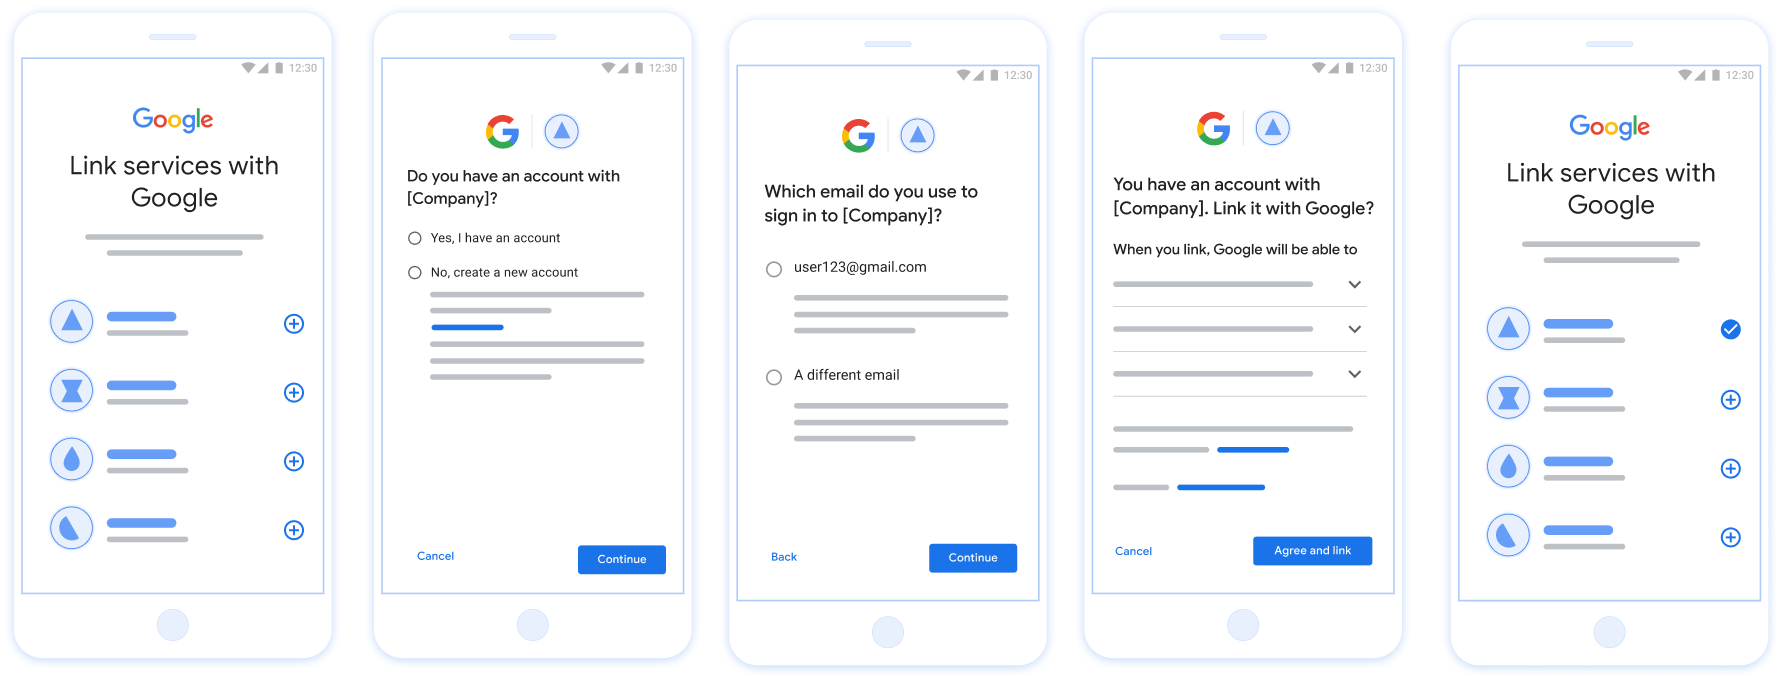
איור 1. קישור חשבון בטלפון של משתמש באמצעות קישור פשוט

הדרישות לקישור פשוט

הטמעת שרת OAuth

נקודת הקצה של החלפת הטוקנים צריכה לתמוך בכוונות check, create ו-get. בצע את השלבים הבאים כדי להשלים את תהליך קישור החשבון וללמוד מתי נעשה שימוש בכוונה מסוימת:

  1. האם למשתמש יש חשבון במערכת האימות שלכם? (המשתמש מחליט על ידי בחירה באפשרות 'כן' או 'לא')
    1. כן : המשתמש משתמש בכתובת האימייל שמשויכת לחשבון Google שלו כדי להיכנס לפלטפורמה שלכם. (המשתמש מחליט על ידי בחירה באפשרות 'כן' או 'לא')
      1. כן : האם למשתמש יש חשבון תואם במערכת האימות שלכם? (מתקשרים אל check intent כדי לאשר)
        1. ‫YES : מתבצעת שיחה אל get intent והחשבון מקושר אם הכוונה get מוחזרת בהצלחה.
        2. לא : ליצור חשבון חדש? (המשתמש בוחר באפשרות YES או NO)
          1. כן : מתבצעת שיחה עם create intent והחשבון מקושר אם כוונת היצירה מוחזרת בהצלחה.
          2. לא : תהליך OAuth באינטרנט מופעל, המשתמש מועבר לדפדפן שלו ומוצגת לו האפשרות לקשר עם כתובת אימייל אחרת.
      2. לא : מופעל תהליך OAuth בדפדפן, המשתמש מועבר לדפדפן שלו ומוצגת לו אפשרות לקשר עם כתובת אימייל אחרת.
    2. לא : האם למשתמש יש חשבון תואם במערכת האימות שלך? (מתקשרים אל check intent כדי לאשר)
      1. ‫YES : מתבצעת שיחה אל get intent והחשבון מקושר אם הכוונה get מוחזרת בהצלחה.
      2. לא : מתבצעת קריאה אל create intent והחשבון מקושר אם כוונת היצירה מוחזרת בהצלחה.

Check for an existing user account (check intent)

After the user gives consent to access their Google profile, Google sends a request that contains a signed assertion of the Google user's identity. The assertion contains information that includes the user's Google Account ID, name, and email address. The token exchange endpoint configured for your project handles that request.

If the corresponding Google account is already present in your authentication system, your token exchange endpoint responds with account_found=true. If the Google account doesn't match an existing user, your token exchange endpoint returns an HTTP 404 Not Found error with account_found=false.

The request has the following form:

POST /token HTTP/1.1
Host: oauth2.example.com
Content-Type: application/x-www-form-urlencoded

grant_type=urn:ietf:params:oauth:grant-type:jwt-bearer&intent=check&assertion=JWT&scope=SCOPES&client_id=GOOGLE_CLIENT_ID&client_secret=GOOGLE_CLIENT_SECRET

Your token exchange endpoint must be able to handle the following parameters:

Token endpoint parameters
intent For these requests, the value of this parameter is check.
grant_type The type of token being exchanged. For these requests, this parameter has the value urn:ietf:params:oauth:grant-type:jwt-bearer.
assertion A JSON Web Token (JWT) that provides a signed assertion of the Google user's identity. The JWT contains information that includes the user's Google Account ID, name, and email address.
client_id The client ID you assigned to Google.
client_secret The client secret you assigned to Google.

To respond to the check intent requests, your token exchange endpoint must perform the following steps:

  • Validate and decode the JWT assertion.
  • Check if the Google account is already present in your authentication system.
אימות ופענוח של טענת הנכוֹנוּת (assertion) של JWT

אפשר לאמת ולפענח את טענת הנכוֹנוּת (assertion) של JWT באמצעות ספריית פענוח קוד JWT לשפה שלכם. כדאי להשתמש המפתחות הציבוריים של Google זמינים ב JWK או של PEM לצורך אימות לחתימה של האסימון.

אחרי הפענוח, טענת הנכוֹנוּת (assertion) של ה-JWT תיראה כמו הדוגמה הבאה:

{
  "sub": "1234567890",      // The unique ID of the user's Google Account
  "iss": "https://accounts.google.com",        // The assertion's issuer
  "aud": "123-abc.apps.googleusercontent.com", // Your server's client ID
  "iat": 233366400,         // Unix timestamp of the assertion's creation time
  "exp": 233370000,         // Unix timestamp of the assertion's expiration time
  "name": "Jan Jansen",
  "given_name": "Jan",
  "family_name": "Jansen",
  "email": "jan@gmail.com", // If present, the user's email address
  "email_verified": true,   // true, if Google has verified the email address
  "hd": "example.com",      // If present, the host domain of the user's GSuite email address
                            // If present, a URL to user's profile picture
  "picture": "https://lh3.googleusercontent.com/a-/AOh14GjlTnZKHAeb94A-FmEbwZv7uJD986VOF1mJGb2YYQ",
  "locale": "en_US"         // User's locale, from browser or phone settings
}

בנוסף לאימות החתימה של האסימון, צריך לוודא מנפיק (השדה iss) הוא https://accounts.google.com, שהקהל (השדה aud) הוא מזהה הלקוח שהוקצה לך, ושתוקף האסימון לא פג (השדה exp).

באמצעות השדות email, email_verified ו-hd אפשר לקבוע אם Google מארחת כתובת אימייל מסוימת, והיא מהימן. במקרים שבהם Google מהימן, כרגע ידוע שהמשתמש הוא הבעלים החוקיים של החשבון ותוכלו לדלג על סיסמה או על שיטות אחרות לאתגרים. אחרת, השיטות האלה יכול לשמש לאימות החשבון לפני הקישור.

מקרים שבהם Google היא מהימן:

  • ל-email יש סיומת @gmail.com. זהו חשבון Gmail.
  • email_verified מוגדר כ-True ו-hd מוגדר. זהו חשבון G Suite.

משתמשים יכולים להירשם לחשבונות Google בלי להשתמש ב-Gmail או ב-G Suite. מתי email לא מכיל סיומת @gmail.com ו-hd חסר Google מומלץ לאמת סיסמה או סיסמה או שיטות אחרות לאימות למשתמש. email_verified יכול להיות גם נכון כי Google אימתה בהתחלה את משתמש כשחשבון Google נוצר, אבל בעלות על הצד השלישי ייתכן שחשבון האימייל השתנה מאז.

Check if the Google account is already present in your authentication system

Check whether either of the following conditions are true:

  • The Google Account ID, found in the assertion's sub field, is in your user database.
  • The email address in the assertion matches a user in your user database.

If either condition is true, the user has already signed up. In that case, return a response like the following:

HTTP/1.1 200 Success
Content-Type: application/json;charset=UTF-8

{
  "account_found":"true",
}

If neither the Google Account ID nor the email address specified in the assertion matches a user in your database, the user hasn't signed up yet. In this case, your token exchange endpoint needs to reply with a HTTP 404 error that specifies "account_found": "false", as in the following example:

HTTP/1.1 404 Not found
Content-Type: application/json;charset=UTF-8

{
  "account_found":"false",
}

טיפול בקישור אוטומטי (השגת כוונה)

אחרי שהמשתמש מביע הסכמה לגשת לפרופיל Google שלו, Google שולחת בקשה שמכילה טענת נכוֹנוּת (assertion) חתומה של זהות המשתמש ב-Google. טענת הנכוֹנוּת (assertion) מכילה מידע שכולל את מספר חשבון Google של המשתמש, שם וכתובת אימייל. נקודת הקצה להחלפת אסימונים שהוגדרה עבור בפרויקט הזה יטפל בבקשה הזו.

אם חשבון Google התואם כבר קיים באימות נקודת הקצה (endpoint) של המרת האסימון מחזירה אסימון עבור המשתמש. אם חשבון Google לא תואם למשתמש קיים, שהוא נקודת הקצה של המרת האסימון מחזירה שגיאת linking_error ושדה login_hint אופציונלי.

הבקשה מוצגת בפורמט הבא:

POST /token HTTP/1.1
Host: oauth2.example.com
Content-Type: application/x-www-form-urlencoded

grant_type=urn:ietf:params:oauth:grant-type:jwt-bearer&intent=get&assertion=JWT&scope=SCOPES&client_id=GOOGLE_CLIENT_ID&client_secret=GOOGLE_CLIENT_SECRET

נקודת הקצה (endpoint) של המרת האסימונים חייבת להיות מסוגלת לטפל בפרמטרים הבאים:

פרמטרים של נקודת קצה של אסימון
intent בבקשות האלה, הערך של הפרמטר הזה הוא get.
grant_type סוג האסימון המוחלף. בבקשות האלה, מכיל את הערך urn:ietf:params:oauth:grant-type:jwt-bearer.
assertion אסימון רשת מבוסס JSON (JWT) שמספק טענת נכוֹנוּת (assertion) חתומה של זהות המשתמש. ה-JWT מכיל מידע שכולל את שם המשתמש מספר חשבון Google, שם וכתובת אימייל.
scope אופציונלי: היקפי הרשאות שהגדרתם ל-Google לבקש מהם משתמשים.
client_id מזהה הלקוח שהקצית ל-Google.
client_secret סוד הלקוח שהקצית ל-Google.

כדי להגיב לבקשות Intent מסוג get, נקודת הקצה (endpoint) של המרת האסימונים חייבת לבצע את השלבים הבאים:

  • לאמת ולפענח את טענת הנכוֹנוּת (assertion) של JWT.
  • בודקים אם חשבון Google כבר קיים במערכת האימות.
אימות ופענוח של טענת הנכוֹנוּת (assertion) של JWT

אפשר לאמת ולפענח את טענת הנכוֹנוּת (assertion) של JWT באמצעות ספריית פענוח קוד JWT לשפה שלכם. כדאי להשתמש המפתחות הציבוריים של Google זמינים ב JWK או של PEM לצורך אימות לחתימה של האסימון.

אחרי הפענוח, טענת הנכוֹנוּת (assertion) של ה-JWT תיראה כמו הדוגמה הבאה:

{
  "sub": "1234567890",      // The unique ID of the user's Google Account
  "iss": "https://accounts.google.com",        // The assertion's issuer
  "aud": "123-abc.apps.googleusercontent.com", // Your server's client ID
  "iat": 233366400,         // Unix timestamp of the assertion's creation time
  "exp": 233370000,         // Unix timestamp of the assertion's expiration time
  "name": "Jan Jansen",
  "given_name": "Jan",
  "family_name": "Jansen",
  "email": "jan@gmail.com", // If present, the user's email address
  "email_verified": true,   // true, if Google has verified the email address
  "hd": "example.com",      // If present, the host domain of the user's GSuite email address
                            // If present, a URL to user's profile picture
  "picture": "https://lh3.googleusercontent.com/a-/AOh14GjlTnZKHAeb94A-FmEbwZv7uJD986VOF1mJGb2YYQ",
  "locale": "en_US"         // User's locale, from browser or phone settings
}

בנוסף לאימות החתימה של האסימון, צריך לוודא מנפיק (השדה iss) הוא https://accounts.google.com, שהקהל (השדה aud) הוא מזהה הלקוח שהוקצה לך, ושתוקף האסימון לא פג (השדה exp).

באמצעות השדות email, email_verified ו-hd אפשר לקבוע אם Google מארחת כתובת אימייל מסוימת, והיא מהימן. במקרים שבהם Google מהימן, כרגע ידוע שהמשתמש הוא הבעלים החוקיים של החשבון ותוכלו לדלג על סיסמה או על שיטות אחרות לאתגרים. אחרת, השיטות האלה יכול לשמש לאימות החשבון לפני הקישור.

מקרים שבהם Google היא מהימן:

  • ל-email יש סיומת @gmail.com. זהו חשבון Gmail.
  • email_verified מוגדר כ-True ו-hd מוגדר. זהו חשבון G Suite.

משתמשים יכולים להירשם לחשבונות Google בלי להשתמש ב-Gmail או ב-G Suite. מתי email לא מכיל סיומת @gmail.com ו-hd חסר Google מומלץ לאמת סיסמה או סיסמה או שיטות אחרות לאימות למשתמש. email_verified יכול להיות גם נכון כי Google אימתה בהתחלה את משתמש כשחשבון Google נוצר, אבל בעלות על הצד השלישי ייתכן שחשבון האימייל השתנה מאז.

בודקים אם חשבון Google כבר קיים במערכת האימות

בודקים אם אחד מהתנאים הבאים מתקיים:

  • מספר חשבון Google, שנמצא בשדה sub בטענת הנכונות (assertion) שלך, נמצא אצל המשתמש. מסד נתונים.
  • כתובת האימייל בטענת הנכונות (assertion) תואמת למשתמש במסד הנתונים של המשתמשים.

אם נמצא חשבון למשתמש, מנפיקים אסימון גישה ומחזירים את הערכים באובייקט JSON בגוף תגובת ה-HTTPS, כמו בדוגמה הבאה:

{
  "token_type": "Bearer",
  "access_token": "ACCESS_TOKEN",
  "refresh_token": "REFRESH_TOKEN",
  "expires_in": SECONDS_TO_EXPIRATION
}

במקרים מסוימים, קישור חשבונות שמבוסס על אסימון מזהה עלול להיכשל עבור המשתמש. אם מכל סיבה שהיא, נקודת הקצה של המרת אסימונים צריכה להשיב באמצעות HTTP שגיאת 401 שמציינת error=linking_error, כמו בדוגמה הבאה:

HTTP/1.1 401 Unauthorized
Content-Type: application/json;charset=UTF-8

{
  "error":"linking_error",
  "login_hint":"foo@bar.com"
}

כש-Google מקבלת תגובה לשגיאה 401 עם linking_error, Google שולחת המשתמש בנקודת הקצה של ההרשאה עם login_hint כפרמטר. משתמש משלים את קישור החשבון באמצעות תהליך הקישור של OAuth בדפדפן שלו.

Handle account creation using Sign in with Google (create intent)

When a user needs to create an account on your service, Google makes a request to your token exchange endpoint that specifies intent=create.

The request has the following form:

POST /token HTTP/1.1
Host: oauth2.example.com
Content-Type: application/x-www-form-urlencoded

response_type=token&grant_type=urn:ietf:params:oauth:grant-type:jwt-bearer&scope=SCOPES&intent=create&assertion=JWT&client_id=GOOGLE_CLIENT_ID&client_secret=GOOGLE_CLIENT_SECRET

Your token exchange endpoint must able to handle the following parameters:

Token endpoint parameters
intent For these requests, the value of this parameter is create.
grant_type The type of token being exchanged. For these requests, this parameter has the value urn:ietf:params:oauth:grant-type:jwt-bearer.
assertion A JSON Web Token (JWT) that provides a signed assertion of the Google user's identity. The JWT contains information that includes the user's Google Account ID, name, and email address.
client_id The client ID you assigned to Google.
client_secret The client secret you assigned to Google.

The JWT within the assertion parameter contains the user's Google Account ID, name, and email address, which you can use to create a new account on your service.

To respond to the create intent requests, your token exchange endpoint must perform the following steps:

  • Validate and decode the JWT assertion.
  • Validate user information and create new account.
אימות ופענוח של טענת הנכוֹנוּת (assertion) של JWT

אפשר לאמת ולפענח את טענת הנכוֹנוּת (assertion) של JWT באמצעות ספריית פענוח קוד JWT לשפה שלכם. כדאי להשתמש המפתחות הציבוריים של Google זמינים ב JWK או של PEM לצורך אימות לחתימה של האסימון.

אחרי הפענוח, טענת הנכוֹנוּת (assertion) של ה-JWT תיראה כמו הדוגמה הבאה:

{
  "sub": "1234567890",      // The unique ID of the user's Google Account
  "iss": "https://accounts.google.com",        // The assertion's issuer
  "aud": "123-abc.apps.googleusercontent.com", // Your server's client ID
  "iat": 233366400,         // Unix timestamp of the assertion's creation time
  "exp": 233370000,         // Unix timestamp of the assertion's expiration time
  "name": "Jan Jansen",
  "given_name": "Jan",
  "family_name": "Jansen",
  "email": "jan@gmail.com", // If present, the user's email address
  "email_verified": true,   // true, if Google has verified the email address
  "hd": "example.com",      // If present, the host domain of the user's GSuite email address
                            // If present, a URL to user's profile picture
  "picture": "https://lh3.googleusercontent.com/a-/AOh14GjlTnZKHAeb94A-FmEbwZv7uJD986VOF1mJGb2YYQ",
  "locale": "en_US"         // User's locale, from browser or phone settings
}

בנוסף לאימות החתימה של האסימון, צריך לוודא מנפיק (השדה iss) הוא https://accounts.google.com, שהקהל (השדה aud) הוא מזהה הלקוח שהוקצה לך, ושתוקף האסימון לא פג (השדה exp).

באמצעות השדות email, email_verified ו-hd אפשר לקבוע אם Google מארחת כתובת אימייל מסוימת, והיא מהימן. במקרים שבהם Google מהימן, כרגע ידוע שהמשתמש הוא הבעלים החוקיים של החשבון ותוכלו לדלג על סיסמה או על שיטות אחרות לאתגרים. אחרת, השיטות האלה יכול לשמש לאימות החשבון לפני הקישור.

מקרים שבהם Google היא מהימן:

  • ל-email יש סיומת @gmail.com. זהו חשבון Gmail.
  • email_verified מוגדר כ-True ו-hd מוגדר. זהו חשבון G Suite.

משתמשים יכולים להירשם לחשבונות Google בלי להשתמש ב-Gmail או ב-G Suite. מתי email לא מכיל סיומת @gmail.com ו-hd חסר Google מומלץ לאמת סיסמה או סיסמה או שיטות אחרות לאימות למשתמש. email_verified יכול להיות גם נכון כי Google אימתה בהתחלה את משתמש כשחשבון Google נוצר, אבל בעלות על הצד השלישי ייתכן שחשבון האימייל השתנה מאז.

Validate user information and create new account

Check whether either of the following conditions are true:

  • The Google Account ID, found in the assertion's sub field, is in your user database.
  • The email address in the assertion matches a user in your user database.

If either condition is true, prompt the user to link their existing account with their Google Account. To do so, respond to the request with an HTTP 401 error that specifies error=linking_error and gives the user's email address as the login_hint. The following is a sample response:

HTTP/1.1 401 Unauthorized
Content-Type: application/json;charset=UTF-8

{
  "error":"linking_error",
  "login_hint":"foo@bar.com"
}

When Google receives a 401 error response with linking_error, Google sends the user to your authorization endpoint with login_hint as a parameter. The user completes account linking using the OAuth linking flow in their browser.

If neither condition is true, create a new user account with the information provided in the JWT. New accounts don't typically have a password set. It's recommended that you add Sign in with Google to other platforms to enable users to sign in with Google across the surfaces of your application. Alternatively, you can email the user a link that starts your password recovery flow to allow the user to set a password to sign in on other platforms.

When the creation is completed, issue an access token and refresh token and return the values in a JSON object in the body of your HTTPS response, like in the following example:

{
  "token_type": "Bearer",
  "access_token": "ACCESS_TOKEN",
  "refresh_token": "REFRESH_TOKEN",
  "expires_in": SECONDS_TO_EXPIRATION
}

איך מקבלים את מזהה הלקוח ב-Google API

במהלך תהליך ההרשמה לקישור החשבון, תצטרכו לספק את מזהה הלקוח של Google API.

כדי לקבל את מזהה הלקוח של ה-API באמצעות הפרויקט שיצרתם במהלך השלבים של קישור OAuth. כדי לעשות זאת, פועלים לפי השלבים הבאים:

  1. עוברים אל דף הלקוחות.
  2. יוצרים פרויקט ב-Google APIs או בוחרים פרויקט קיים.

    אם בפרויקט שלכם אין מזהה לקוח מסוג אפליקציית אינטרנט, לוחצים על יצירת לקוח כדי ליצור אחד. חשוב להוסיף את הדומיין של האתר לתיבה מקורות מורשים של JavaScript. כשמבצעים בדיקות מקומיות או פיתוח, צריך להוסיף את http://localhost ואת http://localhost:<port_number> לשדה מקורות JavaScript מורשים.

אימות ההטמעה

כדי לאמת את ההטמעה, אפשר להשתמש בכלי OAuth 2.0 Playground.

בכלי, מבצעים את השלבים הבאים:

  1. לוחצים על Configuration (הגדרה) כדי לפתוח את חלון ההגדרה של OAuth 2.0.
  2. בשדה OAuth flow (תהליך OAuth), בוחרים באפשרות Client-side (בצד הלקוח).
  3. בשדה OAuth Endpoints (נקודות קצה של OAuth), בוחרים באפשרות Custom (מותאם אישית).
  4. בשדות המתאימים, מציינים את נקודת הקצה של OAuth 2.0 ואת מזהה הלקוח שהקציתם ל-Google.
  5. בקטע Step 1, לא בוחרים אף היקף של Google. במקום זאת, משאירים את השדה הזה ריק או מקלידים היקף הרשאות שתקף לשרת (או מחרוזת שרירותית אם לא משתמשים בהיקפי הרשאות OAuth). בסיום, לוחצים על הרשאת ממשקי API.
  6. בקטעים שלב 2 ושלב 3, עוברים על תהליך ההרשאה באמצעות OAuth 2.0 ומוודאים שכל שלב פועל כמו שצריך.

כדי לאמת את ההטמעה, אפשר להשתמש בכלי Google Account Linking Demo.

בכלי, מבצעים את השלבים הבאים:

  1. לוחצים על הכפתור כניסה באמצעות חשבון Google.
  2. בוחרים את החשבון שרוצים לקשר.
  3. מזינים את מזהה השירות.
  4. אפשר להזין היקף אחד או יותר שרוצים לבקש גישה אליהם.
  5. לוחצים על התחלת ההדגמה.
  6. כשמופיעה הבקשה, מאשרים שרוצים להסכים לבקשת הקישור או לדחות אותה.
  7. מוודאים שמופנים לפלטפורמה שלכם.