הקישור בין החשבונות מתבצע באמצעות תהליך קוד ההרשאה של OAuth 2.0, שהוא תקן בתעשייה.
OAuth 2.1 ו-PKCE לסוכנים
מומלץ לאכוף את OAuth 2.1 עבור סוכני AI חסרי מצב ופייפליינים מולטי-מודאליים.
- PKCE (מפתח אימות להחלפת קוד): חובה להשתמש בו כדי לאבטח את תהליך הרשאה באמצעות קוד ולמנוע מתקפות יירוט.
- אין זרם הענקת גישה משתמע: זרם הענקת הגישה המשתמע חושף טוקני גישה בכתובת ה-URL, וזה סיכון אבטחה בסביבות של סוכנים.
השירות שלכם צריך לתמוך בנקודות קצה של הרשאה והחלפת טוקנים שתואמות ל-OAuth 2.0/2.1.
יצירת הפרויקט
כדי ליצור את הפרויקט לשימוש בקישור לחשבון:
- עוברים אל Google API Console.
- לוחצים על יצירת פרויקט.
- מזינים שם או מאשרים את ההצעה שנוצרה.
- מאשרים או עורכים את השדות שנותרו.
- לוחצים על יצירה.
כדי לראות את מזהה הפרויקט:
- עוברים אל Google API Console.
- מחפשים את הפרויקט בטבלה בדף הנחיתה. מזהה הפרויקט מופיע בעמודה ID.
הגדרה של מסך ההסכמה ל-OAuth
תהליך קישור חשבון Google כולל מסך הסכמה שבו מוצגת למשתמש האפליקציה שמבקשת גישה לנתונים שלו, סוג הנתונים שהיא מבקשת והתנאים שחלים. תצטרכו להגדיר את מסך ההסכמה ל-OAuth לפני שתפיקו מזהה לקוח Google API.
- פותחים את הדף מסך ההסכמה ל-OAuth ב-Google APIs Console.
- אם מתבקשים, בוחרים את הפרויקט שיצרתם.
בדף 'מסך ההסכמה ל-OAuth', ממלאים את הטופס ולוחצים על הלחצן 'שמירה'.
שם האפליקציה: השם של האפליקציה שמבקשת הסכמה. השם צריך לשקף במדויק את האפליקציה שלכם ולהיות זהה לשם האפליקציה שמוצג למשתמשים במקומות אחרים. שם האפליקציה יוצג במסך ההסכמה לקישור החשבון.
הלוגו של האפליקציה: תמונה במסך ההסכמה שתעזור למשתמשים לזהות את האפליקציה. הלוגו מוצג במסך ההסכמה לקישור החשבון ובהגדרות החשבון
כתובת אימייל לתמיכה: כתובת אימייל שאליה משתמשים יכולים לפנות אם יש להם שאלות לגבי ההסכמה שלהם.
היקפי גישה לממשקי Google API: היקפי גישה מאפשרים לאפליקציה לגשת לנתונים הפרטיים של המשתמשים ב-Google. במקרה השימוש של קישור לחשבון Google, היקף ברירת המחדל (אימייל, פרופיל, OpenID) מספיק, ואין צורך להוסיף היקפים רגישים. בדרך כלל מומלץ לבקש הרשאות בהדרגה, בזמן שנדרשת גישה, ולא מראש. מידע נוסף
דומיינים מורשים: כדי להגן עליכם ועל המשתמשים שלכם, Google מאפשרת רק לאפליקציות שעוברות אימות באמצעות OAuth להשתמש בדומיינים מורשים. הקישורים לאפליקציות שלכם צריכים להיות מאוחסנים בדומיינים מורשים. מידע נוסף
קישור לדף הבית של האפליקציה: דף הבית של האפליקציה. הן חייבות להתארח בדומיין מורשה.
קישור למדיניות הפרטיות של האפליקציה: מוצג במסך ההסכמה לקישור לחשבון Google. הן חייבות להתארח בדומיין מורשה.
קישור לתנאים ולהגבלות של האפליקציה (אופציונלי): הקישור צריך להיות מאוחסן בדומיין מורשה.
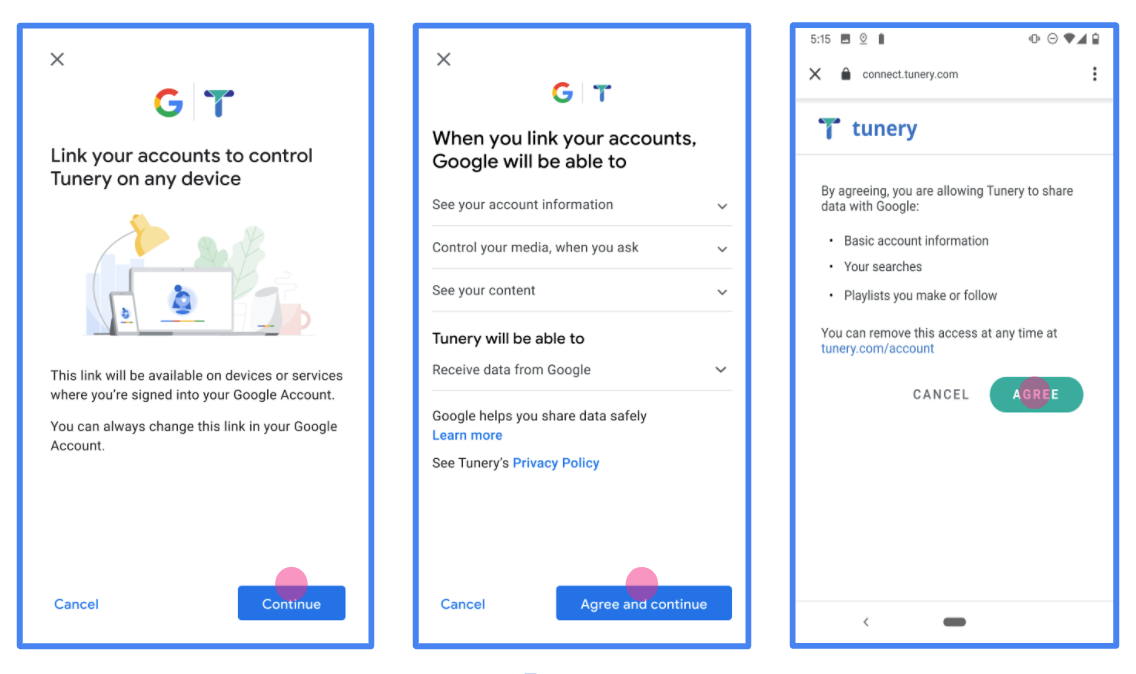
איור 1. מסך הסכמה לקישור של חשבון Google לאפליקציה פיקטיבית, Tunery
בודקים את 'סטטוס האימות'. אם האפליקציה שלכם צריכה אימות, לוחצים על הלחצן 'שליחה לאימות' כדי לשלוח את האפליקציה לאימות. פרטים נוספים מופיעים במאמר בנושא דרישות האימות של OAuth.
הטמעת שרת OAuth
הטמעה של שרת OAuth 2.0 של תהליך קוד ההרשאה מורכבת משתי נקודות קצה, שהשירות שלכם מספק באמצעות HTTPS. נקודת הקצה הראשונה היא נקודת הקצה של ההרשאה, שאחראית למציאת הסכמה מהמשתמשים לגישה לנתונים או לקבלת הסכמה כזו. נקודת הקצה של ההרשאה מציגה למשתמשים שלא מחוברים כבר ממשק משתמש לכניסה, ומתעדת את ההסכמה לגישה המבוקשת. נקודת הקצה השנייה היא נקודת הקצה להחלפת אסימונים, שמשמשת לקבלת מחרוזות מוצפנות שנקראות אסימונים, שמאשרות למשתמש גישה לשירות שלכם.
כשיישום של Google צריך לקרוא לאחד מממשקי ה-API של השירות שלכם, Google משתמשת בנקודות הקצה האלה כדי לקבל מהמשתמשים שלכם הרשאה לקרוא לממשקי ה-API האלה בשמם.
קישור של חשבון Google: הרשאה באמצעות קוד OAuth
בתרשים הרצף הבא מפורטות האינטראקציות בין המשתמש, Google ונקודות הקצה של השירות שלכם.
תפקידים ותחומי אחריות
בטבלה הבאה מוגדרים התפקידים ותחומי האחריות של הגורמים בתהליך OAuth של קישור חשבון Google (GAL). חשוב לדעת שב-GAL, Google פועלת כלקוח של OAuth, והשירות שלכם פועל כספק זהויות או ספק שירותים.
| המשתמש / הרכיב | תפקיד ב-GAL | תחומי אחריות |
|---|---|---|
| אפליקציית Google / שרת | לקוח OAuth | מתחיל את התהליך, מקבל את קוד ההרשאה, מחליף אותו באסימונים ומאחסן אותם בצורה מאובטחת כדי לגשת לממשקי ה-API של השירות. |
| נקודת הקצה להרשאה | שרת הרשאות | מאמת את המשתמשים ומקבל את הסכמתם לשיתוף הגישה לנתונים שלהם עם Google. |
| נקודת הקצה של חילופי הטוקנים | שרת הרשאות | מאמת את קודי ההרשאה ואסימוני הרענון, ומנפיק אסימוני גישה לשרת Google. |
| URI של הפניה לכתובת אחרת ב-Google | נקודת קצה של קריאה חוזרת (callback) | מקבל את ההפניה האוטומטית של המשתמש משירות ההרשאה עם הערכים code ו-state. |
סשן של הרשאה באמצעות קוד ב-OAuth 2.0 שהופעל על ידי Google מתנהל באופן הבא:
- Google פותחת את נקודת הקצה של ההרשאה בדפדפן של המשתמש. אם התהליך התחיל במכשיר עם קול בלבד לפעולה, Google מעבירה את הביצוע לטלפון.
- המשתמש מתחבר לחשבון שלו, אם הוא לא מחובר כבר, ומעניק ל-Google הרשאה לגשת לנתונים שלו באמצעות ה-API שלכם, אם הוא עדיין לא העניק הרשאה כזו.
- השירות שלכם יוצר קוד הרשאה ומחזיר אותו ל-Google. כדי לעשות זאת, צריך להפנות את הדפדפן של המשתמש בחזרה אל Google עם קוד ההרשאה שמצורף לבקשה.
- Google שולחת את קוד ההרשאה לנקודת הקצה (endpoint) של המרת האסימון, שמאמתת את האותנטיות של הקוד ומחזירה אסימון גישה ואסימון רענון. אסימון הגישה הוא אסימון לטווח קצר שהשירות מקבל כפרטי כניסה לגישה לממשקי API. אסימון הרענון הוא אסימון לטווח ארוך ש-Google יכולה לאחסן ולהשתמש בו כדי לקבל אסימוני גישה חדשים כשהתוקף שלהם פג.
- אחרי שהמשתמש משלים את תהליך קישור החשבון, כל בקשה עוקבת שנשלחת מ-Google מכילה אסימון גישה.
מתכון להטמעה
כדי להטמיע את תהליך אישור הגישה באמצעות קוד הרשאה, פועלים לפי השלבים הבאים.
שלב 1: טיפול בבקשות הרשאה
כש-Google יוזמת קישור חשבון, היא מפנה את המשתמש לנקודת הקצה של ההרשאה שלכם. פרטים על חוזי פרוטוקול ודרישות פרמטרים מופיעים במאמר בנושא נקודת קצה (endpoint) של הרשאה.
כדי לטפל בבקשה, מבצעים את הפעולות הבאות:
אימות הבקשה:
- מוודאים שהערך
client_idזהה למזהה הלקוח שהוקצה ל-Google. - מוודאים שכתובת ה-URL של ההפניה האוטומטית של Google שמופיעה ב-
redirect_uriזהה לכתובת ה-URL הצפויה:none https://oauth-redirect.googleusercontent.com/r/YOUR_PROJECT_ID https://oauth-redirect-sandbox.googleusercontent.com/r/YOUR_PROJECT_ID - מוודאים ש-
response_typeהואcode.
- מוודאים שהערך
מאמתים את המשתמש:
- בודקים אם המשתמש מחובר לשירות שלכם.
- אם המשתמש לא מחובר לחשבון, צריך להציג לו בקשה להשלים את תהליך הכניסה או ההרשמה.
יצירת קוד הרשאה:
- יצירת קוד הרשאה ייחודי שאי אפשר לנחש אותו, שמשויך למשתמש וללקוח.
- מגדירים את תוקף הקוד ל-10 דקות בערך.
הפניה חזרה אל Google:
- מפנים את הדפדפן לכתובת ה-URL שמופיעה ב-
redirect_uri. - הוספת פרמטרים לשאילתה:
-
code: קוד ההרשאה שיצרתם. -
state: ערך הסטטוס שלא שונה שהתקבל מ-Google.
-
- מפנים את הדפדפן לכתובת ה-URL שמופיעה ב-
שלב 2: טיפול בבקשות להחלפת טוקנים
נקודת הקצה להמרת טוקנים מעבדת שני סוגים של בקשות: המרת קודים לטוקנים ורענון של טוקני גישה שפג תוקפם. לפרטים על חוזי פרוטוקול ודרישות פרמטרים, ראו נקודת קצה (endpoint) של החלפת טוקנים.
א. המרת קודי הרשאה לאסימונים
כש-Google מקבלת את קוד ההרשאה, היא קוראת לנקודת הקצה (POST) של החלפת האסימונים כדי לאחזר אסימונים.
אימות הבקשה:
- מאמתים את
client_idואתclient_secret. - מוודאים שקוד ההרשאה תקין ושלא פג התוקף שלו.
- מוודאים שהערך
redirect_uriזהה לערך שבו השתמשתם בשלב 1. - אם האימות נכשל, מחזירים HTTP
400 Bad Requestעם{"error": "invalid_grant"}.
- מאמתים את
הנפקת טוקנים:
- יצירת
refresh_tokenלטווח ארוך וaccess_tokenלטווח קצר (בדרך כלל לשעה). - החזרת HTTP
200 OKעם תגובת אסימון JSON רגילה.
- יצירת
ב. רענון טוקנים של גישה
כשפג התוקף של אסימון הגישה, Google מבקשת אסימון חדש באמצעות אסימון הרענון.
אימות הבקשה:
- מאמתים את
client_id,client_secretוrefresh_token. - אם האימות נכשל, מחזירים HTTP
400 Bad Requestעם{"error": "invalid_grant"}.
- מאמתים את
הנפקת אסימון גישה חדש:
- יוצרים
access_tokenחדש לזמן קצר. - מחזירים קוד HTTP
200 OKעם תגובת אסימון JSON (אפשר לכלול גם אסימון רענון חדש).
- יוצרים
טיפול בבקשות למידע על משתמשים
נקודת הקצה של userinfo היא משאב מוגן ב-OAuth 2.0 שמחזיר תלונות לגבי המשתמש המקושר. ההטמעה והאירוח של נקודת הקצה של userinfo הם אופציונליים, חוץ מאשר בתרחישים הבאים לדוגמה:
- כניסה לחשבון המקושר באמצעות Google One Tap.
- מינוי פשוט וקל ב-AndroidTV.
אחרי שהאחזור של אסימון הגישה מנקודת הקצה של האסימון מתבצע, Google שולחת בקשה לנקודת הקצה (endpoint) של userinfo כדי לאחזר פרטי פרופיל בסיסיים של המשתמש המקושר.
| כותרות של בקשות של נקודות קצה של userinfo | |
|---|---|
Authorization header |
אסימון הגישה מסוג נושא. |
לדוגמה, אם נקודת הקצה של Userinfo זמינה
https://myservice.example.com/userinfo, בקשה עשויה להיראות כך:
GET /userinfo HTTP/1.1
Host: myservice.example.com
Authorization: Bearer ACCESS_TOKEN
כדי שנקודת הקצה של userinfo תטפל בבקשות, מבצעים את השלבים הבאים:
- מחלצים את אסימון הגישה מהכותרת Authorization ומחזירים מידע עבור המשתמש שמשויך לאסימון הגישה.
- אם אסימון הגישה לא חוקי, צריך להחזיר שגיאה מסוג HTTP 401 מאושר עם שימוש בכותרת התגובה
WWW-Authenticate. דוגמה לתגובה עם שגיאה של userinfo:HTTP/1.1 401 Unauthorized WWW-Authenticate: error="invalid_token", error_description="The Access Token expired"
אם אסימון הגישה תקין, מוחזר ותגובת HTTP 200 עם אובייקט ה-JSON הבא בגוף ה-HTTPS תגובה:
{ "sub": "USER_UUID", "email": "EMAIL_ADDRESS", "given_name": "FIRST_NAME", "family_name": "LAST_NAME", "name": "FULL_NAME", "picture": "PROFILE_PICTURE", }תגובה של נקודת הקצה של userinfo subמזהה ייחודי שמזהה את המשתמש במערכת שלכם. emailכתובת האימייל של המשתמש. given_nameאופציונלי: השם הפרטי של המשתמש. family_nameאופציונלי: שם המשפחה של המשתמש. nameאופציונלי: השם המלא של המשתמש. pictureאופציונלי: תמונת פרופיל של המשתמש.
אימות ההטמעה
כדי לאמת את ההטמעה, אפשר להשתמש בכלי OAuth 2.0 Playground.
בכלי, מבצעים את השלבים הבאים:
- לוחצים על Configuration (הגדרה) כדי לפתוח את חלון ההגדרה של OAuth 2.0.
- בשדה OAuth flow (תהליך OAuth), בוחרים באפשרות Client-side (בצד הלקוח).
- בשדה OAuth Endpoints (נקודות קצה של OAuth), בוחרים באפשרות Custom (מותאם אישית).
- בשדות המתאימים, מציינים את נקודת הקצה של OAuth 2.0 ואת מזהה הלקוח שהקציתם ל-Google.
- בקטע Step 1, לא בוחרים אף היקף של Google. במקום זאת, משאירים את השדה הזה ריק או מקלידים היקף הרשאות שתקף לשרת (או מחרוזת שרירותית אם לא משתמשים בהיקפי הרשאות OAuth). בסיום, לוחצים על הרשאת ממשקי API.
- בקטעים שלב 2 ושלב 3, עוברים על תהליך ההרשאה באמצעות OAuth 2.0 ומוודאים שכל שלב פועל כמו שצריך.
כדי לאמת את ההטמעה, אפשר להשתמש בכלי Google Account Linking Demo.
בכלי, מבצעים את השלבים הבאים:
- לוחצים על הכפתור כניסה באמצעות חשבון Google.
- בוחרים את החשבון שרוצים לקשר.
- מזינים את מזהה השירות.
- אפשר להזין היקף אחד או יותר שרוצים לבקש גישה אליהם.
- לוחצים על התחלת ההדגמה.
- כשמופיעה הבקשה, מאשרים שרוצים להסכים לבקשת הקישור או לדחות אותה.
- מוודאים שמופנים לפלטפורמה שלכם.