概要
OAuth ベースの Google でログインの簡素化されたリンクは、OAuth リンクの上層に Google でログインを追加します。これにより、Google ユーザーにシームレスなリンク エクスペリエンスを提供し、アカウントの作成も可能になります。ユーザーは Google アカウントを使用してサービスに新しいアカウントを作成できます。
OAuth と Google でログインを使用してアカウント リンクを行うには、次の一般的な手順に従います。
- まず、ユーザーの Google プロフィールにアクセスすることについてユーザーに同意を求めます。
- プロフィールの情報を使用して、ユーザー アカウントが存在するかどうかを確認します。
- 既存のユーザーの場合は、アカウントをリンクします。
- 認証システムで Google ユーザーに一致するユーザーが見つからない場合は、Google から受け取った ID トークンを検証します。その後、ID トークンに含まれているプロフィール情報に基づいてユーザー アカウントを作成できます。
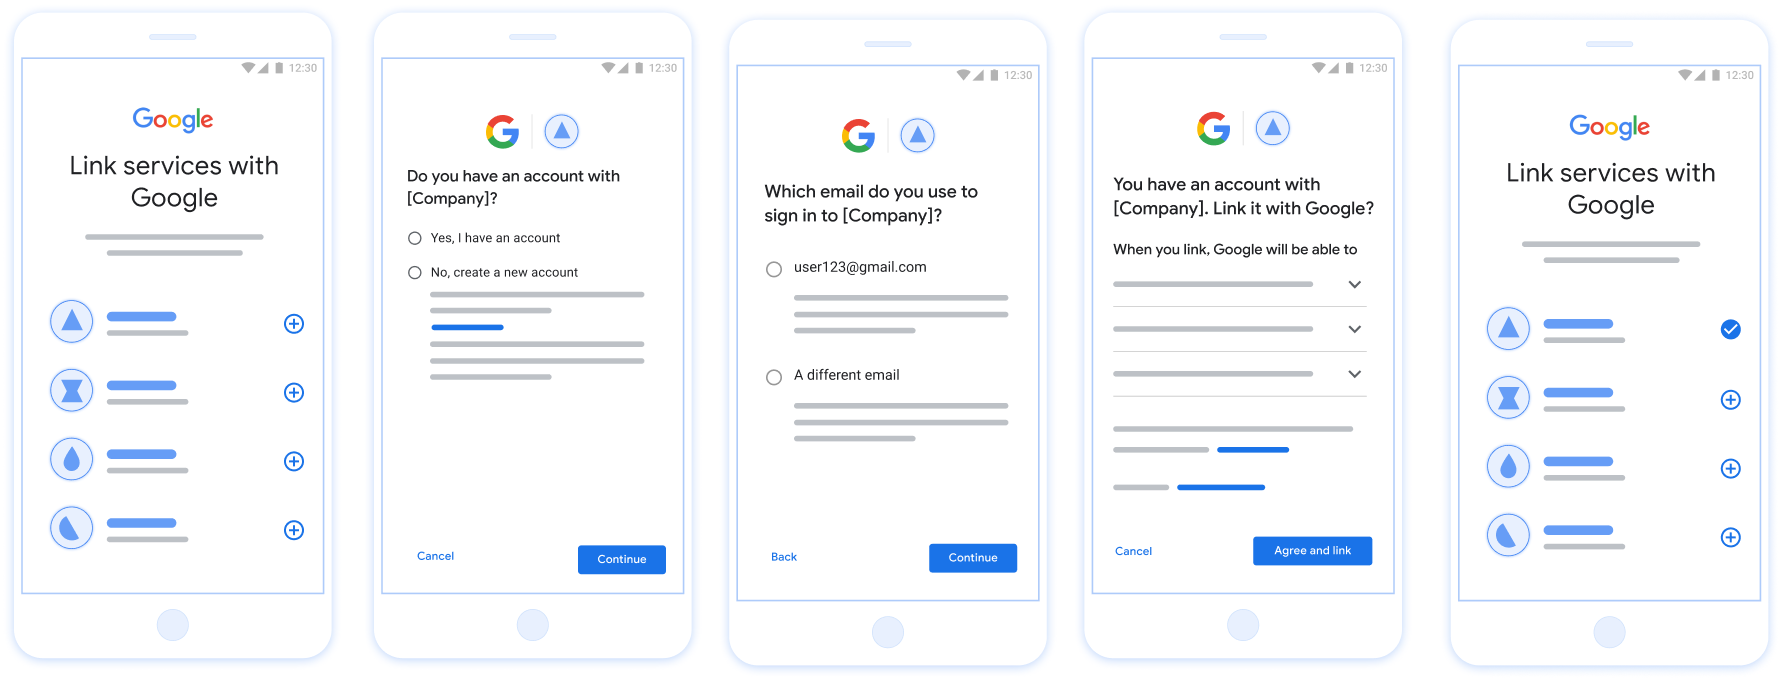
図 1. ユーザーのスマートフォンでの簡素化されたリンクによるアカウント リンク
簡素化されたリンク: OAuth + 「Google でログイン」フロー
次のシーケンス図は、Streamlined Linking におけるユーザー、Google、トークン交換エンドポイント間のインタラクションの詳細を示しています。
役割と責任
次の表に、Streamlined Linking フローにおけるアクターの役割と責任を定義します。
| アクター / コンポーネント | GAL ロール | 責任 |
|---|---|---|
| Google アプリ / サーバー | OAuth クライアント | Google でログインのユーザーの同意を取得し、ID アサーション(JWT)をサーバーに渡し、結果のトークンを安全に保存します。 |
| トークン交換エンドポイント | ID プロバイダ / 認可サーバー | ID アサーションを検証し、既存のアカウントを確認し、アカウント リンク インテント(check、get、create)を処理し、リクエストされたインテントに基づいてトークンを発行します。 |
| サービス API | リソース サーバー | 有効なアクセス トークンが提示された場合にユーザーデータへのアクセスを提供します。 |
簡素化されたリンクの要件
- 基本的な OAuth リンクフローを実装します。サービスは、OAuth 2.0 準拠の認証エンドポイントとトークン交換エンドポイントをサポートする必要があります。
- トークン交換エンドポイントは、JSON Web Token(JWT)アサーションをサポートし、
check、create、getインテントを実装する必要があります。
簡素化されたリンクの決定ロジック
次のロジックは、簡略化されたリンクフローでインテントが呼び出される方法を決定します。
- ユーザーが認証システムにアカウントを持っているかどうか。(ユーザーが [はい] または [いいえ] を選択して決定します)
- はい : ユーザーは Google アカウントに関連付けられているメールアドレスを使用してプラットフォームにログインしますか?(ユーザーが [はい] または [いいえ] を選択して決定します)
- YES : 認証システムに一致するアカウントがユーザーにありますか?(確認のために
check intentが呼び出されます)- YES :
get intentが呼び出され、インテントの取得が成功した場合、アカウントがリンクされます。 - いいえ : 新しいアカウントを作成しますか?(ユーザーが [はい] または [いいえ] を選択して決定します)
- YES :
create intentが呼び出され、作成インテントが正常に返された場合、アカウントがリンクされます。 - いいえ : OAuth リンクフローがトリガーされ、ユーザーはブラウザにリダイレクトされます。ユーザーは別のメールアドレスでリンクするオプションを選択できます。
- YES :
- YES :
- いいえ : OAuth リンクフローがトリガーされ、ユーザーはブラウザにリダイレクトされ、別のメールアドレスでリンクするオプションが表示されます。
- YES : 認証システムに一致するアカウントがユーザーにありますか?(確認のために
- NO : 認証システムに一致するアカウントがユーザーにありますか?(確認のために
check intentが呼び出されます)- YES :
get intentが呼び出され、インテントの取得が成功した場合、アカウントがリンクされます。 - NO : 作成インテントが正常に返された場合、
create intentが呼び出され、アカウントがリンクされます。
- YES :
- はい : ユーザーは Google アカウントに関連付けられているメールアドレスを使用してプラットフォームにログインしますか?(ユーザーが [はい] または [いいえ] を選択して決定します)
実装レシピ
トークン交換エンドポイントでは、Streamlined Linking をサポートするために check、get、create インテントを実装する必要があります。
さまざまなインテントを処理する手順は次のとおりです。
既存のユーザー アカウントを確認する(インテントを確認する)
Google はトークン交換エンドポイントを呼び出して、Google ユーザーがシステムに存在するかどうかを確認します。パラメータの詳細については、リンクインテントの簡素化をご覧ください。
実装レシピ
check インテントを処理するには、次の操作を行います。
リクエストを検証する:
client_id、client_secret、grant_typeを確認します(urn:ietf:params:oauth:grant-type:jwt-bearerである必要があります)。- JWT 検証の条件を使用して
assertion(JWT)を検証します。
ユーザーを検索:
- JWT の Google アカウント ID(
sub)またはメールアドレスが、データベース内のユーザーと一致するかどうかを確認します。
- JWT の Google アカウント ID(
対応:
- 見つかった場合:
{"account_found": "true"}を含む HTTP200 OKを返します。 - 見つからない場合:
{"account_found": "false"}で HTTP404 Not Foundを返します。
- 見つかった場合:
自動リンクを処理する(インテントを取得する)
アカウントが存在する場合、Google は intent=get を使用してエンドポイントを呼び出し、トークンを取得します。パラメータの詳細については、リンクインテントの簡素化をご覧ください。
実装レシピ
get インテントを処理するには、次の操作を行います。
リクエストを検証する:
client_id、client_secret、grant_typeを確認します。assertion(JWT)を検証します。
ユーザーを検索:
subまたはemailクレームを使用して、ユーザーが存在することを確認します。
対応:
- 成功した場合: JSON レスポンス(HTTP
200 OK)でaccess_token、refresh_token、expires_inを生成して返します。 - リンクに失敗した場合: HTTP
401 Unauthorizedと{"error": "linking_error"}を返し、必要に応じてlogin_hintを返して標準の OAuth リンクにフォールバックします。
- 成功した場合: JSON レスポンス(HTTP
Google でログインを使用したアカウントの作成(インテントの作成)を処理する
アカウントが存在しない場合、Google は intent=create を使用してエンドポイントを呼び出し、新しいユーザーを作成します。パラメータの詳細については、リンクインテントの簡素化をご覧ください。
実装レシピ
create インテントを処理するには、次の操作を行います。
リクエストを検証する:
client_id、client_secret、grant_typeを確認します。assertion(JWT)を検証します。
ユーザーが存在しないことを確認する:
subまたはemailがデータベースにすでに存在するかどうかを確認します。- ユーザーが存在する場合: HTTP
401 Unauthorizedと{"error": "linking_error", "login_hint": "USER_EMAIL"}を返して、OAuth リンクへのフォールバックを強制します。
アカウントを作成:
- JWT の
sub、email、name、pictureの各クレームを使用して、新規ユーザー レコードを作成します。
- JWT の
対応:
- JSON レスポンスでトークンを生成して返します(HTTP
200 OK)。
- JSON レスポンスでトークンを生成して返します(HTTP
Google API クライアント ID を取得する
アカウント リンクの登録プロセスで、Google API クライアント ID を指定する必要があります。OAuth リンクの手順を完了する際に作成したプロジェクトを使用して API クライアント ID を取得します。手順は次のとおりです。
- [クライアント] ページに移動します。
Google APIs プロジェクトを作成または選択します。
プロジェクトにウェブ アプリケーション タイプのクライアント ID がない場合は、[クライアントを作成] をクリックして作成します。[承認済みの JavaScript 生成元] ボックスに、サイトのドメインを必ず含めてください。ローカルテストや開発を行う場合は、[承認済みの JavaScript の生成元] フィールドに
http://localhostとhttp://localhost:<port_number>の両方を追加する必要があります。
実装を検証する
OAuth 2.0 Playground ツールを使用して、実装を検証できます。
このツールで、次の手順を行います。
- [構成] 設定をクリックして、[OAuth 2.0 構成] ウィンドウを開きます。
- [OAuth flow] フィールドで、[クライアントサイド] を選択します。
- [OAuth Endpoints] フィールドで、[Custom] を選択します。
- 対応するフィールドに、OAuth 2.0 エンドポイントと Google に割り当てたクライアント ID を指定します。
- [Step 1] セクションで、Google スコープを選択しないでください。代わりに、このフィールドを空白のままにするか、サーバーで有効なスコープを入力します(OAuth スコープを使用しない場合は任意の文字列を入力します)。完了したら、[Authorize APIs] をクリックします。
- [Step 2] セクションと [Step 3] セクションで、OAuth 2.0 フローを確認し、各ステップが意図したとおりに動作することを確認します。
Google アカウント リンク デモツールを使用して、実装を検証できます。
このツールで、次の手順を行います。
- [Google でログイン] ボタンをクリックします。
- リンクするアカウントを選択します。
- サービス ID を入力します。
- 必要に応じて、アクセスをリクエストするスコープを 1 つ以上入力します。
- [Start Demo] をクリックします。
- 確認のメッセージが表示されたら、リンク リクエストに同意または拒否できることを確認します。
- プラットフォームにリダイレクトされることを確認します。