I collegamenti degli account vengono eseguiti utilizzando il flusso del codice di autorizzazione OAuth 2.0, standard di settore.
OAuth 2.1 e PKCE per gli agenti
Per gli agenti AI senza stato e le pipeline multimodali, è consigliabile applicare OAuth 2.1.
- PKCE (Proof Key for Code Exchange): deve essere utilizzato per proteggere il flusso del codice di autorizzazione, impedendo attacchi di intercettazione.
- Nessun flusso implicito: il flusso implicito espone i token di accesso nell'URL, il che rappresenta un rischio per la sicurezza degli ambienti degli agenti.
Il tuo servizio deve supportare gli endpoint di autorizzazione e scambio di token conformi a OAuth 2.0/2.1.
Creare il progetto
Per creare il progetto da utilizzare per il collegamento dell'account:
- Vai alla console dell'API di Google.
- Fai clic su Crea progetto.
- Inserisci un nome o accetta il suggerimento generato.
- Conferma o modifica i campi rimanenti.
- Fai clic su Crea.
Per visualizzare l'ID progetto:
- Vai alla console dell'API di Google.
- Trova il tuo progetto nella tabella della pagina di destinazione. L'ID progetto viene visualizzato nella ID colonna.
Configurare la schermata per il consenso OAuth
La procedura di collegamento dell'Account Google include una schermata per il consenso che indica agli utenti l'applicazione che richiede l'accesso ai loro dati, il tipo di dati richiesti e i termini applicabili. Prima di generare un ID client dell'API Google, devi configurare la schermata per il consenso OAuth.
- Apri la pagina della schermata per il consenso OAuth della console API di Google.
- Se ti viene richiesto, seleziona il progetto che hai appena creato.
Nella pagina "Schermata per il consenso OAuth", compila il modulo e fai clic sul pulsante "Salva".
Nome dell'applicazione: il nome dell'applicazione che richiede il consenso. Il nome deve riflettere con precisione l'applicazione ed essere coerente con il nome dell'applicazione visualizzato dagli utenti altrove. Il nome dell'applicazione verrà mostrato nella schermata per il consenso del collegamento dell'account.
Logo dell'applicazione: un'immagine nella schermata per il consenso che aiuterà gli utenti a riconoscere la tua app. Il logo viene mostrato nella schermata per il consenso del collegamento dell'account e nelle impostazioni dell'account.
Email di assistenza: gli utenti possono contattarti per domande sul loro consenso.
Ambiti per le API Google: gli ambiti consentono alla tua applicazione di accedere ai dati privati di Google dell'utente. Per il caso d'uso del collegamento dell'Account Google, l'ambito predefinito (email, profilo, openid) è sufficiente, non devi aggiungere ambiti sensibili. In genere, è una best practice richiedere gli ambiti in modo incrementale, nel momento in cui è necessario l'accesso, anziché in anticipo. Scopri di più.
Domini autorizzati: per proteggere te e i tuoi utenti, Google consente l'utilizzo dei domini autorizzati alle sole applicazioni che eseguono l'autenticazione tramite OAuth. I link delle tue applicazioni devono essere ospitati su domini autorizzati. Scopri di più.
Link alla home page dell'applicazione: la home page della tua applicazione. Deve essere ospitata su un dominio autorizzato.
Link alle norme sulla privacy dell'applicazione: viene mostrato nella schermata per il consenso del collegamento dell'Account Google. Deve essere ospitata su un dominio autorizzato.
(Facoltativo) Link ai Termini di servizio dell'applicazione: deve essere ospitato su un dominio autorizzato.
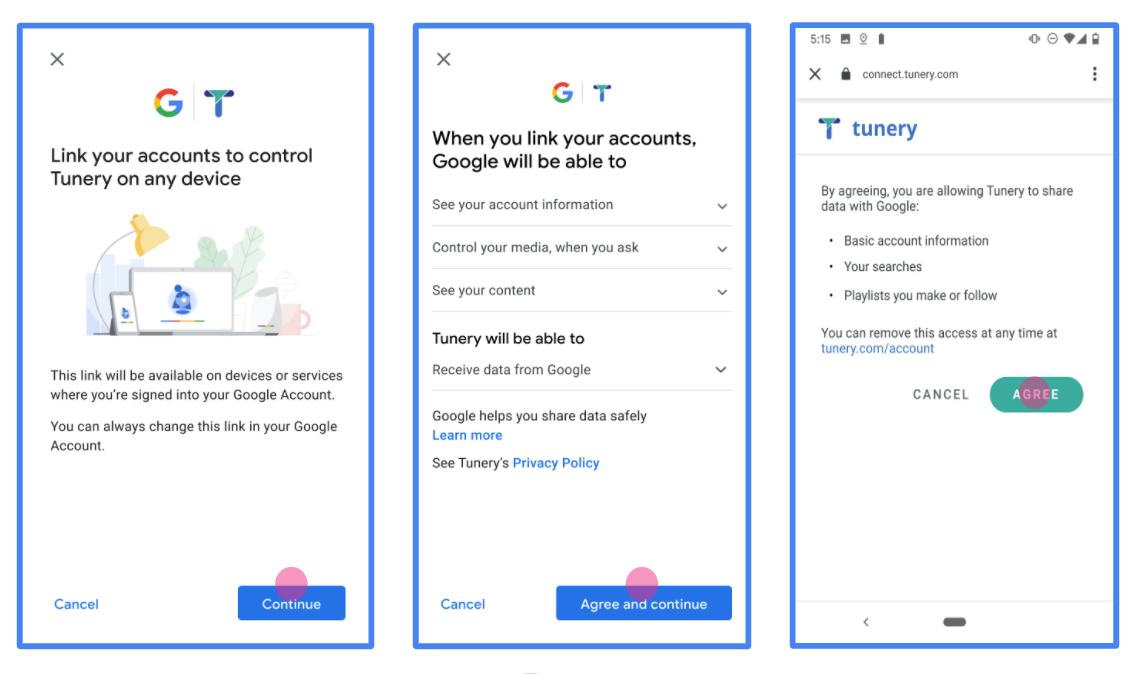
Figura 1. Schermata per il consenso del collegamento dell'Account Google per un'applicazione fittizia, Tunery
Controlla lo "Stato della verifica". Se la tua applicazione richiede la verifica, fai clic sul pulsante "Invia per la verifica" per inviarla. Per i dettagli, consulta i requisiti di verifica OAuth.
Implementare il server OAuth
Un'implementazione del server OAuth 2.0 del flusso del codice di autorizzazione è costituita da due endpoint, che il tuo servizio rende disponibili tramite HTTPS. Il primo endpoint è l'endpoint di autorizzazione, che è responsabile di trovare o ottenere il consenso degli utenti per l'accesso ai dati. L'endpoint di autorizzazione presenta un'interfaccia utente di accesso agli utenti che non hanno ancora eseguito l'accesso e registra il consenso all'accesso richiesto. Il secondo endpoint è l'endpoint di scambio dei token, che viene utilizzato per ottenere stringhe criptate, chiamate token, che autorizzano un utente ad accedere al tuo servizio.
Quando un'applicazione Google deve chiamare una delle API del tuo servizio, Google utilizza questi endpoint insieme per ottenere l'autorizzazione dai tuoi utenti a chiamare queste API per loro conto.
Collegamento dell'account Google: flusso del codice di autorizzazione OAuth
Il seguente diagramma di sequenza descrive in dettaglio le interazioni tra l'utente, Google e gli endpoint del tuo servizio.
Ruoli e responsabilità
La seguente tabella definisce i ruoli e le responsabilità degli attori nel flusso OAuth di collegamento dell'Account Google (GAL). Tieni presente che in GAL Google funge da client OAuth, mentre il tuo servizio funge da provider di identità/servizi.
| Attore / componente | Ruolo GAL | Responsabilità |
|---|---|---|
| App / server Google | Client OAuth | Avvia il flusso, riceve il codice di autorizzazione, lo scambia con token e li archivia in modo sicuro per accedere alle API del tuo servizio. |
| Il tuo endpoint di autorizzazione | Server di autorizzazione | Autentica gli utenti e ottiene il loro consenso a condividere l'accesso ai loro dati con Google. |
| Endpoint di scambio token | Server di autorizzazione | Convalida i codici di autorizzazione e i token di aggiornamento ed emette token di accesso al server Google. |
| URI di reindirizzamento Google | Endpoint di callback | Riceve il reindirizzamento dell'utente dal tuo servizio di autorizzazione con i valori
code e state. |
Una sessione del flusso del codice di autorizzazione OAuth 2.0 avviata da Google ha il seguente flusso:
- Google apre l'endpoint di autorizzazione nel browser dell'utente. Se il flusso è iniziato su un dispositivo solo vocale per un'azione, Google trasferisce l'esecuzione a uno smartphone.
- L'utente esegue l'accesso, se non l'ha già fatto, e concede a Google l'autorizzazione ad accedere ai propri dati con la tua API, se non l'ha già concessa.
- Il tuo servizio crea un codice di autorizzazione e lo restituisce a Google. Per farlo, reindirizza il browser dell'utente a Google con il codice di autorizzazione allegato alla richiesta.
- Google invia il codice di autorizzazione all'endpoint di scambio dei token, che verifica l'autenticità del codice e restituisce un token di accesso e un token di aggiornamento. Il token di accesso è un token di breve durata che il tuo servizio accetta come credenziali per accedere alle API. Il token di aggiornamento è un token a lunga durata che Google può archiviare e utilizzare per acquisire nuovi token di accesso quando scadono.
- Una volta completato il flusso di collegamento dell'account, ogni richiesta successiva inviata da Google contiene un token di accesso.
Implementation Recipe
Segui questi passaggi per implementare il flusso del codice di autorizzazione.
Passaggio 1: gestisci le richieste di autorizzazione
Quando Google avvia il collegamento dell'account, reindirizza l'utente all'endpoint di autorizzazione. Per i contratti di protocollo dettagliati e i requisiti dei parametri, consulta l'endpoint di autorizzazione.
Per gestire la richiesta, esegui le seguenti azioni:
Convalida la richiesta:
- Verifica che
client_idcorrisponda all'ID client assegnato a Google. - Verifica che
redirect_uricorrisponda all'URL di reindirizzamento di Google previsto:none https://oauth-redirect.googleusercontent.com/r/YOUR_PROJECT_ID https://oauth-redirect-sandbox.googleusercontent.com/r/YOUR_PROJECT_ID - Verifica che
response_typesiacode.
- Verifica che
Autentica l'utente:
- Controlla se l'utente ha eseguito l'accesso al tuo servizio.
- Se l'utente non ha eseguito l'accesso, invitalo a completare la procedura di accesso o registrazione.
Genera codice di autorizzazione:
- Crea un codice di autorizzazione univoco e non intuibile associato all'utente e al client.
- Imposta la scadenza del codice dopo circa 10 minuti.
Reindirizza di nuovo a Google:
- Reindirizza il browser all'URL fornito in
redirect_uri. - Aggiungi i seguenti parametri di query:
code: il codice di autorizzazione che hai generato.state: il valore dello stato non modificato ricevuto da Google.
- Reindirizza il browser all'URL fornito in
Passaggio 2: gestisci le richieste di scambio di token
L'endpoint di scambio di token elabora due tipi di richieste: lo scambio di codici con token e l'aggiornamento dei token di accesso scaduti. Per i contratti di protocollo dettagliati e i requisiti dei parametri, consulta Endpoint Token Exchange.
A. Scambiare codici di autorizzazione con token
Quando Google riceve il codice di autorizzazione, chiama l'endpoint di scambio dei token (POST) per recuperare i token.
Convalida la richiesta:
- Verifica
client_ideclient_secret. - Verifica che il codice di autorizzazione sia valido e non scaduto.
- Verifica che
redirect_uricorrisponda al valore utilizzato nel passaggio 1. - Se la convalida non va a buon fine, restituisci un errore HTTP
400 Bad Requestcon{"error": "invalid_grant"}.
- Verifica
Token problema:
- Genera un
refresh_tokendi lunga durata e unaccess_tokendi breve durata (in genere 1 ora). - Restituisci un codice HTTP
200 OKcon la risposta standard del token JSON.
- Genera un
B. Aggiornare i token di accesso
Quando il token di accesso scade, Google ne richiede uno nuovo utilizzando il token di aggiornamento.
Convalida la richiesta:
- Verifica
client_id,client_secreterefresh_token. - Se la convalida non va a buon fine, restituisci un errore HTTP
400 Bad Requestcon{"error": "invalid_grant"}.
- Verifica
Emetti un nuovo token di accesso:
- Genera un nuovo
access_tokentemporaneo. - Restituisci un codice HTTP
200 OKcon la risposta del token JSON (inclusa facoltativamente una nuova risposta del token di aggiornamento).
- Genera un nuovo
Gestire le richieste di informazioni utente
L'endpoint userinfo è una risorsa protetta da OAuth 2.0 che restituisce attestazioni sull'utente collegato. L'implementazione e l'hosting dell'endpoint userinfo sono facoltative, ad eccezione dei seguenti casi d'uso:
- Accesso a un account collegato con Google One Tap.
- Abbonamento senza problemi su AndroidTV.
Dopo che il token di accesso è stato recuperato correttamente dall'endpoint del token, Google invia una richiesta all'endpoint userinfo per recuperare le informazioni di base del profilo dell'utente collegato.
| intestazioni delle richieste endpoint userinfo | |
|---|---|
Authorization header |
Il token di accesso di tipo Bearer. |
Ad esempio, se l'endpoint userinfo è disponibile su
https://myservice.example.com/userinfo, una richiesta potrebbe avere il seguente aspetto:
GET /userinfo HTTP/1.1
Host: myservice.example.com
Authorization: Bearer ACCESS_TOKEN
Affinché l'endpoint userinfo possa gestire le richieste, segui questi passaggi:
- Estrai il token di accesso dall'intestazione Autorizzazione e restituisci le informazioni per l'utente associato al token di accesso.
- Se il token di accesso non è valido, restituisce un errore HTTP 401 Autorizzazione non autorizzata utilizzando l'intestazione della risposta
WWW-Authenticate. Di seguito è riportato un esempio di risposta di errore userinfo:HTTP/1.1 401 Unauthorized WWW-Authenticate: error="invalid_token", error_description="The Access Token expired"
Se il token di accesso è valido, restituisce e invia una risposta HTTP 200 con il seguente oggetto JSON nel corpo dell'HTTPS risposta:
{ "sub": "USER_UUID", "email": "EMAIL_ADDRESS", "given_name": "FIRST_NAME", "family_name": "LAST_NAME", "name": "FULL_NAME", "picture": "PROFILE_PICTURE", }risposta endpoint userinfo subUn ID univoco che identifica l'utente nel sistema. emailIndirizzo email dell'utente. given_nameFacoltativo:nome dell'utente. family_nameFacoltativo:il cognome dell'utente. nameFacoltativo:nome completo dell'utente. picture(Facoltativo) Immagine del profilo dell'utente.
Convalidare l'implementazione
Puoi convalidare l'implementazione utilizzando lo strumento OAuth 2.0 Playground.
Nello strumento, segui questi passaggi:
- Fai clic su Configurazione per aprire la finestra di configurazione di OAuth 2.0.
- Nel campo Flusso OAuth, seleziona Lato client.
- Nel campo Endpoint OAuth, seleziona Personalizzato.
- Specifica l'endpoint OAuth 2.0 e l'ID client che hai assegnato a Google nei campi corrispondenti.
- Nella sezione Passaggio 1, non selezionare alcun ambito Google. Lascia invece questo campo vuoto o digita un ambito valido per il tuo server (o una stringa arbitraria se non utilizzi gli ambiti OAuth). Quando hai finito, fai clic su Autorizza API.
- Nelle sezioni Passaggio 2 e Passaggio 3, segui il flusso OAuth 2.0 e verifica che ogni passaggio funzioni come previsto.
Puoi convalidare l'implementazione utilizzando lo strumento Demo di collegamento dell'Account Google.
Nello strumento, segui questi passaggi:
- Fai clic sul pulsante Accedi con Google.
- Scegli l'account che vuoi collegare.
- Inserisci l'ID servizio.
- (Facoltativo) Inserisci uno o più ambiti per i quali richiederai l'accesso.
- Fai clic su Avvia demo.
- Quando richiesto, conferma che puoi dare il consenso e rifiutare la richiesta di collegamento.
- Verifica di essere reindirizzato alla tua piattaforma.