Konta są łączone za pomocą standardowych w branży przepływów niejawnych i kodów autoryzacji OAuth 2.0. Twoja usługa musi obsługiwać punkty końcowe autoryzacji i wymiany tokenów zgodne z OAuth 2.0.
W procesie domyślnym Google otwiera Twój punkt końcowy autoryzacji w przeglądarce użytkownika. Po zalogowaniu się zwracasz do Google długotrwały token dostępu. Ten token dostępu jest teraz dołączany do każdego żądania wysyłanego z Google.
W przepływie kodu autoryzacji musisz użyć 2 punktów końcowych:
Punkt końcowy autoryzacji, który wyświetla interfejs logowania użytkownikom, którzy nie są jeszcze zalogowani. Punkt końcowy autoryzacji tworzy też krótkotrwały kod autoryzacji, aby zarejestrować zgodę użytkownika na żądany dostęp.
Punkt końcowy wymiany tokenów, który odpowiada za 2 rodzaje wymiany:
- Wymienia kod autoryzacji na długotrwały token odświeżania i token dostępu o ograniczonym czasie ważności. Wymiana ta następuje, gdy użytkownik przechodzi przez proces łączenia kont.
- Wymiana długoterminowego tokena odświeżania na krótkoterminowy token dostępu. Wymiana ta ma miejsce, gdy Google potrzebuje nowego tokena dostępu, ponieważ poprzedni wygasł.
Wybierz przepływ OAuth 2.0
Chociaż przepływ domyślnie jest prostszy do wdrożenia, Google zaleca, aby tokeny dostępu wydane w ramach procesu niejawnego nigdy nie wygasały. Dzieje się tak, ponieważ użytkownik musi ponownie połączyć swoje konto po wygaśnięciu tokena w ramach procesu niejawnego. Jeśli ze względów bezpieczeństwa potrzebujesz tokenu z terminem ważności, zdecydowanie zalecamy użycie przepływu kodu autoryzacji.
Wskazówki dotyczące wyglądu
W tej sekcji znajdziesz wymagania dotyczące projektu i zalecenia dotyczące ekranu użytkownika, który hostujesz w ramach procesów łączenia OAuth. Gdy wywoła go aplikacja Google, Twoja platforma wyświetli użytkownikowi stronę logowania do Google i ekran z prośbą o zgodę na połączenie kont. Po wyrażeniu zgody na połączenie kont użytkownik zostaje przekierowany z powrotem do aplikacji Google.

Wymagania
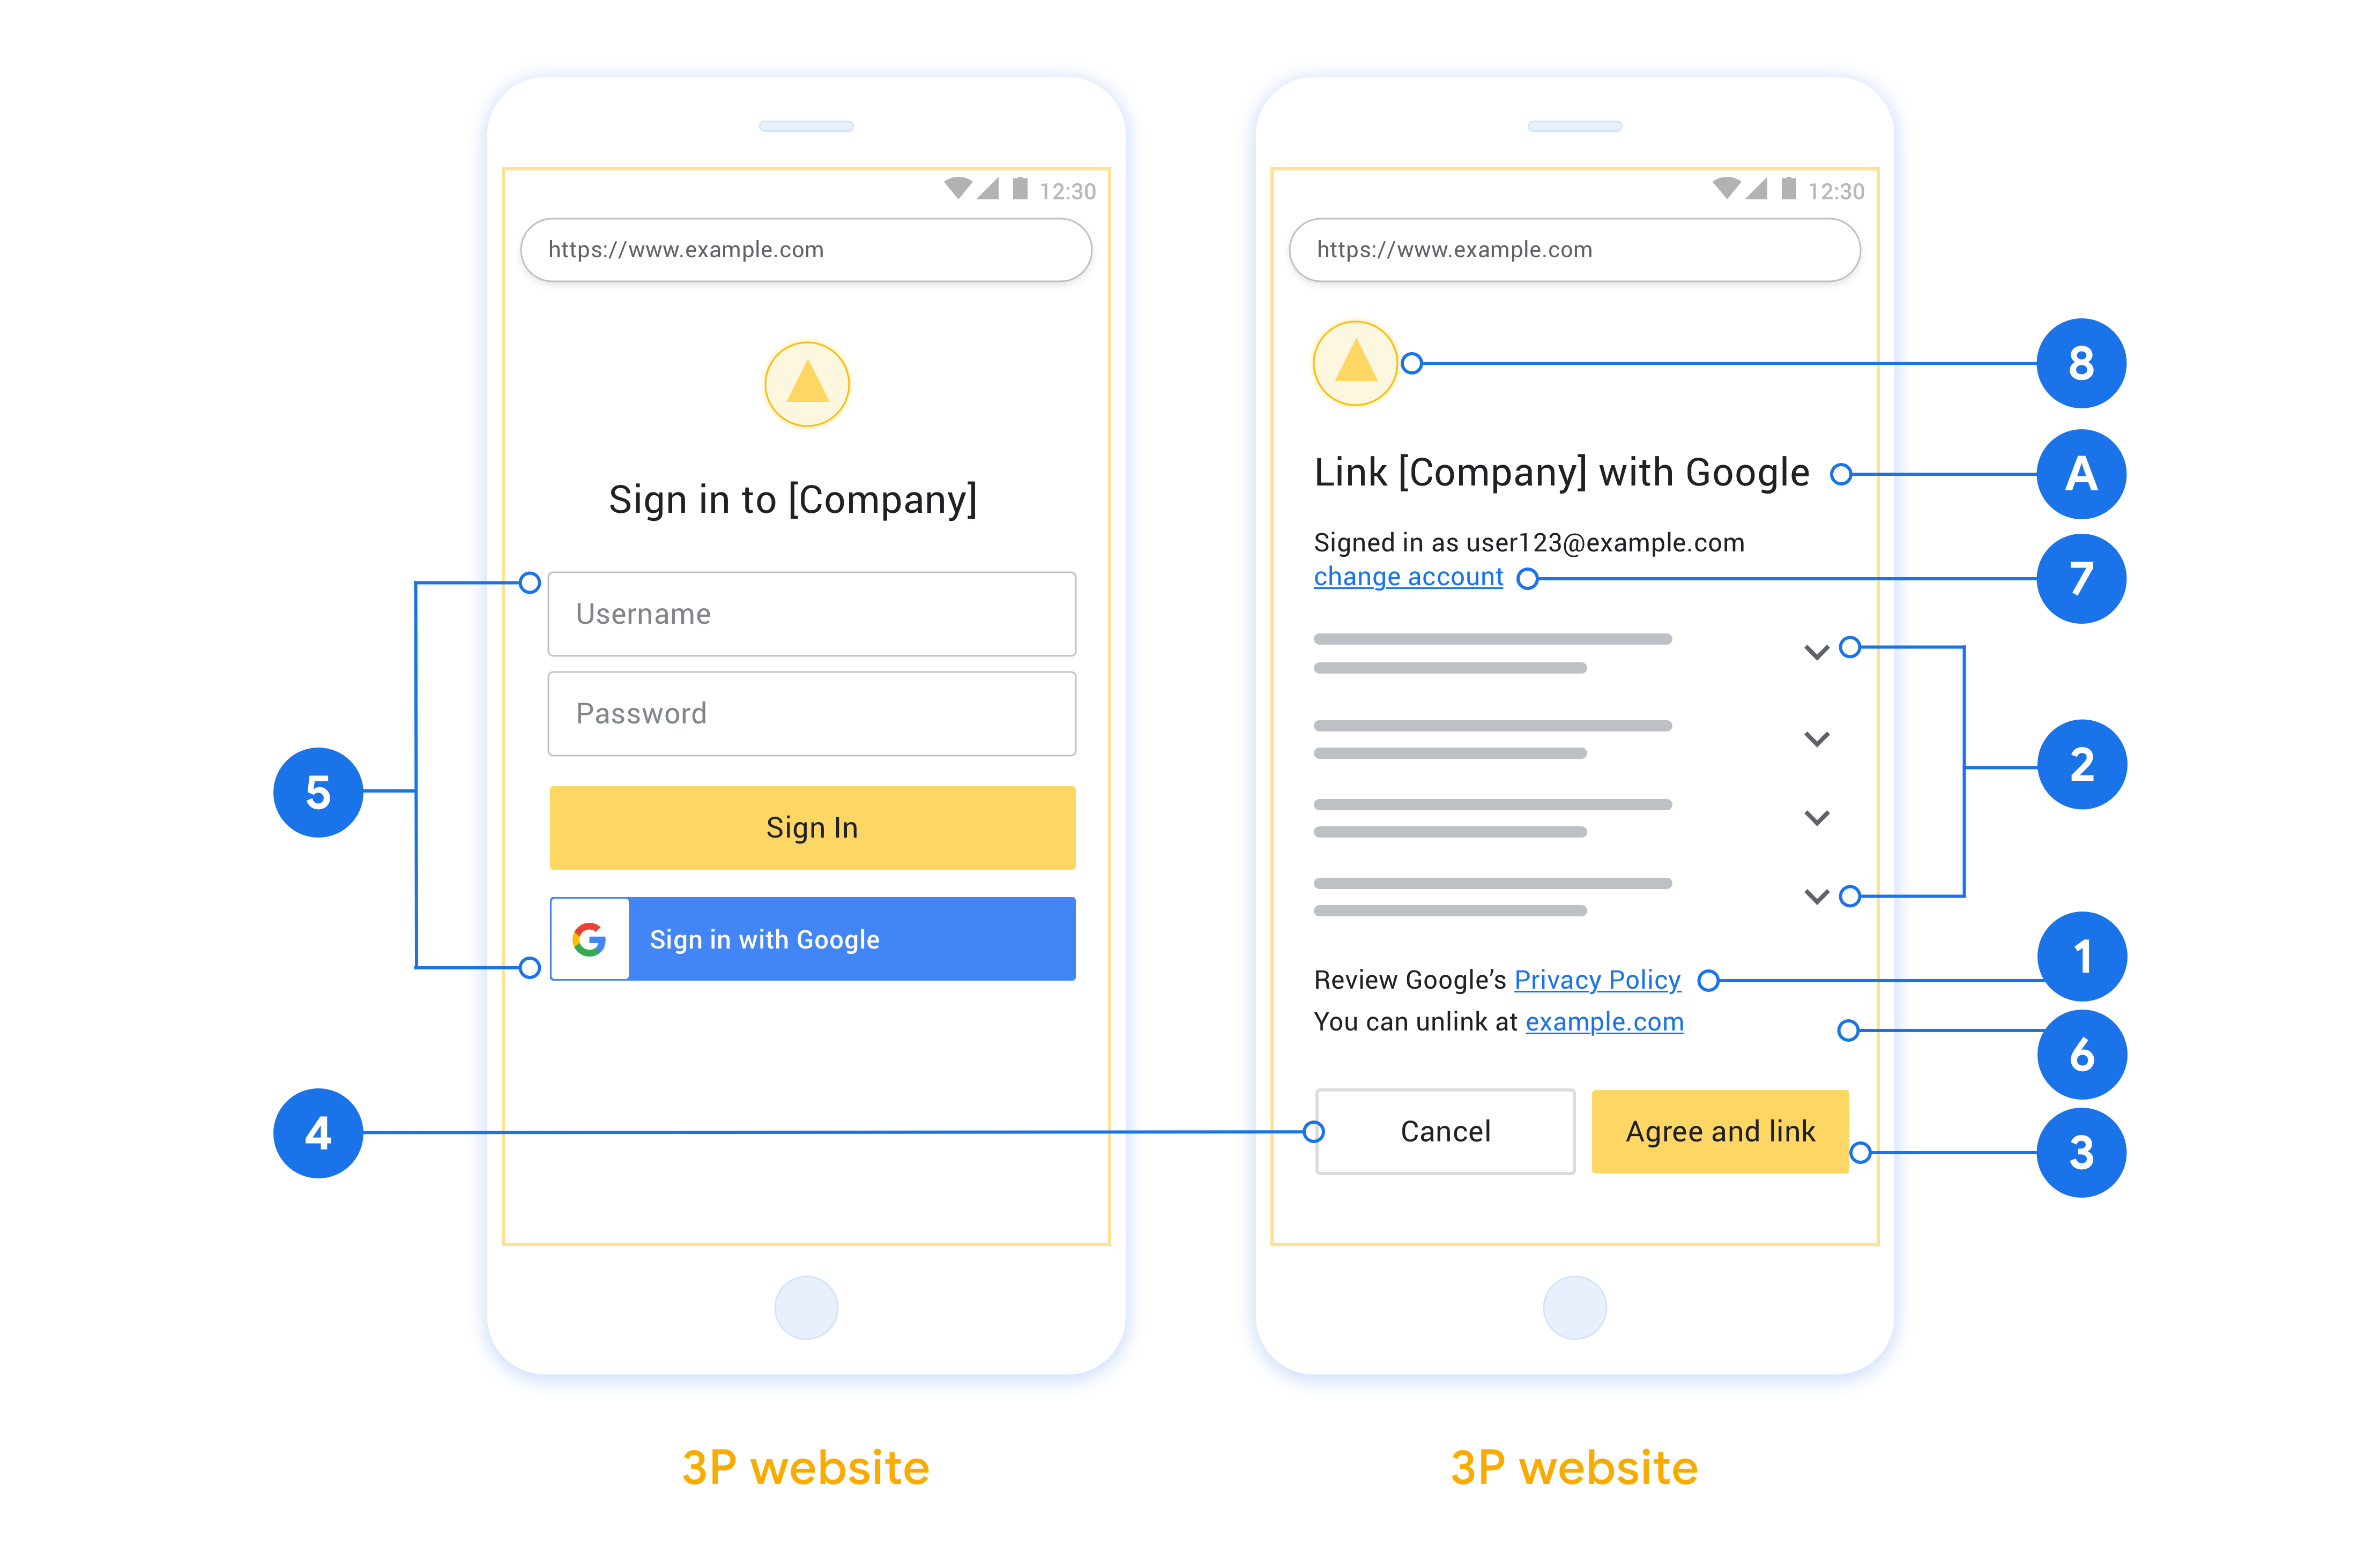
- Musisz poinformować, że konto użytkownika zostanie połączone z Google, a nie z konkretną usługą Google, taką jak Google Home czy Asystent Google.
Rekomendacje
Zalecamy wykonanie tych czynności:
Wyświetlanie Polityki prywatności Google Dodaj link do Polityki prywatności Google na ekranie zgody.
Dane do udostępnienia. Używaj jasnego i zwięzłego języka, aby poinformować użytkownika, jakich danych wymaga Google i dlaczego.
Wyraźne wezwanie do działania. Na ekranie z prośbą o zgodę umieść wyraźne wezwanie do działania, np. „Zgadzam się i chcę połączyć”. Użytkownicy muszą wiedzieć, jakie dane muszą udostępnić Google, aby połączyć swoje konta.
Możliwość anulowania. zapewnienie użytkownikom możliwości powrotu do poprzedniego ekranu lub anulowania połączenia, jeśli nie chcą go nawiązać;
Jednoznaczny proces logowania. Zadbaj o to, aby użytkownicy mieli jasną metodę logowania się na konto Google, np. pola na nazwę użytkownika i hasło lub przycisk Zaloguj się przez Google.
Możliwość odłączenia. Udostępnij użytkownikom mechanizm umożliwiający odłączenie konta, np. adres URL do ustawień konta na Twojej platformie. Możesz też dołączyć link do konta Google, na którym użytkownicy mogą zarządzać połączonym kontem.
Możliwość zmiany konta użytkownika. Zaproponuj użytkownikom sposób przełączania kont. Jest to szczególnie korzystne, jeśli użytkownicy mają tendencję do tworzenia wielu kont.
- Jeśli użytkownik musi zamknąć ekran akceptacji, aby przełączyć się na inne konto, prześlij do Google nieodwracalny błąd, aby użytkownik mógł zalogować się na odpowiednie konto za pomocą linkowania OAuth i przepływu utajonego.
Dołącz logo. Wyświetlać logo firmy na ekranie zgody. Umieść logo na podstawie wytycznych dotyczących stylu. Jeśli chcesz wyświetlać też logo Google, zapoznaj się z artykułem Logotypy i znaki towarowe.

Tworzenie projektu
Aby utworzyć projekt do łączenia kont:
- Kliknij Utwórz projekt.
- Wpisz nazwę lub zaakceptuj wygenerowaną sugestię.
- Potwierdź lub zmień pozostałe pola.
- Kliknij Utwórz.
Aby wyświetlić identyfikator projektu:
- Znajdź projekt w tabeli na stronie docelowej. Identyfikator projektu jest wyświetlany w kolumnie Identyfikator.
Konfigurowanie ekranu zgody OAuth
Proces łączenia konta Google obejmuje ekran akceptacji, na którym użytkownicy mogą zobaczyć, która aplikacja prosi o dostęp do ich danych, jakiego rodzaju dane są wymagane oraz jakie warunki mają zastosowanie. Zanim wygenerujesz identyfikator klienta interfejsu API Google, musisz skonfigurować ekran zgody OAuth.
- Otwórz stronę Ekran zgody OAuth w konsoli interfejsów API Google.
- Jeśli pojawi się taka prośba, wybierz utworzony projekt.
Na stronie „Ekran zgody OAuth” wypełnij formularz i kliknij przycisk „Zapisz”.
Nazwa aplikacji: nazwa aplikacji, która prosi o zgodę. Nazwa powinna dokładnie odzwierciedlać aplikację i być zgodna z nazwą aplikacji, którą użytkownicy widzą w innych miejscach. Nazwa aplikacji będzie wyświetlana na ekranie zgody na połączenie kont.
Logo aplikacji: obraz na ekranie zgody, który ułatwia użytkownikom rozpoznanie aplikacji. Logo jest wyświetlane na ekranie zgody na połączenie konta i w ustawieniach konta.
Adres e-mail pomocy: dla użytkowników do kontaktowania się z Tobą w sprawie pytań o ich zgodę.
Zakresy interfejsów API Google: zakresy umożliwiają aplikacji dostęp do prywatnych danych użytkownika w Google. W przypadku łączenia kont Google wystarczy domyślny zakres (email, profile, openid). Nie musisz dodawać żadnych zakresów zawierających dane wrażliwe. Zwykle zaleca się, aby prosić o zakresy przyrostowo, w momencie, gdy dostęp jest wymagany, a nie z góry. Więcej informacji
Autoryzowane domeny: aby chronić Ciebie i Twoich użytkowników, Google pozwala na używanie autoryzowanych domen tylko aplikacjom, które uwierzytelniają się za pomocą protokołu OAuth. Linki do aplikacji muszą być hostowane w autoryzowanych domenach. Więcej informacji
Link do strony głównej aplikacji: strona główna aplikacji. Musi być hostowany w autoryzowanej domenie.
Link do polityki prywatności aplikacji: wyświetlany na ekranie zgody na łączenie kont Google. Musi być hostowany w autoryzowanej domenie.
Link do warunków korzystania z aplikacji (opcjonalnie): musi być hostowany w autoryzowanej domenie.

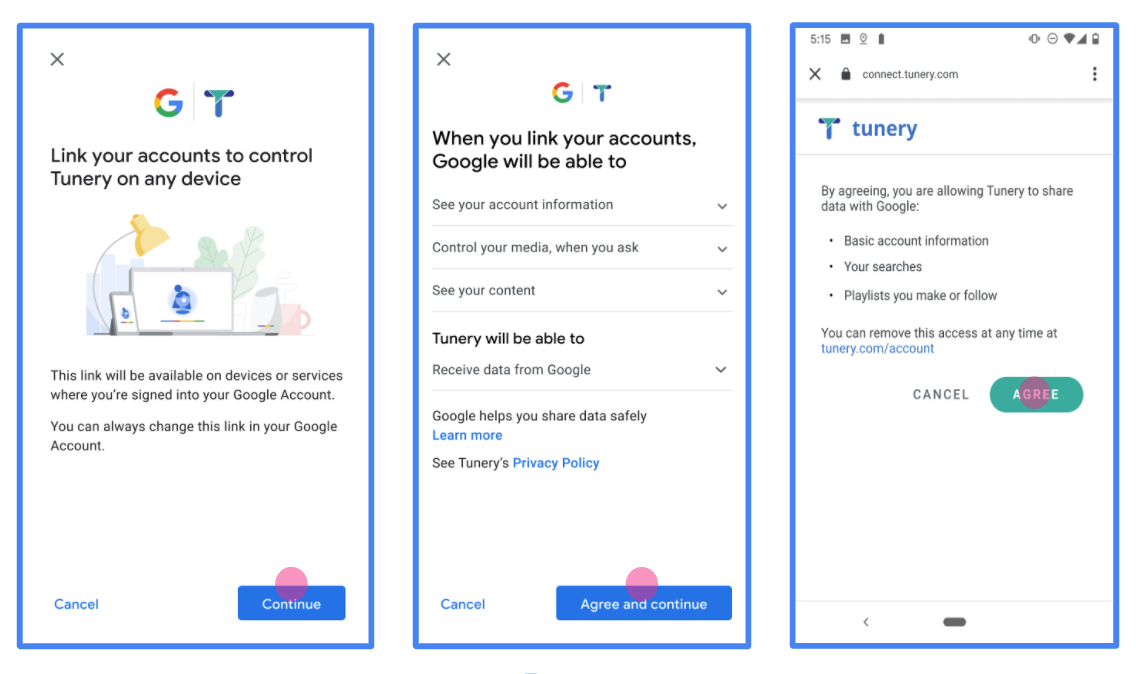
Rysunek 1. Ekran zgody na łączenie kont Google w fikcyjnej aplikacji Tunery
Sprawdź „Stan weryfikacji”. Jeśli Twoja aplikacja wymaga weryfikacji, kliknij przycisk „Prześlij do weryfikacji”, aby przesłać ją do weryfikacji. Szczegółowe informacje znajdziesz w wymaganiach dotyczących weryfikacji OAuth.
Wdrożenie serwera OAuth
Aby obsługiwać przepływ niejawny OAuth 2.0, Twoja usługa wymaga autoryzacji punktu końcowego dostępnego przez HTTPS. Ten punkt końcowy odpowiada za uwierzytelnianie i uzyskiwania od użytkowników zgody na dostęp do danych. Punkt końcowy autoryzacji wyświetla interfejs logowania użytkownikom, którzy nie są jeszcze zalogowani, wyrazić zgodę na żądany dostęp.
Gdy aplikacja Google musi wywołać jeden z autoryzowanych interfejsów API Twojej usługi, Google używa tego punktu końcowego, aby uzyskać od użytkowników uprawnienia do wywoływania tych interfejsów API w ich imieniu.
Typowa sesja niejawnego przepływu zainicjowana przez Google w języku OAuth 2.0 ma następujący przepływ:
- Google otworzy punkt końcowy autoryzacji w przeglądarce użytkownika. loguje się użytkownik, jeśli jeszcze nie jest zalogowany, i zezwala Google na uzyskać dostęp do swoich danych za pomocą Twojego interfejsu API, jeśli nie przyznał on jeszcze odpowiednich uprawnień.
- Usługa tworzy token dostępu i zwraca go do Google. W tym celu przekieruj przeglądarkę użytkownika z powrotem do Google z odpowiednim dostępem token dołączony do żądania.
- Google wywołuje interfejsy API Twojej usługi i łączy token dostępu z każdego żądania. Usługa sprawdza, czy token dostępu przyznaje Google aby uzyskać dostęp do interfejsu API, a następnie wykonać jego wywołanie.
Obsługa żądań autoryzacji
Gdy aplikacja Google musi łączyć konta przy użyciu protokołu OAuth 2.0 niejawna, Google wysyła użytkownika do punktu końcowego autoryzacji ze znakiem , które zawiera te parametry:
| Parametry punktu końcowego autoryzacji | |
|---|---|
client_id |
Identyfikator klienta przypisany przez Ciebie do Google. |
redirect_uri |
Adres URL, na który została wysłana odpowiedź na to żądanie. |
state |
wartości księgowej, która jest przesyłana do Google bez zmian w identyfikator URI przekierowania. |
response_type |
Typ wartości do zwrócenia w odpowiedzi. W przypadku protokołu OAuth 2.0 implicit
przepływu, typ odpowiedzi to zawsze token. |
user_locale |
Ustawienia języka konta Google w RFC5646 używany do zlokalizowania treści na język preferowany przez użytkownika. |
Jeśli na przykład punkt końcowy autoryzacji jest dostępny pod adresem
https://myservice.example.com/auth, żądanie może wyglądać tak:
GET https://myservice.example.com/auth?client_id=GOOGLE_CLIENT_ID&redirect_uri=REDIRECT_URI&state=STATE_STRING&response_type=token&user_locale=LOCALE
Aby punkt końcowy autoryzacji mógł obsługiwać żądania logowania, wykonaj te czynności kroki:
Sprawdź wartości
client_idiredirect_uriw zapobiegaj przyznawaniu dostępu do niezamierzonych lub błędnie skonfigurowanych aplikacji klienckich:- Sprawdź, czy identyfikator
client_idjest zgodny z Twoim identyfikatorem klienta przypisane do Google. - Sprawdź, czy URL podany w pliku
redirect_urima taką postać:https://oauth-redirect.googleusercontent.com/r/YOUR_PROJECT_ID https://oauth-redirect-sandbox.googleusercontent.com/r/YOUR_PROJECT_ID
- Sprawdź, czy identyfikator
Sprawdź, czy użytkownik jest zalogowany w Twojej usłudze. Jeśli użytkownik nie jest zalogowany dokończ proces logowania lub rejestracji w usłudze.
Wygeneruj token dostępu, którego Google będzie używać do uzyskiwania dostępu do Twojego interfejsu API. token dostępu może być dowolną wartością ciągu, ale musi jednoznacznie reprezentować i klienta, dla którego jest przeznaczony token, i nie może być odgadywany.
Wyślij odpowiedź HTTP przekierowującą przeglądarkę użytkownika na ten adres URL wskazywaną przez parametr
redirect_uri. Uwzględnij wszystkie następujące parametry we fragmencie adresu URL:access_token: wygenerowany przed chwilą token dostępu.token_type: ciąg znakówbearerstate: niezmodyfikowana wartość stanu pierwotnego, prośba
Oto przykład powstałego adresu URL:
https://oauth-redirect.googleusercontent.com/r/YOUR_PROJECT_ID#access_token=ACCESS_TOKEN&token_type=bearer&state=STATE_STRING
Moduł obsługi przekierowań OAuth 2.0 od Google otrzymuje token dostępu i potwierdza
że wartość state się nie zmieniła. Po uzyskaniu przez Google
token dostępu do Twojej usługi, Google będzie dołączać go do kolejnych wywołań
do interfejsów API Twojej usługi.
Obsługa żądań informacji o użytkowniku
Punkt końcowy informacji o użytkowniku jest chronionym przez OAuth 2.0 zasobem, który zwraca deklaracje dotyczące połączonego użytkownika. Wdrożenie i hosting punktu końcowego informacji o użytkowniku jest opcjonalne. Wyjątkiem są te przypadki użycia:
- Logowanie się na połączone konto za pomocą Google One Tap
- Bezproblemowa subskrypcja na AndroidTV.
Po pobraniu tokena dostępu z punktu końcowego tokena Google wysyła żądanie do punktu końcowego informacji o użytkowniku, aby pobrać podstawowe informacje profilowe połączonego użytkownika.
| nagłówki żądań punktu końcowego informacji o użytkowniku | |
|---|---|
Authorization header |
Token dostępu typu okaziciela. |
Jeśli na przykład punkt końcowy informacji o użytkowniku jest dostępny pod adresem
https://myservice.example.com/userinfo, żądanie może wyglądać tak:
GET /userinfo HTTP/1.1
Host: myservice.example.com
Authorization: Bearer ACCESS_TOKEN
Aby punkt końcowy informacji o użytkowniku mógł obsługiwać żądania, wykonaj te czynności:
- Wyodrębnij token dostępu z nagłówka autoryzacji i zwróć informacje o użytkowniku powiązanym z tym tokenem.
- Jeśli token dostępu jest nieprawidłowy, zwróć błąd HTTP 401 (Brak autoryzacji) i użyj nagłówka odpowiedzi
WWW-Authenticate. Poniżej znajduje się przykładowa odpowiedź na pytanie o błąd w informacjach o użytkowniku:HTTP/1.1 401 Unauthorized WWW-Authenticate: error="invalid_token", error_description="The Access Token expired"
Jeśli token dostępu jest prawidłowy, zwróć odpowiedź HTTP 200 z podanym niżej obiektem JSON w treści HTTPS odpowiedź:
{ "sub": "USER_UUID", "email": "EMAIL_ADDRESS", "given_name": "FIRST_NAME", "family_name": "LAST_NAME", "name": "FULL_NAME", "picture": "PROFILE_PICTURE", }odpowiedź dotycząca punktu końcowego informacji o użytkowniku subUnikalny identyfikator, który identyfikuje użytkownika w Twoim systemie. emailAdres e-mail użytkownika. given_nameOpcjonalnie: imię użytkownika. family_nameOpcjonalnie: nazwisko użytkownika. nameOpcjonalnie: pełna nazwa użytkownika. pictureOpcjonalnie: zdjęcie profilowe użytkownika.
Weryfikowanie implementacji
Własną implementację możesz sprawdzić za pomocą narzędzia OAuth 2.0 Playground.
W narzędziu wykonaj te czynności:
- Kliknij Konfiguracja , aby otworzyć okno konfiguracji OAuth 2.0.
- W polu Procedura OAuth wybierz Po stronie klienta.
- W polu Punkty końcowe OAuth wybierz Niestandardowe.
- W odpowiednich polach podaj punkt końcowy OAuth 2.0 i identyfikator klienta przypisany do Google.
- W sekcji Krok 1 nie wybieraj żadnych zakresów uprawnień Google. Zamiast tego pozostaw to pole puste lub wpisz zakres prawidłowy dla Twojego serwera (lub dowolny ciąg znaków, jeśli nie używasz zakresów OAuth). Gdy skończysz, kliknij Autoryzuj interfejsy API.
- W sekcji Krok 2 i Krok 3 przejdź przez proces OAuth 2.0 i sprawdź, czy każdy krok działa prawidłowo.
Implementację możesz zweryfikować za pomocą narzędzia Demo łączenia kont Google.
W narzędziu wykonaj te czynności:
- Kliknij przycisk Zaloguj się przez Google.
- Wybierz konto, które chcesz połączyć.
- Wpisz identyfikator usługi.
- Opcjonalnie wpisz co najmniej 1 zakres, do którego chcesz uzyskać dostęp.
- Kliknij Uruchom wersję pokazową.
- Gdy pojawi się odpowiedni komunikat, potwierdź, że możesz wyrazić zgodę lub odrzucić prośbę o połączenie.
- Sprawdź, czy nastąpiło przekierowanie na Twoją platformę.