Hesaplar, endüstri standardı OAuth 2.0 yetkilendirme kodu akışı kullanılarak bağlanır.
Aracılar için OAuth 2.1 ve PKCE
Durum bilgisiz yapay zeka aracıları ve çok modlu ardışık düzenler için OAuth 2.1 zorunlu kılınması önerilir.
- PKCE (Proof Key for Code Exchange): Yetkilendirme kodu akışını güvenli hale getirmek ve araya girme saldırılarını önlemek için kullanılmalıdır.
- Örtülü Akış Yok: Örtülü akış, URL'deki erişim jetonlarını kullanıma sunar. Bu durum, aracı ortamları için güvenlik riski oluşturur.
Hizmetiniz, OAuth 2.0/2.1 uyumlu yetkilendirme ve jeton değişimi uç noktalarını desteklemelidir.
Projeyi oluşturma
Hesap bağlamayı kullanmak için projenizi oluşturmak üzere:
- Google API Konsolu'na gidin.
- Proje oluştur'u tıklayın.
- Bir ad girin veya oluşturulan öneriyi kabul edin.
- Kalan alanları onaylayın veya düzenleyin.
- Oluştur'u tıklayın.
Proje kimliğinizi görüntülemek için:
- Google API Konsolu'na gidin.
- Açılış sayfasındaki tabloda projenizi bulun. Proje kimliği, Kimlik sütununda görünür.
OAuth kullanıcı rızası ekranınızı yapılandırma
Google Hesabı bağlantısı sürecinde, kullanıcılara verilerine erişim isteyen uygulamayı, hangi tür verileri istediğini ve geçerli şartları bildiren bir kullanıcı rızası ekranı gösterilir. Google API istemci kimliği oluşturmadan önce OAuth kullanıcı rızası ekranınızı yapılandırmanız gerekir.
- Google API'leri konsolunun OAuth kullanıcı rızası ekranı sayfasını açın.
- İstenirse yeni oluşturduğunuz projeyi seçin.
"OAuth kullanıcı rızası ekranı" sayfasında formu doldurun ve "Kaydet" düğmesini tıklayın.
Uygulama adı: İzin isteyen uygulamanın adı. Ad, uygulamanızı doğru bir şekilde yansıtmalı ve kullanıcıların başka yerlerde gördüğü uygulama adıyla tutarlı olmalıdır. Uygulama adı, hesap bağlama kullanıcı rızası ekranında gösterilir.
Uygulama logosu: Kullanıcıların uygulamanızı tanımasına yardımcı olacak, kullanıcı rızası ekranında gösterilen bir resim. Logo, hesap bağlama kullanıcı rızası ekranında ve hesap ayarlarında gösterilir.
Destek e-postası: Kullanıcıların rızalarıyla ilgili soruları için sizinle iletişime geçmesi amacıyla.
Google API'leri için kapsamlar: Kapsamlar, uygulamanızın kullanıcınızın gizli Google verilerine erişmesine olanak tanır. Google Hesabı Bağlantısı kullanım alanı için varsayılan kapsam (e-posta, profil, openid) yeterlidir. Hassas kapsamlar eklemeniz gerekmez. Genel olarak, kapsamları önceden değil, erişim gerektiğinde artımlı olarak istemek en iyi uygulamadır. Daha fazla bilgi edinin.
Yetkilendirilen alanlar: Google, sizi ve kullanıcılarınızı korumak için yalnızca OAuth kullanarak kimlik doğrulayan uygulamaların yetkilendirilen alanları kullanmasına izin verir. Uygulamalarınızın bağlantıları, yetkilendirilmiş alanlarda barındırılmalıdır. Daha fazla bilgi edinin.
Uygulama ana sayfası bağlantısı: Uygulamanızın ana sayfası. Yetkili bir alan adında barındırılmalıdır.
Uygulama gizlilik politikası bağlantısı: Google Hesabı Bağlama kullanıcı rızası ekranında gösterilir. Yetkili bir alan adında barındırılmalıdır.
Uygulama Hizmet Şartları bağlantısı (isteğe bağlı): Yetkili bir alanda barındırılmalıdır.
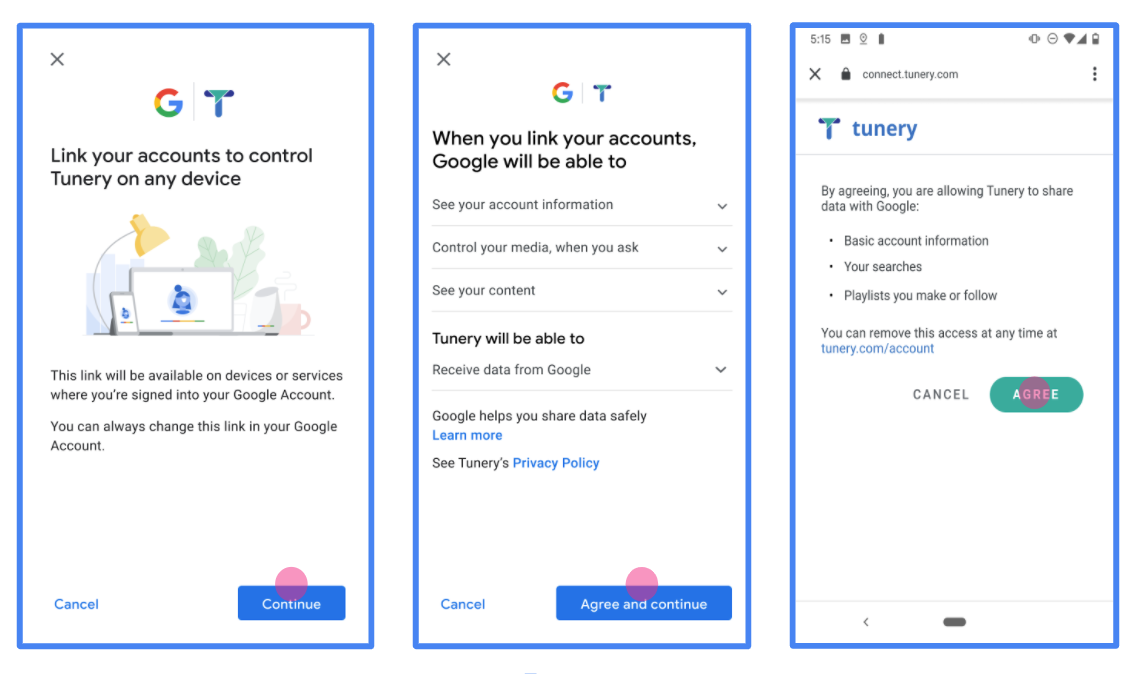
Şekil 1. Kurgusal bir uygulama olan Tunery için Google Hesabı bağlantısı İzin Ekranı
"Doğrulama Durumu"nu kontrol edin. Uygulamanızın doğrulanması gerekiyorsa "Doğrulamaya Gönder" düğmesini tıklayarak uygulamanızı doğrulamaya gönderin. Ayrıntılı bilgi için OAuth doğrulama koşulları başlıklı makaleyi inceleyin.
OAuth sunucunuzu uygulama
An OAuth 2.0 server implementation of the authorization code flow consists of two endpoints, which your service makes available by HTTPS. The first endpoint is the authorization endpoint, which is responsible for finding or obtaining consent from users for data access. The authorization endpoint presents a sign-in UI to your users that aren't already signed in and records consent to the requested access. The second endpoint is the token exchange endpoint, which is used to obtain encrypted strings, called tokens, that authorize a user to access your service.
When a Google application needs to call one of your service's APIs, Google uses these endpoints together to get permission from your users to call these APIs on their behalf.
Google Account Linking: OAuth Authorization Code Flow
The following sequence diagram details interactions between the User, Google, and your service's endpoints.
Roles and responsibilities
The following table defines the roles and responsibilities of the actors in the Google Account Linking (GAL) OAuth flow. Note that in GAL, Google acts as the OAuth Client, while your service acts as the Identity/Service Provider.
| Actor / Component | GAL Role | Responsibilities |
|---|---|---|
| Google App / Server | OAuth Client | Initiates the flow, receives the authorization code, exchanges it for tokens, and securely stores them to access your service's APIs. |
| Your Authorization Endpoint | Authorization Server | Authenticates your users and obtains their consent to share access to their data with Google. |
| Your Token Exchange Endpoint | Authorization Server | Validates authorization codes and refresh tokens, and issues access tokens to the Google Server. |
| Google Redirect URI | Callback Endpoint | Receives the user redirect from your authorization service with the
code and state values. |
An OAuth 2.0 authorization code flow session initiated by Google has the following flow:
- Google opens your authorization endpoint in the user's browser. If the flow started on a voice-only device for an Action, Google transfers the execution to a phone.
- The user signs in, if not signed in already, and grants Google permission to access their data with your API, if they haven't already granted permission.
- Your service creates an authorization code and returns it to Google. To do so, redirect the user's browser back to Google with the authorization code attached to the request.
- Google sends the authorization code to your token exchange endpoint, which verifies the authenticity of the code and returns an access token and a refresh token. The access token is a short-lived token that your service accepts as credentials to access APIs. The refresh token is a long-lived token that Google can store and use to acquire new access tokens when they expire.
- After the user has completed the account linking flow, every subsequent request sent from Google contains an access token.
Implementation Recipe
Follow these steps to implement the Authorization Code flow.
Step 1: Handle authorization requests
When Google initiates account linking, it redirects the user to your authorization endpoint. For detailed protocol contracts and parameter requirements, see the Authorization Endpoint.
To handle the request, perform the following actions:
Validate the request:
- Confirm that the
client_idmatches the Client ID assigned to Google. - Confirm that the
redirect_urimatches the expected Google redirect URL:none https://oauth-redirect.googleusercontent.com/r/YOUR_PROJECT_ID https://oauth-redirect-sandbox.googleusercontent.com/r/YOUR_PROJECT_ID - Verify that
response_typeiscode.
- Confirm that the
Authenticate the user:
- Check if the user is signed in to your service.
- If the user is not signed in, prompt them to complete your sign-in or sign-up flow.
Generate authorization code:
- Create a unique, non-guessable authorization code associated with the user and client.
- Set the code to expire in approximately 10 minutes.
Redirect back to Google:
- Redirect the browser to the URL provided in
redirect_uri. - Append the following query parameters:
code: The authorization code you generated.state: The unmodified state value received from Google.
- Redirect the browser to the URL provided in
Step 2: Handle token exchange requests
Your token exchange endpoint processes two types of requests: exchanging codes for tokens, and refreshing expired access tokens. For detailed protocol contracts and parameter requirements, see the Token Exchange Endpoint.
A. Exchange authorization codes for tokens
When Google receives the authorization code, it calls your token exchange endpoint (POST) to retrieve tokens.
Validate the request:
- Verify
client_idandclient_secret. - Verify the authorization code is valid and not expired.
- Confirm
redirect_urimatches the value used in Step 1. - If validation fails, return an HTTP
400 Bad Requestwith{"error": "invalid_grant"}.
- Verify
Issue tokens:
- Generate a long-lived
refresh_tokenand a short-livedaccess_token(typically 1 hour). - Return an HTTP
200 OKwith the standard JSON token response.
- Generate a long-lived
B. Refresh access tokens
When the access token expires, Google requests a new one using the refresh token.
Validate the request:
- Verify
client_id,client_secret, andrefresh_token. - If validation fails, return an HTTP
400 Bad Requestwith{"error": "invalid_grant"}.
- Verify
Issue new access token:
- Generate a new short-lived
access_token. - Return an HTTP
200 OKwith the JSON token response (optionally including a new refresh token).
- Generate a new short-lived
Handle userinfo requests
The userinfo endpoint is an OAuth 2.0 protected resource that return claims about the linked user. Implementing and hosting the userinfo endpoint is optional, except for the following use cases:
- Linked Account Sign-In with Google One Tap.
- Frictionless subscription on AndroidTV.
After the access token has been successfully retrieved from your token endpoint, Google sends a request to your userinfo endpoint to retrieve basic profile information about the linked user.
| userinfo endpoint request headers | |
|---|---|
Authorization header |
The access token of type Bearer. |
For example, if your userinfo endpoint is available at
https://myservice.example.com/userinfo, a request might look like the following:
GET /userinfo HTTP/1.1
Host: myservice.example.com
Authorization: Bearer ACCESS_TOKEN
For your userinfo endpoint to handle requests, do the following steps:
- Extract access token from the Authorization header and return information for the user associated with the access token.
- If the access token is invalid, return an HTTP 401 Unauthorized error with using the
WWW-AuthenticateResponse Header. Below is an example of a userinfo error response:HTTP/1.1 401 Unauthorized WWW-Authenticate: error="invalid_token", error_description="The Access Token expired"
If the access token is valid, return and HTTP 200 response with the following JSON object in the body of the HTTPS response:
{ "sub": "USER_UUID", "email": "EMAIL_ADDRESS", "given_name": "FIRST_NAME", "family_name": "LAST_NAME", "name": "FULL_NAME", "picture": "PROFILE_PICTURE", }userinfo endpoint response subA unique ID that identifies the user in your system. emailEmail address of the user. given_nameOptional: First name of the user. family_nameOptional: Last name of the user. nameOptional: Full name of the user. pictureOptional: Profile picture of the user.
Uygulamanızı doğrulama
OAuth 2.0 Playground aracını kullanarak uygulamanızı doğrulayabilirsiniz.
Araçta aşağıdaki adımları uygulayın:
- OAuth 2.0 Yapılandırma penceresini açmak için Yapılandırma'yı tıklayın.
- OAuth akışı alanında İstemci tarafı'nı seçin.
- OAuth Uç Noktaları alanında Özel'i seçin.
- OAuth 2.0 uç noktanızı ve Google'a atadığınız istemci kimliğini ilgili alanlarda belirtin.
- 1. adım bölümünde herhangi bir Google kapsamı seçmeyin. Bunun yerine bu alanı boş bırakın veya sunucunuz için geçerli bir kapsam yazın (OAuth kapsamları kullanmıyorsanız rastgele bir dize yazabilirsiniz). İşiniz bittiğinde API'leri yetkilendir'i tıklayın.
- 2. adım ve 3. adım bölümlerinde OAuth 2.0 akışını inceleyin ve her adımın beklendiği gibi çalıştığını doğrulayın.
Uygulamanızı Google Hesabı Bağlantısı Demosu aracını kullanarak doğrulayabilirsiniz.
Araçta aşağıdaki adımları uygulayın:
- Google ile oturum aç düğmesini tıklayın.
- Bağlamak istediğiniz hesabı seçin.
- Hizmet kimliğini girin.
- İsteğe bağlı olarak, erişim isteğinde bulunacağınız bir veya daha fazla kapsam girin.
- Start Demo'yu (Demoyu Başlat) tıklayın.
- İstendiğinde, bağlantı isteğini onaylayabileceğinizi ve reddedebileceğinizi onaylayın.
- Platformunuza yönlendirildiğinizi onaylayın.