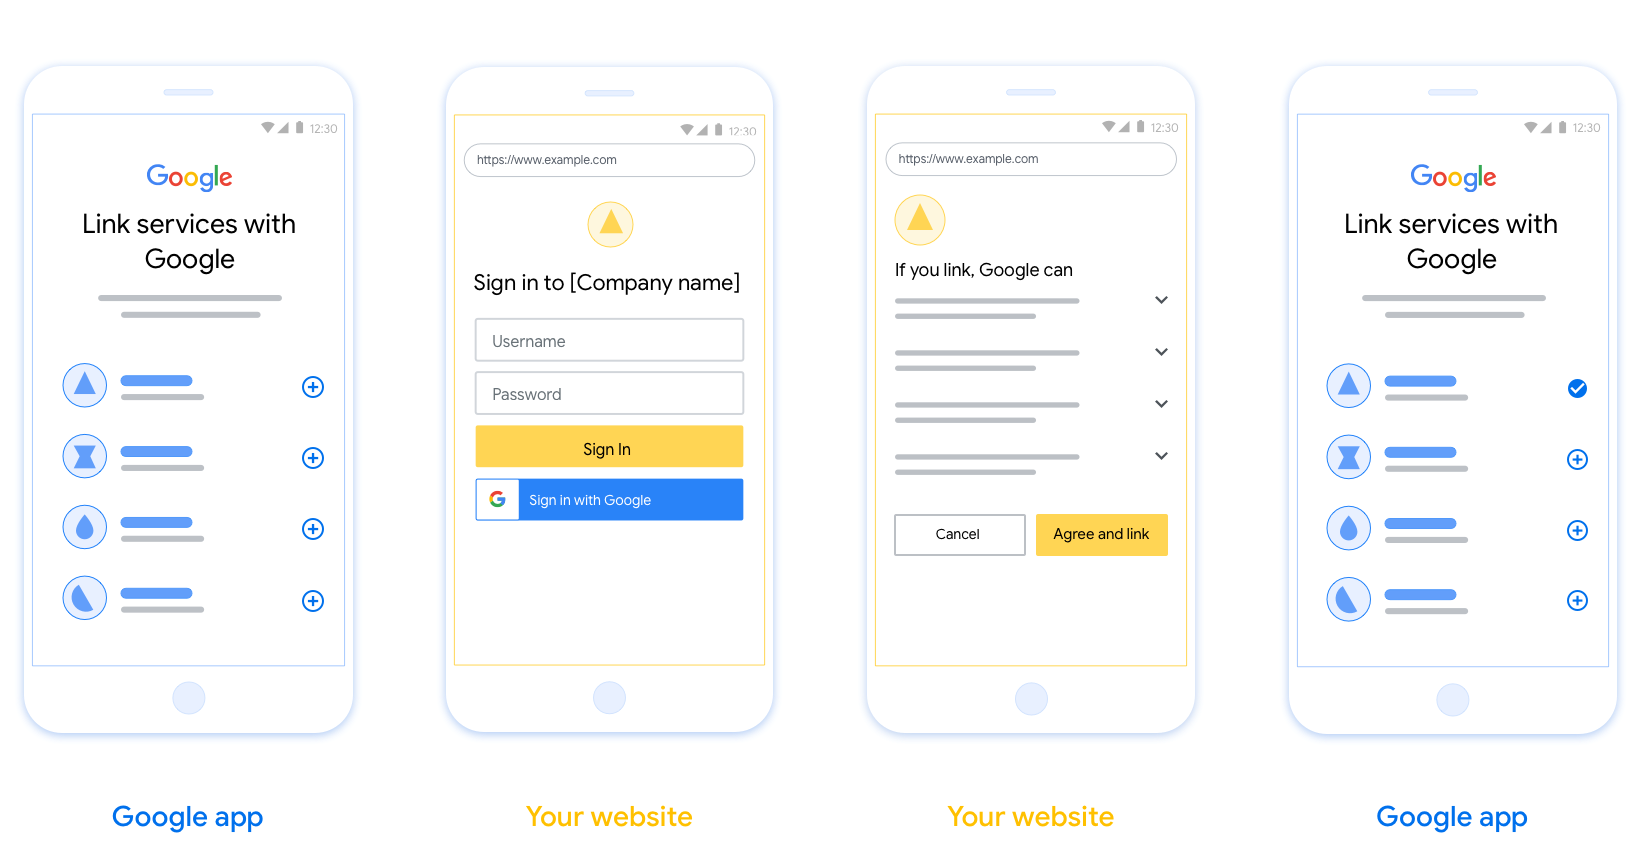
Konta są łączone za pomocą standardowych w branży przepływów niejawnych i kodów autoryzacji OAuth 2.0. Twoja usługa musi obsługiwać punkty końcowe autoryzacji i wymiany tokenów zgodne z OAuth 2.0.
In the implicit flow, Google opens your authorization endpoint in the user's browser. After successful sign in, you return a long-lived access token to Google. This access token is now included in every request sent from Google.
In the authorization code flow, you need two endpoints:
The authorization endpoint, which presents the sign-in UI to your users that aren't already signed in. The authorization endpoint also creates a short-lived authorization code to record users' consent to the requested access.
The token exchange endpoint, which is responsible for two types of exchanges:
- Exchanges an authorization code for a long-lived refresh token and a short-lived access token. This exchange happens when the user goes through the account linking flow.
- Exchanges a long-lived refresh token for a short-lived access token. This exchange happens when Google needs a new access token because the one it had expired.
Choose an OAuth 2.0 flow
Although the implicit flow is simpler to implement, Google recommends that access tokens issued by the implicit flow never expire. This is because the user is forced to link their account again after a token expires with the implicit flow. If you need token expiration for security reasons, we strongly recommend that you use the authorization code flow instead.
Design guidelines
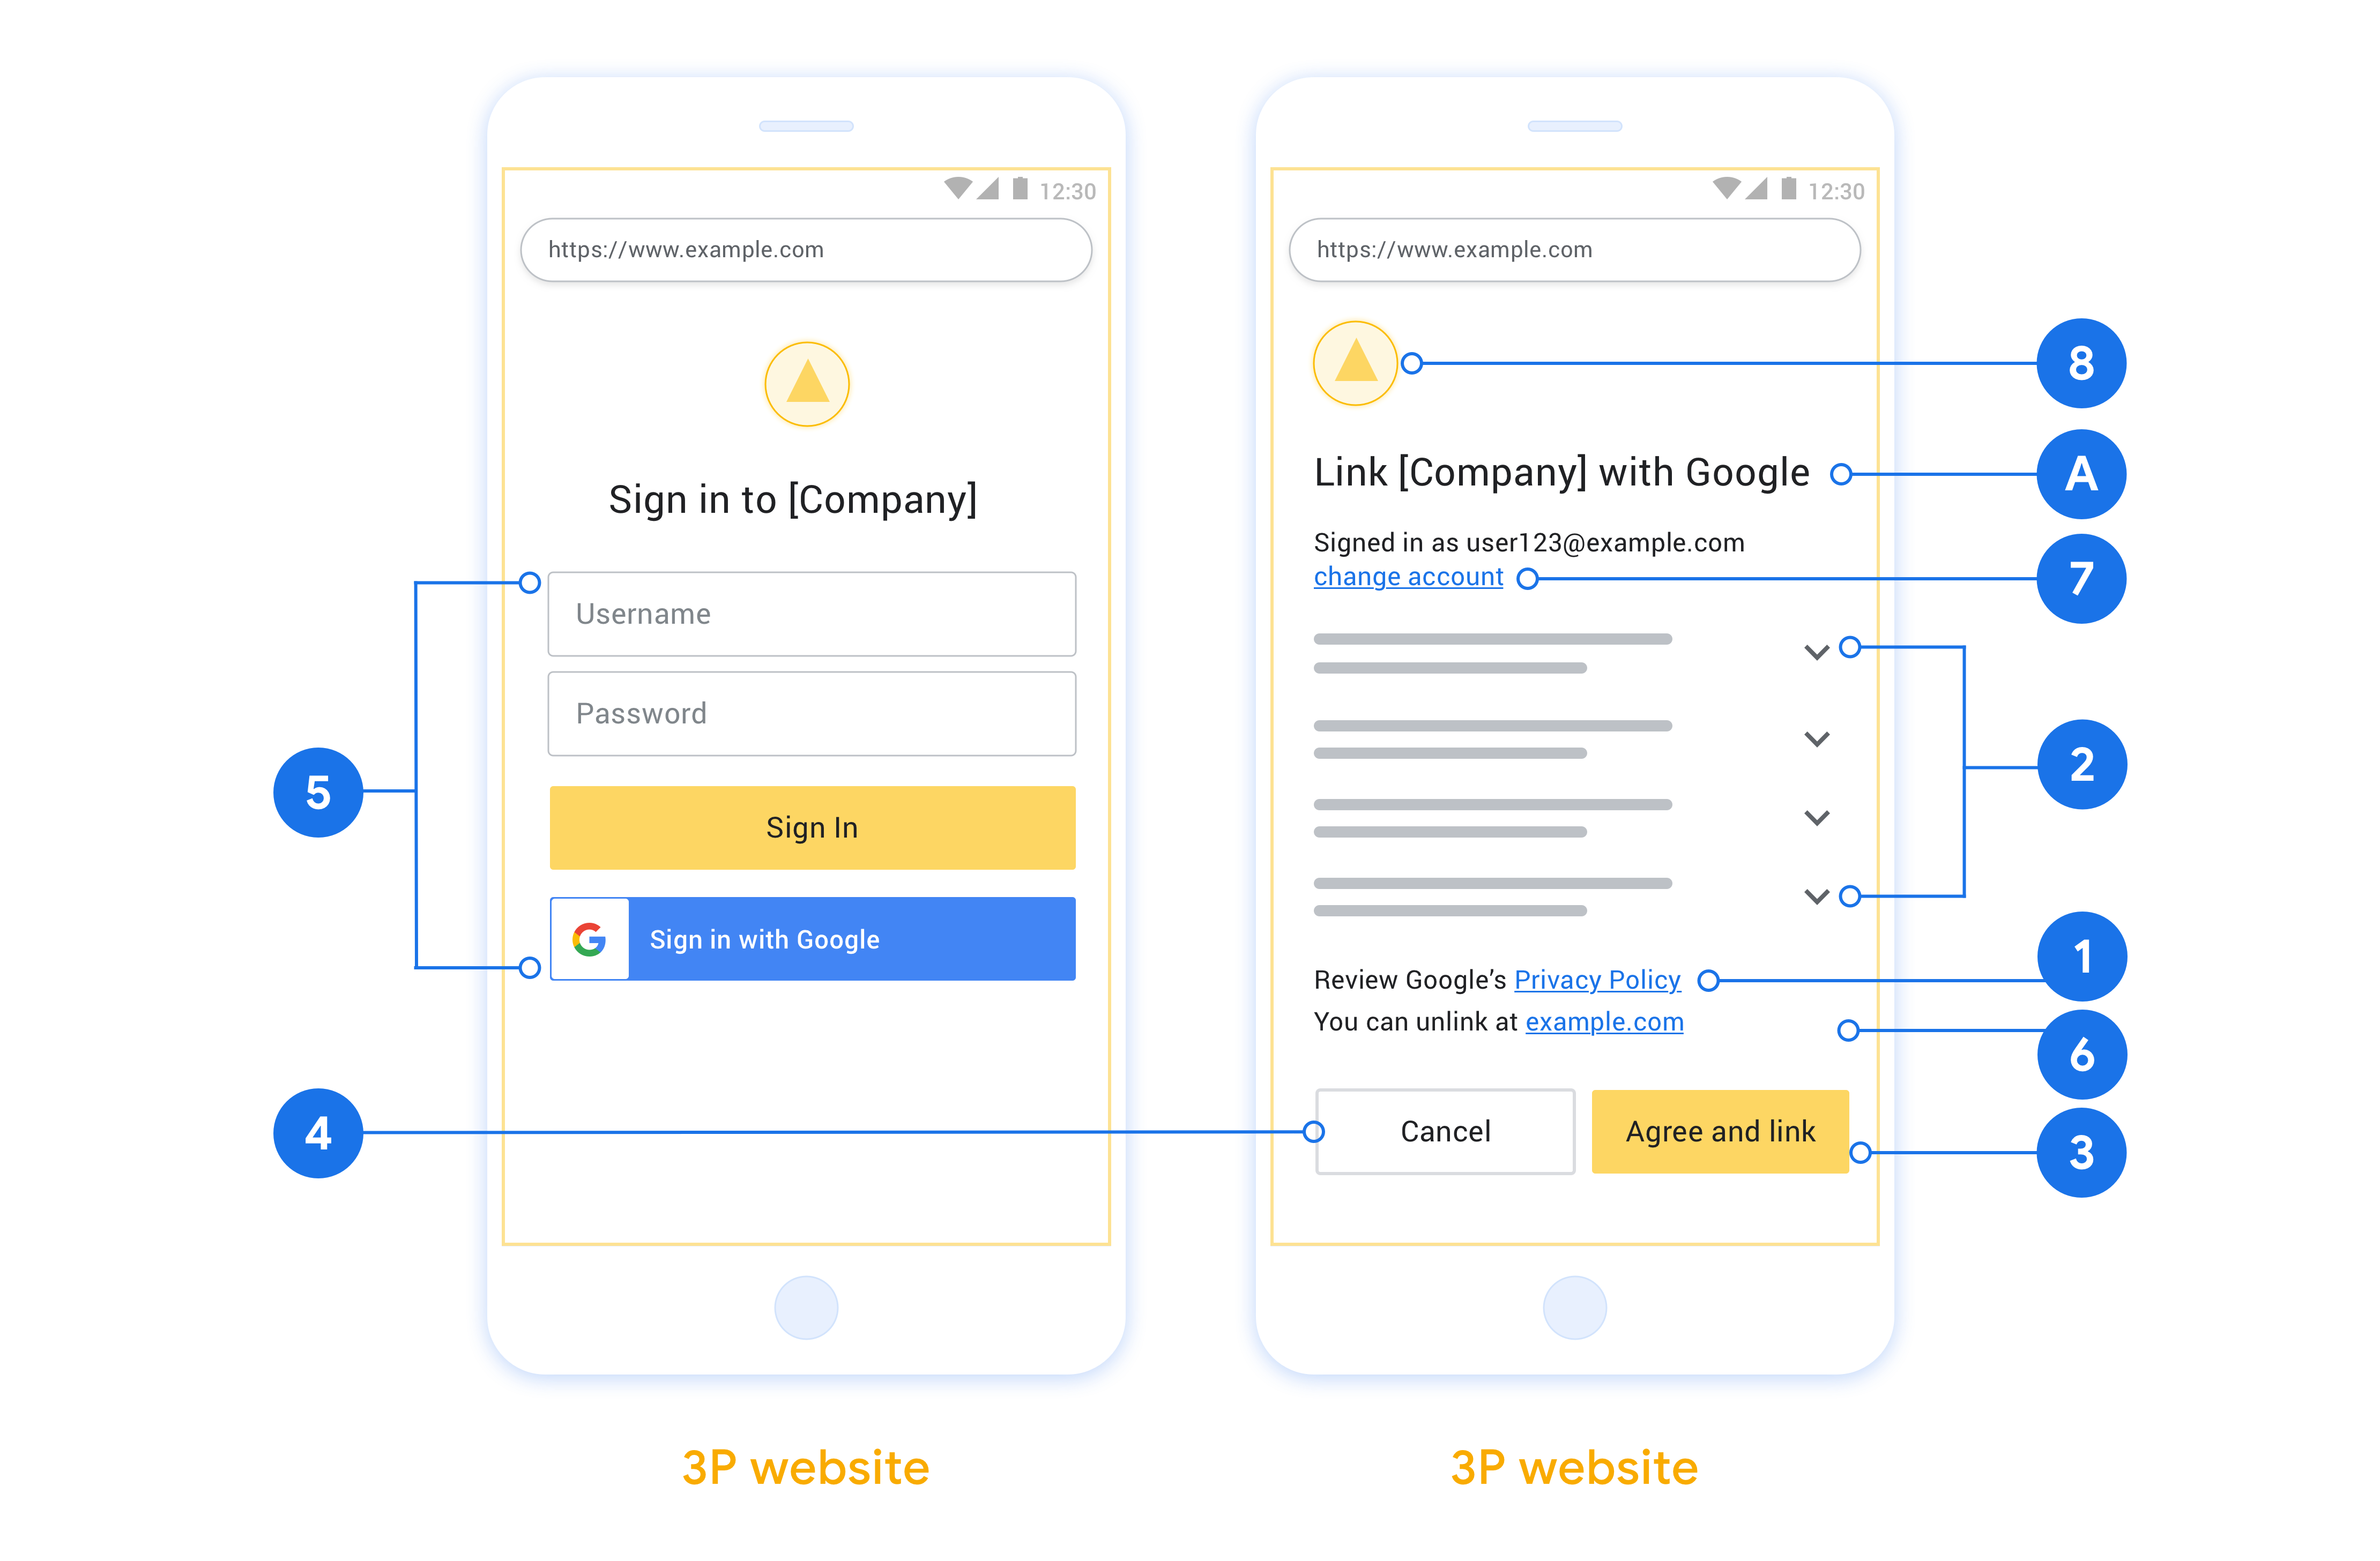
This section describes the design requirements and recommendations for the user screen that you host for OAuth linking flows. After it's called by Google's app, your platform displays a sign in to Google page and account linking consent screen to the user. The user is directed back to Google's app after giving their consent to link accounts.

Requirements
- You must communicate that the user’s account will be linked to Google, not a specific Google product like Google Home or Google Assistant.
Recommendations
We recommend that you do the following:
Display Google's Privacy Policy. Include a link to Google’s Privacy Policy on the consent screen.
Data to be shared. Use clear and concise language to tell the user what data of theirs Google requires and why.
Clear call-to-action. State a clear call-to-action on your consent screen, such as “Agree and link.” This is because users need to understand what data they're required to share with Google to link their accounts.
Ability to cancel. Provide a way for users to go back or cancel, if they choose not to link.
Clear sign-in process. Ensure that users have clear method for signing in to their Google account, such as fields for their username and password or Sign in with Google.
Ability to unlink. Offer a mechanism for users to unlink, such as a URL to their account settings on your platform. Alternatively, you can include a link to Google Account where users can manage their linked account.
Ability to change user account. Suggest a method for users to switch their account(s). This is especially beneficial if users tend to have multiple accounts.
- If a user must close the consent screen to switch accounts, send a recoverable error to Google so the user can sign in to the desired account with OAuth linking and the implicit flow.
Include your logo. Display your company logo on the consent screen. Use your style guidelines to place your logo. If you wish to also display Google's logo, see Logos and trademarks.

Create the project
To create your project to use account linking:
- Go to the Google API Console.
- Click Create project.
- Enter a name or accept the generated suggestion.
- Confirm or edit any remaining fields.
- Click Create.
To view your project ID:
- Go to the Google API Console.
- Find your project in the table on the landing page. The project ID appears in the ID column.
Configure your OAuth Consent Screen
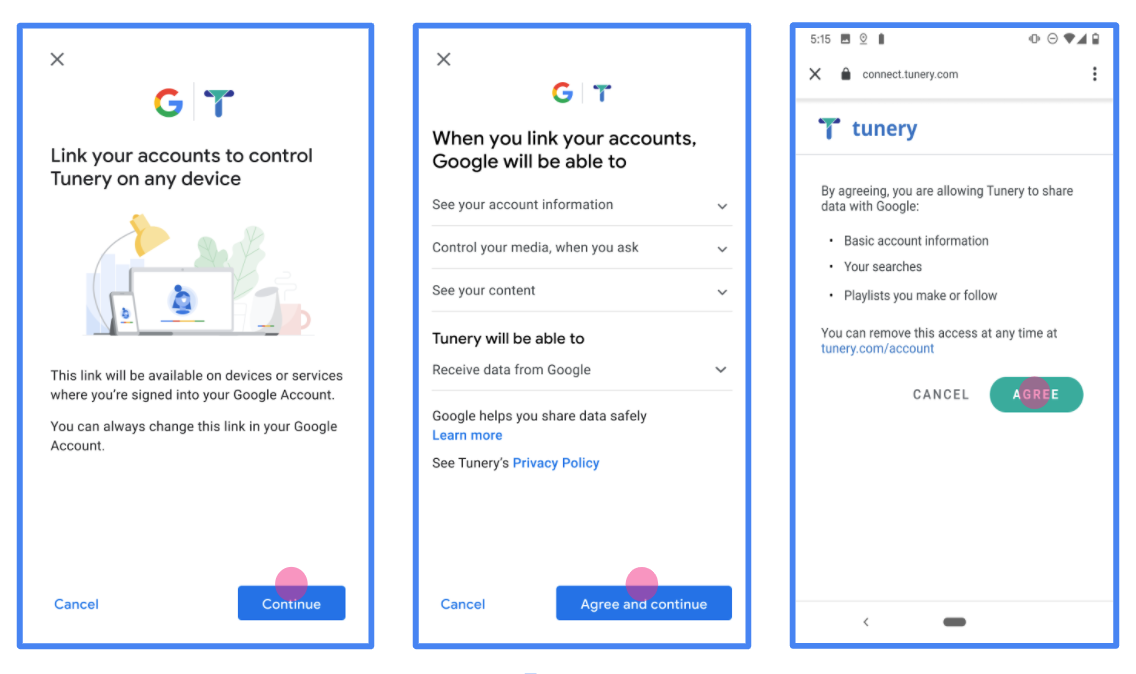
The Google Account Linking process includes a consent screen which tells users the application requesting access to their data, what kind of data they are asking for and the terms that apply. You will need to configure your OAuth consent screen before generating a Google API client ID.
- Open the OAuth consent screen page of the Google APIs console.
- If prompted, select the project you just created.
On the "OAuth consent screen" page, fill out the form and click the “Save” button.
Application name: The name of the application asking for consent. The name should accurately reflect your application and be consistent with the application name users see elsewhere. The application name will be shown on the Account Linking consent screen.
Application logo: An image on the consent screen that will help users recognize your app. The logo is shown on Account linking consent screen and on account settings
Support email: For users to contact you with questions about their consent.
Scopes for Google APIs: Scopes allow your application to access your user's private Google data. For the Google Account Linking use case, default scope (email, profile, openid) is sufficient, you don’t need to add any sensitive scopes. It is generally a best practice to request scopes incrementally, at the time access is required, rather than up front. Learn more.
Authorized domains: To protect you and your users, Google only allows applications that authenticate using OAuth to use Authorized Domains. Your applications' links must be hosted on Authorized Domains. Learn more.
Application Homepage link: Home page for your application. Must be hosted on an Authorized Domain.
Application Privacy Policy link: Shown on Google Account Linking consent screen. Must be hosted on an Authorized Domain.
Application Terms of Service link (Optional): Must be hosted on an Authorized Domain.

Figure 1. Google Account Linking Consent Screen for a fictitious Application, Tunery
Check "Verification Status", if your application needs verification then click the "Submit For Verification" button to submit your application for verification. Refer to OAuth verification requirements for details.
Wdrożenie serwera OAuth
To support the OAuth 2.0 implicit flow, your service makes an authorization endpoint available by HTTPS. This endpoint is responsible for authentication and obtaining consent from users for data access. The authorization endpoint presents a sign-in UI to your users that aren't already signed in and records consent to the requested access.
When a Google application needs to call one of your service's authorized APIs, Google uses this endpoint to get permission from your users to call these APIs on their behalf.
A typical OAuth 2.0 implicit flow session initiated by Google has the following flow:
- Google opens your authorization endpoint in the user's browser. The user signs in, if not signed in already, and grants Google permission to access their data with your API, if they haven't already granted permission.
- Your service creates an access token and returns it to Google. To do so, redirect the user's browser back to Google with the access token attached to the request.
- Google calls your service's APIs and attaches the access token with each request. Your service verifies that the access token grants Google authorization to access the API and then completes the API call.
Handle authorization requests
When a Google application needs to perform account linking via an OAuth 2.0 implicit flow, Google sends the user to your authorization endpoint with a request that includes the following parameters:
| Authorization endpoint parameters | |
|---|---|
client_id |
The client ID you assigned to Google. |
redirect_uri |
The URL to which you send the response to this request. |
state |
A bookkeeping value that is passed back to Google unchanged in the redirect URI. |
response_type |
The type of value to return in the response. For the OAuth 2.0 implicit
flow, the response type is always token. |
user_locale |
The Google Account language setting in RFC5646 format used to localize your content in the user's preferred language. |
For example, if your authorization endpoint is available at
https://myservice.example.com/auth, a request might look like the following:
GET https://myservice.example.com/auth?client_id=GOOGLE_CLIENT_ID&redirect_uri=REDIRECT_URI&state=STATE_STRING&response_type=token&user_locale=LOCALE
For your authorization endpoint to handle sign-in requests, do the following steps:
Verify the
client_idandredirect_urivalues to prevent granting access to unintended or misconfigured client apps:- Confirm that the
client_idmatches the client ID you assigned to Google. - Confirm that the URL specified by the
redirect_uriparameter has the following form:https://oauth-redirect.googleusercontent.com/r/YOUR_PROJECT_ID https://oauth-redirect-sandbox.googleusercontent.com/r/YOUR_PROJECT_ID
- Confirm that the
Check if the user is signed in to your service. If the user isn't signed in, complete your service's sign-in or sign-up flow.
Generate an access token for Google to use to access your API. The access token can be any string value, but it must uniquely represent the user and the client the token is for and must not be guessable.
Send an HTTP response that redirects the user's browser to the URL specified by the
redirect_uriparameter. Include all of the following parameters in the URL fragment:access_token: The access token you just generatedtoken_type: The stringbearerstate: The unmodified state value from the original request
The following is an example of the resulting URL:
https://oauth-redirect.googleusercontent.com/r/YOUR_PROJECT_ID#access_token=ACCESS_TOKEN&token_type=bearer&state=STATE_STRING
Google's OAuth 2.0 redirect handler receives the access token and confirms
that the state value hasn't changed. After Google has obtained an
access token for your service, Google attaches the token to subsequent calls
to your service APIs.
Handle userinfo requests
The userinfo endpoint is an OAuth 2.0 protected resource that return claims about the linked user. Implementing and hosting the userinfo endpoint is optional, except for the following use cases:
- Linked Account Sign-In with Google One Tap.
- Frictionless subscription on AndroidTV.
After the access token has been successfully retrieved from your token endpoint, Google sends a request to your userinfo endpoint to retrieve basic profile information about the linked user.
| userinfo endpoint request headers | |
|---|---|
Authorization header |
The access token of type Bearer. |
For example, if your userinfo endpoint is available at
https://myservice.example.com/userinfo, a request might look like the following:
GET /userinfo HTTP/1.1
Host: myservice.example.com
Authorization: Bearer ACCESS_TOKEN
For your userinfo endpoint to handle requests, do the following steps:
- Extract access token from the Authorization header and return information for the user associated with the access token.
- If the access token is invalid, return an HTTP 401 Unauthorized error with using the
WWW-AuthenticateResponse Header. Below is an example of a userinfo error response:HTTP/1.1 401 Unauthorized WWW-Authenticate: error="invalid_token", error_description="The Access Token expired"
If the access token is valid, return and HTTP 200 response with the following JSON object in the body of the HTTPS response:
{ "sub": "USER_UUID", "email": "EMAIL_ADDRESS", "given_name": "FIRST_NAME", "family_name": "LAST_NAME", "name": "FULL_NAME", "picture": "PROFILE_PICTURE", }userinfo endpoint response subA unique ID that identifies the user in your system. emailEmail address of the user. given_nameOptional: First name of the user. family_nameOptional: Last name of the user. nameOptional: Full name of the user. pictureOptional: Profile picture of the user.
Weryfikowanie implementacji
Własną implementację możesz sprawdzić za pomocą narzędzia OAuth 2.0 Playground.
W narzędziu wykonaj te czynności:
- Kliknij Konfiguracja , aby otworzyć okno konfiguracji OAuth 2.0.
- W polu Procedura OAuth wybierz Po stronie klienta.
- W polu Punkty końcowe OAuth wybierz Niestandardowe.
- W odpowiednich polach podaj punkt końcowy OAuth 2.0 i identyfikator klienta przypisany do Google.
- W sekcji Krok 1 nie wybieraj żadnych zakresów uprawnień Google. Zamiast tego pozostaw to pole puste lub wpisz zakres prawidłowy dla Twojego serwera (lub dowolny ciąg znaków, jeśli nie używasz zakresów OAuth). Gdy skończysz, kliknij Autoryzuj interfejsy API.
- W sekcji Krok 2 i Krok 3 przejdź przez proces OAuth 2.0 i sprawdź, czy każdy krok działa prawidłowo.
Implementację możesz zweryfikować za pomocą narzędzia Demo łączenia kont Google.
W narzędziu wykonaj te czynności:
- Kliknij przycisk Zaloguj się przez Google.
- Wybierz konto, które chcesz połączyć.
- Wpisz identyfikator usługi.
- Opcjonalnie wpisz co najmniej 1 zakres, do którego chcesz uzyskać dostęp.
- Kliknij Uruchom wersję pokazową.
- Gdy pojawi się odpowiedni komunikat, potwierdź, że możesz wyrazić zgodę lub odrzucić prośbę o połączenie.
- Sprawdź, czy nastąpiło przekierowanie na Twoją platformę.