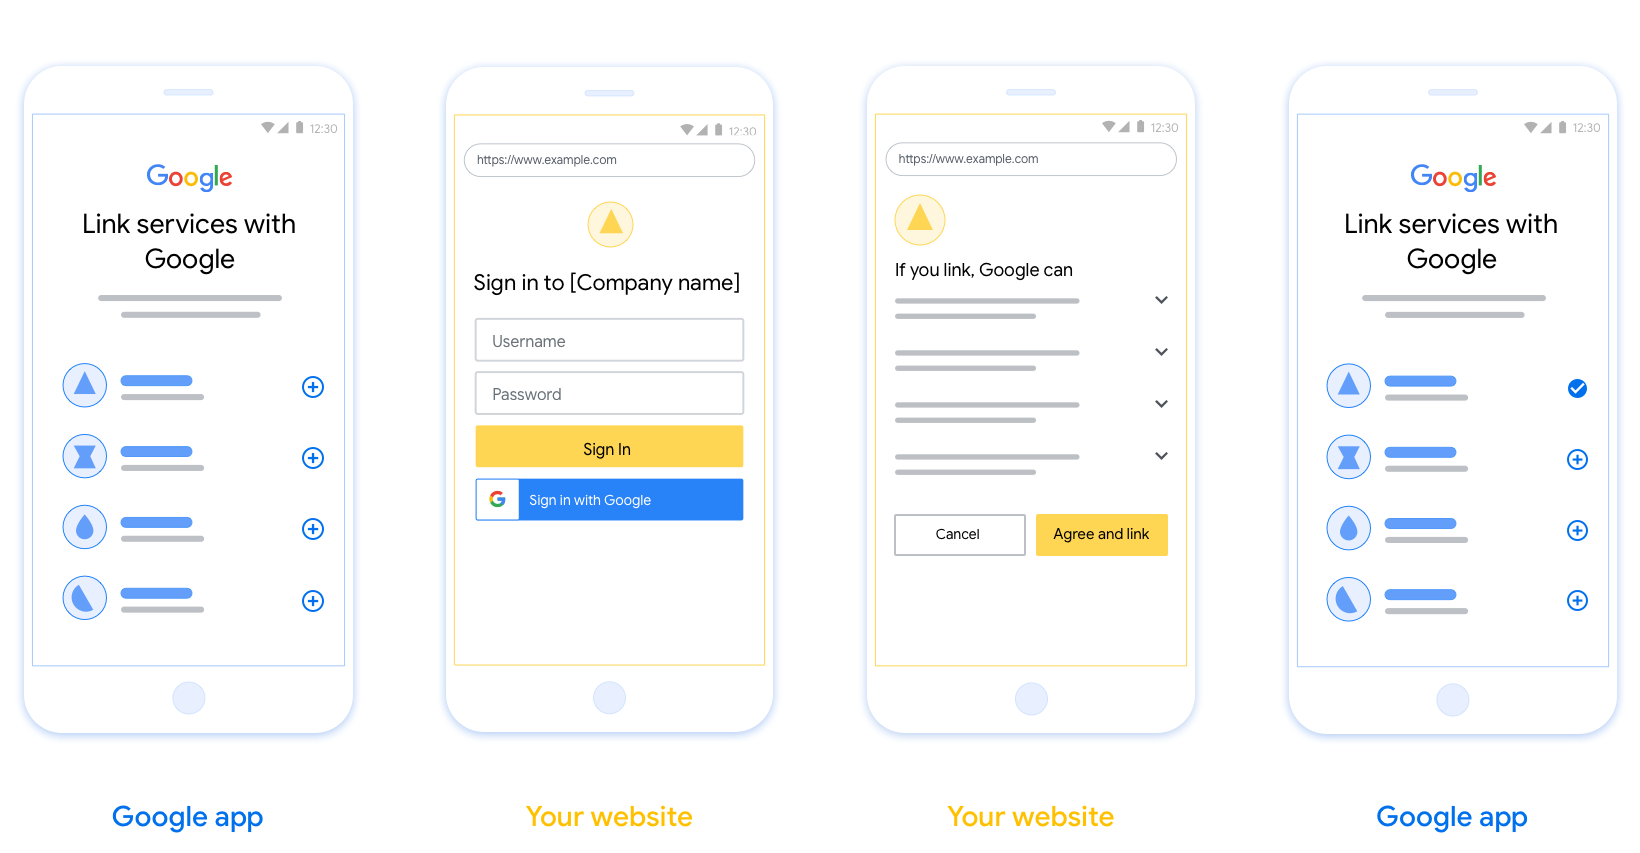
Hesaplar, endüstri standardı OAuth 2.0 dolaylı ve yetkilendirme kodu akışları kullanılarak bağlanır. Hizmetiniz, OAuth 2.0 uyumlu yetkilendirme ve jeton değişimi uç noktalarını desteklemelidir.
Dolaysız akışta Google, kullanıcının tarayıcısında yetkilendirme uç noktanızı açar. Başarıyla oturum açtıktan sonra Google'a uzun süreli bir erişim jetonu döndürürsünüz. Bu erişim jetonu artık Google'dan gönderilen her isteğe dahil edilir.
Yetkilendirme kodu akışında iki uç noktaya ihtiyacınız vardır:
Oturum açmamış kullanıcılarınıza oturum açma kullanıcı arayüzünü sunan authorization uç noktası. Yetkilendirme uç noktası ayrıca kullanıcıların istenen erişim için iznini kaydetmek üzere kısa ömürlü bir yetkilendirme kodu oluşturur.
İki tür değişimden sorumlu olan jeton değişimi uç noktası:
- Yetkilendirme kodunu uzun ömürlü bir yenileme jetonu ve kısa ömürlü bir erişim jetonuyla değiştirir. Bu değişim, kullanıcı hesap bağlama akışında ilerlerken gerçekleşir.
- Uzun ömürlü yenileme jetonunu kısa ömürlü erişim jetonuyla değiştirir. Bu değişim, Google'ın süresi dolmuş olan erişim jetonu nedeniyle yeni bir erişim jetonuna ihtiyaç duyduğunda gerçekleşir.
OAuth 2.0 akışı seçme
Yarı açık akışın uygulanması daha kolay olsa da Google, yarı açık akış tarafından verilen erişim jetonlarının süresinin hiçbir zaman dolmaması gerektiğini önerir. Bunun nedeni, kullanıcının, jetonun süresi dolduğunda, gizli akışla hesabını tekrar bağlamaya zorlanmasıdır. Güvenlik nedeniyle jetonun son geçerlilik tarihine ihtiyacınız varsa bunun yerine yetkilendirme kodu akışını kullanmanızı önemle tavsiye ederiz.
Tasarım yönergeleri
Bu bölümde, OAuth bağlantı akışları için barındırdığınız kullanıcı ekranıyla ilgili tasarım şartları ve öneriler açıklanmaktadır. Google'ın uygulaması tarafından çağrıldıktan sonra platformunuz kullanıcıya Google'da oturum açma sayfası ve hesap bağlama izni ekranı gösterir. Kullanıcı, hesapları bağlama izni verdikten sonra Google'ın uygulamasına geri yönlendirilir.

Şartlar
- Kullanıcının hesabının Google Home veya Google Asistan gibi belirli bir Google ürününe değil Google'a bağlanacağını bildirmeniz gerekir.
Öneriler
Aşağıdakileri yapmanızı öneririz:
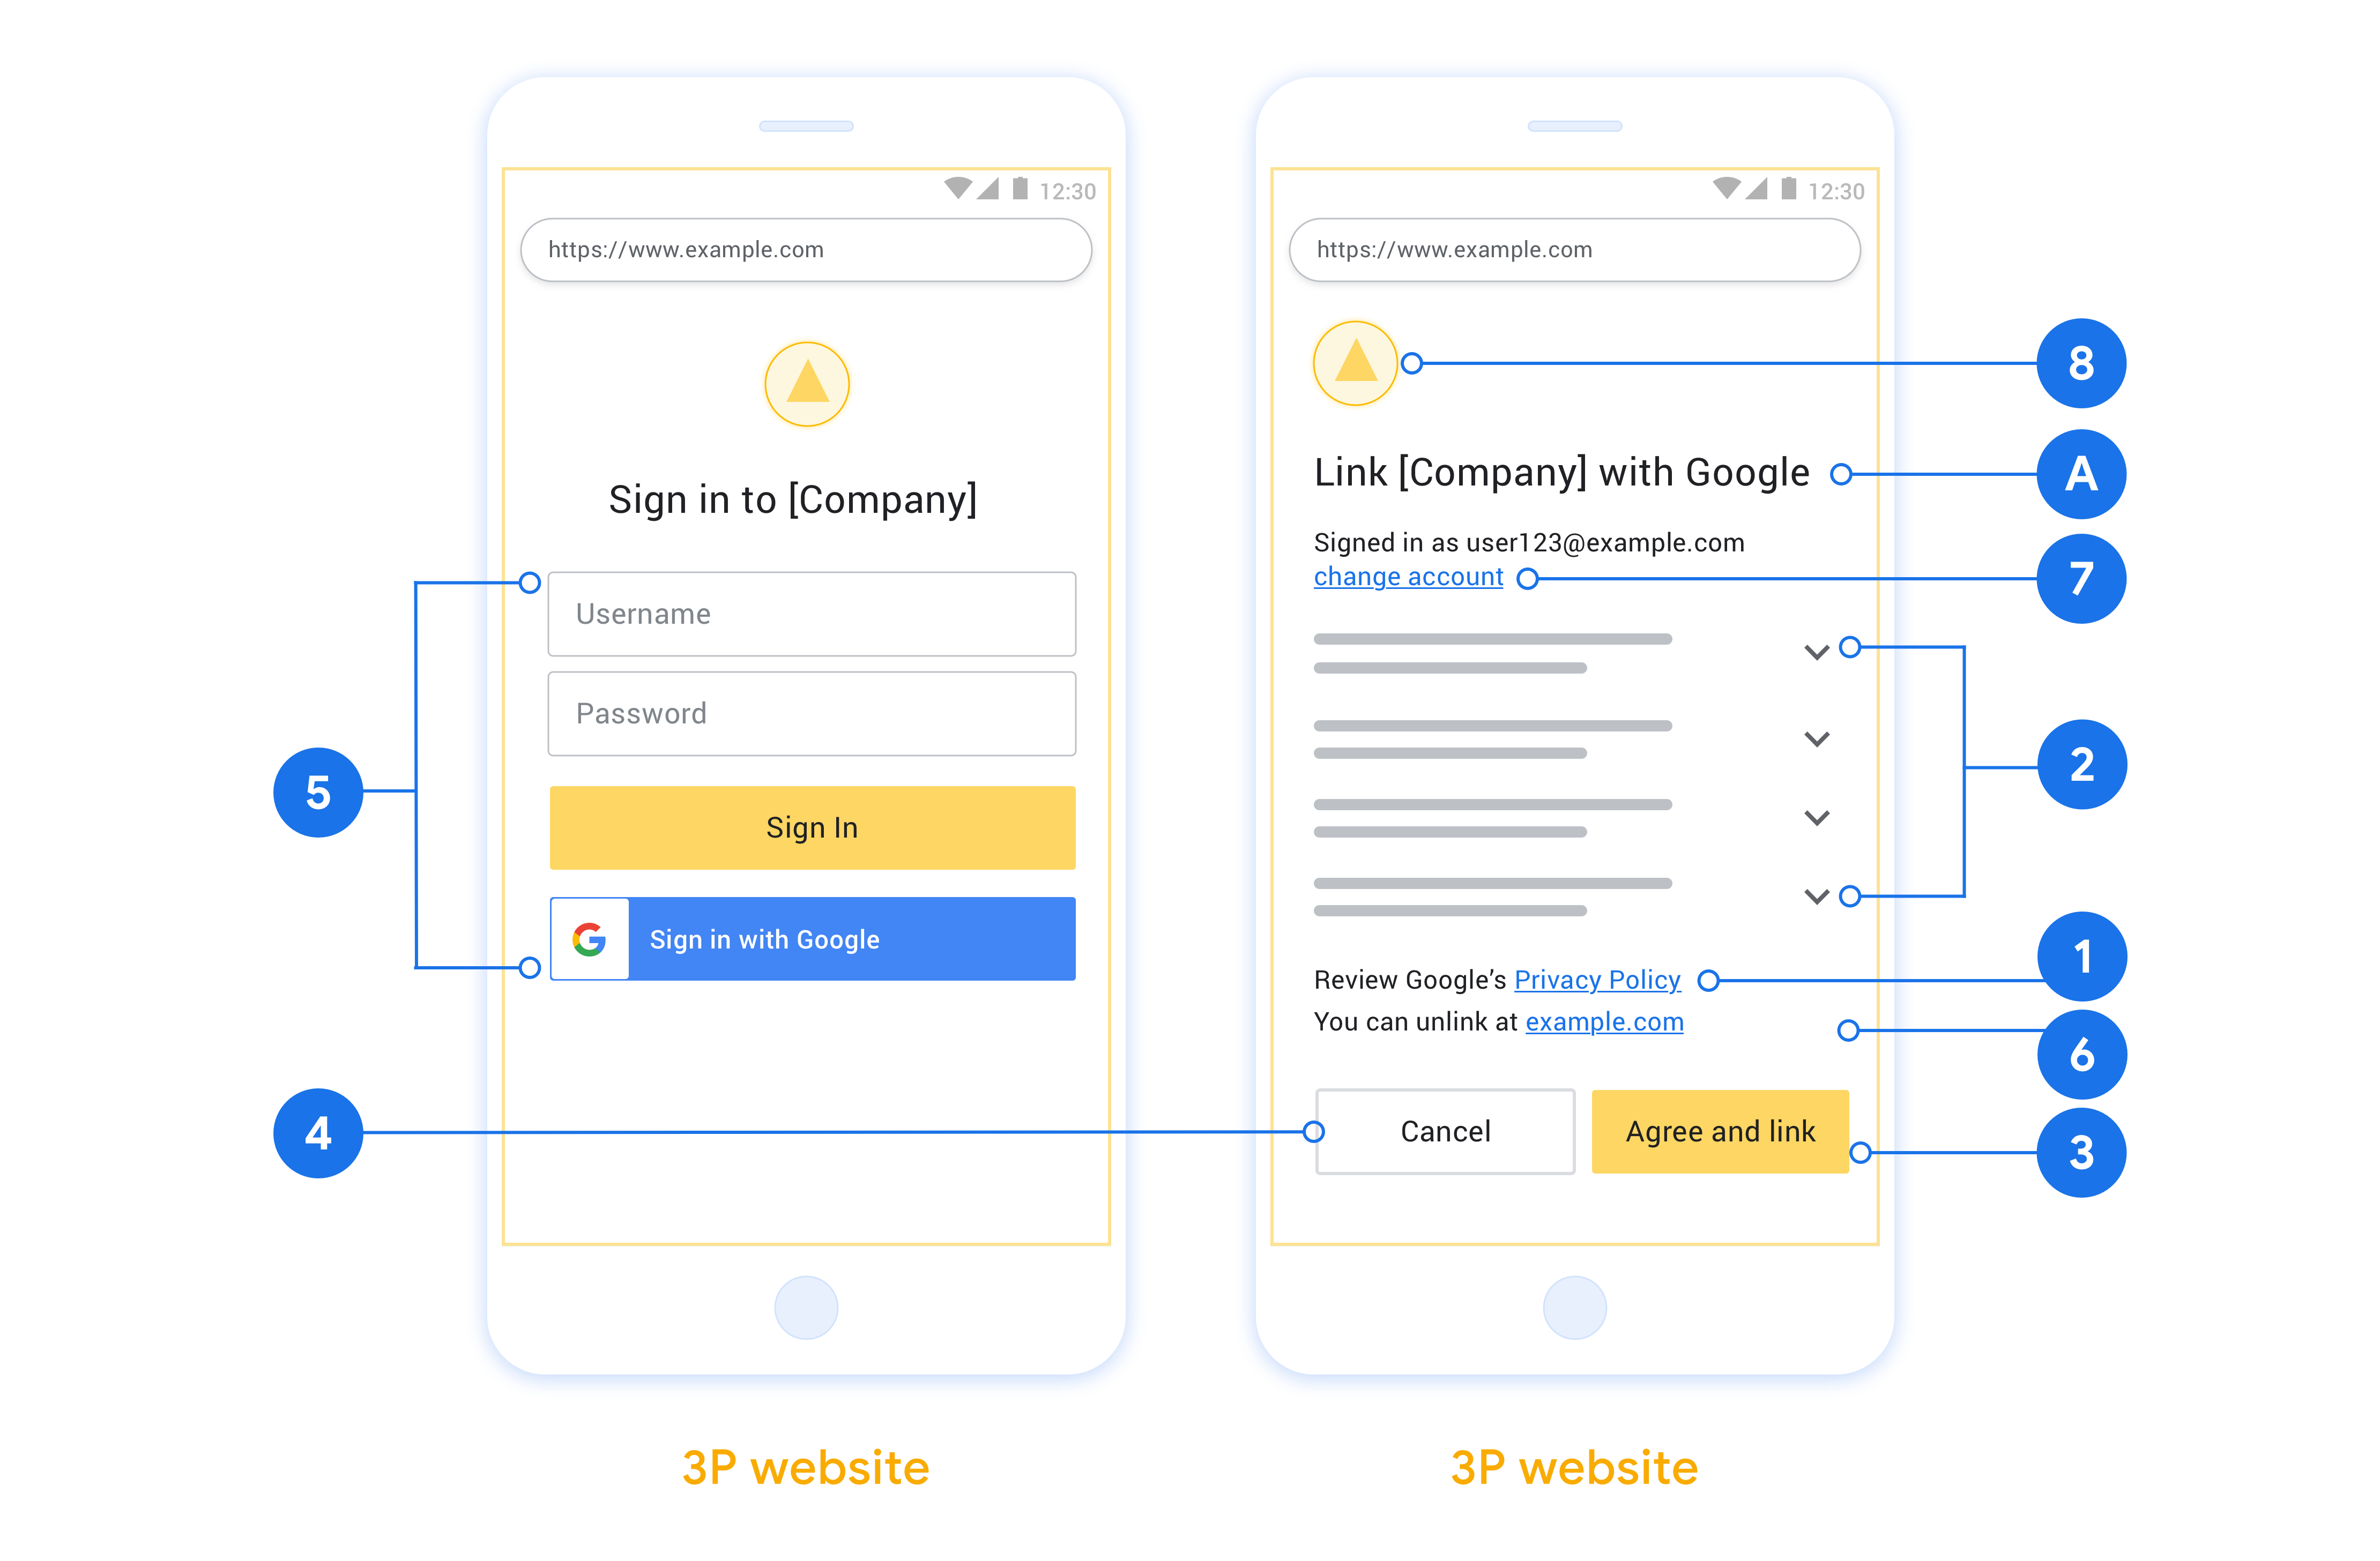
Google'ın Gizlilik Politikası'nı gösterin. İzin ekranına Google'ın Gizlilik Politikası'nın bağlantısını ekleyin.
Paylaşılacak veriler. Google'ın kullanıcının hangi verilerini neden gerekli kıldığını net ve kısa bir dille açıklayın.
Net bir harekete geçirici mesaj İzin ekranınızda "Kabul et ve bağla" gibi net bir harekete geçirici mesaj belirtin. Bunun nedeni, kullanıcıların hesaplarını bağlamak için Google ile hangi verileri paylaşmaları gerektiğini anlamalarıdır.
İptal etme imkanı Kullanıcıların bağlantı oluşturmayı tercih etmemesi durumunda geri dönmelerine veya işlemi iptal etmelerine olanak tanıyacak bir yöntem sunun.
Net oturum açma süreci. Kullanıcıların Google Hesaplarında oturum açmak için net bir yönteme (ör. kullanıcı adı ve şifre alanları veya Google ile oturum açma) sahip olduğundan emin olun.
Bağlantı kaldırma yetkisi. Kullanıcıların bağlantıyı kaldırabileceği bir mekanizma (ör. platformunuzdaki hesap ayarlarının URL'si) sunun. Alternatif olarak, kullanıcıların bağlı hesaplarını yönetebilecekleri Google Hesabı'nın bağlantısını da ekleyebilirsiniz.
Kullanıcı hesabını değiştirme olanağı Kullanıcılara hesaplarını değiştirmek için bir yöntem önerebilirsiniz. Bu, özellikle kullanıcıların birden fazla hesabı varsa yararlıdır.
- Kullanıcının hesap değiştirmek için izin ekranını kapatması gerekiyorsa kullanıcının OAuth bağlama ve örtülü akışla istediği hesapta oturum açabilmesi için Google'a kurtarılabilir bir hata gönderin.
Logonuzu ekleyin. İzin ekranında şirket logonuzu gösterin. Logonuzu yerleştirmek için stil yönergelerinizi kullanın. Google'ın logosunu da göstermek istiyorsanız Logolar ve ticari markalar başlıklı makaleyi inceleyin.

Projeyi oluşturma
Hesap bağlamayı kullanmak için projenizi oluşturmak üzere:
- Proje oluştur'u tıklayın.
- Bir ad girin veya oluşturulan öneriyi kabul edin.
- Kalan alanları onaylayın veya düzenleyin.
- Oluştur'u tıklayın.
Proje kimliğinizi görüntülemek için:
- Açılış sayfasındaki tabloda projenizi bulun. Proje kimliği, Kimlik sütununda görünür.
OAuth izin ekranınızı yapılandırma
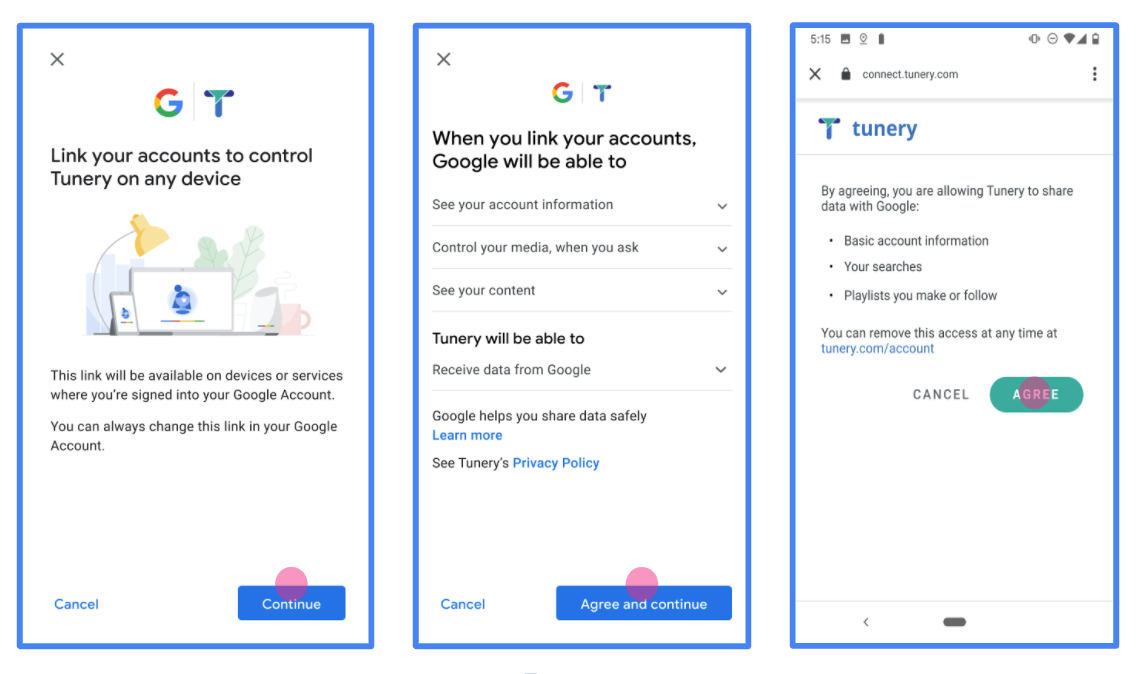
Google Hesabı bağlama sürecinde, kullanıcılara verilerine erişim isteyen uygulamayı, hangi tür verileri istediğini ve geçerli şartları bildiren bir izin ekranı gösterilir. Google API istemci kimliği oluşturmadan önce OAuth izin ekranınızı yapılandırmanız gerekir.
- Google API'leri konsolunun OAuth izin ekranı sayfasını açın.
- İstenirse yeni oluşturduğunuz projeyi seçin.
"OAuth izin ekranı" sayfasında formu doldurun ve "Kaydet" düğmesini tıklayın.
Uygulama adı: İzin isteyen uygulamanın adı. Ad, uygulamanızı doğru bir şekilde yansıtmalı ve kullanıcıların başka yerlerde gördüğü uygulama adıyla tutarlı olmalıdır. Uygulama adı, hesap bağlama izin ekranında gösterilir.
Uygulama logosu: İzin ekranında, kullanıcıların uygulamanızı tanımasına yardımcı olacak bir resim. Logo, hesap bağlama izin ekranında ve hesap ayarlarında gösterilir.
Destek e-postası: Kullanıcıların rızalarıyla ilgili soruları için sizinle iletişime geçmesi amacıyla.
Google API'leri için kapsamlar: Kapsamlar, uygulamanızın kullanıcınızın gizli Google verilerine erişmesine olanak tanır. Google Hesabı Bağlama kullanım alanı için varsayılan kapsam (e-posta, profil, openid) yeterlidir. Hassas kapsamlar eklemeniz gerekmez. Genel olarak, kapsamları önceden değil, erişim gerektiğinde artımlı olarak istemek en iyi uygulamadır. Daha fazla bilgi edinin.
Yetkilendirilen alanlar: Google, sizi ve kullanıcılarınızı korumak için yalnızca OAuth kullanarak kimlik doğrulayan uygulamaların Yetkilendirilen Alanları kullanmasına izin verir. Uygulamalarınızın bağlantıları, yetkilendirilmiş alanlarda barındırılmalıdır. Daha fazla bilgi edinin.
Uygulama ana sayfası bağlantısı: Uygulamanızın ana sayfası. Yetkili bir alan adında barındırılmalıdır.
Uygulamanın gizlilik politikası bağlantısı: Google Hesabı Bağlama izni ekranında gösterilir. Yetkili bir alan adında barındırılmalıdır.
Uygulama Hizmet Şartları bağlantısı (isteğe bağlı): Yetkili bir alanda barındırılmalıdır.

Şekil 1. Kurgusal bir uygulama olan Tunery için Google Hesabı Bağlama İzin Ekranı
"Doğrulama Durumu"nu kontrol edin. Uygulamanızın doğrulanması gerekiyorsa "Doğrulamaya Gönder" düğmesini tıklayarak uygulamanızı doğrulamaya gönderin. Ayrıntılar için OAuth doğrulama koşulları bölümüne bakın.
OAuth sunucunuzu uygulama
OAuth 2.0 dolaylı akışını desteklemek için hizmetiniz bir yetkilendirme yapar uç nokta ile kullanılabilir. Bu uç nokta, kimlik doğrulama ve güvenlikten ve verilere erişim için kullanıcılardan izin alınması gerekir. Yetkilendirme uç noktası Henüz oturum açmamış kullanıcılarınıza bir oturum açma kullanıcı arayüzü sunar ve istenen erişim için izin verin.
Bir Google uygulamasının, hizmetinizin yetkili API'lerinden birini çağırması gerektiğinde Google, bu API'leri çağırmak amacıyla kullanıcılarınızdan izin almak için bu uç noktayı kullanır oluşturabilirsiniz.
Google tarafından başlatılan tipik bir OAuth 2.0 örtülü akış oturumunda, takip eden akış:
- Google, yetkilendirme uç noktanızı kullanıcının tarayıcısında açar. İlgili içeriği oluşturmak için kullanılan kullanıcı oturum açmış değilse oturum açar ve Google'a şunu yapması için izin verir: Henüz izin vermediyse verilerine API'nizle erişme.
- Hizmetiniz bir erişim jetonu oluşturur ve bu jetonu Google'a dokunun. Bunun için, kullanıcının tarayıcısını yeniden erişim iznine sahip Google'a yönlendirin. isteğe ekli jeton.
- Google, hizmetinizin API'lerini çağırır ve erişim jetonunu dikkat edin. Hizmetiniz, erişim jetonunun Google'a ve ardından API çağrısını tamamlar.
Yetkilendirme isteklerini işleme
Bir Google uygulamasının, OAuth 2.0 aracılığıyla hesap bağlama işlemi gerçekleştirmesi gerektiğinde gizli akış kullanıyorsanız Google, kullanıcıyı bir isteği gönderin:
| Yetkilendirme uç noktası parametreleri | |
|---|---|
client_id |
Google'a atadığınız istemci kimliği. |
redirect_uri |
Bu isteğe yanıt gönderdiğiniz URL. |
state |
yönlendirme URI'si. |
response_type |
Yanıtta döndürülecek değerin türü. OAuth 2.0 dolaylı için
akışında, yanıt türü her zaman token olur. |
user_locale |
Google Hesabı dil ayarı RFC5646 biçimi, içeriğinizi kullanıcının tercih ettiği dilde yerelleştirmek için kullanılır. |
Örneğin, yetkilendirme uç noktanız
https://myservice.example.com/auth, talep aşağıdaki gibi görünebilir:
GET https://myservice.example.com/auth?client_id=GOOGLE_CLIENT_ID&redirect_uri=REDIRECT_URI&state=STATE_STRING&response_type=token&user_locale=LOCALE
Yetkilendirme uç noktanızın oturum açma isteklerini işlemesi için aşağıdakileri yapın için şu adımları izleyin:
Aşağıdaki işlemler için
client_idveredirect_urideğerlerini doğrulayın: istenmeyen veya yanlış yapılandırılmış istemci uygulamalarına erişim verilmesini önleyin:client_iddeğerinin, kullandığınız istemci kimliğiyle eşleştiğini doğrulayın Google'a atanmıştır.redirect_uritarafından belirtilen URL'yi doğrulayın parametresi aşağıdaki biçimdedir:https://oauth-redirect.googleusercontent.com/r/YOUR_PROJECT_ID https://oauth-redirect-sandbox.googleusercontent.com/r/YOUR_PROJECT_ID
Kullanıcının hizmetinizde oturum açıp açmadığını kontrol edin. Kullanıcı oturum açmamışsa hizmetinizin oturum açma veya kaydolma akışını tamamlayın.
Google'ın API'nize erişmek için kullanacağı bir erişim jetonu oluşturun. İlgili içeriği oluşturmak için kullanılan erişim jetonu herhangi bir dize değeri olabilir, ancak jetonun ait olduğu ve tahmin edilememesi gerekir.
Kullanıcının tarayıcısını URL'ye yönlendiren bir HTTP yanıtı gönderme
redirect_uriparametresiyle belirtilir. Aşağıdakilerin tümünü dahil edin: aşağıdaki parametreleri kullanabilirsiniz:access_token: Az önce oluşturduğunuz erişim jetonutoken_type:bearerdizesistate: Orijinal durumdaki değiştirilmemiş durum değeri istek
Sonuçta elde edilen URL'nin bir örneği aşağıda verilmiştir:
https://oauth-redirect.googleusercontent.com/r/YOUR_PROJECT_ID#access_token=ACCESS_TOKEN&token_type=bearer&state=STATE_STRING
Google'ın OAuth 2.0 yönlendirme işleyicisi, erişim jetonunu alır ve
state değerinin değişmediğinden emin olun. Google,
hizmetiniz için erişim jetonu kullanıyorsanız Google, jetonu sonraki çağrılara ekler
kullanıma sunun.
Kullanıcı bilgileri isteklerini işleme
userinfo uç noktası, bağlı kullanıcıyla ilgili hak taleplerini döndüren, OAuth 2.0 korumalı bir kaynaktır. Kullanıcı bilgileri uç noktasını uygulamak ve barındırmak, aşağıdaki kullanım alanları hariç isteğe bağlıdır:
- Google One Tap ile Bağlı Hesapta Oturum Açma.
- AndroidTV'de sorunsuz abonelik.
Erişim jetonu, jeton uç noktanızdan başarıyla alındıktan sonra Google, bağlı kullanıcıyla ilgili temel profil bilgilerini almak için kullanıcı bilgileri uç noktanıza bir istek gönderir.
| kullanıcı bilgileri uç nokta istek başlıkları | |
|---|---|
Authorization header |
Taşıyıcı türündeki erişim jetonu. |
Örneğin, kullanıcı bilgileri uç noktanız
https://myservice.example.com/userinfo, talep aşağıdaki gibi görünebilir:
GET /userinfo HTTP/1.1
Host: myservice.example.com
Authorization: Bearer ACCESS_TOKEN
Kullanıcı bilgileri uç noktanızın istekleri işlemesi için aşağıdaki adımları uygulayın:
- Yetkilendirme başlığından erişim jetonunu çıkarın ve erişim jetonuyla ilişkilendirilmiş kullanıcının bilgilerini döndürün.
- Erişim jetonu geçersizse
WWW-Authenticateyanıt üstbilgisini kullanarak HTTP 401 Yetkilendirilmemiş hatası döndürün. Aşağıda kullanıcı bilgileri hata yanıtı örneği verilmiştir:HTTP/1.1 401 Unauthorized WWW-Authenticate: error="invalid_token", error_description="The Access Token expired"
Erişim jetonu geçerliyse HTTPS gövdesinde aşağıdaki JSON nesnesiyle HTTP 200 yanıtını döndürün ve HTTP 200 yanıtını alın yanıt:
{ "sub": "USER_UUID", "email": "EMAIL_ADDRESS", "given_name": "FIRST_NAME", "family_name": "LAST_NAME", "name": "FULL_NAME", "picture": "PROFILE_PICTURE", }userinfo uç nokta yanıtı subSisteminizdeki kullanıcıyı tanımlayan benzersiz bir kimlik. emailKullanıcının e-posta adresi. given_nameİsteğe bağlı: Kullanıcının adı. family_nameİsteğe bağlı: Kullanıcının soyadı. nameİsteğe bağlı: Kullanıcının tam adı. pictureİsteğe bağlı: Kullanıcının profil resmi.
Uygulamanızı doğrulama
OAuth 2.0 Playground aracını kullanarak uygulamanızı doğrulayabilirsiniz.
Aracı kullanarak aşağıdaki adımları uygulayın:
- OAuth 2.0 Yapılandırması penceresini açmak için Yapılandırma'yı tıklayın.
- OAuth akışı alanında İstemci tarafı'nı seçin.
- OAuth Uç Noktaları alanında Özel'i seçin.
- İlgili alanlarda OAuth 2.0 uç noktanızı ve Google'a atadığınız istemci kimliğini belirtin.
- 1. Adım bölümünde herhangi bir Google kapsamı seçmeyin. Bunun yerine bu alanı boş bırakın veya sunucunuz için geçerli bir kapsam yazın (veya OAuth kapsamları kullanmıyorsanız rastgele bir dize yazın). İşlemi tamamladığınızda API'leri yetkilendir'i tıklayın.
- 2. Adım ve 3. Adım bölümlerinde OAuth 2.0 akışını uygulayın ve her adımın istenen şekilde çalıştığını doğrulayın.
Google Hesabı Bağlantı Demo aracını kullanarak uygulamanızı doğrulayabilirsiniz.
Araçta aşağıdaki adımları uygulayın:
- Google ile oturum aç düğmesini tıklayın.
- Bağlamak istediğiniz hesabı seçin.
- Hizmet kimliğini girin.
- İsteğe bağlı olarak, erişim isteyeceğiniz bir veya daha fazla kapsam girin.
- Demoyu Başlat'ı tıklayın.
- Sorulduğunda, bağlantı isteğini onaylayabileceğinizi ve reddedebileceğinizi onaylayın.
- Platformunuza yönlendirildiğinizi onaylayın.