ระบบจะลิงก์บัญชีโดยใช้ขั้นตอน โดยนัย และ รหัสการให้สิทธิ์ ของ OAuth 2.0 ซึ่งเป็นมาตรฐานอุตสาหกรรม
บริการของคุณต้องรองรับปลายทาง การให้สิทธิ์ และ การแลกเปลี่ยนโทเค็น ที่เป็นไปตามข้อกำหนดของ OAuth 2.0ในโฟลว์โดยนัย Google จะเปิดปลายทางการให้สิทธิ์ในเบราว์เซอร์ของผู้ใช้ หลังจากลงชื่อเข้าใช้สำเร็จแล้ว คุณจะส่งโทเค็นเพื่อการเข้าถึงที่มีอายุยาวนานไปยัง Google ตอนนี้โทเค็นเพื่อการเข้าถึงนี้รวมอยู่ในคำขอทุกรายการที่ส่งจาก Google
ในขั้นตอนรหัสการให้สิทธิ์ คุณต้องมีปลายทาง 2 รายการ ได้แก่
ปลายทางการให้สิทธิ์ซึ่งแสดง UI การลงชื่อเข้าใช้ต่อผู้ใช้ที่ยังไม่ได้ลงชื่อเข้าใช้ นอกจากนี้ ปลายทางการให้สิทธิ์ยังสร้างรหัสการให้สิทธิ์แบบมีอายุสั้นเพื่อบันทึกความยินยอมของผู้ใช้ในการเข้าถึงที่ขอ
ปลายทางการแลกเปลี่ยนโทเค็น ซึ่งรับผิดชอบการแลกเปลี่ยน 2 ประเภท ได้แก่
- แลกรหัสการให้สิทธิ์เป็นโทเค็นการรีเฟรชที่ใช้ได้นานและโทเค็นเพื่อการเข้าถึงที่ใช้ได้ในระยะสั้น การแลกเปลี่ยนนี้จะเกิดขึ้นเมื่อผู้ใช้ ทำตามโฟลว์การลิงก์บัญชี
- แลกเปลี่ยนโทเค็นการรีเฟรชที่ใช้ได้นานเป็นโทเค็นเพื่อการเข้าถึงที่ใช้ได้ในระยะสั้น การแลกเปลี่ยนนี้จะเกิดขึ้นเมื่อ Google ต้องการโทเค็นเพื่อการเข้าถึงใหม่เนื่องจากโทเค็นเดิมหมดอายุแล้ว
เลือกขั้นตอน OAuth 2.0
แม้ว่าขั้นตอนการให้สิทธิ์โดยนัยจะใช้งานง่ายกว่า แต่ Google ขอแนะนำว่าโทเค็นเพื่อการเข้าถึงที่ออกโดยขั้นตอนการให้สิทธิ์โดยนัยไม่ควรหมดอายุ เนื่องจากระบบบังคับให้ผู้ใช้ ลิงก์บัญชีอีกครั้งหลังจากที่โทเค็นหมดอายุด้วยโฟลว์โดยนัย หากต้องการให้โทเค็นหมดอายุด้วยเหตุผลด้านความปลอดภัย เราขอแนะนำเป็นอย่างยิ่ง ให้ใช้ขั้นตอนรหัสการให้สิทธิ์แทน
หลักเกณฑ์การออกแบบ
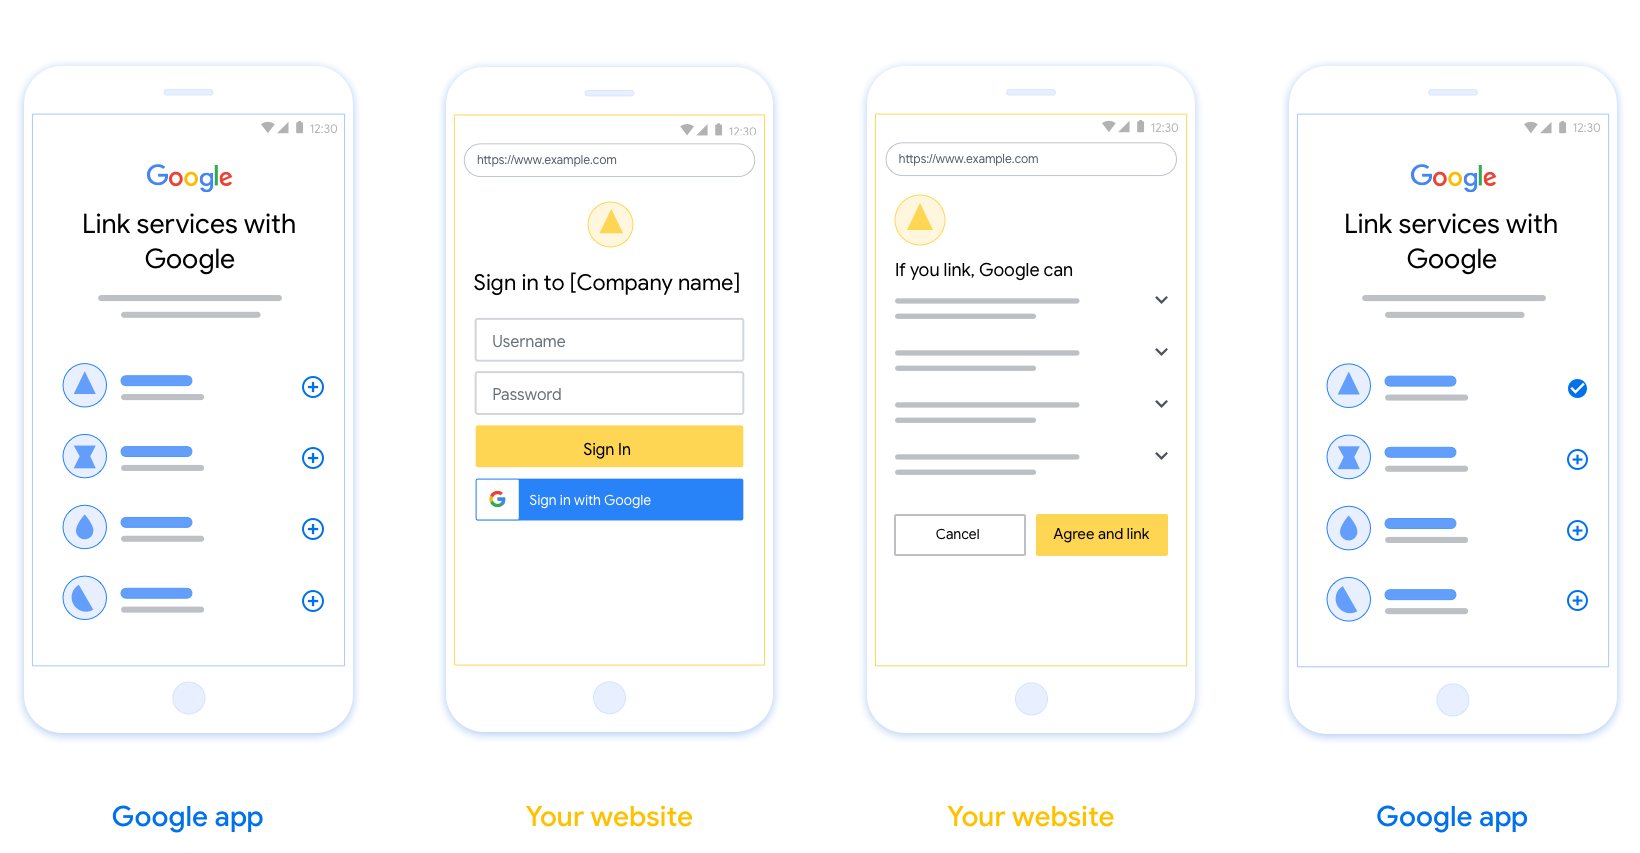
ส่วนนี้อธิบายข้อกำหนดและคำแนะนำด้านการออกแบบสำหรับ หน้าจอผู้ใช้ที่คุณโฮสต์สำหรับขั้นตอนการลิงก์ OAuth หลังจากที่แอปของ Google เรียกใช้แล้ว แพลตฟอร์มจะแสดงหน้าลงชื่อเข้าใช้ Google และหน้าจอความยินยอมในการลิงก์บัญชีต่อผู้ใช้ ระบบจะนำผู้ใช้กลับไปที่แอปของ Google หลังจากที่ผู้ใช้ให้ความยินยอม ในการลิงก์บัญชี
ข้อกำหนด
- คุณต้องแจ้งให้ทราบว่าบัญชีของผู้ใช้จะลิงก์กับ Google ไม่ใช่ผลิตภัณฑ์ของ Google ที่เฉพาะเจาะจง เช่น Google Home หรือ Google Assistant
คำแนะนำ
เราขอแนะนำให้คุณทำดังนี้
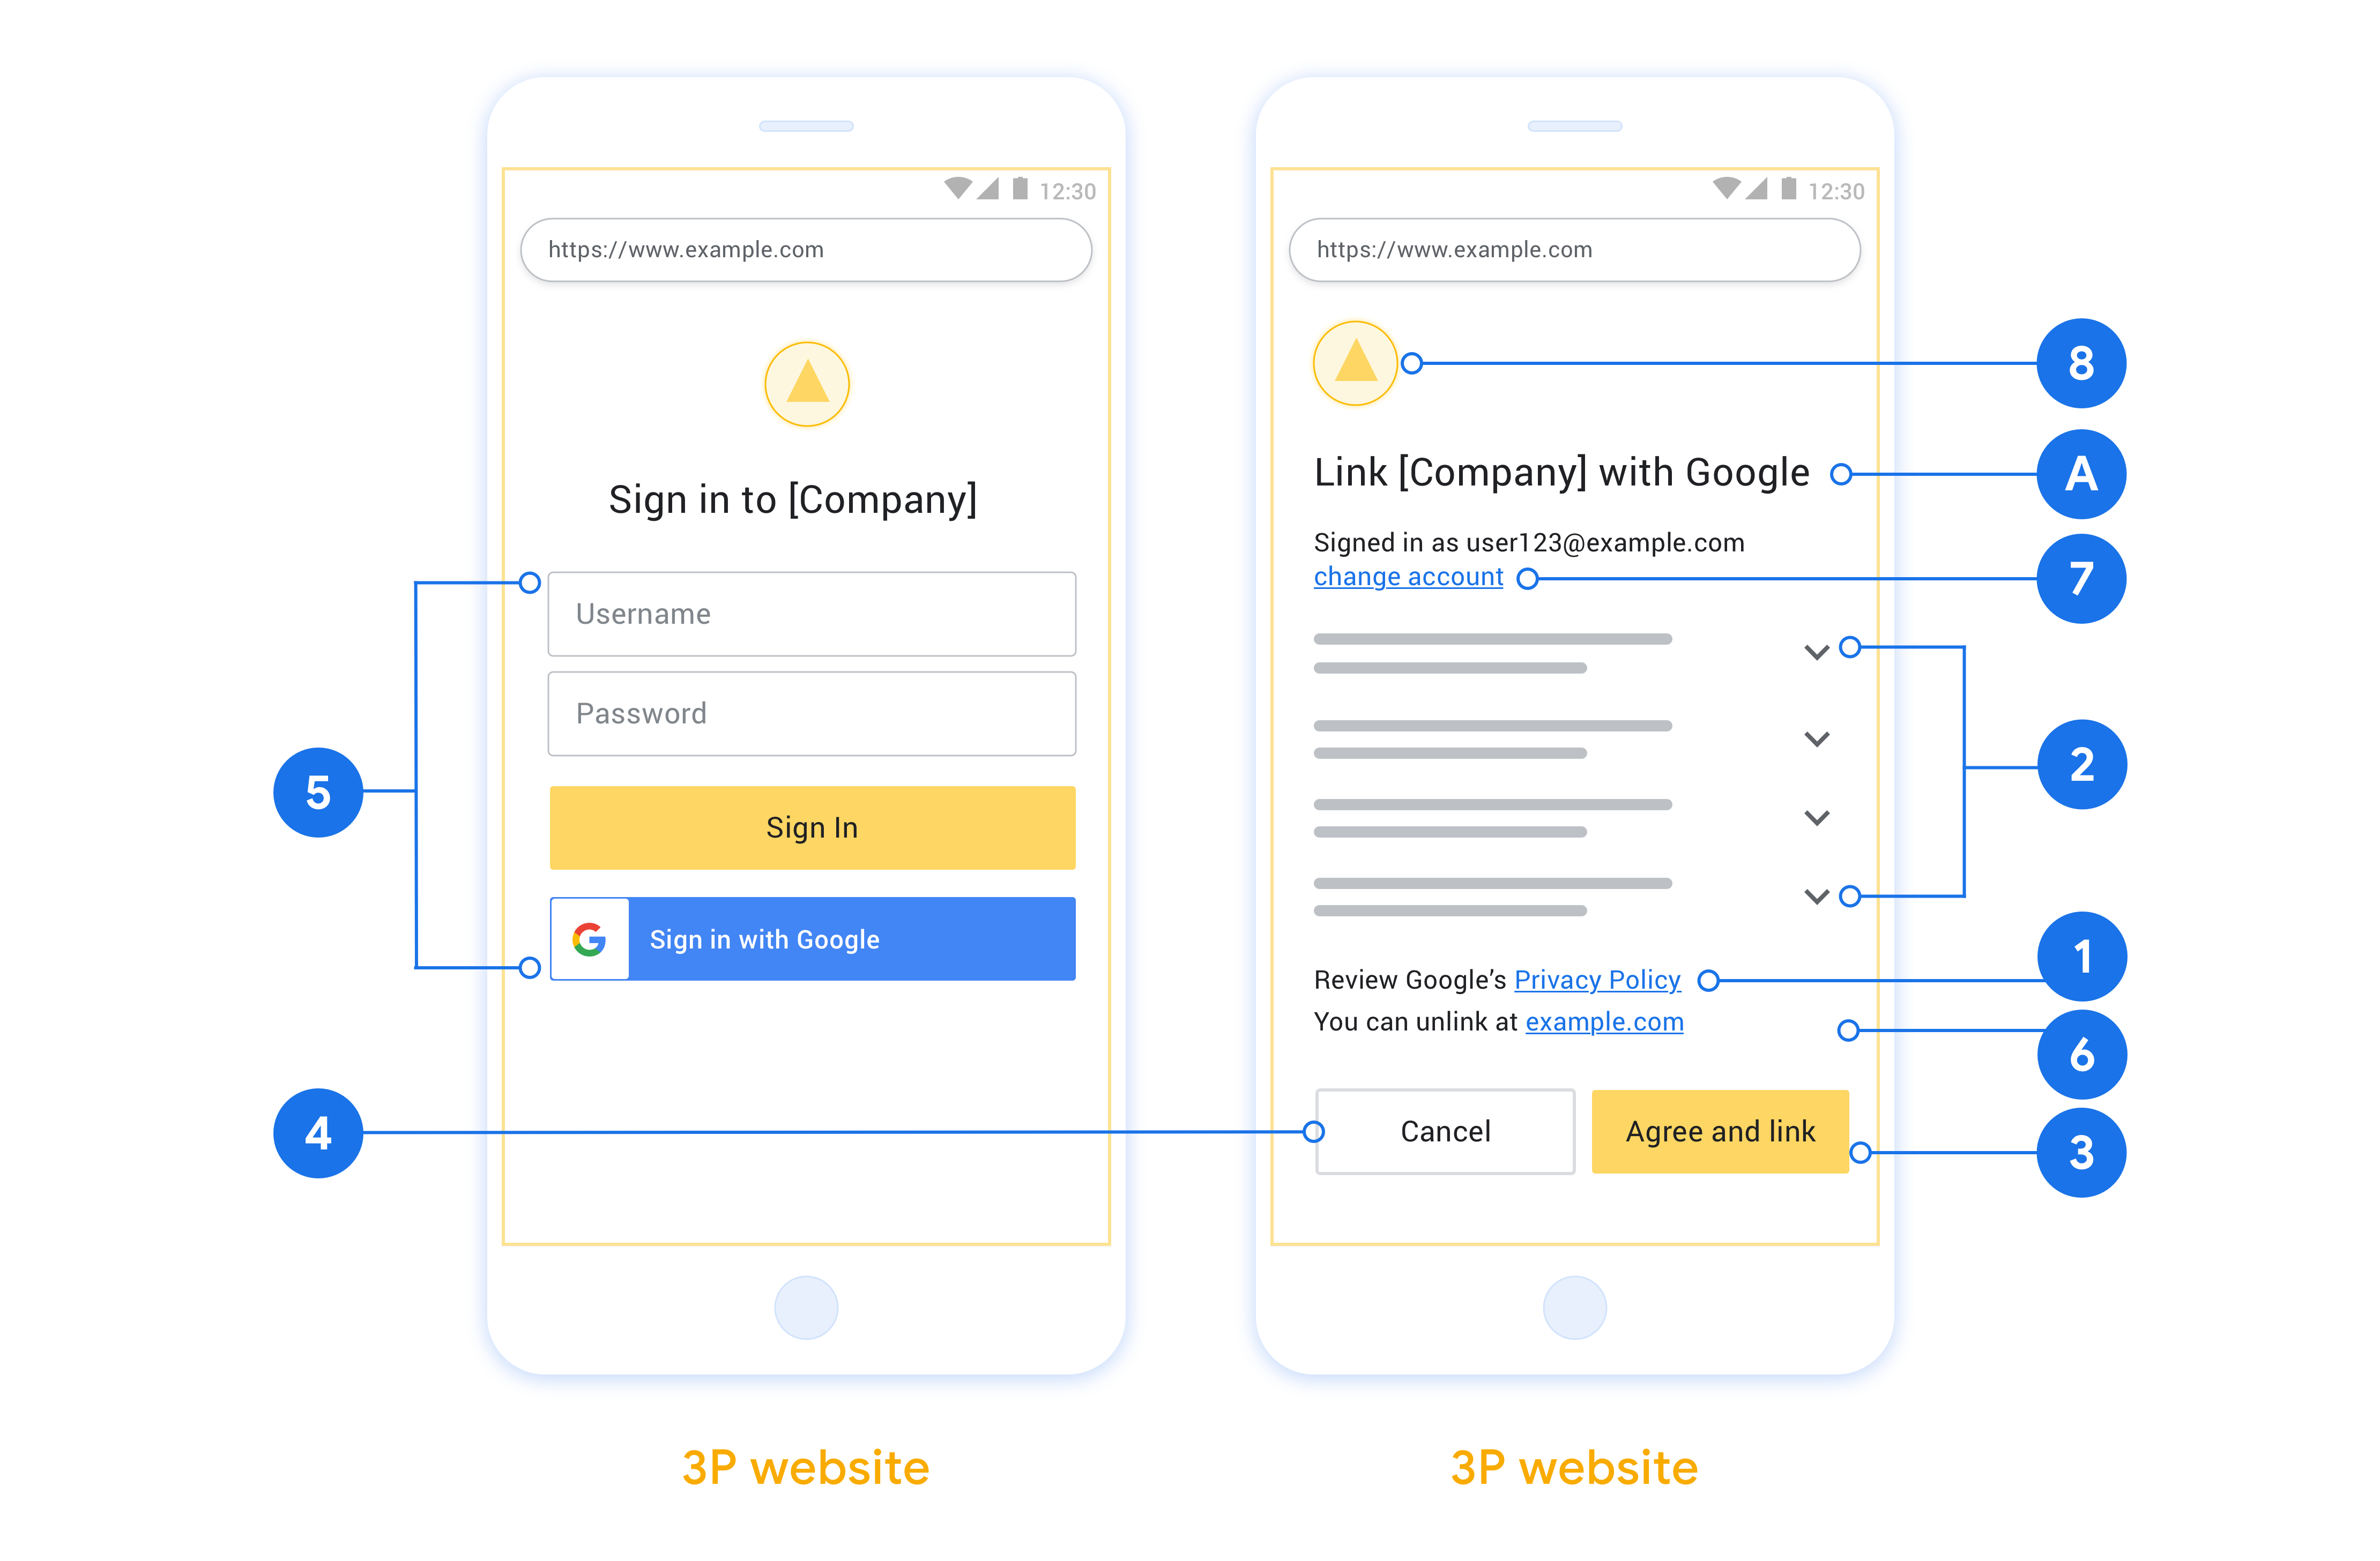
แสดงนโยบายความเป็นส่วนตัวของ Google ระบุลิงก์ไปยังนโยบายความเป็นส่วนตัวของ Google ในหน้าจอขอความยินยอม
ข้อมูลที่จะแชร์ ใช้ภาษาที่ชัดเจนและกระชับเพื่อบอกผู้ใช้ว่า Google ต้องการข้อมูลใดของผู้ใช้และเพราะเหตุใด
คำกระตุ้นการตัดสินใจที่ชัดเจน ระบุคํากระตุ้นให้ดําเนินการที่ชัดเจนในหน้าจอความยินยอม เช่น "ยอมรับและลิงก์" เนื่องจากผู้ใช้ต้องเข้าใจว่าตนเองต้องแชร์ข้อมูลใดกับ Google เพื่อลิงก์บัญชี
ความสามารถในการยกเลิก ระบุวิธีให้ผู้ใช้ย้อนกลับหรือยกเลิก หากผู้ใช้เลือกที่จะไม่ลิงก์
กระบวนการลงชื่อเข้าใช้ที่ชัดเจน ตรวจสอบว่าผู้ใช้มีวิธีที่ชัดเจนในการลงชื่อเข้าใช้บัญชี Google เช่น ช่องสำหรับชื่อผู้ใช้และรหัสผ่าน หรือลงชื่อเข้าใช้ด้วย Google
ความสามารถในการยกเลิกการลิงก์ มีกลไกให้ผู้ใช้ยกเลิกการลิงก์ เช่น URL ไปยังการตั้งค่าบัญชีในแพลตฟอร์มของคุณ หรือคุณจะใส่ลิงก์ไปยังบัญชี Google ที่ผู้ใช้ สามารถจัดการบัญชีที่ลิงก์ได้ก็ได้
ความสามารถในการเปลี่ยนบัญชีผู้ใช้ แนะนำวิธีให้ผู้ใช้เปลี่ยน บัญชี ซึ่งจะเป็นประโยชน์อย่างยิ่งหากผู้ใช้มีแนวโน้มที่จะมี หลายบัญชี
- หากผู้ใช้ต้องปิดหน้าจอขอความยินยอมเพื่อเปลี่ยนบัญชี ให้ส่งข้อผิดพลาดที่กู้คืนได้ไปยัง Google เพื่อให้ผู้ใช้ลงชื่อเข้าใช้บัญชีที่ต้องการได้ด้วยการลิงก์ OAuth และโฟลว์โดยนัย
ใส่โลโก้ของคุณ แสดงโลโก้บริษัทในหน้าจอขอความยินยอม ใช้หลักเกณฑ์ด้านสไตล์เพื่อวางโลโก้ หากต้องการแสดงโลโก้ของ Google ด้วย โปรดดูโลโก้และเครื่องหมายการค้า
Create the project
To create your project to use account linking:
- Go to the Google API Console.
- Click Create project.
- Enter a name or accept the generated suggestion.
- Confirm or edit any remaining fields.
- Click Create.
To view your project ID:
- Go to the Google API Console.
- Find your project in the table on the landing page. The project ID appears in the ID column.
Configure your OAuth Consent Screen
The Google Account Linking process includes a consent screen which tells users the application requesting access to their data, what kind of data they are asking for and the terms that apply. You will need to configure your OAuth consent screen before generating a Google API client ID.
- Open the OAuth consent screen page of the Google APIs console.
- If prompted, select the project you just created.
On the "OAuth consent screen" page, fill out the form and click the “Save” button.
Application name: The name of the application asking for consent. The name should accurately reflect your application and be consistent with the application name users see elsewhere. The application name will be shown on the Account Linking consent screen.
Application logo: An image on the consent screen that will help users recognize your app. The logo is shown on Account linking consent screen and on account settings
Support email: For users to contact you with questions about their consent.
Scopes for Google APIs: Scopes allow your application to access your user's private Google data. For the Google Account Linking use case, default scope (email, profile, openid) is sufficient, you don’t need to add any sensitive scopes. It is generally a best practice to request scopes incrementally, at the time access is required, rather than up front. Learn more.
Authorized domains: To protect you and your users, Google only allows applications that authenticate using OAuth to use Authorized Domains. Your applications' links must be hosted on Authorized Domains. Learn more.
Application Homepage link: Home page for your application. Must be hosted on an Authorized Domain.
Application Privacy Policy link: Shown on Google Account Linking consent screen. Must be hosted on an Authorized Domain.
Application Terms of Service link (Optional): Must be hosted on an Authorized Domain.
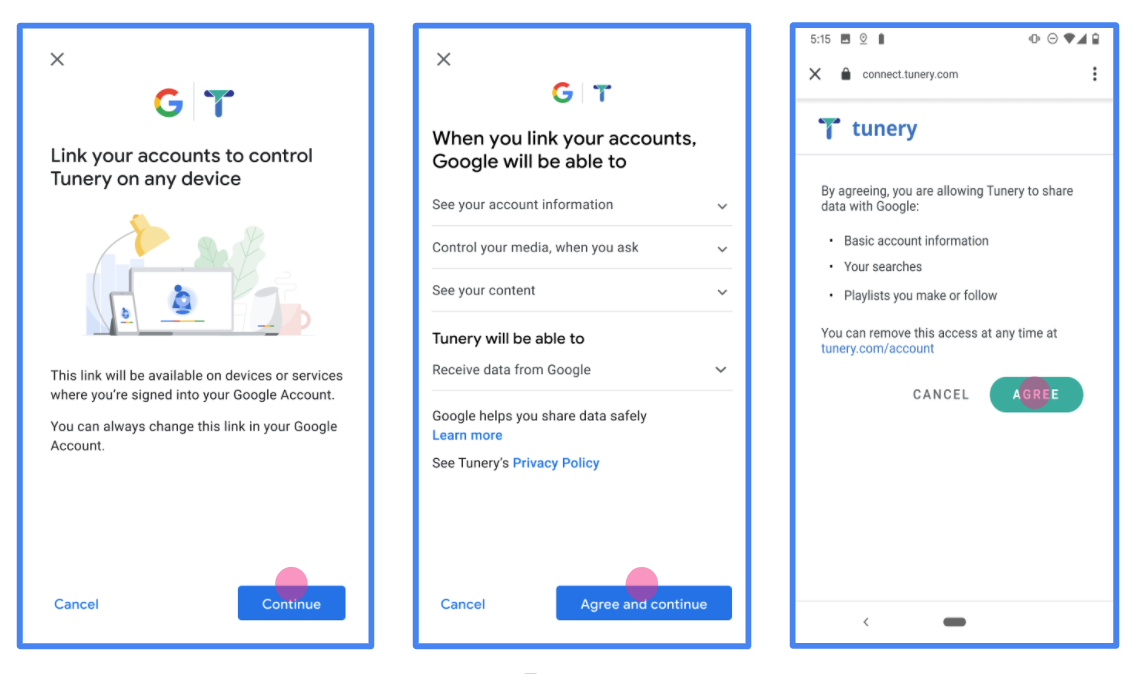
Figure 1. Google Account Linking Consent Screen for a fictitious Application, Tunery
Check "Verification Status", if your application needs verification then click the "Submit For Verification" button to submit your application for verification. Refer to OAuth verification requirements for details.
ติดตั้งใช้งานเซิร์ฟเวอร์ OAuth
n
หากต้องการรองรับโฟลว์ ขั้นตอนการให้สิทธิ์โดยนัย ของ OAuth 2.0 บริการของคุณต้องทำให้ปลายทางการให้สิทธิ์พร้อมใช้งานผ่าน HTTPS ปลายทางนี้มีหน้าที่รับผิดชอบในการตรวจสอบสิทธิ์และ ขอความยินยอมจากผู้ใช้สำหรับการเข้าถึงข้อมูล ปลายทางการให้สิทธิ์ จะแสดง UI การลงชื่อเข้าใช้ต่อผู้ใช้ที่ยังไม่ได้ลงชื่อเข้าใช้และบันทึก ความยินยอมในการเข้าถึงที่ขอ
เมื่อแอปพลิเคชันของ Google ต้องเรียกใช้ API ที่ได้รับอนุญาตของบริการใดบริการหนึ่ง Google จะใช้ปลายทางนี้เพื่อขอสิทธิ์จากผู้ใช้ในการเรียกใช้ API เหล่านี้ในนามของผู้ใช้
การลิงก์บัญชี Google: ขั้นตอน OAuth โดยนัย
แผนภาพลำดับต่อไปนี้แสดงรายละเอียดการโต้ตอบระหว่างผู้ใช้ Google และปลายทางของบริการ
บทบาทและความรับผิดชอบ
ตารางต่อไปนี้จะกำหนดบทบาทและความรับผิดชอบของผู้เกี่ยวข้องใน การลิงก์บัญชี Google (GAL) ที่มีขั้นตอนการให้สิทธิ์ OAuth โดยนัย โปรดทราบว่าใน GAL นั้น Google จะทำหน้าที่เป็นไคลเอ็นต์ OAuth ขณะที่บริการของคุณจะทำหน้าที่เป็นผู้ให้บริการข้อมูลประจำตัว/บริการ
| ผู้ดำเนินการ / คอมโพเนนต์ | บทบาท GAL | หน้าที่รับผิดชอบ |
|---|---|---|
| แอป / เซิร์ฟเวอร์ของ Google | ไคลเอ็นต์ OAuth | เริ่มโฟลว์ รับโทเค็นเพื่อการเข้าถึงโดยใช้การเปลี่ยนเส้นทางของเบราว์เซอร์ และจัดเก็บอย่างปลอดภัยเพื่อเข้าถึง API ของบริการ |
| ปลายทางการให้สิทธิ์ของคุณ | เซิร์ฟเวอร์การให้สิทธิ์ | ตรวจสอบสิทธิ์ผู้ใช้ ขอรับความยินยอมจากผู้ใช้ และออกโทเค็นเพื่อการเข้าถึงที่มีอายุยาวนาน ให้กับ Google โดยตรง |
| URI การเปลี่ยนเส้นทางของ Google | ปลายทางการเรียกกลับ | รับการเปลี่ยนเส้นทางผู้ใช้จากบริการให้สิทธิ์ของคุณโดยมีค่า
access_token และ state ใน URL
Fragment |
เซสชันขั้นตอนการให้สิทธิ์โดยนัยของ OAuth 2.0 ทั่วไปที่ Google เริ่มต้นจะมีขั้นตอนดังนี้
- Google จะเปิดปลายทางการให้สิทธิ์ในเบราว์เซอร์ของผู้ใช้ ผู้ใช้จะลงชื่อเข้าใช้ (หากยังไม่ได้ลงชื่อเข้าใช้) และให้สิทธิ์ Google ในการเข้าถึงข้อมูลด้วย API ของคุณ หากยังไม่ได้ให้สิทธิ์
- บริการของคุณจะสร้างโทเค็นเพื่อการเข้าถึงและส่งคืนให้ Google โดยให้เปลี่ยนเส้นทางเบราว์เซอร์ของผู้ใช้กลับไปที่ Google พร้อมแนบโทเค็นเพื่อเข้าถึง ไว้กับคำขอ
- Google จะเรียก API ของบริการและแนบโทเค็นเพื่อการเข้าถึงไปกับคำขอแต่ละรายการ บริการของคุณจะยืนยันว่าโทเค็นเพื่อการเข้าถึงให้สิทธิ์ Google ในการเข้าถึง API จากนั้นจึงทำการเรียก API ให้เสร็จสมบูรณ์
จัดการคำขอการให้สิทธิ์
เมื่อแอปพลิเคชันของ Google ต้องการลิงก์บัญชีโดยใช้ขั้นตอนการให้สิทธิ์โดยนัยของ OAuth 2.0 Google จะส่งผู้ใช้ไปยังปลายทางการให้สิทธิ์ของคุณพร้อมคำขอที่มีพารามิเตอร์ต่อไปนี้
| พารามิเตอร์ของปลายทางการให้สิทธิ์ | |
|---|---|
client_id |
รหัสไคลเอ็นต์ที่คุณกำหนดให้กับ Google |
redirect_uri |
URL ที่คุณส่งการตอบกลับคำขอนี้ |
state |
ค่าการทำบัญชีที่ส่งกลับไปยัง Google โดยไม่มีการเปลี่ยนแปลงใน URI การเปลี่ยนเส้นทาง |
response_type |
ประเภทของค่าที่จะแสดงในคำตอบ สําหรับขั้นตอนแบบโดยนัยของ OAuth 2.0
ประเภทการตอบกลับจะเป็น token เสมอ |
user_locale |
การตั้งค่าภาษาของบัญชี Google ในรูปแบบ RFC5646 ที่ใช้ในการแปลเนื้อหาเป็นภาษาที่ผู้ใช้ต้องการ |
ตัวอย่างเช่น หากปลายทางการให้สิทธิ์ของคุณพร้อมใช้งานที่
https://myservice.example.com/auth คำขออาจมีลักษณะดังนี้
GET https://myservice.example.com/auth?client_id=GOOGLE_CLIENT_ID&redirect_uri=REDIRECT_URI&state=STATE_STRING&response_type=token&user_locale=LOCALE
หากต้องการให้ปลายทางการให้สิทธิ์จัดการคำขอลงชื่อเข้าใช้ ให้ทำตามขั้นตอนต่อไปนี้
ยืนยันค่า
client_idและredirect_uriเพื่อ ป้องกันการให้สิทธิ์เข้าถึงแอปไคลเอ็นต์ที่ไม่ต้องการหรือกำหนดค่าไม่ถูกต้อง- ยืนยันว่า
client_idตรงกับรหัสไคลเอ็นต์ที่คุณ กำหนดให้กับ Google - ยืนยันว่า URL ที่ระบุโดย
redirect_uriพารามิเตอร์มีรูปแบบดังนี้https://oauth-redirect.googleusercontent.com/r/YOUR_PROJECT_ID https://oauth-redirect-sandbox.googleusercontent.com/r/YOUR_PROJECT_ID
- ยืนยันว่า
ตรวจสอบว่าผู้ใช้ลงชื่อเข้าใช้บริการของคุณหรือไม่ หากผู้ใช้ไม่ได้ลงชื่อเข้าใช้ ให้ดำเนินการขั้นตอนการลงชื่อเข้าใช้หรือลงชื่อสมัครใช้ของบริการให้เสร็จสมบูรณ์
สร้างโทเค็นเพื่อการเข้าถึงให้ Google ใช้เพื่อเข้าถึง API ของคุณ โทเค็นเพื่อการเข้าถึงอาจเป็นค่าสตริงใดก็ได้ แต่ต้องแสดงถึง ผู้ใช้และไคลเอ็นต์ที่โทเค็นใช้สำหรับนั้นอย่างไม่ซ้ำกัน และต้องคาดเดาไม่ได้
ส่งการตอบกลับ HTTP ที่เปลี่ยนเส้นทางเบราว์เซอร์ของผู้ใช้ไปยัง URL ที่ระบุโดยพารามิเตอร์
redirect_uriรวมพารามิเตอร์ต่อไปนี้ทั้งหมด ในส่วนย่อย URLaccess_token: โทเค็นเพื่อการเข้าถึงที่คุณเพิ่งสร้างtoken_type: สตริงbearerstate: ค่าสถานะที่ไม่ได้แก้ไขจากคำขอเดิม
ตัวอย่าง URL ที่ได้มีดังนี้
https://oauth-redirect.googleusercontent.com/r/YOUR_PROJECT_ID#access_token=ACCESS_TOKEN&token_type=bearer&state=STATE_STRING
ตัวแฮนเดิลการเปลี่ยนเส้นทาง OAuth 2.0 ของ Google จะได้รับโทเค็นเพื่อการเข้าถึงและยืนยันว่าค่า state ไม่มีการเปลี่ยนแปลง หลังจากที่ Google ได้รับโทเค็นเพื่อการเข้าถึงสำหรับบริการของคุณแล้ว Google จะแนบโทเค็นไปกับการเรียก API ของบริการในครั้งต่อๆ ไป
Handle userinfo requests
The userinfo endpoint is an OAuth 2.0 protected resource that return claims about the linked user. Implementing and hosting the userinfo endpoint is optional, except for the following use cases:
- Linked Account Sign-In with Google One Tap.
- Frictionless subscription on AndroidTV.
After the access token has been successfully retrieved from your token endpoint, Google sends a request to your userinfo endpoint to retrieve basic profile information about the linked user.
| userinfo endpoint request headers | |
|---|---|
Authorization header |
The access token of type Bearer. |
For example, if your userinfo endpoint is available at
https://myservice.example.com/userinfo, a request might look like the following:
GET /userinfo HTTP/1.1
Host: myservice.example.com
Authorization: Bearer ACCESS_TOKEN
For your userinfo endpoint to handle requests, do the following steps:
- Extract access token from the Authorization header and return information for the user associated with the access token.
- If the access token is invalid, return an HTTP 401 Unauthorized error with using the
WWW-AuthenticateResponse Header. Below is an example of a userinfo error response:HTTP/1.1 401 Unauthorized WWW-Authenticate: error="invalid_token", error_description="The Access Token expired"
If the access token is valid, return and HTTP 200 response with the following JSON object in the body of the HTTPS response:
{ "sub": "USER_UUID", "email": "EMAIL_ADDRESS", "given_name": "FIRST_NAME", "family_name": "LAST_NAME", "name": "FULL_NAME", "picture": "PROFILE_PICTURE", }userinfo endpoint response subA unique ID that identifies the user in your system. emailEmail address of the user. given_nameOptional: First name of the user. family_nameOptional: Last name of the user. nameOptional: Full name of the user. pictureOptional: Profile picture of the user.
การตรวจสอบการติดตั้งใช้งาน
You can validate your implementation by using the OAuth 2.0 Playground tool.
In the tool, do the following steps:
- Click Configuration to open the OAuth 2.0 Configuration window.
- In the OAuth flow field, select Client-side.
- In the OAuth Endpoints field, select Custom.
- Specify your OAuth 2.0 endpoint and the client ID you assigned to Google in the corresponding fields.
- In the Step 1 section, don't select any Google scopes. Instead, leave this field blank or type a scope valid for your server (or an arbitrary string if you don't use OAuth scopes). When you're done, click Authorize APIs.
- In the Step 2 and Step 3 sections, go through the OAuth 2.0 flow and verify that each step works as intended.
You can validate your implementation by using the Google Account Linking Demo tool.
In the tool, do the following steps:
- Click the Sign in with Google button.
- Choose the account you'd like to link.
- Enter the service ID.
- Optionally enter one or more scopes that you will request access for.
- Click Start Demo.
- When prompted, confirm that you may consent and deny the linking request.
- Confirm that you are redirected to your platform.