Konta są łączone za pomocą standardowego w branży przepływu kodu autoryzacji OAuth 2.0.
OAuth 2.1 i PKCE w przypadku agentów
W przypadku bezstanowych agentów AI i wielomodowych potoków zalecane jest egzekwowanie OAuth 2.1.
- PKCE (Proof Key for Code Exchange): musi być używany do zabezpieczania przepływu kodu autoryzacji, co zapobiega atakom polegającym na przechwytywaniu.
- Brak przepływu niejawnego: przepływ niejawny udostępnia tokeny dostępu w adresie URL, co stanowi zagrożenie dla bezpieczeństwa środowisk agentów.
Usługa musi obsługiwać punkty końcowe autoryzacji i wymiany tokenów zgodne z OAuth 2.0/2.1.
Tworzenie projektu
Aby utworzyć projekt do łączenia kont:
- Otwórz konsolę interfejsów API Google.
- Kliknij Utwórz projekt.
- Wpisz nazwę lub zaakceptuj wygenerowaną sugestię.
- Potwierdź lub edytuj pozostałe pola.
- Kliknij Utwórz.
Aby wyświetlić identyfikator projektu:
- Otwórz konsolę interfejsów API Google.
- Znajdź swój projekt w tabeli na stronie docelowej. Identyfikator projektu jest wyświetlany w kolumnie Identyfikator.
Konfigurowanie ekranu zgody OAuth
Proces łączenia z kontem Google obejmuje ekran zgody, na którym użytkownicy mogą zobaczyć, która aplikacja prosi o dostęp do ich danych, jakich danych żąda i jakie warunki mają zastosowanie. Zanim wygenerujesz identyfikator klienta interfejsu API Google, musisz skonfigurować ekran zgody OAuth.
- Otwórz stronę ekranu zgody OAuth w konsoli interfejsów API Google.
- Jeśli pojawi się prośba, wybierz projekt, który właśnie utworzyłeś.
Na stronie „Ekran zgody OAuth” wypełnij formularz i kliknij przycisk „Zapisz”.
Nazwa aplikacji: nazwa aplikacji, która prosi o akceptację. Nazwa powinna dokładnie odzwierciedlać Twoją aplikację i być zgodna z nazwą aplikacji, którą użytkownicy widzą w innych miejscach. Nazwa aplikacji będzie wyświetlana na ekranie zgody na łączenie kont.
Logo aplikacji: obraz na ekranie zgody, który pomoże użytkownikom rozpoznać Twoją aplikację. Logo jest wyświetlane na ekranie zgody na łączenie kont i w ustawieniach konta.
Adres e-mail pomocy: dla użytkowników, którzy chcą się z Tobą skontaktować w sprawie pytań o ich zgodę.
Zakresy interfejsów API Google: zakresy umożliwiają aplikacji dostęp do prywatnych danych Google użytkownika. W przypadku łączenia z kontem Google wystarczy domyślny zakres (e-mail, profil, OpenID). Nie musisz dodawać żadnych zakresów wrażliwych. Zasadniczo najlepszym rozwiązaniem jest żądanie zakresów przyrostowo, w momencie, gdy wymagany jest dostęp, a nie z góry. Więcej informacji.
Autoryzowane domeny: aby chronić Ciebie i Twoich użytkowników, Google pozwala na używanie autoryzowanych domen tylko aplikacjom, które uwierzytelniają się za pomocą protokołu OAuth. Linki do Twoich aplikacji muszą być hostowane w autoryzowanych domenach. Więcej informacji.
Link do strony głównej aplikacji: strona główna Twojej aplikacji. Musi być hostowana w autoryzowanej domenie.
Link do polityki prywatności aplikacji: Wyświetlany na ekranie zgody na łączenie kont Google. Musi być hostowana w autoryzowanej domenie.
Link do Warunków korzystania z usługi (opcjonalnie): musi być hostowany w autoryzowanej domenie.
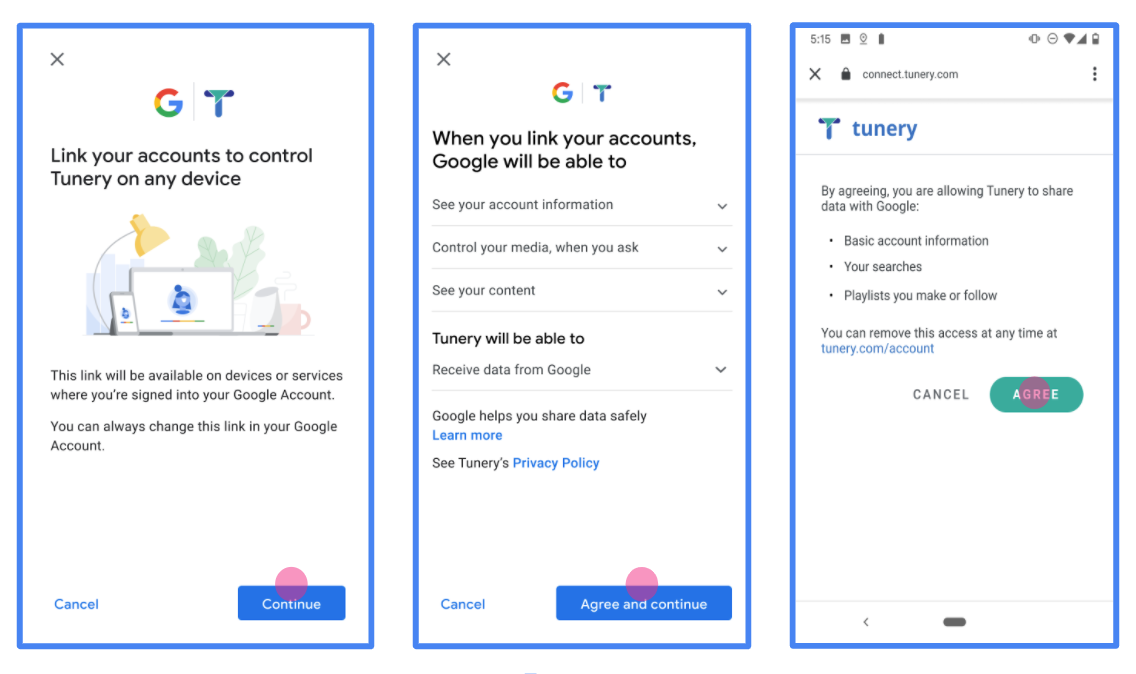
Rysunek 1. Ekran zgody na łączenie z kontem Google w przypadku fikcyjnej aplikacji Tunery
Sprawdź „Stan weryfikacji”. Jeśli Twoja aplikacja wymaga weryfikacji, kliknij przycisk „Prześlij do weryfikacji”, aby przesłać aplikację do weryfikacji. Szczegółowe informacje znajdziesz w wymaganiach dotyczących weryfikacji OAuth.
Wdrażanie serwera OAuth
Implementacja serwera OAuth 2.0 w ramach przepływu kodu autoryzacji obejmuje 2 punkty końcowe, które Twoja usługa udostępnia przez HTTPS. Pierwszy punkt końcowy to punkt końcowy autoryzacji, który odpowiada za znajdowanie lub uzyskiwanie zgody użytkowników na dostęp do danych. Punkt końcowy autoryzacji wyświetla użytkownikom, którzy nie są jeszcze zalogowani, interfejs logowania i rejestruje zgodę na żądany dostęp. Drugi punkt końcowy to punkt końcowy wymiany tokenów, który służy do uzyskiwania zaszyfrowanych ciągów znaków, zwanych tokenami, które autoryzują użytkownika do korzystania z Twojej usługi.
Gdy aplikacja Google musi wywołać jeden z interfejsów API Twojej usługi, Google używa tych punktów końcowych razem, aby uzyskać od użytkowników zgodę na wywoływanie tych interfejsów API w ich imieniu.
Łączenie z kontem Google: przepływ kodu autoryzacji OAuth
Poniższy diagram sekwencji przedstawia interakcje między użytkownikiem, Google i punktami końcowymi Twojej usługi.
Role i obowiązki
W tabeli poniżej zdefiniowano role i obowiązki podmiotów w przepływie protokołu OAuth łączenia z kontem Google (GAL). Pamiętaj, że w przypadku łączenia kont Google pełni rolę OAuth klienta, a Twoja usługa – rolę dostawcy tożsamości/usługi.
| Podmiot / komponent | Rola w globalnej liście adresów | Obowiązki |
|---|---|---|
| Aplikacja / serwer Google | Klient OAuth | Inicjuje przepływ, odbiera kod autoryzacji, wymienia go na tokeny i bezpiecznie je przechowuje, aby uzyskać dostęp do interfejsów API Twojej usługi. |
| Twój punkt końcowy autoryzacji | Serwer autoryzacji | Uwierzytelnia Twoich użytkowników i uzyskuje ich zgodę na udostępnianie Google dostępu do ich danych. |
| Twój punkt końcowy wymiany tokenów | Serwer autoryzacji | Sprawdza kody autoryzacji i tokeny odświeżania oraz wydaje tokeny dostępu serwerowi Google. |
| Identyfikator URI przekierowania Google | Punkt końcowy wywołania zwrotnego | Odbiera przekierowanie użytkownika z Twojej usługi autoryzacji z wartościami
code i state. |
Sesja przepływu kodu autoryzacji OAuth 2.0 zainicjowana przez Google ma następujący przebieg:
- Google otwiera Twój punkt końcowy autoryzacji w przeglądarce użytkownika. Jeśli przepływ został uruchomiony na urządzeniu obsługującym tylko głos w przypadku działania, Google przenosi wykonanie na telefon.
- Użytkownik loguje się (jeśli nie jest jeszcze zalogowany) i przyznaje Google uprawnienia dostępu do swoich danych za pomocą Twojego interfejsu API (jeśli nie przyznał jeszcze uprawnień).
- Twoja usługa tworzy kod autoryzacji i zwraca go do Google. Aby to zrobić, przekieruj przeglądarkę użytkownika z powrotem do Google z kodem autoryzacji dołączonym do żądania.
- Google wysyła kod autoryzacji do Twojego punktu końcowego wymiany tokenów, który sprawdza autentyczność kodu i zwraca token dostępu oraz token odświeżania. Token dostępu to token o krótkim okresie ważności, który Twoja usługa akceptuje jako dane logowania do interfejsów API. Token odświeżania to token o długim okresie ważności, który Google może przechowywać i używać do uzyskiwania nowych tokenów dostępu po ich wygaśnięciu.
- Gdy użytkownik zakończy proces łączenia kont, każde kolejne żądanie wysyłane z Google będzie zawierać token dostępu.
Przepis na implementację
Aby zaimplementować przepływ kodu autoryzacji, wykonaj te czynności.
Krok 1. Obsługa żądań autoryzacji
Gdy Google inicjuje łączenie kont, przekierowuje użytkownika do Twojego punktu końcowego autoryzacji. Szczegółowe informacje o umowach protokołu i wymaganiach dotyczących parametrów znajdziesz w sekcji Punkt końcowy autoryzacji.
Aby obsłużyć żądanie, wykonaj te czynności:
Sprawdź żądanie:
- Potwierdź, że
client_idodpowiada identyfikatorowi klienta przypisanemu do Google. - Potwierdź, że
redirect_uriodpowiada oczekiwanemu adresowi URL przekierowania Google:none https://oauth-redirect.googleusercontent.com/r/YOUR_PROJECT_ID https://oauth-redirect-sandbox.googleusercontent.com/r/YOUR_PROJECT_ID - Sprawdź, czy
response_typema wartośćcode.
- Potwierdź, że
Uwierzytelnij użytkownika:
- Sprawdź, czy użytkownik jest zalogowany w Twojej usłudze.
- Jeśli użytkownik nie jest zalogowany, poproś go o wykonanie czynności koniecznych do zalogowania się lub zarejestrowania.
Wygeneruj kod autoryzacji:
- Utwórz unikalny kod autoryzacji, którego nie można odgadnąć, powiązany z użytkownikiem i klientem.
- Ustaw ważność kodu na około 10 minut.
Przekieruj z powrotem do Google:
- Przekieruj przeglądarkę na adres URL podany w
redirect_uri. - Dołącz te parametry zapytania:
code: wygenerowany przez Ciebie kod autoryzacji.state: niezmieniona wartość stanu otrzymana od Google.
- Przekieruj przeglądarkę na adres URL podany w
Krok 2. Obsługa żądań wymiany tokenów
Twój punkt końcowy wymiany tokenów przetwarza 2 rodzaje żądań: wymianę kodów na tokeny i odświeżanie wygasłych tokenów dostępu. Szczegółowe informacje o umowach protokołu i wymaganiach dotyczących parametrów znajdziesz w sekcji Punkt końcowy wymiany tokenów.
A. Wymiana kodów autoryzacji na tokeny
Gdy Google otrzyma kod autoryzacji, wywoła Twój punkt końcowy wymiany tokenów (POST), aby pobrać tokeny.
Sprawdź żądanie:
- Sprawdź
client_idiclient_secret. - Sprawdź, czy kod autoryzacji jest prawidłowy i nie wygasł.
- Potwierdź, że
redirect_uriodpowiada wartości użytej w kroku 1. - Jeśli weryfikacja się nie powiedzie, zwróć kod HTTP
400 Bad Requestz wartością{"error": "invalid_grant"}.
- Sprawdź
Wydaj tokeny:
- Wygeneruj token
refresh_tokeno długim okresie ważności i tokenaccess_tokeno krótkim okresie ważności (zwykle 1 godzina). - Zwróć kod HTTP
200 OKze standardową odpowiedzią tokena w formacie JSON.
- Wygeneruj token
B. Odświeżanie tokenów dostępu
Gdy token dostępu wygaśnie, Google poprosi o nowy token za pomocą tokena odświeżania.
Sprawdź żądanie:
- Sprawdź
client_id,client_secretirefresh_token. - Jeśli weryfikacja się nie powiedzie, zwróć kod HTTP
400 Bad Requestz wartością{"error": "invalid_grant"}.
- Sprawdź
Wydaj nowy token dostępu:
- Wygeneruj nowy token
access_tokeno krótkim okresie ważności. - Zwróć kod HTTP
200 OKz odpowiedzią tokena w formacie JSON (opcjonalnie z nowym tokenem odświeżania).
- Wygeneruj nowy token
Obsługa żądań informacji o użytkowniku
Punkt końcowy informacji o użytkowniku jest chronionym przez OAuth 2.0 zasobem, który zwraca deklaracje dotyczące połączonego użytkownika. Wdrożenie i hosting punktu końcowego informacji o użytkowniku jest opcjonalne. Wyjątkiem są te przypadki użycia:
- Logowanie się na połączone konto za pomocą Google One Tap
- Bezproblemowa subskrypcja na AndroidTV.
Po pobraniu tokena dostępu z punktu końcowego tokena Google wysyła żądanie do punktu końcowego informacji o użytkowniku, aby pobrać podstawowe informacje profilowe połączonego użytkownika.
| nagłówki żądań punktu końcowego informacji o użytkowniku | |
|---|---|
Authorization header |
Token dostępu typu okaziciela. |
Jeśli na przykład punkt końcowy informacji o użytkowniku jest dostępny pod adresem
https://myservice.example.com/userinfo, żądanie może wyglądać tak:
GET /userinfo HTTP/1.1
Host: myservice.example.com
Authorization: Bearer ACCESS_TOKEN
Aby punkt końcowy informacji o użytkowniku mógł obsługiwać żądania, wykonaj te czynności:
- Wyodrębnij token dostępu z nagłówka autoryzacji i zwróć informacje o użytkowniku powiązanym z tym tokenem.
- Jeśli token dostępu jest nieprawidłowy, zwróć błąd HTTP 401 (Brak autoryzacji) i użyj nagłówka odpowiedzi
WWW-Authenticate. Poniżej znajduje się przykładowa odpowiedź na pytanie o błąd w informacjach o użytkowniku:HTTP/1.1 401 Unauthorized WWW-Authenticate: error="invalid_token", error_description="The Access Token expired"
Jeśli token dostępu jest prawidłowy, zwróć odpowiedź HTTP 200 z podanym niżej obiektem JSON w treści HTTPS odpowiedź:
{ "sub": "USER_UUID", "email": "EMAIL_ADDRESS", "given_name": "FIRST_NAME", "family_name": "LAST_NAME", "name": "FULL_NAME", "picture": "PROFILE_PICTURE", }odpowiedź dotycząca punktu końcowego informacji o użytkowniku subUnikalny identyfikator, który identyfikuje użytkownika w Twoim systemie. emailAdres e-mail użytkownika. given_nameOpcjonalnie: imię użytkownika. family_nameOpcjonalnie: nazwisko użytkownika. nameOpcjonalnie: pełna nazwa użytkownika. pictureOpcjonalnie: zdjęcie profilowe użytkownika.
Sprawdzanie poprawności implementacji
Implementację możesz zweryfikować za pomocą narzędzia OAuth 2.0 Playground.
W narzędziu wykonaj te czynności:
- Kliknij Konfiguracja , aby otworzyć okno Konfiguracja OAuth 2.0.
- W polu OAuth flow (Proces OAuth) wybierz Client-side (Po stronie klienta).
- W polu Punkty końcowe OAuth wybierz Niestandardowe.
- W odpowiednich polach podaj punkt końcowy OAuth 2.0 i identyfikator klienta przypisany do Google.
- W sekcji Krok 1 nie wybieraj żadnych zakresów Google. Zamiast tego pozostaw to pole puste lub wpisz zakres ważny dla Twojego serwera (albo dowolny ciąg znaków, jeśli nie używasz zakresów OAuth). Gdy skończysz, kliknij Autoryzuj interfejsy API.
- W sekcjach Krok 2 i Krok 3 przejdź przez przepływ OAuth 2.0 i sprawdź, czy każdy krok działa zgodnie z oczekiwaniami.
Możesz sprawdzić, czy implementacja jest prawidłowa, korzystając z narzędzia Google Account Linking Demo.
W narzędziu wykonaj te czynności:
- Kliknij przycisk Zaloguj się przez Google.
- Wybierz konto, które chcesz połączyć.
- Wpisz identyfikator usługi.
- Opcjonalnie wpisz co najmniej jeden zakres, do którego chcesz uzyskać dostęp.
- Kliknij Uruchom wersję pokazową.
- Gdy pojawi się komunikat, potwierdź, że możesz wyrazić zgodę na prośbę o połączenie lub ją odrzucić.
- Sprawdź, czy nastąpiło przekierowanie na Twoją platformę.