Las cuentas se vinculan con el flujo de código de autorización de OAuth 2.0 estándar de la industria.
OAuth 2.1 y PKCE para agentes
Para los agentes de IA sin estado y las canalizaciones multimodales, se recomienda aplicar OAuth 2.1.
- PKCE (Proof Key for Code Exchange): Se debe usar para proteger el flujo del código de autorización y evitar ataques de interceptación.
- No hay flujo implícito: El flujo implícito expone tokens de acceso en la URL, lo que representa un riesgo de seguridad para los entornos de agentes.
Tu servicio debe admitir extremos de autorización y de intercambio de tokens que cumplan con OAuth 2.0/2.1.
Crea el proyecto
Para crear tu proyecto y usar la vinculación de cuentas, haz lo siguiente:
- Ve a la Consola de API de Google.
- Haz clic en Crear proyecto.
- Ingresa un nombre o acepta la sugerencia generada.
- Confirma o edita los campos restantes.
- Haz clic en Crear.
Para ver el ID del proyecto, haz lo siguiente:
- Ve a la Consola de API de Google.
- Busca tu proyecto en la tabla de la página de destino. El ID del proyecto aparece en la ID columna.
Configura la pantalla de consentimiento de OAuth
El proceso de vinculación de Cuentas de Google incluye una pantalla de consentimiento que les indica a los usuarios la aplicación que solicita acceso a sus datos, qué tipo de datos solicita y las condiciones que se aplican. Deberás configurar la pantalla de consentimiento de OAuth antes de generar un ID de cliente de la API de Google.
- Abre la página de la pantalla de consentimiento de OAuth de la consola de APIs de Google.
- Si se te solicita, selecciona el proyecto que acabas de crear.
En la página "Pantalla de consentimiento de OAuth", completa el formulario y haz clic en el botón "Guardar".
Nombre de la aplicación: Es el nombre de la aplicación que solicita el consentimiento. El nombre debe reflejar con precisión tu aplicación y ser coherente con el nombre de la aplicación que los usuarios ven en otros lugares. El nombre de la aplicación se mostrará en la pantalla de consentimiento de vinculación de cuentas.
Logotipo de la aplicación: Es una imagen en la pantalla de consentimiento que ayudará a los usuarios a reconocer tu app. El logotipo se muestra en la pantalla de consentimiento de vinculación de cuentas y en la configuración de la cuenta.
Correo electrónico de asistencia: Es para que los usuarios se comuniquen contigo si tienen preguntas sobre su consentimiento.
Permisos para las APIs de Google: Los permisos permiten que tu aplicación acceda a los datos privados de Google de tu usuario. Para el caso de uso de vinculación de Cuentas de Google, el permiso predeterminado (correo electrónico, perfil, openid) es suficiente, no es necesario agregar permisos sensibles. Por lo general, se recomienda solicitar permisos de forma incremental, en el momento en que se requiere el acceso, en lugar de hacerlo por adelantado. Obtén más información.
Dominios autorizados: Para protegerlos a ti y a tus usuarios, Google solo permite que las aplicaciones que se autentican con OAuth usen dominios autorizados. Los vínculos de tus aplicaciones deben alojarse en dominios autorizados. Obtén más información.
Vínculo a la página principal de la aplicación: Es la página principal de tu aplicación. Debe alojarse en un dominio autorizado.
Vínculo a la Política de Privacidad de la aplicación: Se muestra en la pantalla de consentimiento de vinculación de Cuentas de Google. Debe alojarse en un dominio autorizado.
Vínculo a las Condiciones del Servicio de la aplicación (opcional): Debe alojarse en un dominio autorizado.
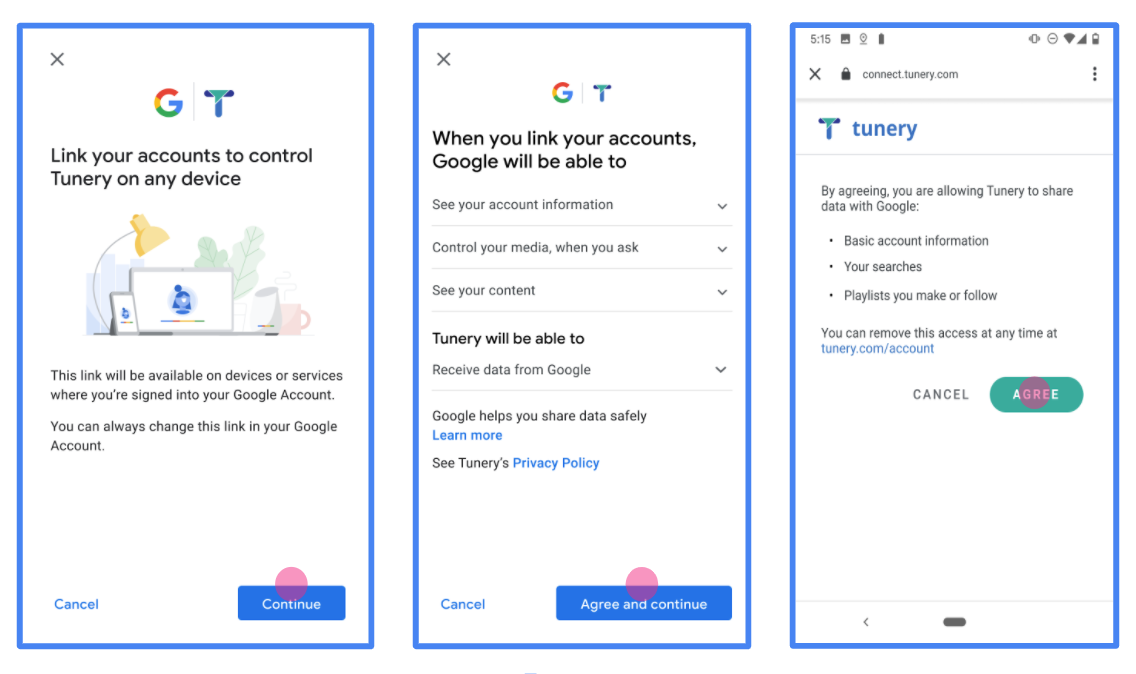
Figura 1. Pantalla de consentimiento de vinculación de Cuentas de Google para una aplicación ficticia, Tunery
Verifica el "Estado de verificación". Si tu aplicación necesita verificación, haz clic en el botón "Enviar para verificación" para enviarla. Consulta los requisitos de verificación de OAuth para obtener más detalles.
Implementa tu servidor de OAuth
Una implementación del servidor OAuth 2.0 del flujo de código de autorización consta de dos extremos que tu servicio pone a disposición a través de HTTPS. El primer extremo es el de autorización, que es responsable de encontrar o obtener el consentimiento de los usuarios para el acceso a los datos. El extremo de autorización presenta una IU de acceso a los usuarios que aún no accedieron y registra el consentimiento para el acceso solicitado. El segundo extremo es el de intercambio de tokens, que se usa para obtener cadenas encriptadas, llamadas tokens, que autorizan a un usuario a acceder a tu servicio.
Cuando una aplicación de Google necesita llamar a una de las APIs de tu servicio, Google usa estos extremos en conjunto para obtener permiso de tus usuarios para llamar a estas APIs en su nombre.
Vinculación de la Cuenta de Google: Flujo de código de autorización de OAuth
En el siguiente diagrama de secuencia, se detallan las interacciones entre el usuario, Google y los extremos de tu servicio.
Funciones y responsabilidades
En la siguiente tabla, se definen las funciones y responsabilidades de los actores en el flujo de OAuth de la vinculación de la Cuenta de Google (GAL). Ten en cuenta que, en GAL, Google actúa como el cliente de OAuth, mientras que tu servicio actúa como el proveedor de identidad o de servicios.
| Actor o componente | Función de GAL | Responsabilidades |
|---|---|---|
| Aplicación o servidor de Google | Cliente de OAuth | Inicia el flujo, recibe el código de autorización, lo intercambia por tokens y los almacena de forma segura para acceder a las APIs de tu servicio. |
| Tu extremo de autorización | Servidor de autorización | Autentica a tus usuarios y obtiene su consentimiento para compartir el acceso a sus datos con Google. |
| Tu extremo de intercambio de tokens | Servidor de autorización | Valida los códigos de autorización y los tokens de actualización, y emite tokens de acceso tokens al servidor de Google. |
| URI de redireccionamiento de Google | Extremo de devolución de llamada | Recibe el redireccionamiento del usuario desde tu servicio de autorización con los
code y state valores. |
Una sesión de flujo de código de autorización de OAuth 2.0 iniciada por Google tiene el siguiente flujo:
- Google abre tu extremo de autorización en el navegador del usuario. Si el flujo se inició en un dispositivo solo de voz para una acción, Google transfiere la ejecución a un teléfono.
- El usuario accede, si aún no lo hizo, y otorga permiso a Google para acceder a sus datos con tu API, si aún no lo hizo.
- Tu servicio crea un código de autorización y lo muestra a Google. Para ello, redirecciona el navegador del usuario a Google con el código de autorización adjunto a la solicitud.
- Google envía el código de autorización a tu extremo de intercambio de tokens, que verifica la autenticidad del código y muestra un token de acceso y un token de actualización. El token de acceso es un token de corta duración que tu servicio acepta como credenciales para acceder a las APIs. El token de actualización es un token de larga duración que Google puede almacenar y usar para adquirir tokens de acceso nuevos cuando vencen.
- Una vez que el usuario completa el flujo de vinculación de cuentas, cada solicitud posterior que se envía desde Google contiene un token de acceso.
Receta de implementación
Sigue estos pasos para implementar el flujo de código de autorización.
Paso 1: Administra las solicitudes de autorización
Cuando Google inicia la vinculación de cuentas, redirecciona al usuario a tu extremo de autorización. Para obtener información detallada sobre los contratos de protocolo y los requisitos de parámetros, consulta el extremo de autorización.
Para administrar la solicitud, realiza las siguientes acciones:
Valida la solicitud:
- Confirma que el
client_idcoincida con el ID de cliente asignado a Google. - Confirma que el
redirect_uricoincida con la URL de redireccionamiento de Google esperada:none https://oauth-redirect.googleusercontent.com/r/YOUR_PROJECT_ID https://oauth-redirect-sandbox.googleusercontent.com/r/YOUR_PROJECT_ID - Verifica que
response_typeseacode.
- Confirma que el
Autentica al usuario:
- Verifica si el usuario accedió a tu servicio.
- Si el usuario no accedió, pídele que complete tu flujo de acceso o registro.
Genera un código de autorización:
- Crea un código de autorización único y no adivinable asociado con el usuario y el cliente.
- Configura el código para que venza en aproximadamente 10 minutos.
Redirecciona a Google:
- Redirecciona el navegador a la URL proporcionada en
redirect_uri. - Agrega los siguientes parámetros de consulta:
code: Es el código de autorización que generaste.state: Es el valor de estado sin modificar que se recibió de Google.
- Redirecciona el navegador a la URL proporcionada en
Paso 2: Administra las solicitudes de intercambio de tokens
Tu extremo de intercambio de tokens procesa dos tipos de solicitudes: el intercambio de códigos por tokens y la actualización de tokens de acceso vencidos. Para obtener información detallada sobre los contratos de protocolo y los requisitos de parámetros, consulta el extremo de intercambio de tokens.
A. Intercambia códigos de autorización por tokens
Cuando Google recibe el código de autorización, llama a tu extremo de intercambio de tokens (POST) para recuperar tokens.
Valida la solicitud:
- Verifica
client_idyclient_secret. - Verifica que el código de autorización sea válido y no haya vencido.
- Confirma que
redirect_uricoincida con el valor usado en el paso 1. - Si falla la validación, muestra un error HTTP
400 Bad Requestcon{"error": "invalid_grant"}.
- Verifica
Emite tokens:
- Genera un
refresh_tokende larga duración y unaccess_tokende corta duración (por lo general, 1 hora). - Muestra un error HTTP
200 OKcon la respuesta de token JSON estándar.
- Genera un
B. Actualiza los tokens de acceso
Cuando vence el token de acceso, Google solicita uno nuevo con el token de actualización.
Valida la solicitud:
- Verifica
client_id,client_secretyrefresh_token. - Si falla la validación, muestra un error HTTP
400 Bad Requestcon{"error": "invalid_grant"}.
- Verifica
Emite un token de acceso nuevo:
- Genera un
access_tokennuevo de corta duración. - Muestra un error HTTP
200 OKcon la respuesta de token JSON (opcionalmente, incluye un token de actualización nuevo).
- Genera un
Controla las solicitudes userinfo
El extremo userinfo es un recurso protegido de OAuth 2.0 que muestra reclamos sobre el usuario vinculado. La implementación y el alojamiento del extremo userinfo son opcionales, excepto en los siguientes casos de uso:
- Acceso a la cuenta vinculada con Google One Tap.
- Suscripción sin inconvenientes en Android TV.
Una vez que el token de acceso se recupera correctamente del extremo del token, Google envía una solicitud al extremo userinfo para recuperar la información básica de perfil del usuario vinculado.
| Encabezados de la solicitud del extremo userinfo | |
|---|---|
Authorization header |
El token de acceso del tipo portador. |
Por ejemplo, si el extremo userinfo está disponible en
https://myservice.example.com/userinfo, una solicitud podría verse de la siguiente manera:
GET /userinfo HTTP/1.1
Host: myservice.example.com
Authorization: Bearer ACCESS_TOKEN
Para que tu extremo userinfo controle las solicitudes, sigue estos pasos:
- Extrae el token de acceso del encabezado de autorización y muestra la información del usuario asociada con el token de acceso.
- Si el token de acceso no es válido, muestra un error HTTP 401 No autorizado con el encabezado de respuesta
WWW-Authenticate. A continuación, se muestra un ejemplo de una respuesta de error de userinfo:HTTP/1.1 401 Unauthorized WWW-Authenticate: error="invalid_token", error_description="The Access Token expired"
Si el token de acceso es válido, devuelve una respuesta HTTP 200 con el siguiente objeto JSON en el cuerpo del protocolo HTTPS respuesta:
{ "sub": "USER_UUID", "email": "EMAIL_ADDRESS", "given_name": "FIRST_NAME", "family_name": "LAST_NAME", "name": "FULL_NAME", "picture": "PROFILE_PICTURE", }respuesta del extremo userinfo subUn ID único que identifica al usuario en tu sistema. emailDirección de correo electrónico del usuario. given_nameOpcional: Es el nombre del usuario. family_nameOpcional: Apellido del usuario. nameOpcional: Es el nombre completo del usuario. pictureOpcional: Foto de perfil del usuario.
Cómo validar la implementación
Puedes validar tu implementación con la herramienta OAuth 2.0 Playground.
En la herramienta, sigue estos pasos:
- Haz clic en Configuración para abrir la ventana Configuración de OAuth 2.0.
- En el campo Flujo de OAuth, selecciona Del cliente.
- En el campo Extremos de OAuth, selecciona Personalizado.
- Especifica tu extremo de OAuth 2.0 y el ID de cliente que le asignaste a Google en los campos correspondientes.
- En la sección Paso 1, no selecciones ningún alcance de Google. En su lugar, deja este campo en blanco o escribe un alcance válido para tu servidor (o una cadena arbitraria si no usas alcances de OAuth). Cuando termines, haz clic en Autorizar APIs.
- En las secciones Paso 2 y Paso 3, sigue el flujo de OAuth 2.0 y verifica que cada paso funcione según lo previsto.
Puedes validar tu implementación con la herramienta de demostración de vinculación de Cuentas de Google.
En la herramienta, sigue estos pasos:
- Haz clic en el botón Acceder con Google.
- Elige la cuenta que quieras vincular.
- Ingresa el ID de servicio.
- De manera opcional, ingresa uno o más alcances para los que solicitarás acceso.
- Haz clic en Iniciar demostración.
- Cuando se te solicite, confirma que puedes dar tu consentimiento y rechazar la solicitud de vinculación.
- Confirma que se te redirecciona a tu plataforma.