ระบบจะลิงก์บัญชีโดยใช้ขั้นตอน OAuth 2.0 แบบโดยนัยและรหัสการให้สิทธิ์ซึ่งเป็นมาตรฐานอุตสาหกรรม บริการของคุณต้องรองรับปลายทางการให้สิทธิ์และการแลกเปลี่ยนโทเค็นที่เป็นไปตาม OAuth 2.0
ในขั้นตอนโดยนัย Google จะเปิดปลายทางการให้สิทธิ์ในเบราว์เซอร์ของผู้ใช้ หลังจากลงชื่อเข้าใช้สำเร็จแล้ว ให้ส่งคืนโทเค็นการเข้าถึงที่มีอายุการใช้งานยาวนานไปยัง Google ตอนนี้โทเค็นการเข้าถึงนี้จะรวมอยู่ในคําขอทุกรายการที่ส่งจาก Google
ในขั้นตอนรหัสการให้สิทธิ์ คุณต้องมีปลายทาง 2 รายการดังนี้
ปลายทางการให้สิทธิ์ ซึ่งแสดง UI การลงชื่อเข้าใช้ต่อผู้ใช้ที่ยังไม่ได้ลงชื่อเข้าใช้ ปลายทางการให้สิทธิ์จะสร้างรหัสการให้สิทธิ์ที่มีอายุสั้นเพื่อบันทึกความยินยอมของผู้ใช้ในการเข้าถึงที่ขอ
ปลายทางการแลกเปลี่ยนโทเค็น ซึ่งรับผิดชอบต่อการแลกเปลี่ยน 2 ประเภทดังนี้
- แลกเปลี่ยนรหัสการให้สิทธิ์เป็นโทเค็นการรีเฟรชที่ใช้ได้นานและโทเค็นเพื่อการเข้าถึงที่ใช้ได้ในระยะสั้น การแลกเปลี่ยนนี้จะเกิดขึ้นเมื่อผู้ใช้ดำเนินการตามขั้นตอนการลิงก์บัญชี
- แลกเปลี่ยนโทเค็นการรีเฟรชที่ใช้ได้นานกับโทเค็นเพื่อการเข้าถึงที่ใช้ได้ในระยะสั้น การแลกเปลี่ยนนี้จะเกิดขึ้นเมื่อ Google ต้องการโทเค็นเพื่อการเข้าถึงใหม่เนื่องจากโทเค็นหมดอายุ
เลือกขั้นตอน OAuth 2.0
แม้ว่าการใช้เวิร์กโฟลว์โดยนัยจะง่ายกว่า แต่ Google ขอแนะนำให้ใช้โทเค็นการเข้าถึงที่ออกโดยเวิร์กโฟลว์โดยนัยซึ่งไม่มีวันหมดอายุ เนื่องจากผู้ใช้ต้องลิงก์บัญชีอีกครั้งหลังจากโทเค็นหมดอายุด้วยขั้นตอนที่ชัดเจน หากต้องการกำหนดวันหมดอายุของโทเค็นเพื่อเหตุผลด้านความปลอดภัย เราขอแนะนําอย่างยิ่งให้คุณใช้ขั้นตอนรหัสการให้สิทธิ์แทน
หลักเกณฑ์การออกแบบ
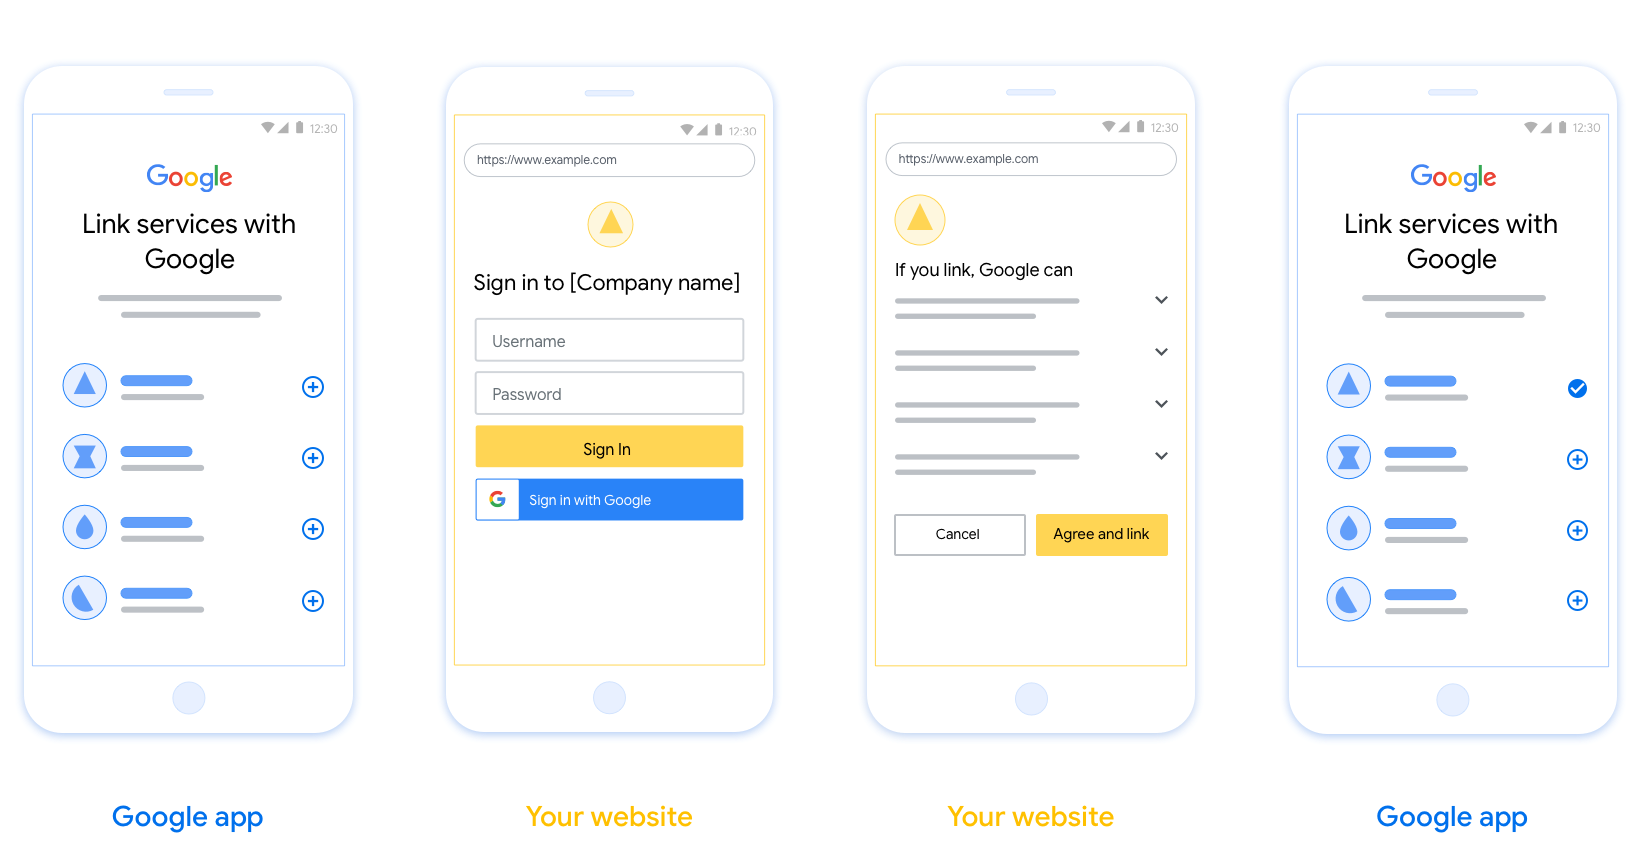
ส่วนนี้จะอธิบายข้อกำหนดและคำแนะนำด้านการออกแบบสำหรับหน้าจอผู้ใช้ที่คุณโฮสต์สำหรับขั้นตอนการลิงก์ OAuth หลังจากที่แอปของ Google เรียกใช้แล้ว แพลตฟอร์มจะแสดงหน้าการลงชื่อเข้าใช้ Google และหน้าจอคำยินยอมการลิงก์บัญชีแก่ผู้ใช้ ระบบจะนําผู้ใช้กลับไปที่แอปของ Google หลังจากที่ผู้ใช้ให้ความยินยอมในการลิงก์บัญชี
ข้อกำหนด
- คุณต้องแจ้งให้ผู้ใช้ทราบว่าบัญชีของผู้ใช้จะลิงก์กับ Googleไม่ใช่ผลิตภัณฑ์ที่เฉพาะเจาะจงของ Google เช่น Google Home หรือ Google Assistant
คำแนะนำ
เราขอแนะนำให้คุณทำดังนี้
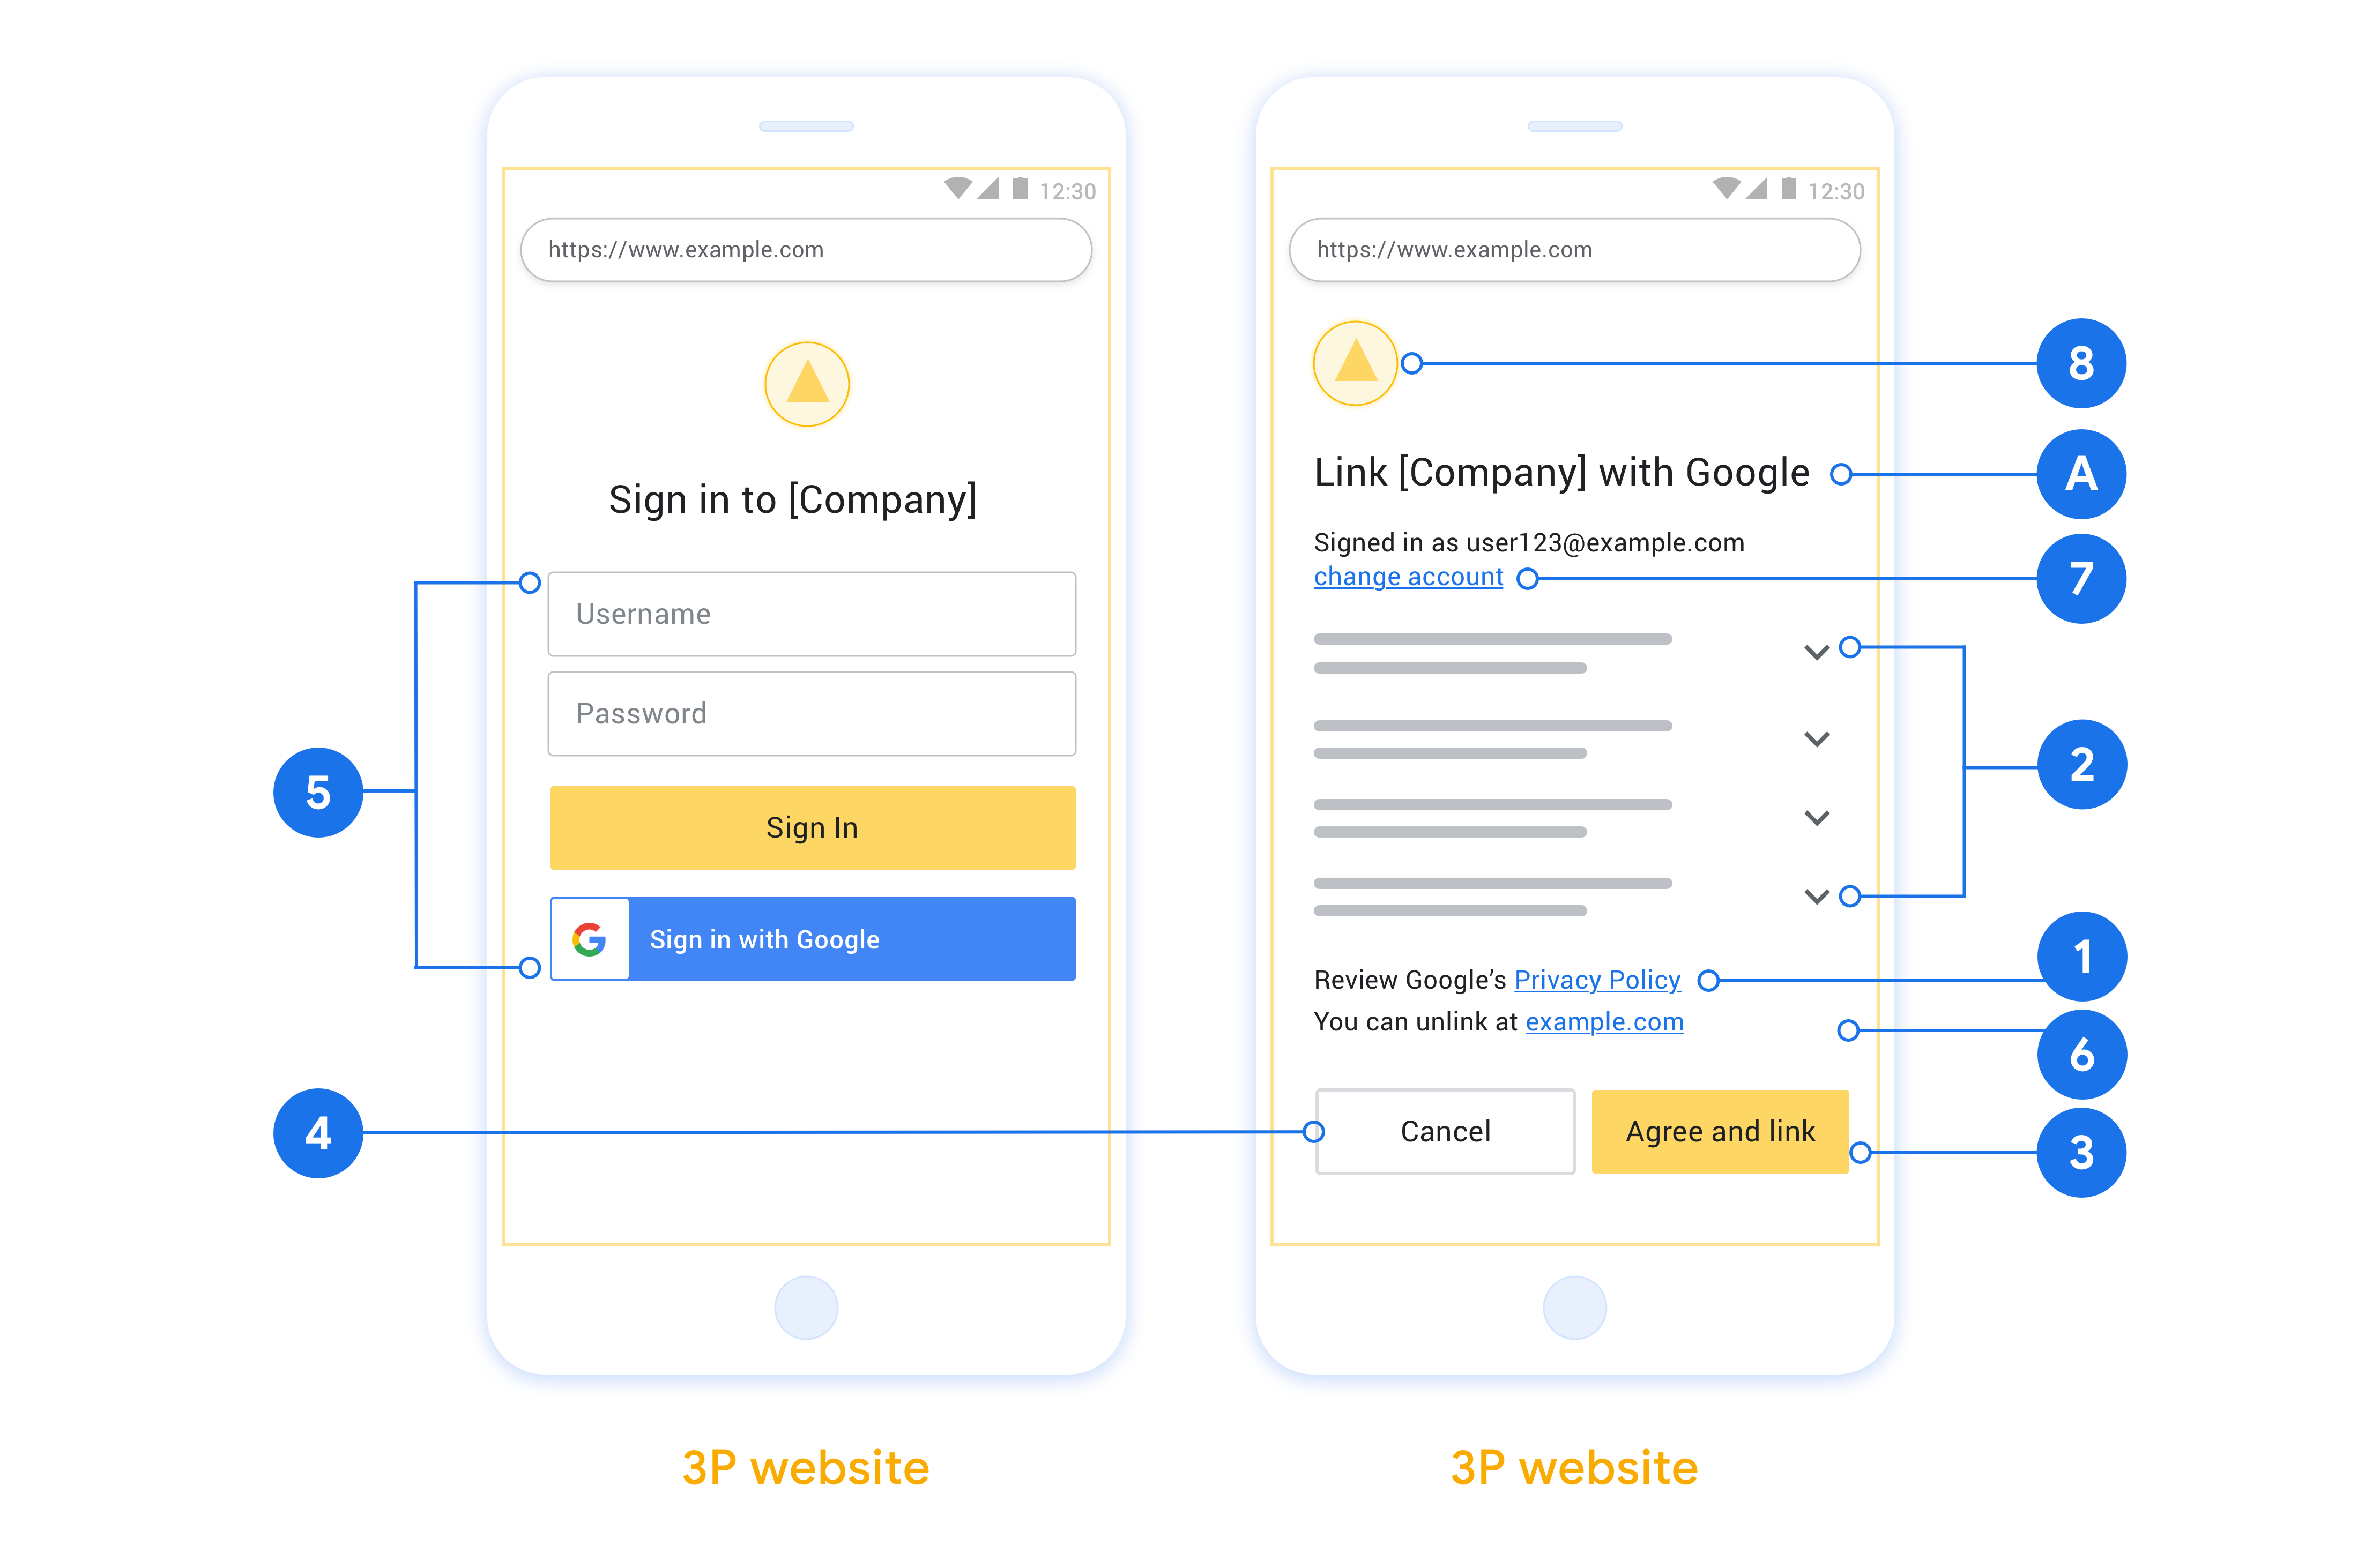
แสดงนโยบายความเป็นส่วนตัวของ Google ใส่ลิงก์ไปยังนโยบายความเป็นส่วนตัวของ Google ในหน้าจอขอความยินยอม
ข้อมูลที่แชร์ ใช้ภาษาที่ชัดเจนและกระชับเพื่อบอกให้ผู้ใช้ทราบว่า Google ต้องการข้อมูลใดและเพราะเหตุใด
คำกระตุ้นให้ดำเนินการที่ชัดเจน ระบุคำกระตุ้นให้ดำเนินการที่ชัดเจนในหน้าจอคำยินยอม เช่น "ยอมรับและลิงก์" เนื่องจากผู้ใช้ต้องเข้าใจว่าต้องแชร์ข้อมูลใดกับ Google จึงจะลิงก์บัญชีได้
ความสามารถในการยกเลิก ระบุวิธีให้ผู้ใช้ย้อนกลับหรือยกเลิก หากผู้ใช้เลือกที่จะไม่ลิงก์
กระบวนการลงชื่อเข้าใช้ที่ชัดเจน ตรวจสอบว่าผู้ใช้มีวิธีการที่ชัดเจนในการลงชื่อเข้าใช้บัญชี Google เช่น ช่องสำหรับชื่อผู้ใช้และรหัสผ่าน หรือลงชื่อเข้าใช้ด้วย Google
ความสามารถในการยกเลิกการลิงก์ เสนอกลไกให้ผู้ใช้ยกเลิกการลิงก์ เช่น URL ไปยังการตั้งค่าบัญชีบนแพลตฟอร์มของคุณ หรือจะใส่ลิงก์ไปยังบัญชี Google ที่ผู้ใช้สามารถจัดการบัญชีที่ลิงก์ไว้ก็ได้
ความสามารถในการเปลี่ยนบัญชีผู้ใช้ แนะนำวิธีการให้ผู้ใช้เปลี่ยนบัญชี ซึ่งจะเป็นประโยชน์อย่างยิ่งหากผู้ใช้มีแนวโน้มที่จะมีบัญชีหลายบัญชี
- หากผู้ใช้ต้องปิดหน้าจอขอความยินยอมเพื่อเปลี่ยนบัญชี ให้ส่งข้อผิดพลาดที่แก้ไขได้ไปยัง Google เพื่อให้ผู้ใช้ลงชื่อเข้าใช้บัญชีที่ต้องการได้โดยใช้การลิงก์ OAuth และขั้นตอนโดยนัย
ใส่โลโก้ของคุณ แสดงโลโก้บริษัทในหน้าจอขอความยินยอม ใช้หลักเกณฑ์การจัดรูปแบบในการวางโลโก้ หากต้องการแสดงโลโก้ของ Google ด้วย โปรดดูโลโก้และเครื่องหมายการค้า
สร้างโปรเจ็กต์
วิธีสร้างโปรเจ็กต์เพื่อใช้การลิงก์บัญชี
- คลิกสร้างโปรเจ็กต์
- ป้อนชื่อหรือยอมรับคำแนะนำที่สร้างขึ้น
- ยืนยันหรือแก้ไขช่องที่เหลือ
- คลิกสร้าง
วิธีดูรหัสโปรเจ็กต์
- ค้นหาโปรเจ็กต์ในตารางในหน้า Landing Page รหัสโปรเจ็กต์จะปรากฏในคอลัมน์รหัส
กำหนดค่าหน้าจอขอความยินยอม OAuth
กระบวนการลิงก์บัญชี Google มีหน้าจอขอความยินยอมซึ่งจะแจ้งให้ผู้ใช้ทราบว่าแอปพลิเคชันใดขอสิทธิ์เข้าถึงข้อมูลของผู้ใช้ ข้อมูลประเภทใดที่แอปพลิเคชันขอ และข้อกำหนดที่เกี่ยวข้อง คุณจะต้องกำหนดค่าหน้าจอคำยินยอม OAuth ก่อนที่จะสร้างรหัสไคลเอ็นต์ Google API
- เปิดหน้าหน้าจอขอความยินยอม OAuth ของคอนโซล Google APIs
- หากได้รับข้อความแจ้ง ให้เลือกโปรเจ็กต์ที่คุณเพิ่งสร้าง
ในหน้า "หน้าจอคำยินยอม OAuth" ให้กรอกแบบฟอร์มแล้วคลิกปุ่ม "บันทึก"
ชื่อแอปพลิเคชัน: ชื่อของแอปพลิเคชันที่ขอความยินยอม ชื่อควรแสดงถึงแอปพลิเคชันของคุณอย่างถูกต้องและสอดคล้องกับชื่อแอปพลิเคชันที่ผู้ใช้เห็นในที่อื่นๆ ชื่อแอปพลิเคชันจะแสดงในหน้าจอคำยินยอมในการลิงก์บัญชี
โลโก้แอปพลิเคชัน: รูปภาพในหน้าจอคำยินยอมที่จะช่วยให้ผู้ใช้จดจำแอปของคุณได้ ระบบจะแสดงโลโก้ในหน้าจอคำยินยอมในการลิงก์บัญชีและในการตั้งค่าบัญชี
อีเมลสนับสนุน: เพื่อให้ผู้ใช้ติดต่อคุณพร้อมคำถามเกี่ยวกับการยินยอม
ขอบเขตสำหรับ Google API: ขอบเขตช่วยให้แอปพลิเคชันเข้าถึงข้อมูลส่วนตัวของผู้ใช้ใน Google ได้ สำหรับกรณีการใช้งานการลิงก์บัญชี Google ขอบเขตเริ่มต้น (อีเมล โปรไฟล์ openid) ก็เพียงพอแล้ว คุณไม่จำเป็นต้องเพิ่มขอบเขตที่มีความละเอียดอ่อน โดยทั่วไปแล้ว แนวทางปฏิบัติแนะนำคือการขอขอบเขตทีละรายการเมื่อจำเป็นต้องเข้าถึง แทนที่จะขอตั้งแต่แรก ดูข้อมูลเพิ่มเติม
โดเมนที่ได้รับอนุญาต: Google อนุญาตเฉพาะแอปพลิเคชันที่ตรวจสอบสิทธิ์โดยใช้ OAuth ในการใช้โดเมนที่ได้รับอนุญาตเท่านั้นเพื่อเป็นการปกป้องคุณและผู้ใช้ ลิงก์ของแอปพลิเคชันต้องโฮสต์อยู่ในโดเมนที่ได้รับอนุญาต ดูข้อมูลเพิ่มเติม
ลิงก์หน้าแรกของแอปพลิเคชัน: หน้าแรกของแอปพลิเคชัน ต้องโฮสต์ในโดเมนที่ได้รับอนุญาต
ลิงก์นโยบายความเป็นส่วนตัวของแอปพลิเคชัน: แสดงในหน้าจอขอความยินยอมในการลิงก์บัญชี Google ต้องโฮสต์ในโดเมนที่ได้รับอนุญาต
ลิงก์ข้อกำหนดในการให้บริการของแอปพลิเคชัน (ไม่บังคับ): ต้องโฮสต์ในโดเมนที่ได้รับอนุญาต
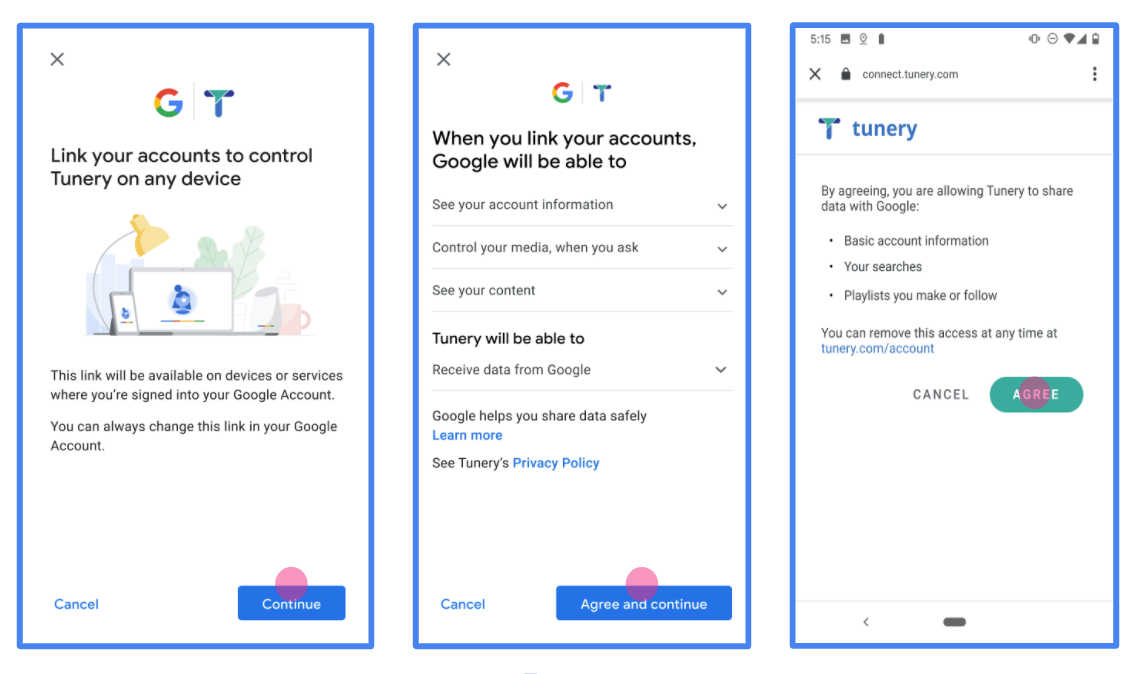
รูปที่ 1 หน้าจอขอความยินยอมในการลิงก์บัญชี Google สำหรับแอปพลิเคชันสมมติ Tunery
ตรวจสอบ "สถานะการยืนยัน" หากแอปพลิเคชันของคุณต้องได้รับการยืนยัน ให้คลิกปุ่ม "ส่งเพื่อรับการยืนยัน" เพื่อส่งแอปพลิเคชันเพื่อรับการยืนยัน ดูรายละเอียดได้ที่ข้อกำหนดในการยืนยัน OAuth
ใช้เซิร์ฟเวอร์ OAuth
บริการของคุณจะให้สิทธิ์เพื่อรองรับขั้นตอน implicit ของ OAuth 2.0 ปลายทางที่พร้อมใช้งานผ่าน HTTPS ปลายทางนี้มีหน้าที่ในการตรวจสอบสิทธิ์และ ได้รับความยินยอมจากผู้ใช้ในการเข้าถึงข้อมูล ปลายทางการให้สิทธิ์ แสดง UI การลงชื่อเข้าใช้แก่ผู้ใช้ที่ยังไม่ได้ลงชื่อเข้าใช้และบันทึกไว้ ความยินยอมต่อการเข้าถึงที่ขอ
เมื่อแอปพลิเคชันของ Google ต้องเรียกใช้ API ที่ได้รับอนุญาตของบริการ Google ใช้ปลายทางนี้เพื่อขอสิทธิ์จากผู้ใช้เพื่อเรียกใช้ API เหล่านี้ ในนามของผู้ลงโฆษณา
เซสชันโฟลว์แบบโดยนัยของ OAuth 2.0 ทั่วไปที่ Google เป็นผู้เริ่มต้นจะมี ขั้นตอนดังต่อไปนี้
- Google จะเปิดปลายทางการให้สิทธิ์ในเบราว์เซอร์ของผู้ใช้ ลงชื่อเข้าใช้หากยังไม่ได้ลงชื่อเข้าใช้ และให้สิทธิ์ Google ในการ เข้าถึงข้อมูลของตนด้วย API ของคุณได้ หากผู้ใช้ยังไม่ได้ให้สิทธิ์
- บริการของคุณจะสร้างโทเค็นเพื่อการเข้าถึงและส่งไปยัง Google โดยเปลี่ยนเส้นทางเบราว์เซอร์ของผู้ใช้กลับไปยัง Google ที่มีสิทธิ์การเข้าถึง แนบมากับคำขอแล้ว
- Google จะเรียก API ของบริการของคุณและแนบโทเค็นเพื่อการเข้าถึง คำขอแต่ละรายการ บริการของคุณยืนยันว่าโทเค็นเพื่อการเข้าถึงให้สิทธิ์ Google การอนุญาตให้เข้าถึง API จากนั้นจึงเรียก API
จัดการคำขอการให้สิทธิ์
เมื่อแอปพลิเคชันของ Google ต้องทำการลิงก์บัญชีผ่าน OAuth 2.0 โดย Google จะส่งผู้ใช้ไปยังปลายทางการให้สิทธิ์พร้อม ที่มีพารามิเตอร์ต่อไปนี้
| พารามิเตอร์ปลายทางการให้สิทธิ์ | |
|---|---|
client_id |
รหัสไคลเอ็นต์ที่คุณกำหนดให้กับ Google |
redirect_uri |
URL ที่คุณส่งการตอบกลับคำขอนี้ |
state |
มูลค่าการทำบัญชีที่ส่งกลับไปยัง Google ไม่เปลี่ยนแปลงใน URI การเปลี่ยนเส้นทาง |
response_type |
ประเภทของค่าที่จะแสดงในคำตอบ สำหรับ OAuth 2.0 โดยปริยาย
ประเภทการตอบกลับจะเป็น token เสมอ |
user_locale |
การตั้งค่าภาษาของบัญชี Google ใน RFC5646 ในการแปลเนื้อหาของคุณเป็นภาษาที่ผู้ใช้ต้องการ |
ตัวอย่างเช่น หากปลายทางการให้สิทธิ์อยู่ที่
https://myservice.example.com/auth คำขออาจมีลักษณะดังต่อไปนี้
GET https://myservice.example.com/auth?client_id=GOOGLE_CLIENT_ID&redirect_uri=REDIRECT_URI&state=STATE_STRING&response_type=token&user_locale=LOCALE
สำหรับปลายทางการให้สิทธิ์ในการจัดการคำขอลงชื่อเข้าใช้ ให้ทำดังนี้ ขั้นตอน:
ยืนยันค่า
client_idและredirect_uriเพื่อ ป้องกันการให้สิทธิ์เข้าถึงแอปไคลเอ็นต์ที่ไม่ได้ตั้งใจหรือกำหนดค่าไม่ถูกต้อง- ยืนยันว่า
client_idตรงกับรหัสไคลเอ็นต์ที่คุณ ที่มอบหมายให้กับ Google - ยืนยันว่า URL ที่ระบุโดย
redirect_uriจะมีรูปแบบต่อไปนี้https://oauth-redirect.googleusercontent.com/r/YOUR_PROJECT_ID https://oauth-redirect-sandbox.googleusercontent.com/r/YOUR_PROJECT_ID
- ยืนยันว่า
ตรวจสอบว่าผู้ใช้ลงชื่อเข้าใช้บริการของคุณหรือไม่ หากผู้ใช้ไม่ได้เซ็น ดำเนินการตามขั้นตอนการลงชื่อเข้าใช้หรือลงชื่อสมัครใช้บริการของคุณ
สร้างโทเค็นเพื่อการเข้าถึงสำหรับ Google เพื่อใช้ในการเข้าถึง API ของคุณ โทเค็นเพื่อการเข้าถึงสามารถเป็นค่าสตริงใดก็ได้ แต่จะต้องแสดงถึง ผู้ใช้และไคลเอ็นต์ที่ใช้โทเค็นและต้องคาดเดาไม่ได้
ส่งการตอบกลับ HTTP ที่เปลี่ยนเส้นทางเบราว์เซอร์ของผู้ใช้ไปยัง URL ที่ระบุโดยพารามิเตอร์
redirect_uriรวม พารามิเตอร์ต่อไปนี้ในส่วนย่อยของ URLaccess_token: โทเค็นเพื่อการเข้าถึงที่คุณเพิ่งสร้างtoken_type: สตริงbearerstate: ค่าสถานะที่ไม่ได้แก้ไขจากค่าเดิม คำขอ
ตัวอย่างของ URL ที่ได้มีดังนี้
https://oauth-redirect.googleusercontent.com/r/YOUR_PROJECT_ID#access_token=ACCESS_TOKEN&token_type=bearer&state=STATE_STRING
เครื่องจัดการการเปลี่ยนเส้นทาง OAuth 2.0 ของ Google ได้รับโทเค็นเพื่อการเข้าถึงและยืนยัน
ค่า state ยังไม่มีการเปลี่ยนแปลง หลังจากที่ Google ได้รับ
โทเค็นเพื่อการเข้าถึงสำหรับบริการของคุณ Google จะแนบโทเค็นไปกับการเรียกครั้งต่อๆ มา
กับ API ของบริการ
จัดการคำขอ Userinfo
ปลายทาง userinfo เป็นทรัพยากรที่มีการป้องกันด้วย OAuth 2.0 ซึ่งส่งกลับการอ้างสิทธิ์เกี่ยวกับผู้ใช้ที่ลิงก์ การติดตั้งใช้งานและการโฮสต์ปลายทาง userinfo เป็นตัวเลือกที่ไม่บังคับ ยกเว้นกรณีการใช้งานต่อไปนี้
- ลงชื่อเข้าใช้บัญชีที่ลิงก์ด้วย Google One Tap
- การติดตามที่ราบรื่นบน AndroidTV
หลังจากเรียกโทเค็นเพื่อการเข้าถึงจากปลายทางของโทเค็นเรียบร้อยแล้ว Google จะส่งคำขอไปยังปลายทาง userinfo เพื่อดึงข้อมูลโปรไฟล์พื้นฐานเกี่ยวกับผู้ใช้ที่ลิงก์
| ส่วนหัวของคำขอปลายทางของ userinfo | |
|---|---|
Authorization header |
โทเค็นเพื่อการเข้าถึงของประเภท Bearer |
ตัวอย่างเช่น หากปลายทาง userinfo พร้อมใช้งานที่
https://myservice.example.com/userinfo คำขออาจมีลักษณะดังต่อไปนี้
GET /userinfo HTTP/1.1
Host: myservice.example.com
Authorization: Bearer ACCESS_TOKEN
หากต้องการให้ปลายทาง userinfo จัดการคำขอ ให้ทำตามขั้นตอนต่อไปนี้
- แยกโทเค็นเพื่อการเข้าถึงจากส่วนหัวการให้สิทธิ์ แล้วแสดงผลข้อมูลสำหรับผู้ใช้ที่เชื่อมโยงกับโทเค็นเพื่อการเข้าถึง
- หากโทเค็นเพื่อการเข้าถึงไม่ถูกต้อง ให้แสดงข้อผิดพลาด HTTP 401 Unauthorized ด้วยการใช้ส่วนหัวการตอบกลับ
WWW-Authenticateตัวอย่างการตอบกลับข้อผิดพลาดเกี่ยวกับ Userinfo มีดังนี้HTTP/1.1 401 Unauthorized WWW-Authenticate: error="invalid_token", error_description="The Access Token expired"
หากโทเค็นเพื่อการเข้าถึงถูกต้อง ให้แสดงผลและการตอบสนอง HTTP 200 ด้วยออบเจ็กต์ JSON ต่อไปนี้ในเนื้อหาของ HTTPS การตอบกลับ:
{ "sub": "USER_UUID", "email": "EMAIL_ADDRESS", "given_name": "FIRST_NAME", "family_name": "LAST_NAME", "name": "FULL_NAME", "picture": "PROFILE_PICTURE", }การตอบสนองของปลายทาง userinfo subรหัสที่ไม่ซ้ำกันที่ระบุผู้ใช้ในระบบ emailอีเมลของผู้ใช้ given_nameไม่บังคับ: ชื่อของผู้ใช้ family_nameไม่บังคับ: นามสกุลของผู้ใช้ nameไม่บังคับ: ชื่อเต็มของผู้ใช้ pictureไม่บังคับ: รูปโปรไฟล์ของผู้ใช้
ตรวจสอบการติดตั้งใช้งาน
คุณตรวจสอบการติดตั้งใช้งานได้โดยใช้เครื่องมือ OAuth 2.0 Playground
ทำตามขั้นตอนต่อไปนี้ในเครื่องมือ
- คลิกการกําหนดค่า เพื่อเปิดหน้าต่างการกําหนดค่า OAuth 2.0
- ในช่องขั้นตอน OAuth ให้เลือกฝั่งไคลเอ็นต์
- ในช่อง OAuth Endpoints ให้เลือก Custom
- ระบุปลายทาง OAuth 2.0 และรหัสไคลเอ็นต์ที่คุณกำหนดให้กับ Google ในช่องที่เกี่ยวข้อง
- ในส่วนขั้นตอนที่ 1 ไม่ต้องเลือกขอบเขตของ Google แต่ให้เว้นช่องนี้ว่างไว้หรือพิมพ์ขอบเขตที่ใช้ได้กับเซิร์ฟเวอร์ของคุณ (หรือสตริงที่กำหนดเองหากคุณไม่ได้ใช้ขอบเขต OAuth) เมื่อดำเนินการเสร็จแล้ว ให้คลิกให้สิทธิ์ API
- ในส่วนขั้นตอนที่ 2 และขั้นตอนที่ 3 ให้ทำตามขั้นตอน OAuth 2.0 และตรวจสอบว่าแต่ละขั้นตอนทำงานตามที่ต้องการ
คุณสามารถตรวจสอบการติดตั้งใช้งานโดยใช้เครื่องมือการสาธิตการลิงก์บัญชี Google
ทำตามขั้นตอนต่อไปนี้ในเครื่องมือ
- คลิกปุ่มลงชื่อเข้าใช้ด้วย Google
- เลือกบัญชีที่ต้องการลิงก์
- ป้อนรหัสบริการ
- (ไม่บังคับ) ป้อนขอบเขตที่จะขอสิทธิ์เข้าถึงอย่างน้อย 1 รายการ
- คลิกเริ่มสาธิต
- เมื่อได้รับข้อความแจ้ง ให้ยืนยันว่าคุณอาจยินยอมและปฏิเสธคำขอลิงก์
- ยืนยันว่าระบบเปลี่ยนเส้นทางคุณไปยังแพลตฟอร์ม