I collegamenti degli account vengono eseguiti utilizzando il flusso del codice di autorizzazione OAuth 2.0, standard di settore.
OAuth 2.1 e PKCE per gli agenti
Per gli agenti AI senza stato e le pipeline multimodali, è consigliabile applicare OAuth 2.1.
- PKCE (Proof Key for Code Exchange): deve essere utilizzato per proteggere il flusso del codice di autorizzazione, impedendo attacchi di intercettazione.
- Nessun flusso implicito: il flusso implicito espone i token di accesso nell'URL, il che rappresenta un rischio per la sicurezza degli ambienti degli agenti.
Il tuo servizio deve supportare gli endpoint di autorizzazione e scambio di token conformi a OAuth 2.0/2.1.
Create the project
To create your project to use account linking:
- Go to the Google API Console.
- Click Create project.
- Enter a name or accept the generated suggestion.
- Confirm or edit any remaining fields.
- Click Create.
To view your project ID:
- Go to the Google API Console.
- Find your project in the table on the landing page. The project ID appears in the ID column.
Configure your OAuth Consent Screen
The Google Account Linking process includes a consent screen which tells users the application requesting access to their data, what kind of data they are asking for and the terms that apply. You will need to configure your OAuth consent screen before generating a Google API client ID.
- Open the OAuth consent screen page of the Google APIs console.
- If prompted, select the project you just created.
On the "OAuth consent screen" page, fill out the form and click the “Save” button.
Application name: The name of the application asking for consent. The name should accurately reflect your application and be consistent with the application name users see elsewhere. The application name will be shown on the Account Linking consent screen.
Application logo: An image on the consent screen that will help users recognize your app. The logo is shown on Account linking consent screen and on account settings
Support email: For users to contact you with questions about their consent.
Scopes for Google APIs: Scopes allow your application to access your user's private Google data. For the Google Account Linking use case, default scope (email, profile, openid) is sufficient, you don’t need to add any sensitive scopes. It is generally a best practice to request scopes incrementally, at the time access is required, rather than up front. Learn more.
Authorized domains: To protect you and your users, Google only allows applications that authenticate using OAuth to use Authorized Domains. Your applications' links must be hosted on Authorized Domains. Learn more.
Application Homepage link: Home page for your application. Must be hosted on an Authorized Domain.
Application Privacy Policy link: Shown on Google Account Linking consent screen. Must be hosted on an Authorized Domain.
Application Terms of Service link (Optional): Must be hosted on an Authorized Domain.
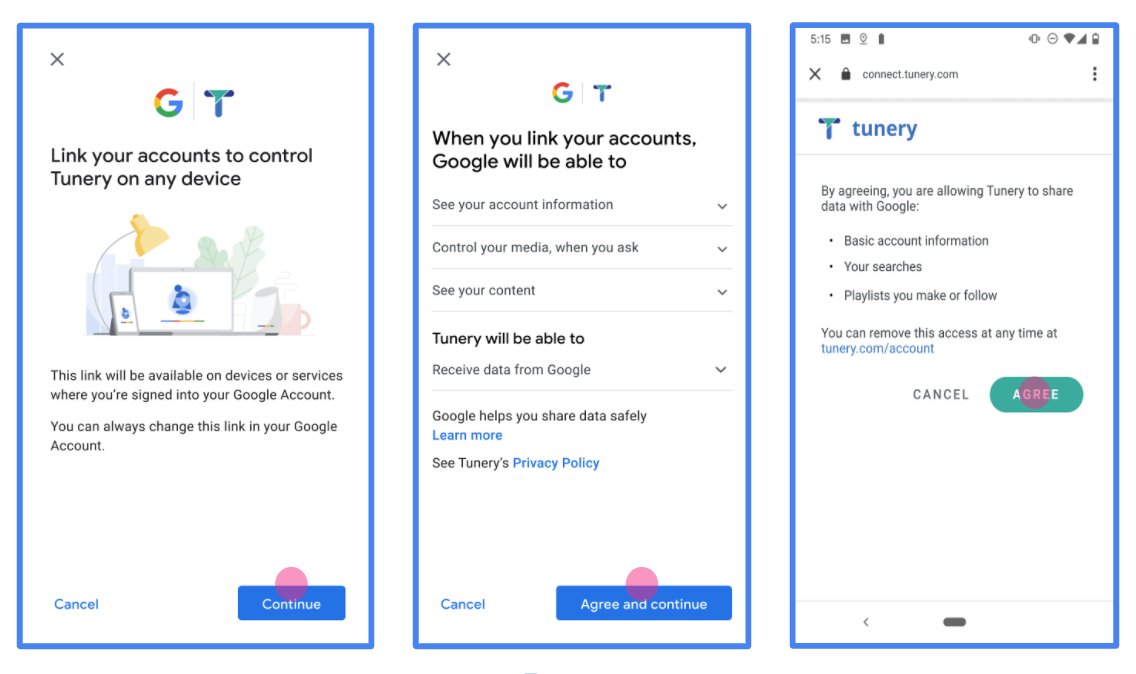
Figure 1. Google Account Linking Consent Screen for a fictitious Application, Tunery
Check "Verification Status", if your application needs verification then click the "Submit For Verification" button to submit your application for verification. Refer to OAuth verification requirements for details.
Implementare il server OAuth
An OAuth 2.0 server implementation of the authorization code flow consists of two endpoints, which your service makes available by HTTPS. The first endpoint is the authorization endpoint, which is responsible for finding or obtaining consent from users for data access. The authorization endpoint presents a sign-in UI to your users that aren't already signed in and records consent to the requested access. The second endpoint is the token exchange endpoint, which is used to obtain encrypted strings, called tokens, that authorize a user to access your service.
When a Google application needs to call one of your service's APIs, Google uses these endpoints together to get permission from your users to call these APIs on their behalf.
Google Account Linking: OAuth Authorization Code Flow
The following sequence diagram details interactions between the User, Google, and your service's endpoints.
Roles and responsibilities
The following table defines the roles and responsibilities of the actors in the Google Account Linking (GAL) OAuth flow. Note that in GAL, Google acts as the OAuth Client, while your service acts as the Identity/Service Provider.
| Actor / Component | GAL Role | Responsibilities |
|---|---|---|
| Google App / Server | OAuth Client | Initiates the flow, receives the authorization code, exchanges it for tokens, and securely stores them to access your service's APIs. |
| Your Authorization Endpoint | Authorization Server | Authenticates your users and obtains their consent to share access to their data with Google. |
| Your Token Exchange Endpoint | Authorization Server | Validates authorization codes and refresh tokens, and issues access tokens to the Google Server. |
| Google Redirect URI | Callback Endpoint | Receives the user redirect from your authorization service with the
code and state values. |
An OAuth 2.0 authorization code flow session initiated by Google has the following flow:
- Google opens your authorization endpoint in the user's browser. If the flow started on a voice-only device for an Action, Google transfers the execution to a phone.
- The user signs in, if not signed in already, and grants Google permission to access their data with your API, if they haven't already granted permission.
- Your service creates an authorization code and returns it to Google. To do so, redirect the user's browser back to Google with the authorization code attached to the request.
- Google sends the authorization code to your token exchange endpoint, which verifies the authenticity of the code and returns an access token and a refresh token. The access token is a short-lived token that your service accepts as credentials to access APIs. The refresh token is a long-lived token that Google can store and use to acquire new access tokens when they expire.
- After the user has completed the account linking flow, every subsequent request sent from Google contains an access token.
Implementation Recipe
Follow these steps to implement the Authorization Code flow.
Step 1: Handle authorization requests
When Google initiates account linking, it redirects the user to your authorization endpoint. For detailed protocol contracts and parameter requirements, see the Authorization Endpoint.
To handle the request, perform the following actions:
Validate the request:
- Confirm that the
client_idmatches the Client ID assigned to Google. - Confirm that the
redirect_urimatches the expected Google redirect URL:none https://oauth-redirect.googleusercontent.com/r/YOUR_PROJECT_ID https://oauth-redirect-sandbox.googleusercontent.com/r/YOUR_PROJECT_ID - Verify that
response_typeiscode.
- Confirm that the
Authenticate the user:
- Check if the user is signed in to your service.
- If the user is not signed in, prompt them to complete your sign-in or sign-up flow.
Generate authorization code:
- Create a unique, non-guessable authorization code associated with the user and client.
- Set the code to expire in approximately 10 minutes.
Redirect back to Google:
- Redirect the browser to the URL provided in
redirect_uri. - Append the following query parameters:
code: The authorization code you generated.state: The unmodified state value received from Google.
- Redirect the browser to the URL provided in
Step 2: Handle token exchange requests
Your token exchange endpoint processes two types of requests: exchanging codes for tokens, and refreshing expired access tokens. For detailed protocol contracts and parameter requirements, see the Token Exchange Endpoint.
A. Exchange authorization codes for tokens
When Google receives the authorization code, it calls your token exchange endpoint (POST) to retrieve tokens.
Validate the request:
- Verify
client_idandclient_secret. - Verify the authorization code is valid and not expired.
- Confirm
redirect_urimatches the value used in Step 1. - If validation fails, return an HTTP
400 Bad Requestwith{"error": "invalid_grant"}.
- Verify
Issue tokens:
- Generate a long-lived
refresh_tokenand a short-livedaccess_token(typically 1 hour). - Return an HTTP
200 OKwith the standard JSON token response.
- Generate a long-lived
B. Refresh access tokens
When the access token expires, Google requests a new one using the refresh token.
Validate the request:
- Verify
client_id,client_secret, andrefresh_token. - If validation fails, return an HTTP
400 Bad Requestwith{"error": "invalid_grant"}.
- Verify
Issue new access token:
- Generate a new short-lived
access_token. - Return an HTTP
200 OKwith the JSON token response (optionally including a new refresh token).
- Generate a new short-lived
Gestire le richieste di informazioni utente
L'endpoint userinfo è una risorsa protetta da OAuth 2.0 che restituisce attestazioni sull'utente collegato. L'implementazione e l'hosting dell'endpoint userinfo sono facoltative, ad eccezione dei seguenti casi d'uso:
- Accesso a un account collegato con Google One Tap.
- Abbonamento senza problemi su AndroidTV.
Dopo che il token di accesso è stato recuperato correttamente dall'endpoint del token, Google invia una richiesta all'endpoint userinfo per recuperare le informazioni di base del profilo dell'utente collegato.
| intestazioni delle richieste endpoint userinfo | |
|---|---|
Authorization header |
Il token di accesso di tipo Bearer. |
Ad esempio, se l'endpoint userinfo è disponibile su
https://myservice.example.com/userinfo, una richiesta potrebbe avere il seguente aspetto:
GET /userinfo HTTP/1.1
Host: myservice.example.com
Authorization: Bearer ACCESS_TOKEN
Affinché l'endpoint userinfo possa gestire le richieste, segui questi passaggi:
- Estrai il token di accesso dall'intestazione Autorizzazione e restituisci le informazioni per l'utente associato al token di accesso.
- Se il token di accesso non è valido, restituisce un errore HTTP 401 Autorizzazione non autorizzata utilizzando l'intestazione della risposta
WWW-Authenticate. Di seguito è riportato un esempio di risposta di errore userinfo:HTTP/1.1 401 Unauthorized WWW-Authenticate: error="invalid_token", error_description="The Access Token expired"
Se il token di accesso è valido, restituisce e invia una risposta HTTP 200 con il seguente oggetto JSON nel corpo dell'HTTPS risposta:
{ "sub": "USER_UUID", "email": "EMAIL_ADDRESS", "given_name": "FIRST_NAME", "family_name": "LAST_NAME", "name": "FULL_NAME", "picture": "PROFILE_PICTURE", }risposta endpoint userinfo subUn ID univoco che identifica l'utente nel sistema. emailIndirizzo email dell'utente. given_nameFacoltativo:nome dell'utente. family_nameFacoltativo:il cognome dell'utente. nameFacoltativo:nome completo dell'utente. picture(Facoltativo) Immagine del profilo dell'utente.
Convalidare l'implementazione
You can validate your implementation by using the OAuth 2.0 Playground tool.
In the tool, do the following steps:
- Click Configuration to open the OAuth 2.0 Configuration window.
- In the OAuth flow field, select Client-side.
- In the OAuth Endpoints field, select Custom.
- Specify your OAuth 2.0 endpoint and the client ID you assigned to Google in the corresponding fields.
- In the Step 1 section, don't select any Google scopes. Instead, leave this field blank or type a scope valid for your server (or an arbitrary string if you don't use OAuth scopes). When you're done, click Authorize APIs.
- In the Step 2 and Step 3 sections, go through the OAuth 2.0 flow and verify that each step works as intended.
You can validate your implementation by using the Google Account Linking Demo tool.
In the tool, do the following steps:
- Click the Sign in with Google button.
- Choose the account you'd like to link.
- Enter the service ID.
- Optionally enter one or more scopes that you will request access for.
- Click Start Demo.
- When prompted, confirm that you may consent and deny the linking request.
- Confirm that you are redirected to your platform.