Các tài khoản được liên kết bằng quy trình mã uỷ quyền OAuth 2.0 theo tiêu chuẩn ngành.
OAuth 2.1 và PKCE cho nhân viên hỗ trợ
Đối với các tác nhân AI không trạng thái và quy trình đa phương thức, bạn nên thực thi OAuth 2.1.
- PKCE (Khoá bằng chứng để trao đổi mã): Phải được dùng để bảo mật quy trình sử dụng mã uỷ quyền, ngăn chặn các cuộc tấn công chặn.
- Không có luồng cấp quyền trực tiếp: Luồng cấp quyền trực tiếp cho phép hiển thị mã truy cập trong URL, đây là một rủi ro bảo mật đối với môi trường tác nhân.
Dịch vụ của bạn phải hỗ trợ các điểm cuối uỷ quyền và trao đổi mã thông báo tuân thủ OAuth 2.0/2.1.
Tạo dự án
Cách tạo dự án để sử dụng tính năng liên kết tài khoản:
- Chuyển đến Google API Console.
- Nhấp vào Tạo dự án.
- Nhập tên hoặc chấp nhận tên được đề xuất.
- Xác nhận hoặc chỉnh sửa mọi trường còn lại.
- Nhấp vào Tạo.
Cách xem mã dự án:
- Chuyển đến Google API Console.
- Tìm dự án của bạn trong bảng trên trang đích. Mã dự án xuất hiện trong cột Mã.
Định cấu hình màn hình xin phép bằng OAuth
Quy trình liên kết Tài khoản Google bao gồm một màn hình xin phép cho người dùng biết ứng dụng đang yêu cầu quyền truy cập vào dữ liệu của họ, loại dữ liệu mà ứng dụng đang yêu cầu và các điều khoản áp dụng. Bạn cần định cấu hình màn hình xin phép bằng OAuth trước khi tạo mã ứng dụng khách Google API.
- Mở trang màn hình xin phép bằng OAuth của Google API Console.
- Nếu được nhắc, hãy chọn dự án mà bạn vừa tạo.
Trên trang "Màn hình xin phép bằng OAuth", hãy điền thông tin vào biểu mẫu rồi nhấp vào nút “Lưu”.
Tên ứng dụng: Tên của ứng dụng yêu cầu sự đồng ý. Tên này phải phản ánh chính xác ứng dụng của bạn và nhất quán với tên ứng dụng mà người dùng thấy ở những nơi khác. Tên ứng dụng sẽ xuất hiện trên màn hình xin phép Liên kết tài khoản.
Biểu trưng ứng dụng: Một hình ảnh trên màn hình xin phép sẽ giúp người dùng nhận ra ứng dụng của bạn. Biểu trưng này xuất hiện trên màn hình xin phép liên kết tài khoản và trên phần cài đặt tài khoản
Email hỗ trợ: Để người dùng liên hệ với bạn khi có thắc mắc về sự đồng ý của họ.
Phạm vi cho các API của Google: Phạm vi cho phép ứng dụng của bạn truy cập vào dữ liệu Google riêng tư của người dùng. Đối với trường hợp sử dụng liên kết Tài khoản Google, phạm vi mặc định (email, hồ sơ, OpenID) là đủ, bạn không cần thêm bất kỳ phạm vi nhạy cảm nào. Thông thường, bạn nên yêu cầu các phạm vi theo từng bước, tại thời điểm cần có quyền truy cập, thay vì yêu cầu trước. Tìm hiểu thêm.
Miền được uỷ quyền: Để bảo vệ bạn và người dùng, Google chỉ cho phép những ứng dụng xác thực bằng OAuth sử dụng Miền được uỷ quyền. Đường liên kết đến các ứng dụng của bạn phải được lưu trữ trên Miền được uỷ quyền. Tìm hiểu thêm.
Đường liên kết đến trang chủ của ứng dụng: Trang chủ của ứng dụng. Phải được lưu trữ trên một Miền được uỷ quyền.
Đường liên kết đến Chính sách quyền riêng tư của ứng dụng: Xuất hiện trên màn hình xin phép Liên kết với Tài khoản Google. Phải được lưu trữ trên một Miền được uỷ quyền.
Đường liên kết đến Điều khoản dịch vụ của ứng dụng (Không bắt buộc): Phải được lưu trữ trên một Miền được uỷ quyền.
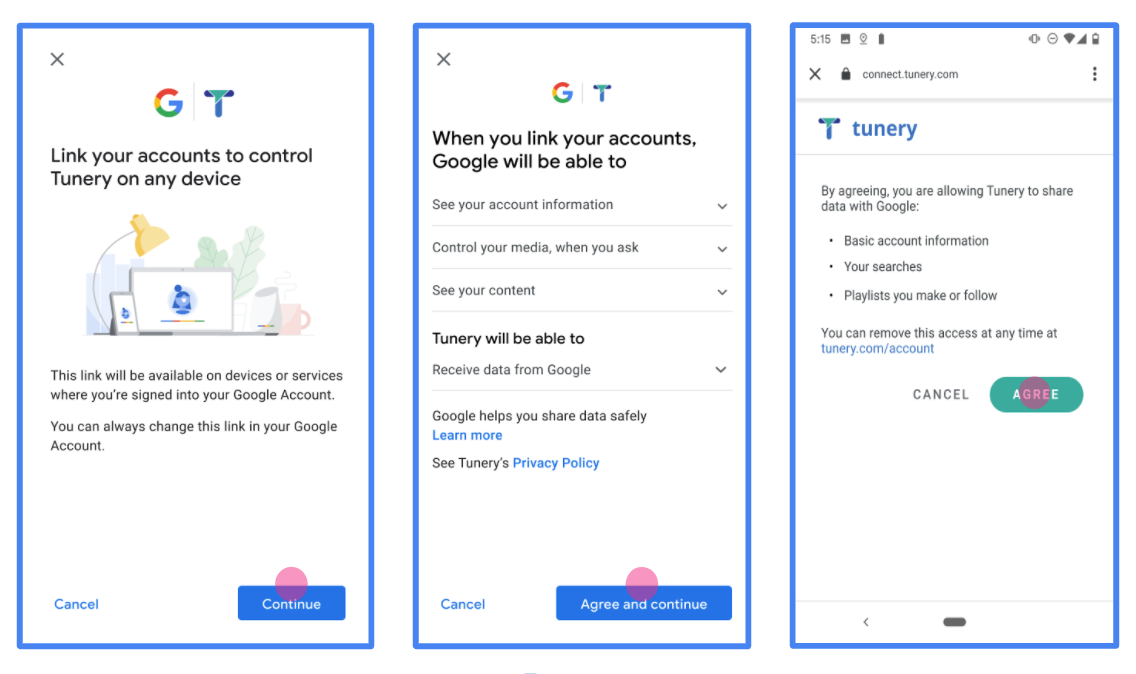
Hình 1 Màn hình đồng ý liên kết Tài khoản Google cho một Ứng dụng giả định, Tunery
Kiểm tra "Trạng thái xác minh". Nếu ứng dụng của bạn cần xác minh, hãy nhấp vào nút "Gửi để xác minh" để gửi ứng dụng của bạn đi xác minh. Hãy tham khảo các yêu cầu xác minh OAuth để biết thông tin chi tiết.
Triển khai máy chủ OAuth
Việc triển khai máy chủ OAuth 2.0 của quy trình mã uỷ quyền bao gồm 2 điểm cuối mà dịch vụ của bạn cung cấp bằng HTTPS. Điểm cuối đầu tiên là điểm cuối uỷ quyền, chịu trách nhiệm tìm hoặc lấy sự đồng ý của người dùng để truy cập vào dữ liệu. Điểm cuối uỷ quyền trình bày một giao diện người dùng đăng nhập cho những người dùng chưa đăng nhập và ghi lại sự đồng ý đối với quyền truy cập được yêu cầu. Điểm cuối thứ hai là điểm cuối trao đổi mã thông báo. Điểm cuối này được dùng để lấy các chuỗi được mã hoá (gọi là mã thông báo) cho phép người dùng truy cập vào dịch vụ của bạn.
Khi một ứng dụng của Google cần gọi một trong các API của dịch vụ, Google sẽ sử dụng các điểm cuối này cùng nhau để được người dùng của bạn cho phép gọi các API này thay cho họ.
Liên kết Tài khoản Google: Quy trình sử dụng mã uỷ quyền OAuth
Sơ đồ trình tự sau đây trình bày chi tiết các hoạt động tương tác giữa Người dùng, Google và các điểm cuối của dịch vụ.
Vai trò và trách nhiệm
Bảng sau đây xác định vai trò và trách nhiệm của các bên trong quy trình OAuth liên kết Tài khoản Google (GAL). Xin lưu ý rằng trong GAL, Google đóng vai trò là Ứng dụng OAuth, trong khi dịch vụ của bạn đóng vai trò là Nhà cung cấp danh tính/dịch vụ.
| Người thực hiện / Thành phần | Vai trò GAL | Yêu cầu của công việc |
|---|---|---|
| Ứng dụng / Máy chủ của Google | Ứng dụng OAuth | Khởi tạo quy trình, nhận mã uỷ quyền, trao đổi mã này để lấy mã thông báo và lưu trữ mã thông báo một cách an toàn để truy cập vào các API của dịch vụ. |
| Điểm cuối uỷ quyền của bạn | Máy chủ uỷ quyền | Xác thực người dùng và nhận được sự đồng ý của họ để chia sẻ quyền truy cập vào dữ liệu của họ với Google. |
| Điểm cuối trao đổi mã thông báo | Máy chủ uỷ quyền | Xác thực mã uỷ quyền và mã làm mới, đồng thời cấp mã truy cập cho Máy chủ của Google. |
| URI chuyển hướng của Google | Điểm cuối gọi lại | Nhận lệnh chuyển hướng người dùng từ dịch vụ uỷ quyền của bạn bằng các giá trị code và state. |
Một phiên quy trình sử dụng mã uỷ quyền OAuth 2.0 do Google khởi tạo có quy trình như sau:
- Google sẽ mở điểm cuối uỷ quyền của bạn trong trình duyệt của người dùng. Nếu quy trình bắt đầu trên một thiết bị chỉ có giọng nói cho một Thao tác, thì Google sẽ chuyển việc thực thi sang điện thoại.
- Người dùng đăng nhập (nếu chưa đăng nhập) và cấp cho Google quyền truy cập vào dữ liệu của họ bằng API của bạn (nếu họ chưa cấp quyền).
- Dịch vụ của bạn tạo một mã uỷ quyền và trả mã đó về cho Google. Để làm như vậy, hãy chuyển hướng trình duyệt của người dùng trở lại Google bằng mã uỷ quyền được đính kèm vào yêu cầu.
- Google gửi mã uỷ quyền đến điểm cuối trao đổi mã thông báo của bạn. Điểm cuối này xác minh tính xác thực của mã và trả về một mã truy cập và một mã làm mới. Mã truy cập là một mã ngắn hạn mà dịch vụ của bạn chấp nhận làm thông tin đăng nhập để truy cập vào các API. Mã làm mới là một mã thông báo có thời hạn sử dụng dài mà Google có thể lưu trữ và sử dụng để lấy mã truy cập mới khi mã truy cập hết hạn.
- Sau khi người dùng hoàn tất quy trình liên kết tài khoản, mọi yêu cầu tiếp theo được gửi từ Google đều chứa mã truy cập.
Công thức triển khai
Hãy làm theo các bước sau để triển khai quy trình Mã uỷ quyền.
Bước 1: Xử lý yêu cầu uỷ quyền
Khi Google bắt đầu liên kết tài khoản, Google sẽ chuyển hướng người dùng đến điểm cuối uỷ quyền của bạn. Để biết các hợp đồng giao thức và yêu cầu về tham số chi tiết, hãy xem Điểm cuối uỷ quyền.
Để xử lý yêu cầu, hãy thực hiện các thao tác sau:
Xác thực yêu cầu:
- Xác nhận rằng
client_idkhớp với Mã ứng dụng khách được chỉ định cho Google. - Xác nhận rằng
redirect_urikhớp với URL chuyển hướng dự kiến của Google:none https://oauth-redirect.googleusercontent.com/r/YOUR_PROJECT_ID https://oauth-redirect-sandbox.googleusercontent.com/r/YOUR_PROJECT_ID - Xác minh rằng
response_typelàcode.
- Xác nhận rằng
Xác thực người dùng:
- Kiểm tra xem người dùng đã đăng nhập vào dịch vụ của bạn hay chưa.
- Nếu người dùng chưa đăng nhập, hãy nhắc họ hoàn tất quy trình đăng nhập hoặc đăng ký của bạn.
Tạo mã uỷ quyền:
- Tạo một mã uỷ quyền duy nhất, không đoán được, được liên kết với người dùng và ứng dụng.
- Đặt thời gian hết hạn của mã là khoảng 10 phút.
Chuyển hướng trở lại Google:
- Chuyển hướng trình duyệt đến URL được cung cấp trong
redirect_uri. - Thêm các tham số truy vấn sau:
code: Mã uỷ quyền mà bạn đã tạo.state: Giá trị trạng thái chưa được sửa đổi nhận được từ Google.
- Chuyển hướng trình duyệt đến URL được cung cấp trong
Bước 2: Xử lý yêu cầu trao đổi mã thông báo
Điểm cuối trao đổi mã thông báo của bạn xử lý hai loại yêu cầu: trao đổi mã để lấy mã thông báo và làm mới mã truy cập đã hết hạn. Để biết các hợp đồng giao thức và yêu cầu về tham số chi tiết, hãy xem Điểm cuối trao đổi mã thông báo.
A. Đổi mã uỷ quyền lấy mã thông báo
Khi nhận được mã uỷ quyền, Google sẽ gọi điểm cuối trao đổi mã thông báo của bạn (POST) để truy xuất mã thông báo.
Xác thực yêu cầu:
- Xác minh
client_idvàclient_secret. - Xác minh rằng mã uỷ quyền còn hiệu lực và chưa hết hạn.
- Xác nhận rằng
redirect_urikhớp với giá trị được dùng ở Bước 1. - Nếu xác thực không thành công, hãy trả về một HTTP
400 Bad Requestcó{"error": "invalid_grant"}.
- Xác minh
Phát hành mã thông báo:
- Tạo một
refresh_tokencó thời gian tồn tại lâu dài và mộtaccess_tokencó thời gian tồn tại ngắn (thường là 1 giờ). - Trả về một
200 OKHTTP với phản hồi mã thông báo JSON tiêu chuẩn.
- Tạo một
B. Làm mới mã truy cập
Khi mã truy cập hết hạn, Google sẽ yêu cầu một mã mới bằng mã làm mới.
Xác thực yêu cầu:
- Xác minh
client_id,client_secretvàrefresh_token. - Nếu xác thực không thành công, hãy trả về một HTTP
400 Bad Requestcó{"error": "invalid_grant"}.
- Xác minh
Phát hành mã truy cập mới:
- Tạo một
access_tokencó thời hạn ngắn mới. - Trả về một
200 OKHTTP với phản hồi mã thông báo JSON (bạn có thể thêm mã làm mới mới).
- Tạo một
Xử lý các yêu cầu thông tin người dùng
Điểm cuối userinfo là một tài nguyên được bảo vệ bằng OAuth 2.0. Tài nguyên này trả về các thông báo xác nhận quyền sở hữu về người dùng được liên kết. Việc triển khai và lưu trữ điểm cuối userinfo là không bắt buộc, ngoại trừ các trường hợp sử dụng sau:
- Đăng nhập vào tài khoản được liên kết bằng tính năng Google One Chạm.
- Gói thuê bao dễ dàng trên Android TV.
Sau khi đã truy xuất thành công mã truy cập từ điểm cuối của mã thông báo, Google sẽ gửi yêu cầu đến điểm cuối userinfo của bạn để truy xuất thông tin hồ sơ cơ bản về người dùng được liên kết.
| tiêu đề của yêu cầu điểm cuối userinfo | |
|---|---|
Authorization header |
Mã truy cập thuộc loại Bearer. |
Ví dụ: nếu điểm cuối userinfo của bạn có sẵn tại
https://myservice.example.com/userinfo, một yêu cầu có thể có dạng như sau:
GET /userinfo HTTP/1.1
Host: myservice.example.com
Authorization: Bearer ACCESS_TOKEN
Để điểm cuối userinfo xử lý các yêu cầu, hãy làm theo các bước sau:
- Trích xuất mã truy cập từ tiêu đề Uỷ quyền và trả về thông tin cho người dùng được liên kết với mã truy cập.
- Nếu mã truy cập không hợp lệ, hãy trả về lỗi HTTP 401 unauthorized (Không được phép sử dụng tiêu đề phản hồi
WWW-Authenticate). Dưới đây là ví dụ về phản hồi khi xảy ra lỗi thông tin người dùng:HTTP/1.1 401 Unauthorized WWW-Authenticate: error="invalid_token", error_description="The Access Token expired"
Nếu mã truy cập hợp lệ, hãy trả về và phản hồi HTTP 200 kèm theo đối tượng JSON sau trong phần nội dung của HTTPS trả lời:
{ "sub": "USER_UUID", "email": "EMAIL_ADDRESS", "given_name": "FIRST_NAME", "family_name": "LAST_NAME", "name": "FULL_NAME", "picture": "PROFILE_PICTURE", }phản hồi của thiết bị đầu cuối userinfo subMã nhận dạng duy nhất giúp nhận dạng người dùng trong hệ thống của bạn. emailĐịa chỉ email của người dùng. given_nameKhông bắt buộc: Tên của người dùng. family_nameKhông bắt buộc: Họ của người dùng. nameKhông bắt buộc: Tên đầy đủ của người dùng. pictureKhông bắt buộc: Ảnh hồ sơ của người dùng.
Xác thực quá trình triển khai
Bạn có thể xác thực việc triển khai bằng cách sử dụng công cụ OAuth 2.0 Playground.
Trong công cụ này, hãy thực hiện các bước sau:
- Nhấp vào Configuration để mở cửa sổ OAuth 2.0 Configuration (Cấu hình OAuth 2.0).
- Trong trường OAuth flow (Quy trình OAuth), hãy chọn Client-side (Phía máy khách).
- Trong trường OAuth Endpoints (Điểm cuối OAuth), hãy chọn Custom (Tuỳ chỉnh).
- Chỉ định điểm cuối OAuth 2.0 và mã ứng dụng khách mà bạn đã chỉ định cho Google trong các trường tương ứng.
- Trong phần Step 1 (Bước 1), đừng chọn phạm vi nào của Google. Thay vào đó, hãy để trống trường này hoặc nhập một phạm vi hợp lệ cho máy chủ của bạn (hoặc một chuỗi tuỳ ý nếu bạn không sử dụng phạm vi OAuth). Khi hoàn tất, hãy nhấp vào Authorize APIs (Cấp quyền cho API).
- Trong phần Step 2 (Bước 2) và Step 3 (Bước 3), hãy thực hiện quy trình OAuth 2.0 và xác minh rằng mỗi bước đều hoạt động như dự kiến.
Bạn có thể xác thực việc triển khai bằng cách sử dụng công cụ Google Account Linking Demo.
Trong công cụ này, hãy thực hiện các bước sau:
- Nhấp vào nút Sign in with Google (Đăng nhập bằng Google).
- Chọn tài khoản mà bạn muốn liên kết.
- Nhập mã dịch vụ.
- Bạn có thể nhập một hoặc nhiều phạm vi mà bạn sẽ yêu cầu quyền truy cập.
- Nhấp vào Start Demo (Bắt đầu bản minh hoạ).
- Khi được nhắc, hãy xác nhận rằng bạn có thể đồng ý và từ chối yêu cầu liên kết.
- Xác nhận rằng bạn được chuyển hướng đến nền tảng của mình.