ระบบจะลิงก์บัญชีโดยใช้ขั้นตอน รหัสการให้สิทธิ์ OAuth 2.0 ซึ่งเป็นมาตรฐานอุตสาหกรรม
OAuth 2.1 และ PKCE สำหรับ Agent
เราขอแนะนำให้บังคับใช้ OAuth 2.1 สำหรับ AI Agent แบบไม่เก็บสถานะและไปป์ไลน์แบบมัลติโมดัล
- PKCE (Proof Key for Code Exchange): ต้องใช้เพื่อรักษาความปลอดภัย ขั้นตอนรหัสการให้สิทธิ์ ซึ่งจะป้องกันการโจมตีแบบดักรับ
- ไม่มีขั้นตอนการให้สิทธิ์โดยนัย: ขั้นตอนการให้สิทธิ์โดยนัยจะเปิดเผยโทเค็นเพื่อการเข้าถึงใน URL, ซึ่งเป็นความเสี่ยงด้านความปลอดภัยสำหรับสภาพแวดล้อมของ Agent
บริการของคุณต้องรองรับปลายทาง การให้สิทธิ์ และ การแลกเปลี่ยนโทเค็น ที่เป็นไปตามข้อกำหนด OAuth 2.0/2.1
Create the project
To create your project to use account linking:
- Go to the Google API Console.
- Click Create project.
- Enter a name or accept the generated suggestion.
- Confirm or edit any remaining fields.
- Click Create.
To view your project ID:
- Go to the Google API Console.
- Find your project in the table on the landing page. The project ID appears in the ID column.
Configure your OAuth Consent Screen
The Google Account Linking process includes a consent screen which tells users the application requesting access to their data, what kind of data they are asking for and the terms that apply. You will need to configure your OAuth consent screen before generating a Google API client ID.
- Open the OAuth consent screen page of the Google APIs console.
- If prompted, select the project you just created.
On the "OAuth consent screen" page, fill out the form and click the “Save” button.
Application name: The name of the application asking for consent. The name should accurately reflect your application and be consistent with the application name users see elsewhere. The application name will be shown on the Account Linking consent screen.
Application logo: An image on the consent screen that will help users recognize your app. The logo is shown on Account linking consent screen and on account settings
Support email: For users to contact you with questions about their consent.
Scopes for Google APIs: Scopes allow your application to access your user's private Google data. For the Google Account Linking use case, default scope (email, profile, openid) is sufficient, you don’t need to add any sensitive scopes. It is generally a best practice to request scopes incrementally, at the time access is required, rather than up front. Learn more.
Authorized domains: To protect you and your users, Google only allows applications that authenticate using OAuth to use Authorized Domains. Your applications' links must be hosted on Authorized Domains. Learn more.
Application Homepage link: Home page for your application. Must be hosted on an Authorized Domain.
Application Privacy Policy link: Shown on Google Account Linking consent screen. Must be hosted on an Authorized Domain.
Application Terms of Service link (Optional): Must be hosted on an Authorized Domain.
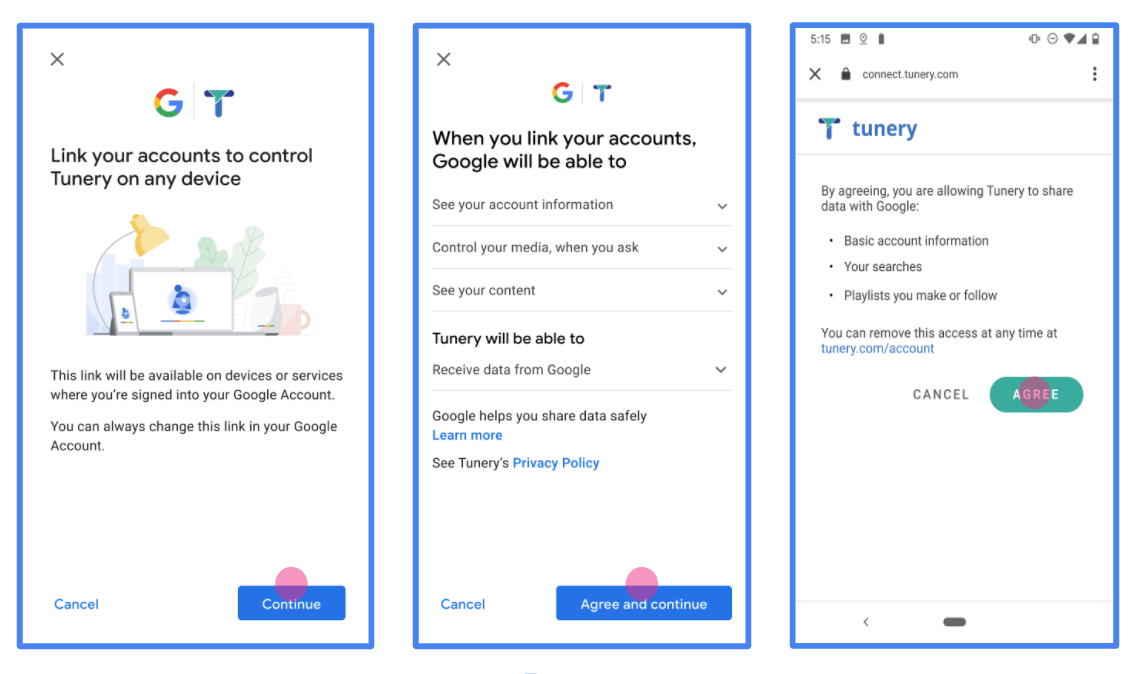
Figure 1. Google Account Linking Consent Screen for a fictitious Application, Tunery
Check "Verification Status", if your application needs verification then click the "Submit For Verification" button to submit your application for verification. Refer to OAuth verification requirements for details.
ติดตั้งใช้งานเซิร์ฟเวอร์ OAuth
An OAuth 2.0 server implementation of the authorization code flow consists of two endpoints, which your service makes available by HTTPS. The first endpoint is the authorization endpoint, which is responsible for finding or obtaining consent from users for data access. The authorization endpoint presents a sign-in UI to your users that aren't already signed in and records consent to the requested access. The second endpoint is the token exchange endpoint, which is used to obtain encrypted strings, called tokens, that authorize a user to access your service.
When a Google application needs to call one of your service's APIs, Google uses these endpoints together to get permission from your users to call these APIs on their behalf.
Google Account Linking: OAuth Authorization Code Flow
The following sequence diagram details interactions between the User, Google, and your service's endpoints.
Roles and responsibilities
The following table defines the roles and responsibilities of the actors in the Google Account Linking (GAL) OAuth flow. Note that in GAL, Google acts as the OAuth Client, while your service acts as the Identity/Service Provider.
| Actor / Component | GAL Role | Responsibilities |
|---|---|---|
| Google App / Server | OAuth Client | Initiates the flow, receives the authorization code, exchanges it for tokens, and securely stores them to access your service's APIs. |
| Your Authorization Endpoint | Authorization Server | Authenticates your users and obtains their consent to share access to their data with Google. |
| Your Token Exchange Endpoint | Authorization Server | Validates authorization codes and refresh tokens, and issues access tokens to the Google Server. |
| Google Redirect URI | Callback Endpoint | Receives the user redirect from your authorization service with the
code and state values. |
An OAuth 2.0 authorization code flow session initiated by Google has the following flow:
- Google opens your authorization endpoint in the user's browser. If the flow started on a voice-only device for an Action, Google transfers the execution to a phone.
- The user signs in, if not signed in already, and grants Google permission to access their data with your API, if they haven't already granted permission.
- Your service creates an authorization code and returns it to Google. To do so, redirect the user's browser back to Google with the authorization code attached to the request.
- Google sends the authorization code to your token exchange endpoint, which verifies the authenticity of the code and returns an access token and a refresh token. The access token is a short-lived token that your service accepts as credentials to access APIs. The refresh token is a long-lived token that Google can store and use to acquire new access tokens when they expire.
- After the user has completed the account linking flow, every subsequent request sent from Google contains an access token.
Implementation Recipe
Follow these steps to implement the Authorization Code flow.
Step 1: Handle authorization requests
When Google initiates account linking, it redirects the user to your authorization endpoint. For detailed protocol contracts and parameter requirements, see the Authorization Endpoint.
To handle the request, perform the following actions:
Validate the request:
- Confirm that the
client_idmatches the Client ID assigned to Google. - Confirm that the
redirect_urimatches the expected Google redirect URL:none https://oauth-redirect.googleusercontent.com/r/YOUR_PROJECT_ID https://oauth-redirect-sandbox.googleusercontent.com/r/YOUR_PROJECT_ID - Verify that
response_typeiscode.
- Confirm that the
Authenticate the user:
- Check if the user is signed in to your service.
- If the user is not signed in, prompt them to complete your sign-in or sign-up flow.
Generate authorization code:
- Create a unique, non-guessable authorization code associated with the user and client.
- Set the code to expire in approximately 10 minutes.
Redirect back to Google:
- Redirect the browser to the URL provided in
redirect_uri. - Append the following query parameters:
code: The authorization code you generated.state: The unmodified state value received from Google.
- Redirect the browser to the URL provided in
Step 2: Handle token exchange requests
Your token exchange endpoint processes two types of requests: exchanging codes for tokens, and refreshing expired access tokens. For detailed protocol contracts and parameter requirements, see the Token Exchange Endpoint.
A. Exchange authorization codes for tokens
When Google receives the authorization code, it calls your token exchange endpoint (POST) to retrieve tokens.
Validate the request:
- Verify
client_idandclient_secret. - Verify the authorization code is valid and not expired.
- Confirm
redirect_urimatches the value used in Step 1. - If validation fails, return an HTTP
400 Bad Requestwith{"error": "invalid_grant"}.
- Verify
Issue tokens:
- Generate a long-lived
refresh_tokenand a short-livedaccess_token(typically 1 hour). - Return an HTTP
200 OKwith the standard JSON token response.
- Generate a long-lived
B. Refresh access tokens
When the access token expires, Google requests a new one using the refresh token.
Validate the request:
- Verify
client_id,client_secret, andrefresh_token. - If validation fails, return an HTTP
400 Bad Requestwith{"error": "invalid_grant"}.
- Verify
Issue new access token:
- Generate a new short-lived
access_token. - Return an HTTP
200 OKwith the JSON token response (optionally including a new refresh token).
- Generate a new short-lived
จัดการคำขอ Userinfo
ปลายทาง userinfo เป็นทรัพยากรที่มีการป้องกันด้วย OAuth 2.0 ซึ่งส่งกลับการอ้างสิทธิ์เกี่ยวกับผู้ใช้ที่ลิงก์ การติดตั้งใช้งานและการโฮสต์ปลายทาง userinfo เป็นตัวเลือกที่ไม่บังคับ ยกเว้นกรณีการใช้งานต่อไปนี้
- ลงชื่อเข้าใช้บัญชีที่ลิงก์ด้วย Google One Tap
- การติดตามที่ราบรื่นบน AndroidTV
หลังจากเรียกโทเค็นเพื่อการเข้าถึงจากปลายทางของโทเค็นเรียบร้อยแล้ว Google จะส่งคำขอไปยังปลายทาง userinfo เพื่อดึงข้อมูลโปรไฟล์พื้นฐานเกี่ยวกับผู้ใช้ที่ลิงก์
| ส่วนหัวของคำขอปลายทางของ userinfo | |
|---|---|
Authorization header |
โทเค็นเพื่อการเข้าถึงของประเภท Bearer |
ตัวอย่างเช่น หากปลายทาง userinfo พร้อมใช้งานที่
https://myservice.example.com/userinfo คำขออาจมีลักษณะดังต่อไปนี้
GET /userinfo HTTP/1.1
Host: myservice.example.com
Authorization: Bearer ACCESS_TOKEN
หากต้องการให้ปลายทาง userinfo จัดการคำขอ ให้ทำตามขั้นตอนต่อไปนี้
- แยกโทเค็นเพื่อการเข้าถึงจากส่วนหัวการให้สิทธิ์ แล้วแสดงผลข้อมูลสำหรับผู้ใช้ที่เชื่อมโยงกับโทเค็นเพื่อการเข้าถึง
- หากโทเค็นเพื่อการเข้าถึงไม่ถูกต้อง ให้แสดงข้อผิดพลาด HTTP 401 Unauthorized ด้วยการใช้ส่วนหัวการตอบกลับ
WWW-Authenticateตัวอย่างการตอบกลับข้อผิดพลาดเกี่ยวกับ Userinfo มีดังนี้HTTP/1.1 401 Unauthorized WWW-Authenticate: error="invalid_token", error_description="The Access Token expired"
หากโทเค็นเพื่อการเข้าถึงถูกต้อง ให้แสดงผลและการตอบสนอง HTTP 200 ด้วยออบเจ็กต์ JSON ต่อไปนี้ในเนื้อหาของ HTTPS การตอบกลับ:
{ "sub": "USER_UUID", "email": "EMAIL_ADDRESS", "given_name": "FIRST_NAME", "family_name": "LAST_NAME", "name": "FULL_NAME", "picture": "PROFILE_PICTURE", }การตอบสนองของปลายทาง userinfo subรหัสที่ไม่ซ้ำกันที่ระบุผู้ใช้ในระบบ emailอีเมลของผู้ใช้ given_nameไม่บังคับ: ชื่อของผู้ใช้ family_nameไม่บังคับ: นามสกุลของผู้ใช้ nameไม่บังคับ: ชื่อเต็มของผู้ใช้ pictureไม่บังคับ: รูปโปรไฟล์ของผู้ใช้
การตรวจสอบการติดตั้งใช้งาน
คุณสามารถตรวจสอบการติดตั้งใช้งานได้โดยใช้เครื่องมือ OAuth 2.0 Playground
ในเครื่องมือ ให้ทำตามขั้นตอนต่อไปนี้
- คลิกการกำหนดค่า เพื่อเปิดหน้าต่างการกำหนดค่า OAuth 2.0
- ในช่องโฟลว์ OAuth ให้เลือกฝั่งไคลเอ็นต์
- ในช่องปลายทาง OAuth ให้เลือกกำหนดเอง
- ระบุปลายทาง OAuth 2.0 และรหัสไคลเอ็นต์ที่คุณกำหนดให้กับ Google ในช่องที่เกี่ยวข้อง
- ในส่วนขั้นตอนที่ 1 ไม่ต้องเลือกขอบเขตของ Google แต่ให้เว้นช่องนี้ว่างไว้หรือพิมพ์ขอบเขตที่ใช้ได้กับเซิร์ฟเวอร์ (หรือสตริงที่กำหนดเองหากคุณไม่ได้ใช้ขอบเขต OAuth) เมื่อเสร็จแล้ว ให้คลิกให้สิทธิ์ API
- ในส่วนขั้นตอนที่ 2 และขั้นตอนที่ 3 ให้ทำตามโฟลว์ OAuth 2.0 และตรวจสอบว่าแต่ละขั้นตอนทำงานตามที่ตั้งใจไว้
คุณสามารถตรวจสอบการติดตั้งใช้งานได้โดยใช้เครื่องมือสาธิตการลิงก์บัญชี Google
ในเครื่องมือ ให้ทำตามขั้นตอนต่อไปนี้
- คลิกปุ่มลงชื่อเข้าใช้ด้วย Google
- เลือกบัญชีที่ต้องการลิงก์
- ป้อนรหัสบริการ
- ป้อนขอบเขตอย่างน้อย 1 รายการที่คุณจะขอสิทธิ์เข้าถึง (ไม่บังคับ)
- คลิกเริ่มการสาธิต
- เมื่อได้รับข้อความแจ้ง ให้ยืนยันว่าคุณอาจให้ความยินยอมและปฏิเสธคำขอลิงก์
- ยืนยันว่าระบบจะนำคุณไปยังแพลตฟอร์มของคุณ