Konta są połączone za pomocą standardowych w branży przepływów OAuth 2.0 niejawnego i kodu autoryzacji.
Twoja usługa musi obsługiwać zgodne z OAuth 2.0 punkty końcowe autoryzacji i wymiany tokenów.
W przepływie niejawnym Google otwiera punkt końcowy autoryzacji w przeglądarce użytkownika. Po zalogowaniu się zwracasz do Google długoterminowy token dostępu. Ten token dostępu jest teraz dołączany do każdego żądania wysyłanego z Google.
W przypadku przepływu kodu autoryzacji potrzebujesz 2 punktów końcowych:
Punkt końcowy autoryzacji, który wyświetla interfejs logowania użytkownikom, którzy nie są jeszcze zalogowani. Punkt autoryzacji tworzy też krótkotrwały kod autoryzacji, aby rejestrować zgodę użytkowników na żądany dostęp.
Punkt końcowy wymiany tokenów, który odpowiada za 2 rodzaje wymian:
- Wymienia kod autoryzacji na długoterminowy token odświeżania i krótkoterminowy token dostępu. Wymiana następuje, gdy użytkownik przechodzi proces łączenia kont.
- Wymienia długotrwały token odświeżania na krótkotrwały token dostępu. Ta wymiana następuje, gdy Google potrzebuje nowego tokena dostępu, ponieważ poprzedni wygasł.
Wybieranie przepływu OAuth 2.0
Chociaż przepływ niejawny jest prostszy do wdrożenia, Google zaleca, aby tokeny dostępu wydawane w ramach tego przepływu nigdy nie wygasały. Dzieje się tak, ponieważ po wygaśnięciu tokena użytkownik musi ponownie połączyć konto z aplikacją w ramach przepływu niejawnego. Jeśli ze względów bezpieczeństwa potrzebujesz wygasania tokena, zdecydowanie zalecamy używanie przepływu kodu autoryzacji.
Wskazówki dotyczące wyglądu
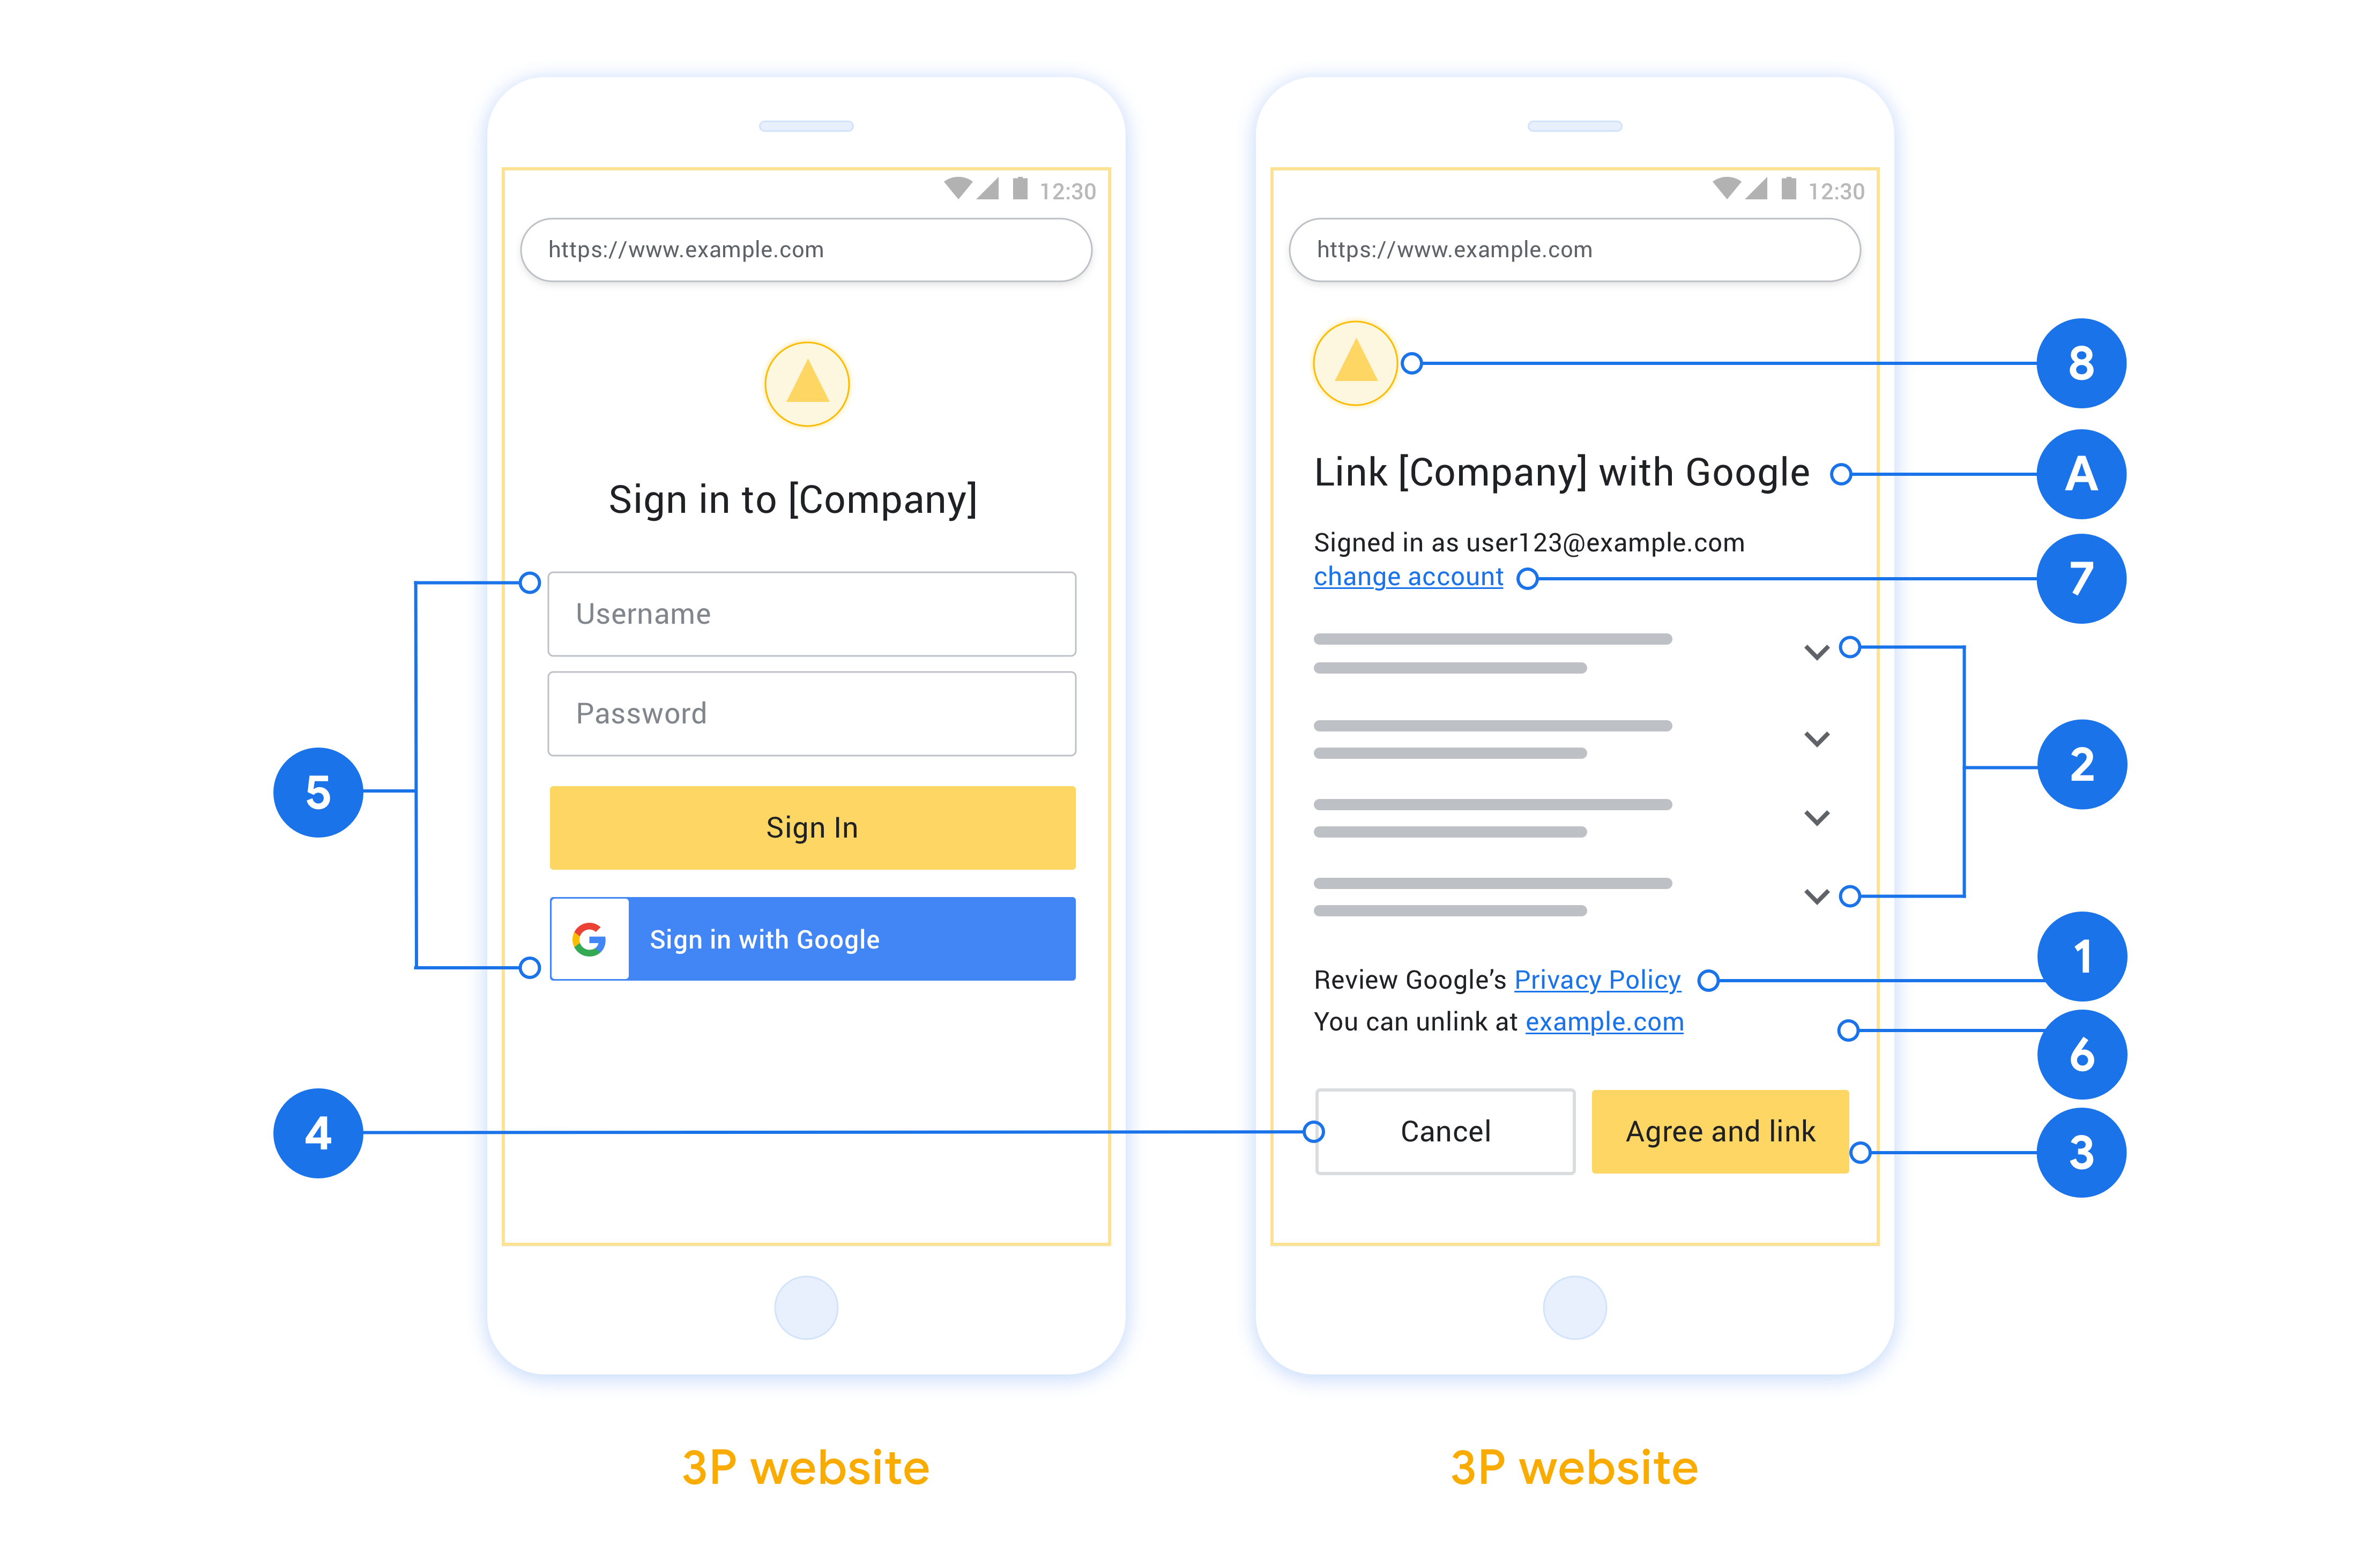
W tej sekcji opisujemy wymagania i zalecenia dotyczące projektu ekranu użytkownika, który hostujesz w przypadku przepływów łączenia OAuth. Gdy aplikacja Google wywoła tę funkcję, platforma wyświetli użytkownikowi stronę logowania w Google i ekran zgody na połączenie kont. Po wyrażeniu zgody na połączenie kont użytkownik zostaje przekierowany z powrotem do aplikacji Google.

Wymagania
- Musisz poinformować użytkownika, że jego konto zostanie połączone z Google, a nie z konkretną usługą Google, taką jak Google Home czy Asystent Google.
Rekomendacje
Zalecamy wykonanie tych czynności:
Wyświetl Politykę prywatności Google. Na ekranie zgody umieść link do Polityki prywatności Google.
Dane, które mają być udostępniane. Używaj jasnego i zwięzłego języka, aby informować użytkowników, jakich danych Google wymaga i dlaczego.
Jednoznaczne wezwanie do działania Na ekranie uzyskiwania zgody umieść wyraźne wezwanie do działania, np. „Zgadzam się i łączę”. Użytkownicy muszą wiedzieć, jakie dane są wymagane do udostępnienia Google, aby połączyć konta.
Możliwość anulowania. Zapewnij użytkownikom możliwość powrotu lub anulowania, jeśli nie chcą połączyć kont.
Jasny proces logowania. Upewnij się, że użytkownicy mają jasną metodę logowania się na konto Google, np. pola na nazwę użytkownika i hasło lub przycisk Zaloguj się przez Google.
Możliwość odłączenia Udostępnij użytkownikom mechanizm odłączania, np. adres URL do ustawień konta na Twojej platformie. Możesz też dodać link do konta Google, na którym użytkownicy mogą zarządzać połączonym kontem.
Możliwość zmiany konta użytkownika. Zaproponuj użytkownikom metodę przełączania kont. Jest to szczególnie korzystne, jeśli użytkownicy mają zwykle kilka kont.
- Jeśli użytkownik musi zamknąć ekran zgody, aby przełączyć konta, wyślij do Google błąd, który można naprawić, aby użytkownik mógł zalogować się na wybrane konto za pomocą połączenia protokołu OAuth i przepływu niejawnego.
Dodaj logo. wyświetlać logo firmy na ekranie zgody; Umieść logo zgodnie z wytycznymi dotyczącymi stylu. Jeśli chcesz lub musisz wyświetlać logo Google, zapoznaj się z sekcją Loga i znaki towarowe.
Create the project
To create your project to use account linking:
- Go to the Google API Console.
- Click Create project.
- Enter a name or accept the generated suggestion.
- Confirm or edit any remaining fields.
- Click Create.
To view your project ID:
- Go to the Google API Console.
- Find your project in the table on the landing page. The project ID appears in the ID column.
Configure your OAuth Consent Screen
The Google Account Linking process includes a consent screen which tells users the application requesting access to their data, what kind of data they are asking for and the terms that apply. You will need to configure your OAuth consent screen before generating a Google API client ID.
- Open the OAuth consent screen page of the Google APIs console.
- If prompted, select the project you just created.
On the "OAuth consent screen" page, fill out the form and click the “Save” button.
Application name: The name of the application asking for consent. The name should accurately reflect your application and be consistent with the application name users see elsewhere. The application name will be shown on the Account Linking consent screen.
Application logo: An image on the consent screen that will help users recognize your app. The logo is shown on Account linking consent screen and on account settings
Support email: For users to contact you with questions about their consent.
Scopes for Google APIs: Scopes allow your application to access your user's private Google data. For the Google Account Linking use case, default scope (email, profile, openid) is sufficient, you don’t need to add any sensitive scopes. It is generally a best practice to request scopes incrementally, at the time access is required, rather than up front. Learn more.
Authorized domains: To protect you and your users, Google only allows applications that authenticate using OAuth to use Authorized Domains. Your applications' links must be hosted on Authorized Domains. Learn more.
Application Homepage link: Home page for your application. Must be hosted on an Authorized Domain.
Application Privacy Policy link: Shown on Google Account Linking consent screen. Must be hosted on an Authorized Domain.
Application Terms of Service link (Optional): Must be hosted on an Authorized Domain.

Figure 1. Google Account Linking Consent Screen for a fictitious Application, Tunery
Check "Verification Status", if your application needs verification then click the "Submit For Verification" button to submit your application for verification. Refer to OAuth verification requirements for details.
Implementowanie serwera OAuth
n
To support the OAuth 2.0 implicit flow, your service makes an authorization endpoint available by HTTPS. This endpoint is responsible for authentication and obtaining consent from users for data access. The authorization endpoint presents a sign-in UI to your users that aren't already signed in and records consent to the requested access.
When a Google application needs to call one of your service's authorized APIs, Google uses this endpoint to get permission from your users to call these APIs on their behalf.
Google Account Linking: OAuth Implicit Flow
The following sequence diagram details interactions between the User, Google, and your service's endpoints.
Roles and responsibilities
The following table defines the roles and responsibilities of actors in the Google Account Linking (GAL) OAuth Implicit flow. Note that in GAL, Google acts as the OAuth Client, while your service acts as the Identity/Service Provider.
| Actor / Component | GAL Role | Responsibilities |
|---|---|---|
| Google App / Server | OAuth Client | Initiates the flow, receives the access token using a browser redirect, and securely stores it to access your service's APIs. |
| Your Authorization Endpoint | Authorization Server | Authenticates your users, obtains their consent, and issues long-lived access tokens directly to Google. |
| Google Redirect URI | Callback Endpoint | Receives the user redirect from your authorization service with the
access_token and state values in the URL
fragment. |
A typical OAuth 2.0 implicit flow session initiated by Google has the following flow:
- Google opens your authorization endpoint in the user's browser. The user signs in, if not signed in already, and grants Google permission to access their data with your API, if they haven't already granted permission.
- Your service creates an access token and returns it to Google. To do so, redirect the user's browser back to Google with the access token attached to the request.
- Google calls your service's APIs and attaches the access token with each request. Your service verifies that the access token grants Google authorization to access the API and then completes the API call.
Handle authorization requests
When a Google application needs to perform account linking using an OAuth 2.0 implicit flow, Google sends the user to your authorization endpoint with a request that includes the following parameters:
| Authorization endpoint parameters | |
|---|---|
client_id |
The client ID you assigned to Google. |
redirect_uri |
The URL to which you send the response to this request. |
state |
A bookkeeping value that is passed back to Google unchanged in the redirect URI. |
response_type |
The type of value to return in the response. For the OAuth 2.0 implicit
flow, the response type is always token. |
user_locale |
The Google Account language setting in RFC5646 format used to localize your content in the user's preferred language. |
For example, if your authorization endpoint is available at
https://myservice.example.com/auth, a request might look like the following:
GET https://myservice.example.com/auth?client_id=GOOGLE_CLIENT_ID&redirect_uri=REDIRECT_URI&state=STATE_STRING&response_type=token&user_locale=LOCALE
For your authorization endpoint to handle sign-in requests, do the following steps:
Verify the
client_idandredirect_urivalues to prevent granting access to unintended or misconfigured client apps:- Confirm that the
client_idmatches the client ID you assigned to Google. - Confirm that the URL specified by the
redirect_uriparameter has the following form:https://oauth-redirect.googleusercontent.com/r/YOUR_PROJECT_ID https://oauth-redirect-sandbox.googleusercontent.com/r/YOUR_PROJECT_ID
- Confirm that the
Check if the user is signed in to your service. If the user isn't signed in, complete your service's sign-in or sign-up flow.
Generate an access token for Google to use to access your API. The access token can be any string value, but it must uniquely represent the user and the client the token is for and must not be guessable.
Send an HTTP response that redirects the user's browser to the URL specified by the
redirect_uriparameter. Include all of the following parameters in the URL fragment:access_token: The access token you just generatedtoken_type: The stringbearerstate: The unmodified state value from the original request
The following is an example of the resulting URL:
https://oauth-redirect.googleusercontent.com/r/YOUR_PROJECT_ID#access_token=ACCESS_TOKEN&token_type=bearer&state=STATE_STRING
Google's OAuth 2.0 redirect handler receives the access token and confirms
that the state value hasn't changed. After Google has obtained an
access token for your service, Google attaches the token to subsequent calls
to your service APIs.
Obsługa żądań informacji o użytkowniku
Punkt końcowy informacji o użytkowniku jest chronionym przez OAuth 2.0 zasobem, który zwraca deklaracje dotyczące połączonego użytkownika. Wdrożenie i hosting punktu końcowego informacji o użytkowniku jest opcjonalne. Wyjątkiem są te przypadki użycia:
- Logowanie się na połączone konto za pomocą Google One Tap
- Bezproblemowa subskrypcja na AndroidTV.
Po pobraniu tokena dostępu z punktu końcowego tokena Google wysyła żądanie do punktu końcowego informacji o użytkowniku, aby pobrać podstawowe informacje profilowe połączonego użytkownika.
| nagłówki żądań punktu końcowego informacji o użytkowniku | |
|---|---|
Authorization header |
Token dostępu typu okaziciela. |
Jeśli na przykład punkt końcowy informacji o użytkowniku jest dostępny pod adresem
https://myservice.example.com/userinfo, żądanie może wyglądać tak:
GET /userinfo HTTP/1.1
Host: myservice.example.com
Authorization: Bearer ACCESS_TOKEN
Aby punkt końcowy informacji o użytkowniku mógł obsługiwać żądania, wykonaj te czynności:
- Wyodrębnij token dostępu z nagłówka autoryzacji i zwróć informacje o użytkowniku powiązanym z tym tokenem.
- Jeśli token dostępu jest nieprawidłowy, zwróć błąd HTTP 401 (Brak autoryzacji) i użyj nagłówka odpowiedzi
WWW-Authenticate. Poniżej znajduje się przykładowa odpowiedź na pytanie o błąd w informacjach o użytkowniku:HTTP/1.1 401 Unauthorized WWW-Authenticate: error="invalid_token", error_description="The Access Token expired"
Jeśli token dostępu jest prawidłowy, zwróć odpowiedź HTTP 200 z podanym niżej obiektem JSON w treści HTTPS odpowiedź:
{ "sub": "USER_UUID", "email": "EMAIL_ADDRESS", "given_name": "FIRST_NAME", "family_name": "LAST_NAME", "name": "FULL_NAME", "picture": "PROFILE_PICTURE", }odpowiedź dotycząca punktu końcowego informacji o użytkowniku subUnikalny identyfikator, który identyfikuje użytkownika w Twoim systemie. emailAdres e-mail użytkownika. given_nameOpcjonalnie: imię użytkownika. family_nameOpcjonalnie: nazwisko użytkownika. nameOpcjonalnie: pełna nazwa użytkownika. pictureOpcjonalnie: zdjęcie profilowe użytkownika.
Sprawdzanie poprawności implementacji
Implementację możesz zweryfikować za pomocą narzędzia OAuth 2.0 Playground.
W narzędziu wykonaj te czynności:
- Kliknij Konfiguracja , aby otworzyć okno Konfiguracja OAuth 2.0.
- W polu OAuth flow (Proces OAuth) wybierz Client-side (Po stronie klienta).
- W polu Punkty końcowe OAuth wybierz Niestandardowe.
- W odpowiednich polach podaj punkt końcowy OAuth 2.0 i identyfikator klienta przypisany do Google.
- W sekcji Krok 1 nie wybieraj żadnych zakresów Google. Zamiast tego pozostaw to pole puste lub wpisz zakres ważny dla Twojego serwera (albo dowolny ciąg znaków, jeśli nie używasz zakresów OAuth). Gdy skończysz, kliknij Autoryzuj interfejsy API.
- W sekcjach Krok 2 i Krok 3 przejdź przez przepływ OAuth 2.0 i sprawdź, czy każdy krok działa zgodnie z oczekiwaniami.
Możesz sprawdzić, czy implementacja jest prawidłowa, korzystając z narzędzia Google Account Linking Demo.
W narzędziu wykonaj te czynności:
- Kliknij przycisk Zaloguj się przez Google.
- Wybierz konto, które chcesz połączyć.
- Wpisz identyfikator usługi.
- Opcjonalnie wpisz co najmniej jeden zakres, do którego chcesz uzyskać dostęp.
- Kliknij Uruchom wersję pokazową.
- Gdy pojawi się komunikat, potwierdź, że możesz wyrazić zgodę na prośbę o połączenie lub ją odrzucić.
- Sprawdź, czy nastąpiło przekierowanie na Twoją platformę.