
1. Overview
Push messaging provides a simple and effective way to re-engage with your users. In this codelab, you'll learn how to add push notifications to your web app.
What you'll learn
- How to subscribe and unsubscribe a user for push messaging
- How to handle incoming push messages
- How to display a notification
- How to respond to notification clicks
What you'll need
- Chrome 52 or above
- Web Server for Chrome, or your own web server of choice
- A text editor
- Basic knowledge of HTML, CSS, JavaScript, and Chrome DevTools
- The sample code (See Get set up.)
2. Get set up
Download the sample code
There are two ways to get the sample code for this codelab:
- Clone the Git repository:
git clone https://github.com/GoogleChrome/push-notifications.git
- Download the ZIP file:
If you download the source as a ZIP file, unpacking it gives you a root folder push-notifications-master.
Install and verify the web server
Though you're free to use your own web server, this codelab is designed to work well with the Web Server for Chrome app. If you don't have that app installed yet, you can get it from the Chrome Web Store:
After installing the Web Server for Chrome app, click on the Apps shortcut on the bookmarks bar:

In the Apps window, click the Web Server icon:

You'll see this dialog next, which allows you to configure your local web server:

Click the Choose folder button, and select the app folder in the push-notifications folder you downloaded. This enables you to serve your work in progress via the URL shown in the Web Server URL(s) section of the dialog.
Under Options, check the box next to Automatically show index.html, as shown below:

Then stop and restart the server by sliding the Web Server: STARTED toggle to the left and then back to the right.

Click the Web Server URL to visit your site in your web browser. You should see a page that looks like this — though your version might show 127.0.0.1:8887 as the address:

Always update the service worker
During development, it's helpful to ensure that your service worker is always up to date and has the latest changes.
To set this up in Chrome:
- Go to the Push Codelab tab.
- Open DevTools: Ctrl-Shift-I on Windows and Linux, Cmd-Option-I on macOS.
- Select the Application panel, click the Service Workers tab, and check the Update on Reload checkbox. When this checkbox is enabled, the service worker is forcibly updated every time the page reloads.

3. Register a service worker
In your app directory, notice that you have an empty file named sw.js. This file will be your service worker. For now, it can stay empty. You'll add code to it later.
First, you need to register this file as your service worker.
Your app/index.html page loads scripts/main.js. You register your service worker in this JavaScript file.
Add the following code to scripts/main.js:
if ('serviceWorker' in navigator && 'PushManager' in window) {
  console.log('Service Worker and Push are supported');

  navigator.serviceWorker.register('sw.js')
  .then(function(swReg) {
    console.log('Service Worker is registered', swReg);

    swRegistration = swReg;
  })
  .catch(function(error) {
    console.error('Service Worker Error', error);
  });
} else {
  console.warn('Push messaging is not supported');
  pushButton.textContent = 'Push Not Supported';
}
This code checks whether service workers and push messaging are supported by your browser. If they are supported, the code registers your sw.js file.
Try it out
Check your changes by refreshing the Push Codelab tab in the browser.
Check the console in Chrome DevTools for a Service Worker is registered message, like so:

Get application server keys
To work with this codelab, you need to generate application server keys. You can do this on the companion site: web-push-codelab.glitch.me
Here you can generate a public and private key pair.

Copy your public key into scripts/main.js replacing the <Your Public Key> value:
const applicationServerPublicKey = '<Your Public Key>';
Important: You should never put your private key in your web app!
4. Initialize state
At the moment, the web app's Enable button is disabled and can't be clicked. This is because it's good practice to disable the push button by default and enable it after you know that push messaging is supported by the browser and you are able to check if the user is currently subscribed to messaging or not.
You will need to create two functions in scripts/main.js:
initializeUI, to check if the user is currently subscribedupdateBtn, to enable your button and change the text depending on whether the user is subscribed or not
Add an initializeUI function to main.js like this:
function initializeUI() {
  // Set the initial subscription value
  swRegistration.pushManager.getSubscription()
  .then(function(subscription) {
    isSubscribed = !(subscription === null);

    if (isSubscribed) {
      console.log('User IS subscribed.');
    } else {
      console.log('User is NOT subscribed.');
    }

    updateBtn();
  });
}
Your new method uses the swRegistration from the previous step, gets the pushManager property from it, and calls getSubscription() on that.
pushManager. getSubscription() returns a promise that resolves with the current subscription if there is one. Otherwise, it returns null. With this, you can check whether the user is already subscribed, set the value of isSubscribed, and then call updateBtn() to update the button.
Add the updateBtn() function to main.js:
function updateBtn() {
  if (isSubscribed) {
    pushButton.textContent = 'Disable Push Messaging';
  } else {
    pushButton.textContent = 'Enable Push Messaging';
  }

  pushButton.disabled = false;
}
This function enables the button and changes the button text depending on whether the user is subscribed or not.
The last thing to do is call initializeUI() when your service worker is registered in main.js:
navigator.serviceWorker.register('sw.js')
.then(function(swReg) {
  console.log('Service Worker is registered', swReg);

  swRegistration = swReg;
  initializeUI();
})
Try it out
Refresh the Push Codelab tab. You should see that the Enable Push Messaging button is now enabled (you can click it) and you should see User is NOT subscribed in the console.

As you progress through the rest of this codelab, you should see the button text change whenever you subscribe or unsubscribe.
5. Subscribe the user
At the moment, your Enable Push Messaging button doesn't do much. Let's fix that.
In the initializeUI() function, add a click listener for your button:
function initializeUI() {
  pushButton.addEventListener('click', function() {
    pushButton.disabled = true;
    if (isSubscribed) {
      // TODO: Unsubscribe user
    } else {
      subscribeUser();
    }
  });

  // Set the initial subscription value
  swRegistration.pushManager.getSubscription()
  .then(function(subscription) {
    isSubscribed = !(subscription === null);

    updateSubscriptionOnServer(subscription);

    if (isSubscribed) {
      console.log('User IS subscribed.');
    } else {
      console.log('User is NOT subscribed.');
    }

    updateBtn();
  });
}
When the user clicks the button, you disable the button just to make sure the user can't click it a second time, since subscribing to push messaging can take some time.
Then you call subscribeUser() if the user isn't currently subscribed. For this, you'll need to paste the following code into scripts/main.js:
function subscribeUser() {
  const applicationServerKey = urlB64ToUint8Array(applicationServerPublicKey);
  swRegistration.pushManager.subscribe({
    userVisibleOnly: true,
    applicationServerKey: applicationServerKey
  })
  .then(function(subscription) {
    console.log('User is subscribed.');

    updateSubscriptionOnServer(subscription);

    isSubscribed = true;

    updateBtn();
  })
  .catch(function(error) {
    console.error('Failed to subscribe the user: ', error);
    updateBtn();
  });
}
Let's step through what this code is doing and how it's subscribing the user for push messaging.
First, you take the application server's public key, which is Base64 URL-safe encoded, and convert it to a UInt8Array, because this is the expected input of the subscribe() call. The urlB64ToUint8Array() function is at the top of scripts/main.js.
After you've converted the value, you call the subscribe() method on your service worker's pushManager, passing in your application server's public key and the value userVisibleOnly: true.
const applicationServerKey = urlB64ToUint8Array(applicationServerPublicKey);
swRegistration.pushManager.subscribe({
  userVisibleOnly: true,
  applicationServerKey: applicationServerKey
})
The userVisibleOnly parameter is an assurance that you will show a notification every time a push message is sent. Currently, this value is required and must be true.
Calling subscribe() returns a promise that will resolve after the following steps:
- The user has granted permission to display notifications.
- The browser has sent a network request to a push service to get the data required to generate a
PushSubscription.
The subscribe() promise will resolve with a PushSubscription if these steps were successful. If the user doesn't grant permission or if there is any problem subscribing the user, the promise will reject with an error. This gives you the following promise chain in your codelab:
swRegistration.pushManager.subscribe({
  userVisibleOnly: true,
  applicationServerKey: applicationServerKey
})
.then(function(subscription) {
  console.log('User is subscribed.');

  updateSubscriptionOnServer(subscription);

  isSubscribed = true;

  updateBtn();

})
.catch(function(err) {
  console.log('Failed to subscribe the user: ', err);
  updateBtn();
});
With this, you either get a subscription and treat the user as subscribed or catch an error and log it to the console. In both scenarios, you call updateBtn() to ensure that the button is re-enabled and has the appropriate text.
In a real application, the function updateSubscriptionOnServer() is where you would send your subscription data to a backend, but for the codelab you simply display the subscription in your UI. Add the following function to scripts/main.js:
function updateSubscriptionOnServer(subscription) {
  // TODO: Send subscription to application server

  const subscriptionJson = document.querySelector('.js-subscription-json');
  const subscriptionDetails =
    document.querySelector('.js-subscription-details');

  if (subscription) {
    subscriptionJson.textContent = JSON.stringify(subscription);
    subscriptionDetails.classList.remove('is-invisible');
  } else {
    subscriptionDetails.classList.add('is-invisible');
  }
}
Try it out
Go to the Push Codelab tab, refresh the page, and click the button. You should see a permission prompt like this:

If you grant the permission, you should see User is subscribed logged to the console. The button's text will change to Disable Push Messaging and you'll be able to view the subscription as JSON data at the bottom of the page.

6. Handle permission denied
One thing that you haven't handled yet is what happens if the user blocks the permission request. This needs some unique consideration because if the user blocks the permission, your web app will not be able to re-show the permission prompt and will not be able to subscribe the user. You need to at least disable the push button so the user knows it can't be used.
The obvious place to handle this scenario is in the updateBtn() function. All you need to do is check the Notification.permission value, like so:
function updateBtn() {
  if (Notification.permission === 'denied') {
    pushButton.textContent = 'Push Messaging Blocked';
    pushButton.disabled = true;
    updateSubscriptionOnServer(null);
    return;
  }

  if (isSubscribed) {
    pushButton.textContent = 'Disable Push Messaging';
  } else {
    pushButton.textContent = 'Enable Push Messaging';
  }

  pushButton.disabled = false;
}
You know that if the permission is denied, then the user can't be subscribed and there is nothing more you can do, so permanently disabling the button is the best approach.
Try it out
Since you've already granted permission for your web app from the previous step, you need to click the i in a circle in the URL bar and change the Notifications permission to Use global default (Ask).

After you've changed this setting, refresh the page and click the Enable Push Messaging button and select Block in the permission dialog. The button will be disabled and show the text Push Messaging Blocked.

With this change, you can now subscribe the user, having taken care of the possible permission scenarios.
7. Handle a push event
Before you learn how to send a push message from your backend, you need to consider what will actually happen when a subscribed user receives a push message.
When you trigger a push message, the browser receives the push message, figures out what service worker the push is for, wakes up that service worker, and dispatches a push event. You need to listen for this event and show a notification as a result.
Add the following code to your sw.js file:
self.addEventListener('push', function(event) {
  console.log('[Service Worker] Push Received.');
  console.log(`[Service Worker] Push had this data: "${event.data.text()}"`);

  const title = 'Push Codelab';
  const options = {
    body: 'Yay it works.',
    icon: 'images/icon.png',
    badge: 'images/badge.png'
  };

  event.waitUntil(self.registration.showNotification(title, options));
});
Let's step through this code. You're listening for push events in your service worker by adding an event listener:
self.addEventListener('push', ... );
(Unless you've played with Web Workers before, self is probably new. In a service worker file, self references the service worker itself.)
When a push message is received, the event listener will be called, and you create a notification by calling showNotification() on the registration property of the service worker. showNotification() requires a title; you can also give it an options object to set a body message, icon, and badge. (The badge is only used on Android at the time of writing.)
const title = 'Push Codelab';
const options = {
  body: 'Yay it works.',
  icon: 'images/icon.png',
  badge: 'images/badge.png'
};
self.registration.showNotification(title, options);
The last thing to cover in your push event handling is event.waitUntil(). This method takes a promise to enable the browser to keep your service worker alive and running until the promise passed in has been resolved.
To make the code above a little easier to understand, you can rewrite it like so:
const notificationPromise = self.registration.showNotification(title, options);
event.waitUntil(notificationPromise);
Now that you've stepped through the push event, let's test out a push event.
Try it out
With push event handling in the service worker, you can trigger a fake push event to test what happens when a message is received.
In your web app, subscribe to push messaging and make sure that you see User IS subscribed in the console. In the Application panel in DevTools, under the Service Workers tab, click the Push button:
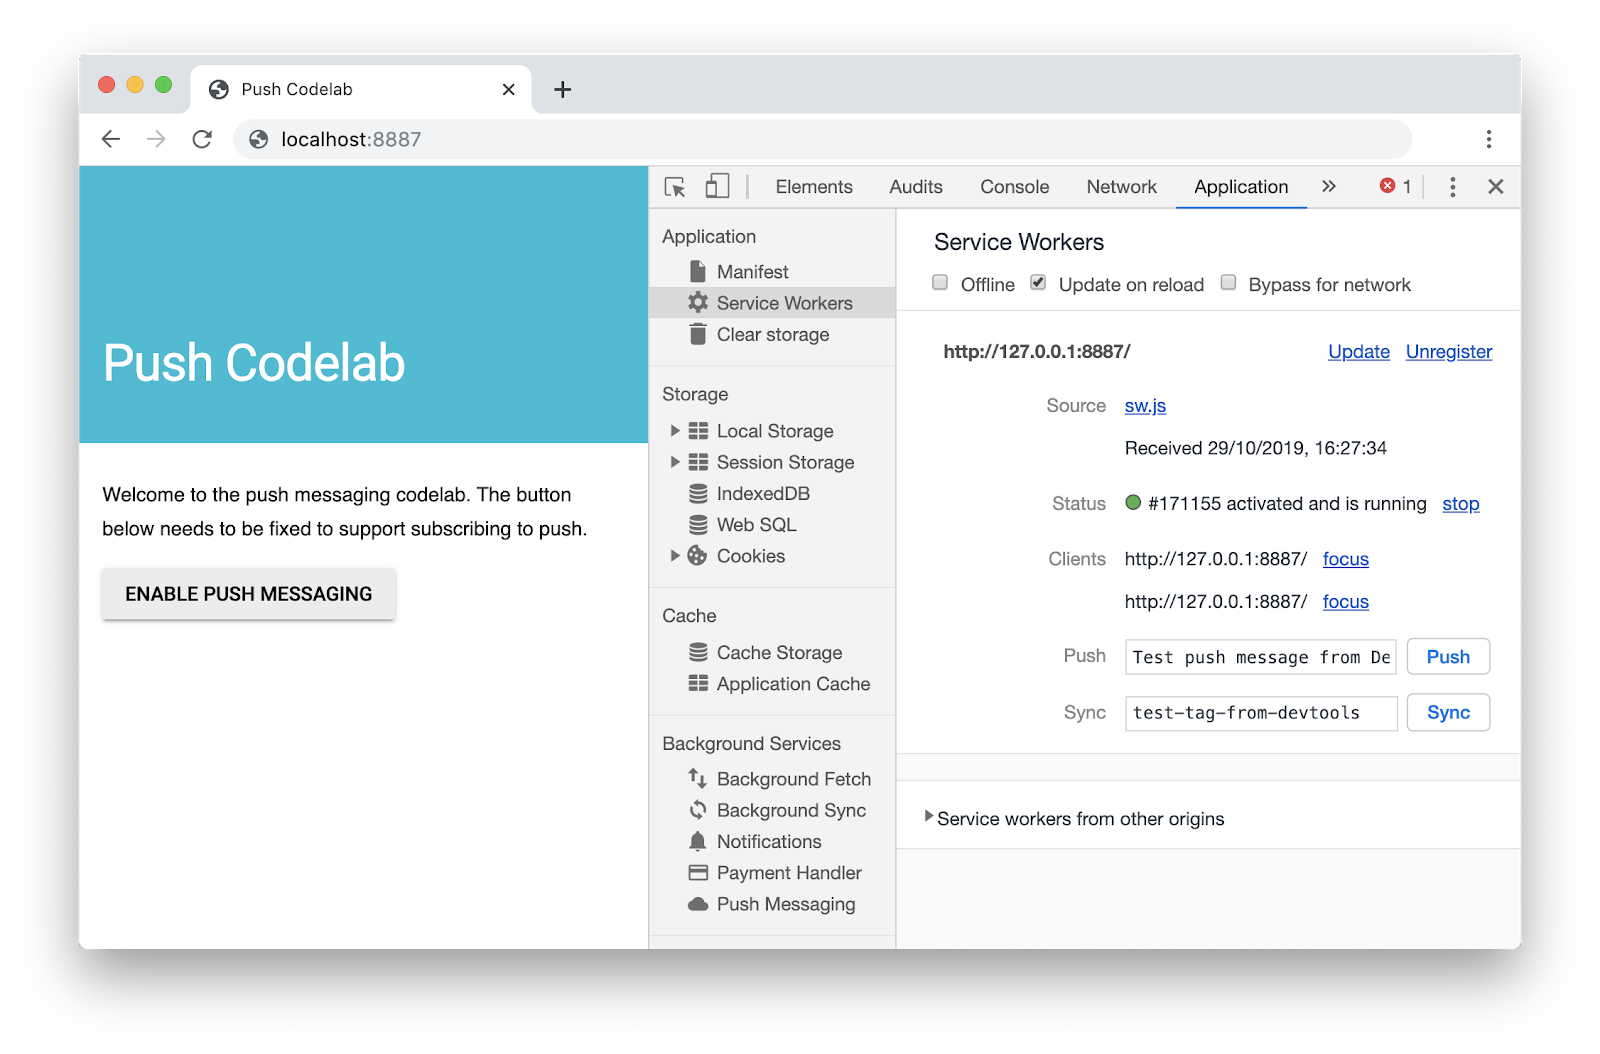
After you click Push, you should see a notification like this:

Note: If this step doesn't work, try unregistering your service worker with the Unregister link in the DevTools Application panel, wait for the service worker to be stopped, and then reload the page.
8. Notification click
If you click one of these notifications, you'll notice that nothing happens. You can handle notification clicks by listening for notificationclick events in your service worker.
Start by adding a notificationclick listener in sw.js:
self.addEventListener('notificationclick', function(event) {
  console.log('[Service Worker] Notification click received.');

  event.notification.close();

  event.waitUntil(
    clients.openWindow('https://developers.google.com/web')
  );
});
When the user clicks the notification, the notificationclick event listener will be called.
The code first closes the notification that was clicked:
event.notification.close();
Then a new window or tab is opened, loading the URL https://developers.google.com/web. Feel free to change this.
event.waitUntil(
    clients.openWindow('https://developers.google.com/web/')
  );
event.waitUntil() ensures that the browser doesn't terminate the service worker before the new window or tab has been displayed.
Try it out
Try triggering a push message in DevTools again and click the notification. You'll now see the notification close and a new tab open.
9. Send push messages
You've seen that your web app is capable of showing a notification using DevTools and looked at how to close the notification with a click. The next step is to send an actual push message.
Normally, this would require sending a subscription from a web page to a backend. The backend would then trigger a push message by making an API call to the endpoint in the subscription.
This is out of scope for this codelab, but you can use the companion site ( web-push-codelab.glitch.me) to trigger an actual push message. Paste the subscription at the bottom of your page:

Then paste this into the companion site in the Subscription to Send To text area:

Under Text to Send, add any string you want to send with the push message.
Click the Send push message button.

You should then receive a push message. The text you used will be logged to the console.

This should give you a chance to test out sending and receiving data, and to manipulate notifications as a result.
The companion app is just a node server that is using the web-push library to send messages. It's worthwhile to review the web-push-libs org on GitHub to see what libraries are available to send push messages for you. This handles a lot of the details to trigger push messages.
You can see all of the code for the companion site here.
10. Unsubscribe the user
The one thing missing is the ability to unsubscribe a user from push. To do this you need to call unsubscribe() on a PushSubscription.
Back in your scripts/main.js file, change the pushButton click listener in initializeUI() to the following:
pushButton.addEventListener('click', function() {
  pushButton.disabled = true;
  if (isSubscribed) {
    unsubscribeUser();
  } else {
    subscribeUser();
  }
});
Notice that you are now going to call a new function unsubscribeUser(). In this function, you get the current subscription and call unsubscribe() on it. Add the following code to scripts/main.js:
function unsubscribeUser() {
  swRegistration.pushManager.getSubscription()
  .then(function(subscription) {
    if (subscription) {
      return subscription.unsubscribe();
    }
  })
  .catch(function(error) {
    console.log('Error unsubscribing', error);
  })
  .then(function() {
    updateSubscriptionOnServer(null);

    console.log('User is unsubscribed.');
    isSubscribed = false;

    updateBtn();
  });
}
Let's step through this function.
First, you get the current subscription by calling getSubscription():
swRegistration.pushManager.getSubscription()
This returns a promise that resolves with a PushSubscription if one exists; otherwise, it returns null. If there is a subscription, you call unsubscribe() on it, which makes the PushSubscription invalid.
swRegistration.pushManager.getSubscription()
.then(function(subscription) {
  if (subscription) {
    // TODO: Tell application server to delete subscription
    return subscription.unsubscribe();
  }
})
.catch(function(error) {
  console.log('Error unsubscribing', error);
})
Calling unsubscribe() returns a promise, since it can take some time to complete. You return that promise so the next then() in the chain waits for unsubscribe() to finish. You also add a catch handler in case calling unsubscribe() results in an error. After this, you can update your UI.
.then(function() {
  updateSubscriptionOnServer(null);

  console.log('User is unsubscribed.');
  isSubscribed = false;

  updateBtn();
})
Try it out
You should be able to press Enable Push Messaging or Disable Push Messaging in your web app, and the logs will show the user being subscribed and unsubscribed.

11. Finished
Congratulations on completing this codelab!
This codelab has shown you how to get up and running with adding push notifications to your web app. If you want to learn more about what web notifications can do, check out these documents.
If you want to deploy push notifications on your site, you may be interested in adding support for older browsers or non-standards-compliant browsers that use GCM. Learn more here.
Further reading
- Web push notification: documentation on web fundamentals.
- Web push libraries: web push libraries, including Node.js, PHP, Java, Python, C, and C#.