This guide describes how to implement common Universal Analytics tags using the Google Tag Manager SDK for Android.
Common Universal Analytics (UA) Tag Configurations
Implementing Universal Analytics in your application with Google Tag Manager enables on the fly changes to your Google Analytics implementation that do not require you to rebuild and resubmit your app binary to marketplaces.
This guide shows how to accomplish the following tasks using Universal Analytics tags and the Google Tag Manager SDK for Android:
Sending App Views (Screen Views)
To send an app view (screen view) to Google Analytics each time a new screen is opened in an app:
- Create a Screen Name Macro
- Create an OpenScreenEvent Rule
- Create a UA App View (Screen View) Tag
- Update Code to Push Event and Screen Name to Data Layer
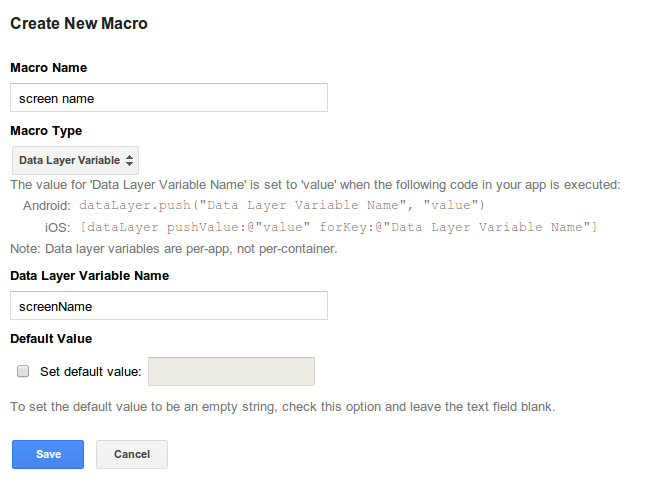
1. Create a Screen Name Macro
Create a new Screen Name macro using the following configuration values:
Macro Name : screen name
Macro Type : Data Layer Variable
Data Layer Variable Name : screenName
See a screenshot
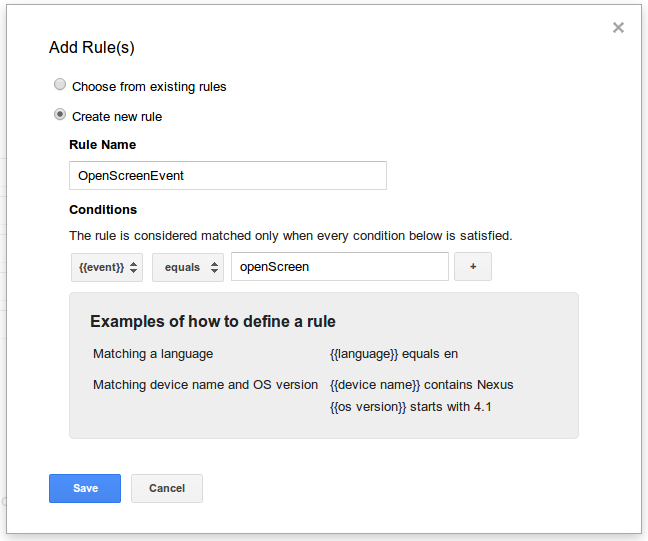
2. Create an OpenScreenEvent Rule
Create a new rule that will be used to fire the new UA app view (screen view) tag using the following configuration values:
Rule Name : OpenScreenEvent
Conditions: {{ event }} equals openScreen
See a screenshot
3. Create an App View (Screen View) UA Tag
Create a new UA Tag using the following configuration values:
Tag Name : Screen Open
Tracking ID : Your Property ID
Tag Type : Universal Analytics (beta)
Track Type : AppView
Basic Configuration - App Name : {{ app name }}
Basic Configuration - App Version : {{ app version }}
Basic Configuration - Screen Name : {{ screen name }}}
See a screenshot

4. Update Code to Push Event and Screen Name to Data Layer
Add code to the app to push an openScreen event and a screenName
value to the data layer, as in this example:
// Push an 'openScreen' event to the data layer.
import com.google.tagmanager.DataLayer;
import com.google.tagmanager.TagManager;

import android.app.Activity;
import android.os.Bundle;

public class MainActivity extends Activity {

  private static final String SCREEN_NAME = "Home Screen";
  private DataLayer mDataLayer;

  @Override
  public void onCreate(Bundle savedInstanceState) {
    super.onCreate();
  }

  @Override
  public void onStart() {
    super.onStart();
    mDataLayer = TagManager.getInstance(this).getDataLayer();

    // This call assumes the container has already been opened, otherwise events
    // pushed to the DataLayer will not fire tags in that container.
    mDataLayer.push(DataLayer.mapOf("event", "openScreen",        // Event, Name of Open Screen Event.
                                    "screenName", SCREEN_NAME));  // Name of screen name field, Screen name value.
  }
}
Sending Events
To send an event to Google Analytics when a user interacts with UI controls or content in your app:
- (Optional) Create Event Macros
- Create an Event Rule
- Create a UA Event Tag
- Update Code to Push Event and Any Event Macro Values to Data Layer
The following steps will show how this would work for an event that gets fired when a user initiates a video playback.
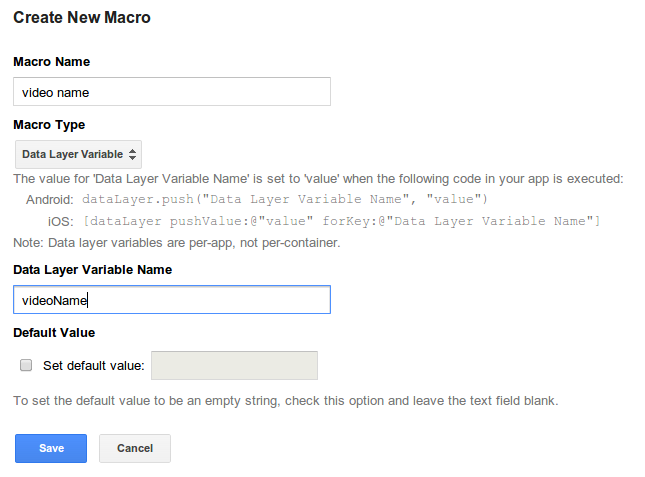
1. (Optional) Create Event Macros
If the event will use any data layer variables for its category, action, label, or value fields, you must configure those macros in the interface first. In this example, the video play event tag will rely on a data layer variable that provides the name of the video that was played.
To implement this video name, we would create a new Macro with the following configuration values:
Macro Name : video name
Macro Type: Data Layer Variable
Data Layer Variable Name : videoName
See a screenshot
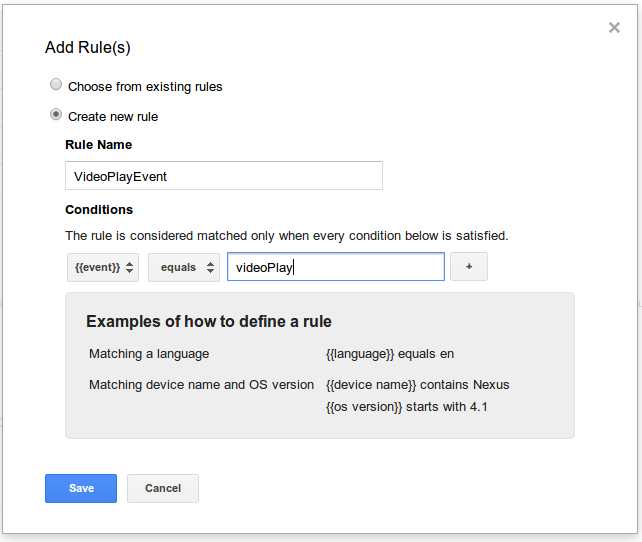
2. Create an Event Rule
Create a rule that causes the event tag to fire when it is pushed to the data layer. In the video play example, that new rule would have the following configuration values:
Rule Name : VideoPlayEvent
Conditions : {{ event }} equals videoPlay
See a screenshot
Create a UA Event Tag
Create a UA Event Tag that will fire when the rule created in the previous
step evaluates to true. In the video play example, that tag
would look like this:
Tag Name : Video Play Event
Tracking ID : Your Property ID
Tag Type : Universal Analytics (beta)
Track Type : Event
Event Tracking Parameters - Category : Video
Event Tracking Parameters - Action : Play
Event Tracking Parameters - Label : {{ video name }}
Basic Configuration - App Name : {{ app name }}
Basic Configuration - App Version : {{ app version }}
Basic Configuration - Screen Name : {{ screen name }}
See a screenshot

Update Code to Push Event to Data Layer
Lastly, update your code to push into the data layer both the event value, and the data layer variables the tag requires, when the user completes the interation. In the video play example, that code would look like this:
//  Push a 'videoPlay' event to the data layer.
import com.google.tagmanager.DataLayer;
import com.google.tagmanager.TagManager;

public class VideoPlayer {

  // Called when a user initiates a video playback.
  public void onPlay(Video v) {
    DataLayer dataLayer = TagManager.getInstance(this).getDataLayer();

    // This call assumes the container has already been opened, otherwise events
    // pushed to the DataLayer will not fire tags in that container.
    dataLayer.push(DataLayer.mapOf("event", "videoPlay",        // Event, Name of Open Screen Event.
                                   "videoName", v.getName());   // Additional data layer variables used by the event tag.
    play(v);
  }

  // Rest of implementation;

}
Sending Ecommerce Transactions
To send a transaction and any associated items to Google Analytics when a user completes an in-app purchase:
- Create a Transaction Rule
- Create a UA Transaction Tag
- Update Code to Push Event and Transaction / Item Data to DataLayer
1. Create a Transaction Rule
Next, create a new rule with the following configuration values:
Rule Name : TransactionCompleted
Conditions : {{ event }} equals transaction
See a screenshot
2. Create a UA Transaction Tag
Create a UA Transaction Tag with the following values:
Tag Name : Transaction Completed
Tracking ID : Your Property ID
Tag Type : Universal Analytics (beta)
Track Type : Transaction
Basic Configuration - App Name : {{ app name }}
Basic Configuration - App Version : {{ app version }}
Basic Configuration - Screen Name : {{ screen name }}
See a screenshot
3. Update Code to Push Event and Transaction / Item Data to DataLayer
Lastly, update your code to push the transaction event, as well as the associated transaction and item data, into the data layer. Note that you must use the Supported Data Layer Variable Names for transactions and item data:
// Called when a user completes a transaction.
public void onPurchaseCompleted(Purchase p) {

  DataLayer dataLayer = TagManager.getInstance(this).getDataLayer();

  // Put maps of item data into an array that will be pushed to the data layer.
  ArrayList<Map<String, String>> purchasedItems = new ArrayList<Map<String, String>>();
  for (Item i : p.items) {
    HashMap<String, String> currentItem = new HashMap<String, String>();

    currentItem.put("name", i.getProductName());
    currentItem.put("sku", i.getProductSku());
    currentItem.put("category", i.getProductCategory());
    currentItem.put("price", i.getProductPrice());
    currentItem.put("currency", "USD");
    currentItem.put("quantity", i.getProductQty());

    purchasedItems.add(currentItem);
  }

  // This call assumes the container has already been opened, otherwise events
  // pushed to the DataLayer will not fire tags in that container.
  dataLayer.push(DataLayer.mapOf("event", "transaction",               // Event, Name of Transaction Event.
                                 "transactionId", p.getTransId(),      // Additional fields required by the tag.
                                 "transactionTotal", p.getTotal(),
                                 "transactionAffiliation", "In-app Store",
                                 "transactionTax", p.getTax(),
                                 "transactionShipping", p.getShippingCost(),
                                 "transactionCurrency", "USD",
                                 "transactionProducts", purchasedItems));

  // Since the data layer is persistent, you should reset fields to null after
  // you are done pushing the transaction.
  dataLayer.push(DataLayer.mapOf("transactionId", null,
                                 "transactionTotal", null,
                                 "transactionAffiliation", null,
                                 "transactionTax", null,
                                 "transactionShipping", null,
                                 "transactionCurrency", null,
                                 "transactionProducts", null));
}
Supported Ecommerce Data Layer Variables
UA Transaction tags support the following data layer variables:
Transaction Variables
| Variable Name | Description | Type | Required |
|---|---|---|---|
transactionId |
Unique transaction identifier | string | Yes |
transactionAffiliation |
Partner or store | string | No |
transactionTotal |
Total value of the transaction | string | No |
transactionTax |
Tax amount for the transaction | string | No |
transactionShipping |
Shipping cost for the transaction | string | No |
transactionCurrency |
Currency of the transaction | string | No |
transactionProducts |
List of items purchased in the transaction | an array of maps containing item variables. | No |
Item Variables
| Variable Name | Description | Type | Required |
|---|---|---|---|
name |
Product name | string | Yes |
sku |
Product SKU | string | No |
category |
Product category | string | No |
price |
Product price | string | No |
currency |
The currency type of price |
string | No |
quantity |
Quantity of items | string | No |
Install Referrer Attribution
When available, install referrer data will be automatically included with any Google Analytics
hits or Google Ads remarketing pixel requests when the following service and receiver are
registered in your AndroidManifest.xml file:
<!-- Used for install referrer tracking -->
<service android:name="com.google.tagmanager.InstallReferrerService" />
<receiver android:name="com.google.tagmanager.InstallReferrerReceiver" android:exported="true">
  <intent-filter>
    <action android:name="com.android.vending.INSTALL_REFERRER" />
  </intent-filter>
</receiver>