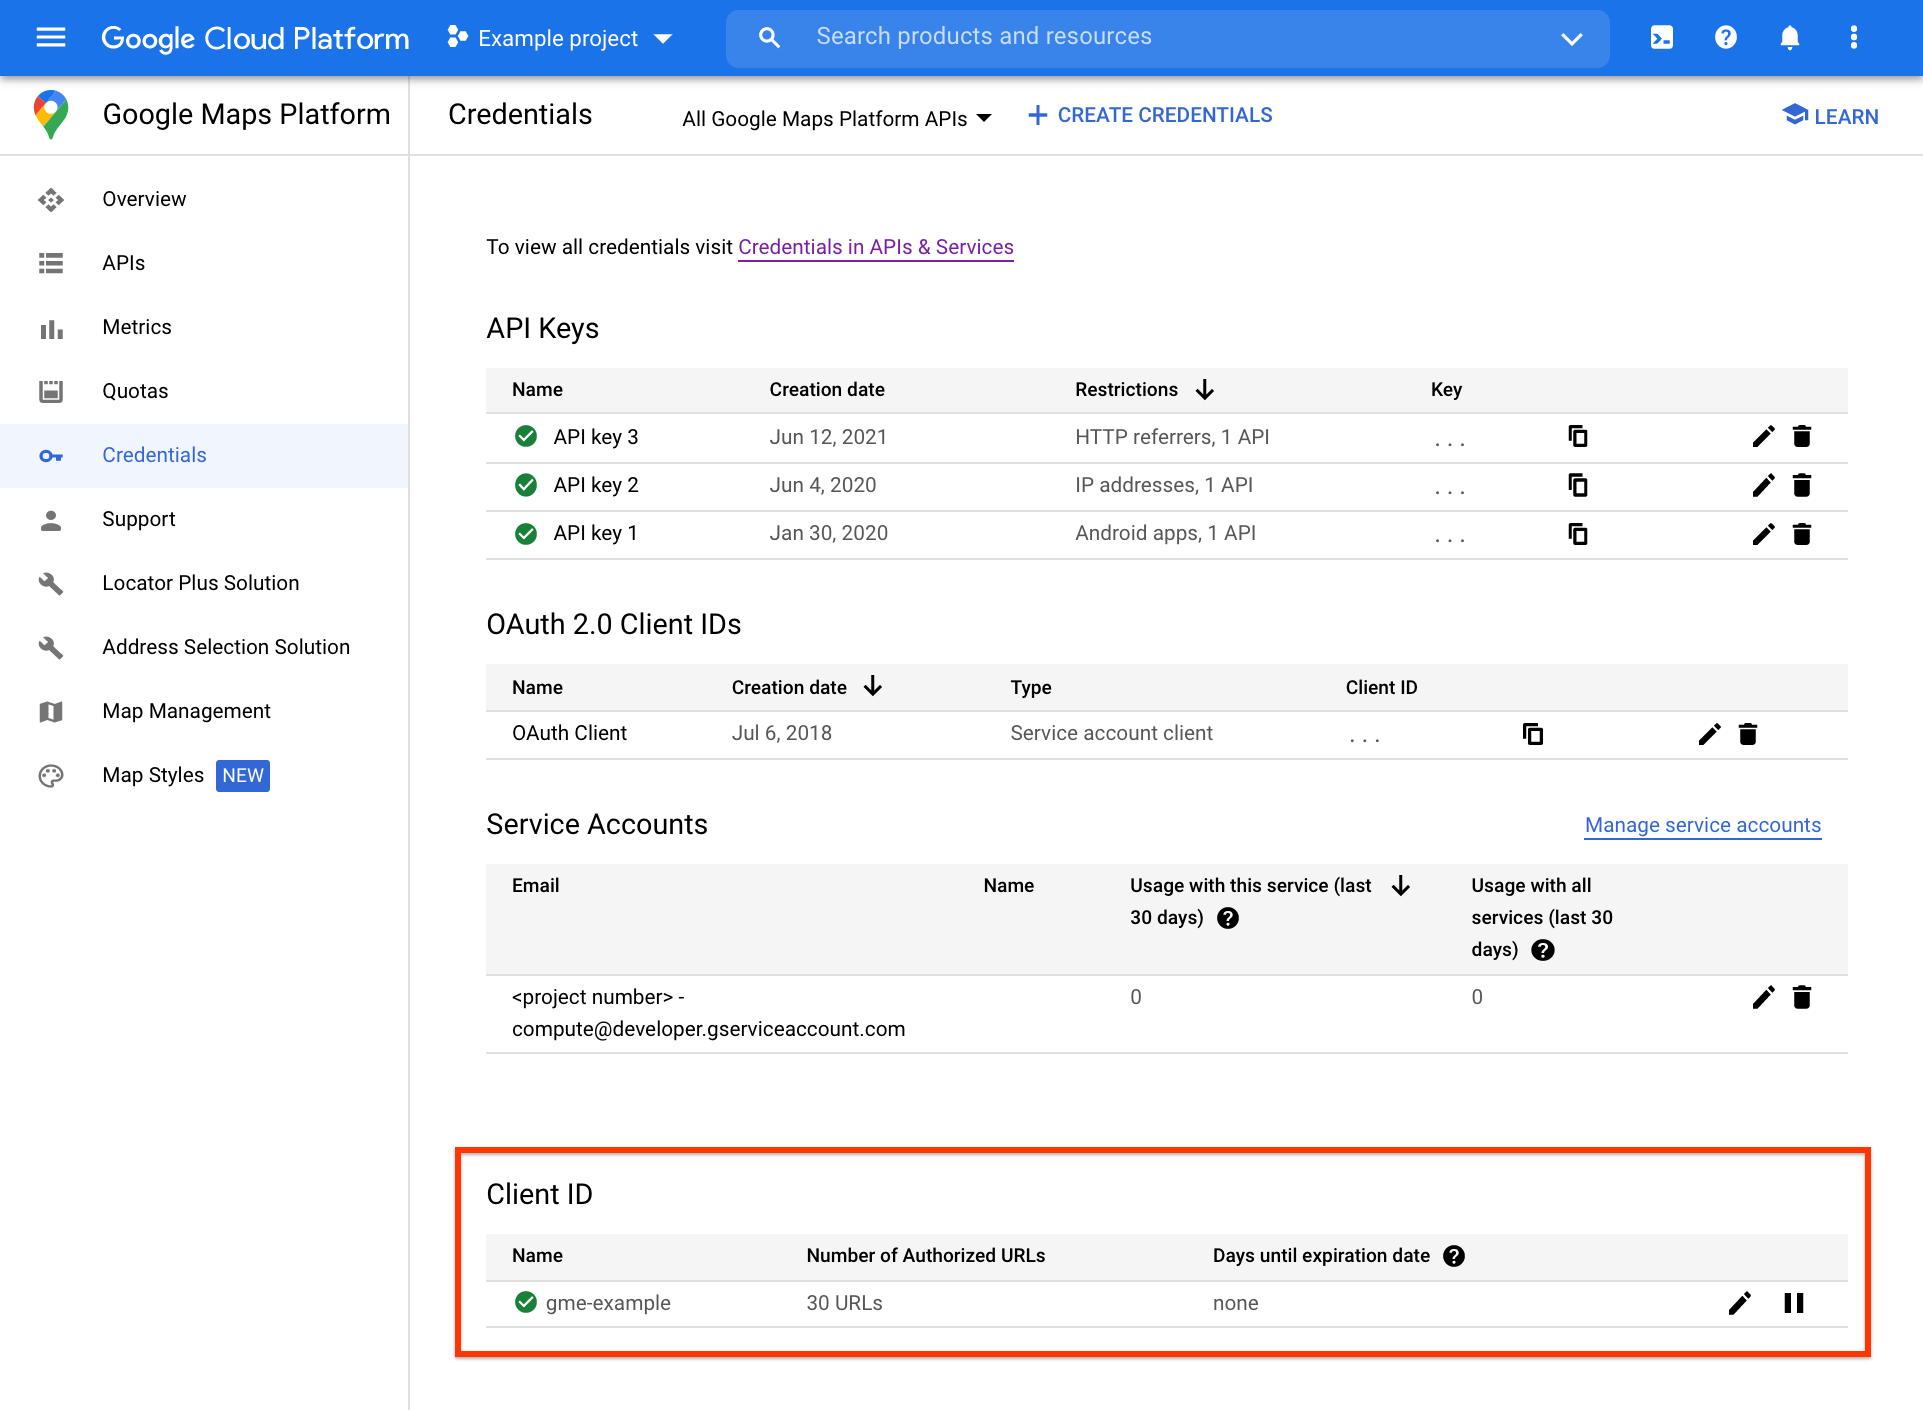
Where to manage your Client ID in the Google Cloud Console
The Premium Plan Client ID management functionality is migrating from the Support Portal to the Cloud Console on the Maps' Credentials page, under the Service Accounts section.

For customers with a previous Google Maps APIs for Work or Google Maps API for Business license, the Maps SDK for iOS is purchased as part of the Google Maps Mobile SDK for Work. This section of the documentation describes the setup for that SDK.
This page is only for customers with a previous Maps APIs for Work or Maps API for Business license. This page is not applicable to customers with the new Google Maps Platform Premium Plan, which became available in January 2016.
Overview
Follow the instructions on this page to download the SDK, set up your project, and add a map. Here is a summary of the steps required:
- Download the SDK.
- Add your API key to your
AppDelegate
. - Add a map.
Download the SDK
Get the latest version of Xcode
To build a project using the Maps SDK for iOS, you need version 11.7 or later of Xcode.
Install the SDK
Use CocoaPods
The Maps SDK for iOS is available as a CocoaPods pod. CocoaPods is an open source dependency manager for Swift and Objective-C Cocoa projects.
If you don't already have the CocoaPods tool, install it on macOS by running the following command from the terminal. For details, see the CocoaPods Getting Started guide.
sudo gem install cocoapods
Create a Podfile
for the Maps SDK for iOS and use
it to install the API and its dependencies:
- If you don't have an Xcode project yet, create one now and save it to your local machine. (If you're newer to iOS development, create a new project and select the iOS App template. In Xcode 11.7 or earlier, create a Single View Application.)
- Create a file named
Podfile
in your project directory. This file defines your project's dependencies. - Edit the
Podfile
and add your dependencies. Here is an example which includes the dependencies you need for the Maps SDK for iOS and Places SDK for iOS (optional):source 'https://github.com/CocoaPods/Specs.git' target 'YOUR_APPLICATION_TARGET_NAME_HERE' do pod 'GoogleMaps' pod 'GooglePlaces' end
- Save the
Podfile
. Open a terminal and go to the directory containing the
Podfile
:cd <path-to-project>
Run the
pod install
command. This will install the APIs specified in thePodfile
, along with any dependencies they may have.pod install
Close Xcode, and then open (double-click) your project's
.xcworkspace
file to launch Xcode. From this time onwards, you must use the.xcworkspace
file to open the project.
Install manually
This guide shows how to manually add the GoogleMaps framework to your project and configure your build settings in Xcode.
- Download the SDK source files: GoogleMaps-4.1.0.
- Unpack the source files.
- Launch Xcode and either open an existing project, or create a new project. If you're new to iOS, create a Single View Application, and disable Use Storyboards and enable Use Automatic Reference Counting.
- Drag the following bundles into your project (when prompted, select
Copy items if needed, please use the same version as above.):
GoogleMaps-x.x.x/Base/Frameworks/GoogleMapsBase.framework
GoogleMaps-x.x.x/Maps/Frameworks/GoogleMaps.framework
GoogleMaps-x.x.x/Maps/Frameworks/GoogleMapsCore.framework
Premium Plan customers must also include
GoogleMaps-x.x.x/M4B/Frameworks/GoogleMapsM4B.framework
. - Right-click
GoogleMaps.framework
in your project, and select Show In Finder. - Drag the
GoogleMaps.bundle
from theResources
folder into your project. When prompted, ensure Copy items into destination group's folder is not selected. - Select your project from the Project Navigator, and choose your application's target.
- Open the Build Phases tab, and within Link Binary with
Libraries, add the following frameworks:
GoogleMapsBase.framework
GoogleMaps.framework
GoogleMapsCore.framework
GoogleMapsM4B.framework
(Premium Plan customers only)Accelerate.framework
CoreData.framework
CoreGraphics.framework
CoreImage.framework
CoreLocation.framework
CoreTelephony.framework
CoreText.framework
GLKit.framework
ImageIO.framework
libc++.tbd
libz.tbd
OpenGLES.framework
QuartzCore.framework
SystemConfiguration.framework
UIKit.framework
Choose your project, rather than a specific target, and open the Build Settings tab. In the Other Linker Flags section, add
-ObjC
. If these settings are not visible, change the filter in the Build Settings bar from Basic to All.To install the Places SDK for iOS, see Get Started with the Places SDK for iOS.
Get an API key and add it to your app
To authenticate your app to the Maps SDK for iOS, you need an API key restricted to an app-specific bundle identifier. This combination creates an iOS-restricted API key.
Your API key identifies you as a Google Maps Mobile SDK for Work customer and enables support and purchased quota for your application. You can generate your API key on an account that has the Google Maps Mobile SDK service enabled by registering your application's package name.
Verify that your account is enabled for the Google Maps Mobile SDK service
The Google Cloud Support team enables the Google Maps Mobile SDK service when you sign up for the Google Maps Mobile SDK for Work. The service is enabled on a new project.
Verify that your account has been enabled for the required API(s) as follows:
- Visit the Google Cloud Console and log in with your Google account.
- Select the Google Maps Mobile SDK for Work project that was created for you when you ordered the Google Maps Mobile SDK for Work. The project name starts with Google Maps APIs for Business or Google Maps for Work or Google Maps. If you have not yet purchased access to the SDK, please contact sales.
- On the Dashboard, in the list of APIs, check that the Google Maps Mobile SDK is enabled.
Get an API key from the Google Cloud Console
After the Google Maps Mobile SDK for Work service is enabled for your project, you must generate a new API key.
- Go to the Credentials page of the Cloud Console and log in with your Google account.
- Select the Google Maps Mobile SDK for Work project that was created for you when you ordered the Google Maps Mobile SDK for Work. The project name starts with Google Maps APIs for Business or Google Maps for Work or Google Maps. If you have not yet purchased access to the SDK, please contact sales.
- From the list of API keys, look for a key with an iOS restriction.
- If your project doesn't already have an iOS-restricted API key, create one now by selecting Create credentials > API key.
- In the resulting dialog, select Restrict key.
- In the Restrictions section, select iOS apps, then enter one or
more app bundle identifiers. For example:
com.example.hellomap
. Click Save.
Your new iOS API key appears in the list of API keys for your project. An API key is a string of characters, something like this:
AIzaSyBdVl-cTICSwYKrZ95SuvNw7dbMuDt1KG0
Add the API key to your app
Swift
Add your API key to your AppDelegate.swift
as follows:
- Add the following import statement:
import GoogleMaps
- Add the following to your
application(_:didFinishLaunchingWithOptions:)
method, replacing YOUR_API_KEY with your API key:GMSServices.provideAPIKey("YOUR_API_KEY")
- If you are also using the Places API, add your key again as shown here:
GMSPlacesClient.provideAPIKey("YOUR_API_KEY")
Objective-C
Add your API key to your AppDelegate.m
as follows:
- Add the following import statement:
@import GoogleMaps;
- Add the following to your
application:didFinishLaunchingWithOptions:
method, replacing YOUR_API_KEY with your API key:[GMSServices provideAPIKey:@"YOUR_API_KEY"];
- If you are also using the Places API, add your key again as shown here:
[GMSPlacesClient provideAPIKey:@"YOUR_API_KEY"];
Add a map
The code below demonstrates how to add a simple map to an existing
ViewController
. If you're creating a new app, first follow the
SDK installation instructions above, and create a new project and select the
iOS App template. Note: on 11.7,
create a Single View Application.
Now, add or update a few methods inside your app's default
ViewController
to create and initialize an instance of
GMSMapView
.
Swift
/* * Copyright 2020 Google Inc. All rights reserved. * * * Licensed under the Apache License, Version 2.0 (the "License"); you may not use this * file except in compliance with the License. You may obtain a copy of the License at * * http://www.apache.org/licenses/LICENSE-2.0 * * Unless required by applicable law or agreed to in writing, software distributed under * the License is distributed on an "AS IS" BASIS, WITHOUT WARRANTIES OR CONDITIONS OF * ANY KIND, either express or implied. See the License for the specific language governing * permissions and limitations under the License. */ import UIKit import GoogleMaps class ViewController: UIViewController { override func viewDidLoad() { super.viewDidLoad() // Do any additional setup after loading the view. // Create a GMSCameraPosition that tells the map to display the // coordinate -33.86,151.20 at zoom level 6. let camera = GMSCameraPosition.camera(withLatitude: -33.86, longitude: 151.20, zoom: 6.0) let mapView = GMSMapView.map(withFrame: self.view.frame, camera: camera) self.view.addSubview(mapView) // Creates a marker in the center of the map. let marker = GMSMarker() marker.position = CLLocationCoordinate2D(latitude: -33.86, longitude: 151.20) marker.title = "Sydney" marker.snippet = "Australia" marker.map = mapView } }
Objective-C
/* * Copyright 2020 Google Inc. All rights reserved. * * * Licensed under the Apache License, Version 2.0 (the "License"); you may not use this * file except in compliance with the License. You may obtain a copy of the License at * * http://www.apache.org/licenses/LICENSE-2.0 * * Unless required by applicable law or agreed to in writing, software distributed under * the License is distributed on an "AS IS" BASIS, WITHOUT WARRANTIES OR CONDITIONS OF * ANY KIND, either express or implied. See the License for the specific language governing * permissions and limitations under the License. */ #import "ViewController.h" #import <GoogleMaps/GoogleMaps.h> @interface ViewController () @end @implementation ViewController - (void)viewDidLoad { [super viewDidLoad]; // Do any additional setup after loading the view. // Create a GMSCameraPosition that tells the map to display the // coordinate -33.86,151.20 at zoom level 6. GMSCameraPosition *camera = [GMSCameraPosition cameraWithLatitude:-33.86 longitude:151.20 zoom:6]; GMSMapView *mapView = [GMSMapView mapWithFrame:self.view.frame camera:camera]; mapView.myLocationEnabled = YES; [self.view addSubview:mapView]; // Creates a marker in the center of the map. GMSMarker *marker = [[GMSMarker alloc] init]; marker.position = CLLocationCoordinate2DMake(-33.86, 151.20); marker.title = @"Sydney"; marker.snippet = @"Australia"; marker.map = mapView; } @end
Run your application. You should see a map with a single marker centered over Sydney, Australia. If you see the marker, but the map is not visible, confirm that you have provided your API key.
More information
Places SDK for iOS
You are free to use the Places SDK for iOS in your project, but this API is not covered by your Google Maps Mobile SDK for Work license. This means that the Places SDK for iOS is not covered by the enhanced support or SLA purchased with the Google Maps Mobile SDK for Work license, and any usage is governed by the standard Google Maps Platform Terms of Service and will not be counted towards your Google Maps Mobile SDK for Work quota. Please contact your Google representative for more information about enabling the Places SDK for iOS.
Attribution requirements
You must include the attribution text as part of a legal notices section in your application. Google recommends including legal notices as an independent menu item, or as part of an "About" menu item.
You can get the attribution text by making a call to
GMSServices.openSourceLicenseInfo()
.
Supported platforms
Developing an iOS application with the Maps SDK for iOS distributed with the Google Maps Mobile SDK for Work requires the following:
- Xcode 11.7 or later.
- iOS SDK 11.0 or later.
Applications developed with this SDK will work on iOS 10.0 and later.
Comparing versions
The following table describes the key differences between the using standard Maps SDK for iOS and using the SDK with the Google Maps Mobile SDK for Work.
Standard Maps SDK for iOS | Google Maps Mobile SDK for Work | |
---|---|---|
Support Channels | Community based support. | Access to Premium support. |
Terms | Subject to the Google Maps Platform Terms of Service. | Subject to Google Maps Mobile SDK for Work terms of use. |
Documentation
The main source of information about the Maps SDK for iOS is the developer and reference documentation available elsewhere on our site.