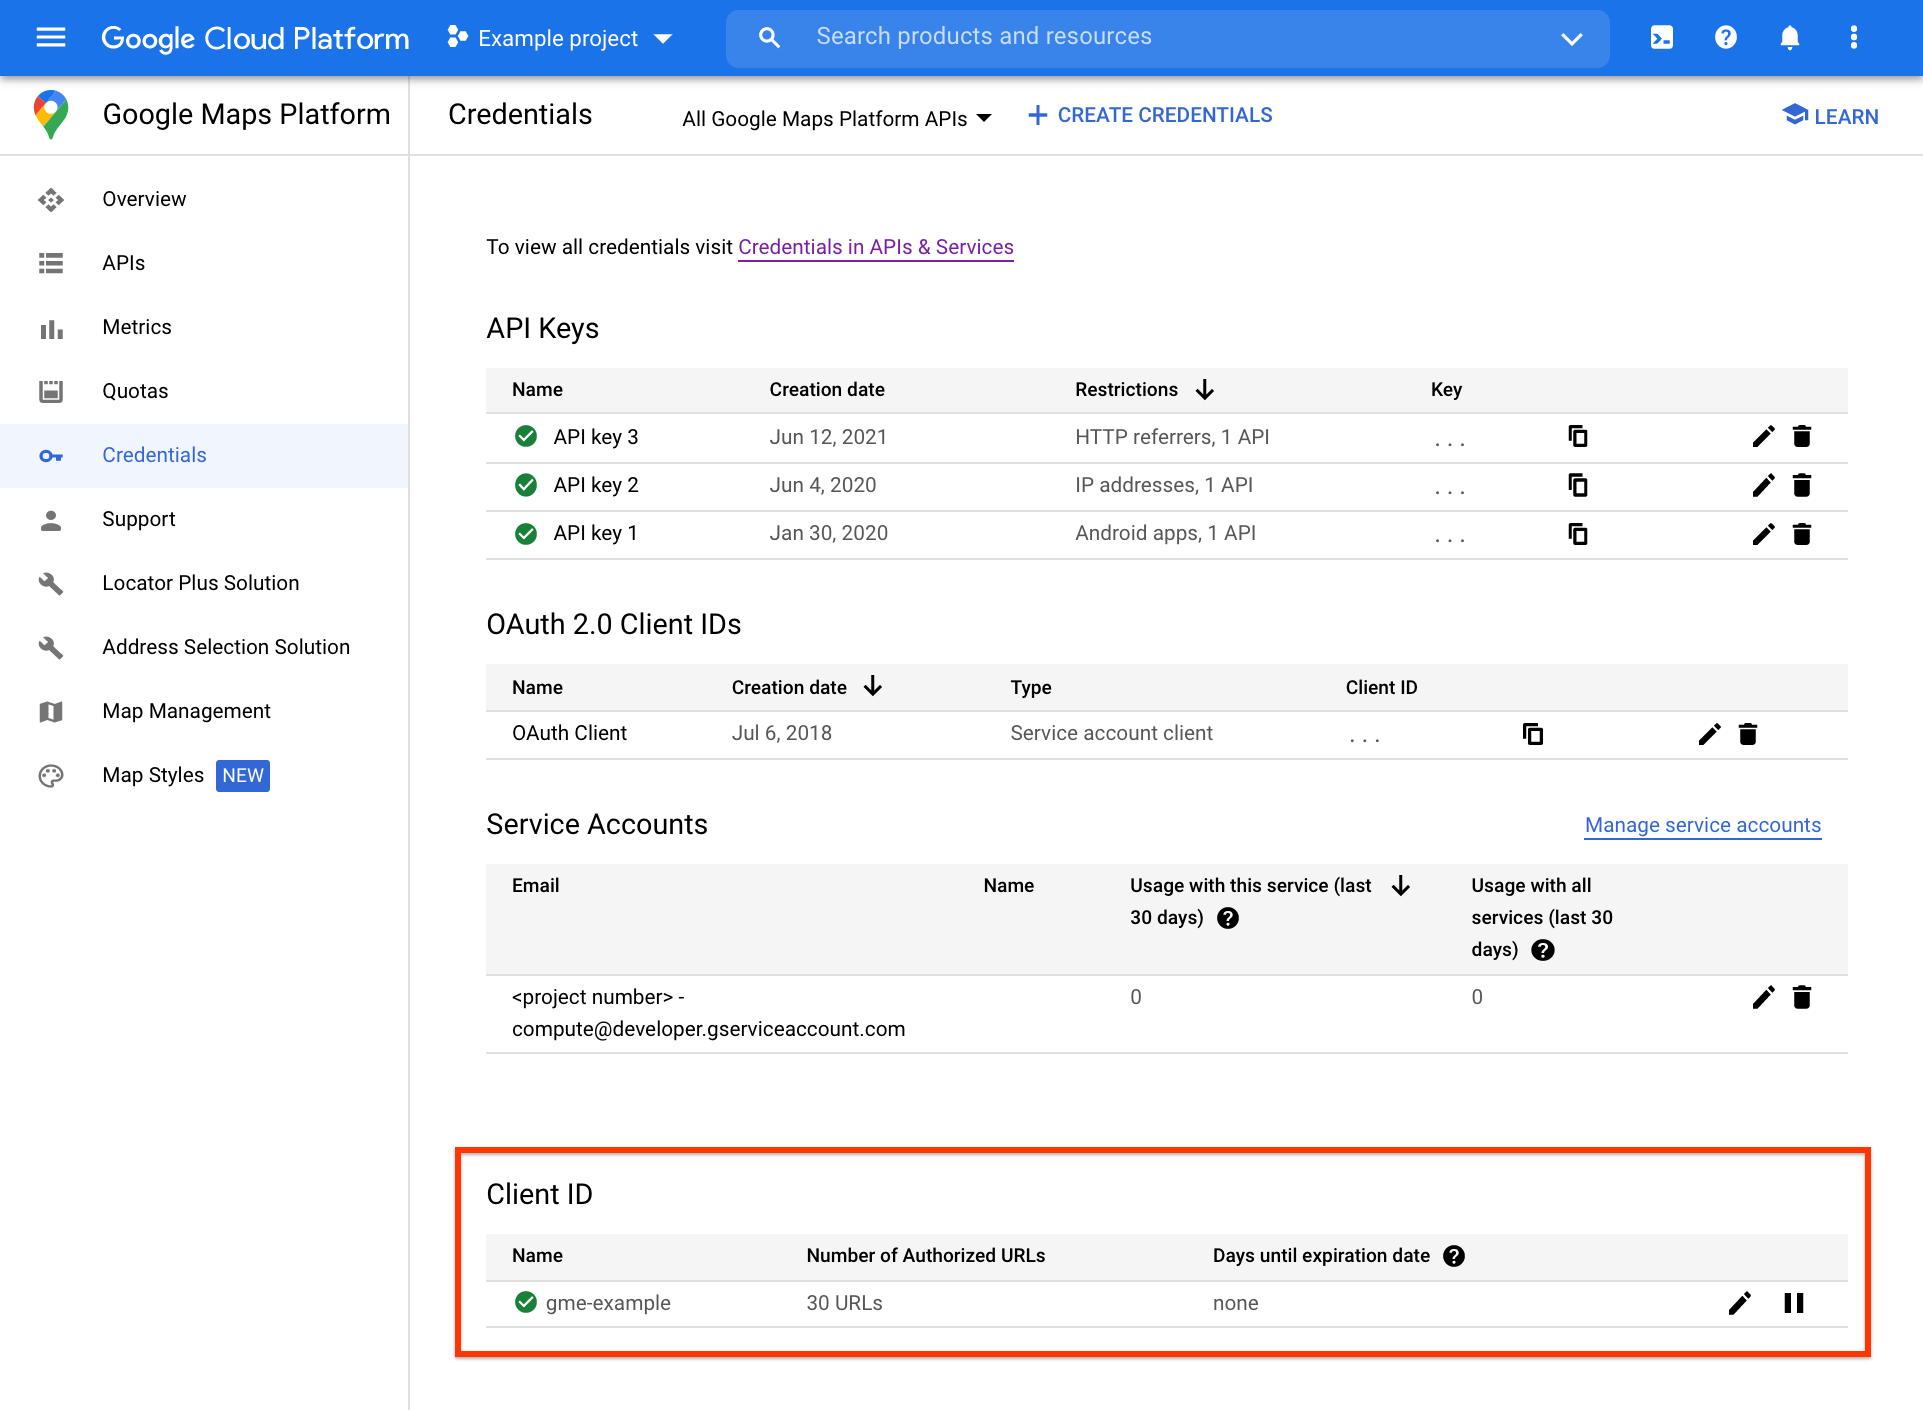
Where to manage your Client ID in the Google Cloud Console
The Premium Plan Client ID management functionality is migrating from the Support Portal to the Cloud Console on the Maps' Credentials page, under the Service Accounts section.

For customers with a previous Google Maps APIs for Work or Google Maps API for Business license, the Maps SDK for Android is purchased as part of the Google Maps Mobile SDK for Work. This section of the documentation describes the setup for that SDK.
This page is only for customers with a previous Maps APIs for Work or Maps API for Business license. This page is not applicable to customers with the new Google Maps Platform Premium Plan, which became available in January 2016.
Overview
Follow the instructions on this page to download the SDK, set up your project, and add a map. Here is a summary of the steps required:
- Download the SDK.
- Add the SDK to a new or existing Android project.
- Add your API key to the app manifest.
- Specify the required Android permissions and OpenGL ES version 2.
- Add a map.
Download the SDK
You can download the SDK as a static library or use the Android SDK Manager.
Option 1: Download the SDK as a static library
Download the latest release as a static library.
Option 2: Download the SDK using the Android SDK Manager
In Android Studio:
- Select Tools > Android > SDK Manager.
- Select Appearance & Behavior > System Settings > Android SDK.
- Click the SDK Update Sites tab.
- Click the plus (+) icon to add a new site.
- Enter a name, such as 'Google Maps Platform', and the URL:
https://dl.google.com/geosdk/android-m4b-addon.xml
- Click OK.
- Click the SDK Tools tab.
- Select Google Maps Mobile SDK for Work and click OK to complete the download.
Android Studio installs the library at
<android-sdk-folder>/extras/google/maps_for_business_sdk/
.
See the guide to the Android SDK Manager for instructions on using the Android SDK Manager as a stand-alone tool.
Add the SDK to your project
Below are the instructions for Android Studio. If you're using a different tool, see the instructions in the Android documentation for command line usage.
The Maps SDK for Android for the
Google Maps Mobile SDK for Work is available in two formats:
an aar
bundle (google-maps-sdk-m4b.aar
) and a library module
(google-maps-sdk-m4b_lib
). You can choose the format that suits
you best.
Option 1: Import the SDK from the aar bundle
Follow these steps in to include the aar
bundle (google-maps-sdk-m4b.aar
)
in your Android Studio project:
Browse to the Google Maps Mobile SDK for Work at this location:
<android-sdk>/extras/google/maps_for_business_sdk
Copy the
google-maps-sdk-m4b.aar
file into thelibs
directory in your project. (Create the directory if it doesn't exist.)Add the following code in your
build.gradle
file:dependencies { compile(name:'google-maps-sdk-m4b', ext:'aar') } repositories { flatDir{ dirs 'libs' } }
Complete the configuration steps as described below.
Option 2: Import the SDK as a library module
Instead of using the aar
file, you can follow these steps to add the SDK
library module (google-maps-sdk-m4b_lib
) to an existing project in Android
Studio:
- In Android Studio, choose the option to import a new module (File -> New -> Import Module).
Browse to the SDK at this location:
<android-sdk>/extras/google/maps_for_business_sdk
Select the
google-maps-sdk-m4b_lib
directory, and click Choose.Accept the default values in the import wizard.
Click Finish. You'll see a text file summarising the results of the import process.
Make sure the library is included in the
settings.gradle
file:include ':googlemapssdkm4b_lib'
Add a module dependency in your app's
build.gradle
file:compile project(':googlemapssdkm4b_lib')
Convert any existing configurations that use Google Play services
- If you have an existing app using Google Play services,
replace all references to the
com.google.android.gms.maps
package withcom.google.android.m4b.maps
. - Prefix all references to the XML layout attributes with
m4b_
. For example:m4b_mapType
andm4b_cameraZoom
.
Get an API key and add it to your app
Generate an API key for your project and add the key to AndroidManifest.xml
,
as described below. You need to set up an Android-restricted API key.
Your API key identifies you as a Google Maps Mobile SDK for Work customer and enables support and purchased quota for your application. You can generate your API key on an account that has the Google Maps Mobile SDK service enabled using a combination of your application's package name and its digital certificate.
Your API key is based on a short form of your app's digital certificate. All Android apps are signed with a digital certificate for which you hold the private key. (Refer to the Android guide to signing your applications for more information about digital certificates.)
Display your app's certificate information
The Android API key restriction is based on a short form of your app's digital certificate, known as its SHA-1 fingerprint.
Getting the certification information from Android Studio
If you follow the Get Started
guide for the Maps SDK for Android, Android Studio creates a handy
google_maps_api.xml
file with your app's credentials.
Choose one of the following ways to get your API key from Android Studio:
- The fast, easy way: Use the link provided in the
google_maps_api.xml
file that Android Studio created for you:- Copy the link provided in the
google_maps_api.xml
file and paste it into your browser. The link takes you to the Google Cloud Console and supplies the required information to the Cloud Console via URL parameters, thus reducing the manual input required from you. - Follow the instructions to create a new project on the Cloud Console or select an existing project.
- Create an Android-restricted API key for your project.
- Copy the resulting API key, go back to Android Studio, and paste the
API key into the <string> element in the
google_maps_api.xml
file.
- Copy the link provided in the
- A slightly less fast way: Use the credentials provided
in the
google_maps_api.xml
file that Android Studio created for you:- Copy the credentials provided in the
google_maps_api.xml
file. - Go to the Google Cloud Platform Console
- Use the copied credentials to add your app to an existing API key or to create a new API key.
- Copy the credentials provided in the
Getting the certificate information yourself
If you didn't follow the Get Started guide when creating your app, you need to get the SHA-1 fingerprint for your certificate yourself. First ensure that you are using the right certificate. You may have two certificates:
- A debug certificate: The Android SDK tools generate this certificate automatically when you do a debug build. Only use this certificate with apps that you're testing. Do not attempt to publish an app that's signed with a debug certificate. The debug certificate is described in more detail in Signing in Debug Mode in the Android Developer Documentation.
- A release certificate: The Android SDK tools generate
this certificate when you do a release build. You can also generate this
certificate using the
keytool
program. Use this certificate when you are ready to release your app to the world.
Follow the steps below to display a certificate's SHA-1 fingerprint using
the keytool
program with the -v
parameter. For more
information about Keytool, see the
Oracle documentation.
Displaying the debug certificate fingerprint
Locate your debug keystore file. The file name is
debug.keystore
, and is created the first time you build your project. By default, it is stored in the same directory as your Android Virtual Device (AVD) files:- macOS and Linux:
~/.android/
- Windows Vista and Windows 7:
C:\Users\your_user_name\.android\
- macOS and Linux:
List the SHA-1 fingerprint:
For Linux or macOS, open a terminal window and enter the following:
keytool -list -v -keystore ~/.android/debug.keystore -alias androiddebugkey -storepass android -keypass android
For Windows Vista and Windows 7, run:
keytool -list -v -keystore "%USERPROFILE%\.android\debug.keystore" -alias androiddebugkey -storepass android -keypass android
You should see output similar to this:
Alias name: androiddebugkey Creation date: Jan 01, 2013 Entry type: PrivateKeyEntry Certificate chain length: 1 Certificate[1]: Owner: CN=Android Debug, O=Android, C=US Issuer: CN=Android Debug, O=Android, C=US Serial number: 4aa9b300 Valid from: Mon Jan 01 08:04:04 UTC 2013 until: Mon Jan 01 18:04:04 PST 2033 Certificate fingerprints: MD5: AE:9F:95:D0:A6:86:89:BC:A8:70:BA:34:FF:6A:AC:F9 SHA1: BB:0D:AC:74:D3:21:E1:43:07:71:9B:62:90:AF:A1:66:6E:44:5D:75 Signature algorithm name: SHA1withRSA Version: 3
Displaying the release certificate fingerprint
-
Locate your release certificate keystore file. There is no default location or name for the release keystore. If you don't specify one when you build your app for release, the build will leave your
.apk
unsigned, and you'll have to sign it before you can publish it. For the release certificate, you also need the certificate's alias and the passwords for the keystore and the certificate. You can list the aliases for all the keys in a keystore by entering:keytool -list -keystore your_keystore_name
Replace
your_keystore_name
with the fully-qualified path and name of the keystore, including the.keystore
extension. You'll be prompted for the keystore's password. Thenkeytool
displays all the aliases in the keystore. -
Enter the following at a terminal or command prompt:
keytool -list -v -keystore your_keystore_name -alias your_alias_name
Replace
your_keystore_name
with the fully-qualified path and name of the keystore, including the.keystore
extension. Replaceyour_alias_name
with the alias that you assigned to the certificate when you created it.
You should see output similar to this:
Alias name: <alias_name> Creation date: Feb 02, 2013 Entry type: PrivateKeyEntry Certificate chain length: 1 Certificate[1]: Owner: CN=Android Debug, O=Android, C=US Issuer: CN=Android Debug, O=Android, C=US Serial number: 4cc9b300 Valid from: Mon Feb 02 08:01:04 UTC 2013 until: Mon Feb 02 18:05:04 PST 2033 Certificate fingerprints: MD5: AE:9F:95:D0:A6:86:89:BC:A8:70:BA:34:FF:6B:AC:F9 SHA1: BB:0D:AC:74:D3:21:E1:43:67:71:9B:62:90:AF:A1:66:6E:44:5D:75 Signature algorithm name: SHA1withRSA Version: 3
The line that begins with SHA1
contains the certificate's SHA-1
fingerprint. The fingerprint is the sequence of 20 two-digit hexadecimal
numbers separated by colons.
Refer to the Android Sign your app guide for further information about digital certificates.
Verify that your account is enabled for the Google Maps Mobile SDK service
The Google Cloud Support team enables the Google Maps Mobile SDK service when you sign up for the Google Maps Mobile SDK for Work. Once the service is enabled on a new project, you can obtain an API key from the Cloud Console.
Verify that your account has been enabled as follows:
- Visit the Cloud Console and log in with your Google account.
- Select the Google Maps Mobile SDK for Work project that was created for you when you ordered the Google Maps Mobile SDK for Work. The project name starts with Google Maps APIs for Business or Google Maps for Work or Google Maps. If you have not yet purchased access to the SDK, please contact sales.
- On the Dashboard, in the list of APIs, check that the Google Maps Mobile SDK* is enabled.
Get an API key from the Cloud Console
After the Google Maps Mobile SDK for Work service is enabled for your project, you must generate a new key.
- Go to the Credentials page in the Cloud Console and log in with your Google account.
- Select the Google Maps Mobile SDK for Work project that was created for you when you ordered the Google Maps Mobile SDK for Work. The project name starts with Google Maps APIs for Business or Google Maps for Work or Google Maps. If you have not yet purchased access to the SDK, please contact sales.
- From the list of API keys, look for a key with an Android restriction.
- If your project doesn't already have an Android-restricted API key, create one now by selecting Create credentials > API key.
- In the resulting dialog, select Restrict key.
In the Restrictions section, select Android apps, then enter your app's SHA-1 fingerprint and package name. For example:
BB:0D:AC:74:D3:21:E1:43:67:71:9B:62:91:AF:A1:66:6E:44:5D:75 com.example.android.mapexample
Click Save.
Your new Android-resticted API key appears in the list of API keys for your project. An API key is a string of characters, something like this:
AIzaSyBdVl-cTICSwYKrZ95SuvNw7dbMuDt1KG0
Add the API key to your application
Follow the steps below to include the API key in your application's manifest,
contained in the file AndroidManifest.xml
.
- In
AndroidManifest.xml
, add the following element as a child of the<application>
element, by inserting it just before the closing</application>
tag:<meta-data android:name="com.google.android.geo.API_KEY" android:value="YOUR_API_KEY"/>
In the
value
attribute, replace YOUR_API_KEY with your API key (the encrypted string). This element sets the keycom.google.android.geo.API_KEY
to the value of your API key. - Save
AndroidManifest.xml
and re-build your application.
Note: As shown above,
com.google.android.geo.API_KEY
is the recommended metadata name
for the API key. A key with this name can be used to authenticate to multiple
Google Maps-based APIs on the Android platform, including the
Maps SDK for Android. For backwards compatibility, the API also
supports the name com.google.android.maps.v2.API_KEY
. This legacy
name allows authentication to the Android Maps API v2 only. An application can
specify only one of the API key metadata names. If both are specified, the API
throws an exception.
Specify app permissions
Specify the permissions your application needs, by adding
<uses-permission>
elements as children of the <manifest>
element in AndroidManifest.xml
.
Location permissions
If your application accesses the user's current location by enabling the My Location layer, you must request location permissions as described in the guide to location data.
External storage permission
If you're targeting version 8.3 or later of the Google Play
services SDK, you no longer need the
WRITE_EXTERNAL_STORAGE
permission to use the
Maps SDK for Android.
If you're targeting earlier versions of the Google Play
services SDK, you must request the
android.permission.WRITE_EXTERNAL_STORAGE
permission.
<uses-permission android:name="android.permission.WRITE_EXTERNAL_STORAGE" />
Note: If your app is targeting API level 23 (Android 6.0), which requires the use of runtime permissions, you should target version 8.3 or later of the Google Play services SDK.
Permissions automatically merged into your manifest
The following permissions are defined in the Google Play services manifest, and are automatically merged into your app's manifest at build time. You don't need to add them explicitly to your manifest:
android.permission.INTERNET
- Used by the API to download map tiles from Google Maps servers.android.permission.ACCESS_NETWORK_STATE
- Allows the API to check the connection status in order to determine whether data can be downloaded.
Specify OpenGL ES version 2
The Maps SDK for Android uses OpenGL ES version 2 to render the map. The following setting is defined in the Google Play services manifest, and is automatically merged into your app's manifest at build time. You don't need to add it explicitly to your manifest:
<uses-feature android:glEsVersion="0x00020000" android:required="true"/>
This notifies external services of the requirement. In particular, it prevents Google Play Store from displaying your app on devices that don't support OpenGL ES version 2.
Add a map
The easiest way to test that your app is configured correctly is to add a simple map.
In
activity_main.xml
, add the following fragment.<?xml version="1.0" encoding="utf-8"?> <fragment xmlns:android="http://schemas.android.com/apk/res/android" android:id="@+id/map" android:layout_width="match_parent" android:layout_height="match_parent" android:name="com.google.android.m4b.maps.MapFragment"/>
In
MainActivity.java
, add the following code.package com.example.mapdemo; import android.app.Activity; import android.os.Bundle; public class MainActivity extends Activity { @Override protected void onCreate(Bundle savedInstanceState) { super.onCreate(savedInstanceState); setContentView(R.layout.activity_main); } }
Build and run your app
Build and run your app. You should see a map.
Troubleshooting:
If you don't see a map, confirm that you've completed all of the steps appearing earlier in this document. In particular, make sure that your API key is correct and that that your account is enabled for the Google Maps Mobile SDK for Work service.
If the number of methods in your project goes over the limit, you may receive an error:
Unable to execute dex: method ID not in [0, 0xffff]: 65536
For information on causes and solutions, see the Android developers' guide to building apps with over 65K methods.
If your project already depends on Guava you may receive class collision errors such as this one:
com.android.dex.DexException: Multiple dex files define Lcom/google/common/annotations/Beta
To solve this problem, you can delete the copy of Guava from the
google-maps-sdk-m4b_lib/libs
directory.
More information
How to migrate an existing app
The Android API available with the Google Maps Mobile SDK for Work has been designed to be very similar to the standard Maps SDK for Android. Consequently, the migration process is straightforward.
- Download the Maps SDK for Android for the Google Maps Mobile SDK for Work, and add the SDK to your project as described above.
- Replace all references to the
com.google.android.gms.maps
package withcom.google.android.m4b.maps
. - Prefix all references to the XML layout attributes with
m4b_
. For example:m4b_mapType
andm4b_cameraZoom
. - Generate a new API key for your project and add the key to
AndroidManifest.xml
, as described in the authentication guide. - Build your app.
Comparing versions
The following table describes the key differences between the using standard Maps SDK for Android and using the API with the Google Maps Mobile SDK for Work.
Standard Maps SDK for Android | Google Maps Mobile SDK for Work | |
---|---|---|
Package name | com.google.android.gms.maps |
com.google.android.m4b.maps |
XML attributes in layout file | Use the attribute name without a prefix. For example:
mapType . |
Prefix all attribute names with m4b_ . For example:
m4b_mapType . For details, see
the
documentation on XML attributes. |
Download location | Included with Google Play services. | Available as a static library. |
Support channels | Community based support | Access to Premium support |
Terms | Subject to the Google Maps Platform Terms of Service. | Subject to Google Maps Mobile SDK for Work terms. |
Google Play services
The standard Maps SDK for Android requires both the Google Play services APK and the Google Play services client library. When used with the Google Maps Mobile SDK for Work, however, the SDK only requires that the Google Play services APK is installed on the target device - the client library is not required.
When migrating your application to the Google Maps Mobile SDK for Work,
you do not need to remove the Google Play services SDK from your project.
However, you should remove any references to the com.google.android.gms.maps
package. Google Play services contains a version of the
Maps SDK for Android as well as other Google services. If you make
use of Play services within your app to use other Google APIs, please ensure
that you use only the Google Maps Mobile SDK for Work SDK (the
com.google.android.m4b.maps
package) to access Maps.
While the Google Play services client library is not required, you may find it helpful to include the library so that you can take advantage of other Google APIs, such as Google+ or the Location API.
Sample code
The Google Maps repo on GitHub includes a number of samples
illustrating the use of the Maps SDK for Android in your Android app.
Note that the sample apps use the com.google.android.gms.maps
package, not
the com.google.android.m4b.maps
used with the
Google Maps Mobile SDK for Work.
The sample apps also require the Google Play services SDK,
as they use the Location APIs for parts of the demo.
In addition, you can find code snippets on each page of the developer's guide.
Documentation
The main source of information about the Google Maps Mobile SDK for Work is the developer and reference documentation available elsewhere on our site.