
Overview
Google Maps Platform is available for web (JS, TS), Android, and iOS, and also offers web services APIs for getting information about places, directions, and distances. The samples in this guide are written for one platform, but documentation links are provided for implementation on other platforms.
Quick Builder in the Google Cloud console lets you build address form autocompletion using an interactive UI that generates JavaScript code for you.
Online shopping and ordering have become a ubiquitous part of our lives. From same-day delivery services to booking a taxi or ordering dinner, customers have come to expect a frictionless checkout process.
In all of these applications, however, address entry for billing or shipping remains one stumbling block in the checkout flow that can be both time consuming and cumbersome. A frictionless checkout experience becomes even more important in the mobile world, where complex text entry on a small screen can be frustrating and another barrier for customer conversion.
This document provides implementation guidance for helping your customers speed through their checkout process with predictive address entry.
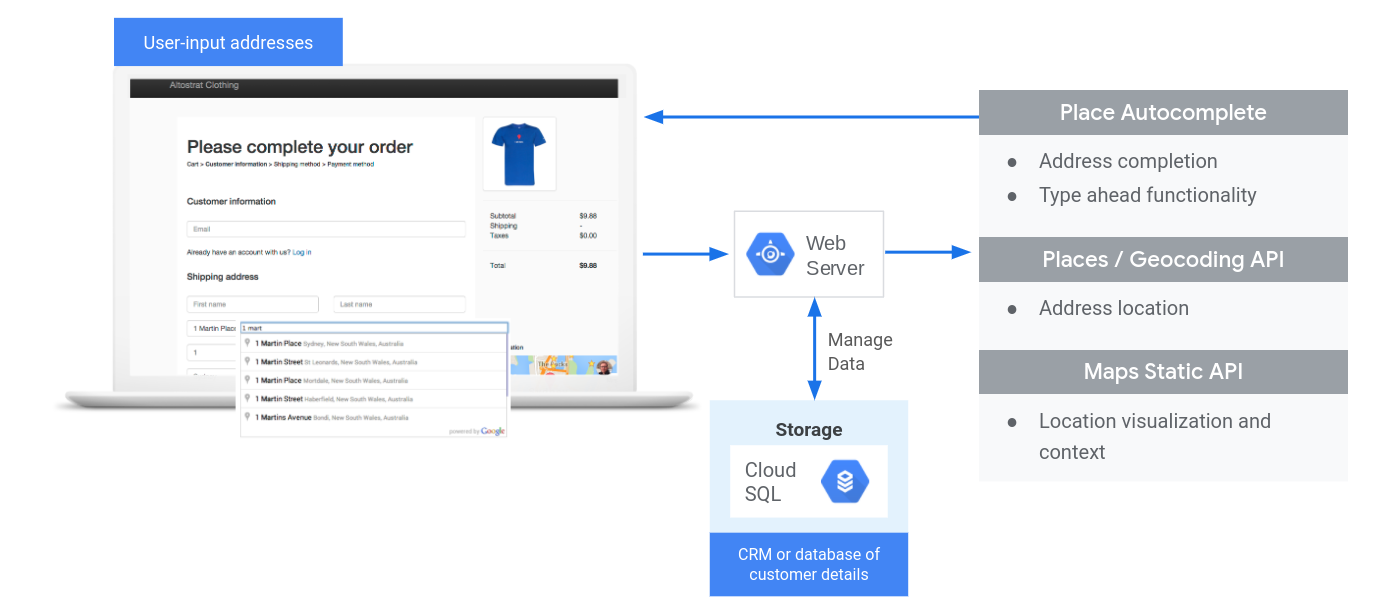
The following diagram shows the core APIs involved in implementing Checkout. Click the diagram to enlarge it.
Enabling APIs
To implement Checkout, you must enable the following APIs in the Google Cloud console:
For more information about setup, see Getting started with Google Maps Platform.
Practices sections
The following sections cover tips and customizations to help you enhance your checkout flow.
- The check mark icon is a core practice.
- The star icon is an optional but recommended customization to enhance the solution.
| Adding autocomplete to input fields | Autofill an address form. Add type-as-you-go functionality to improve the user experience on all platforms and improve address accuracy with minimum keystrokes. | |
| Provide visual confirmation with Maps Static API | Find the latitude/longitude coordinates for a given address (geocoding), or convert the latitude/longitude coordinates of a geographic location to an address (reverse geocoding). | |
| Tips to further enhance Checkout | Use Place Autocomplete advanced features to make the Checkout experience even better. |
Adding autocomplete to input fields
| This example uses: Places Library, Maps JavaScript API | Also available: Android | iOS |
Place Autocomplete can simplify address entry in your application, leading to higher conversion rates and a seamless experience for your customers. Autocomplete provides a single, quick entry field with "type-ahead" address prediction that can be used to automatically populate a billing or shipping address form.
By incorporating the Place Autocomplete in your online shopping cart, you can:
- Reduce address entry errors.
- Decrease the number of steps in the checkout process.
- Simplify the address entry experience on mobile or wearable devices.
- Significantly reduce keystrokes and total time required for a customer to place an order.
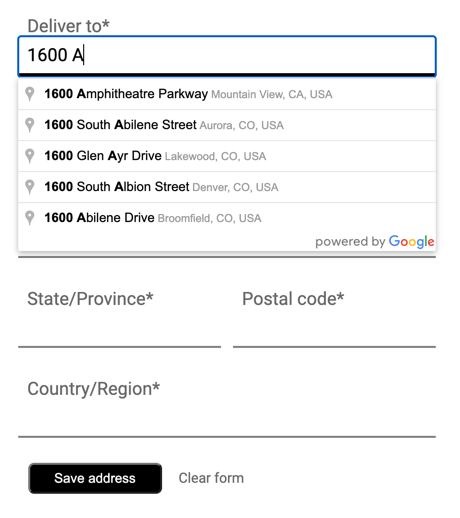
When the user selects the Autocomplete entry box and begins typing, a list of address predictions appear:
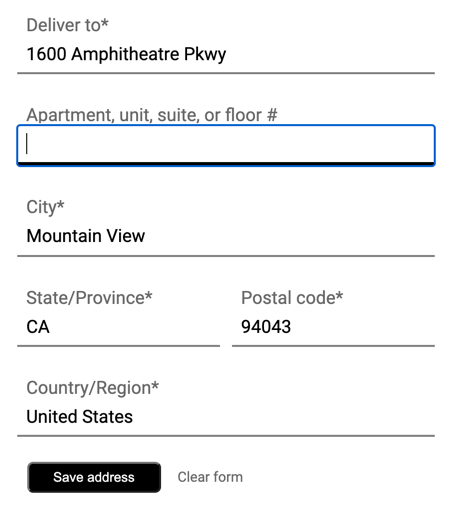
When the user selects an address from the list of predictions, you can use the response to verify the address and get the location. Your application can then populate the correct fields of the address entry form:
Videos: Enhance address forms with Place Autocomplete:
Address forms
Web
Android
iOS
Getting started with Place Autocomplete
You can incorporate Place Autocomplete into your site with a few lines of JavaScript.
You can include the Maps JavaScript API on your site and specify the Places library, even if you aren't displaying a map. The following example shows how to do this and execute the initialization function.
<script async
    src="https://maps.googleapis.com/maps/api/js?key=YOUR_API_KEY&loading=async&libraries=places&callback=initAutocomplete&solution_channel=GMP_guides_checkout_v1_a">
</script>
Next, add a text box to your page, for user input:
<input id="autocomplete" placeholder="Enter your address"></input>Finally, initialize the Autocomplete service and link it to the named text box:
function initAutocomplete() {
  // Create the autocomplete object, restricting the search predictions to
  // addresses in the US and Canada.
  autocomplete = new google.maps.places.Autocomplete(address1Field, {
    componentRestrictions: { country: ["us", "ca"] },
    fields: ["address_components", "geometry"],
    types: ["address"],
  });
  address1Field.focus();
  // When the user selects an address from the drop-down, populate the
  // address fields in the form.
  autocomplete.addListener("place_changed", fillInAddress);
}
In the previous example, the place_changed event listener is triggered when
the user selects an address prediction, and the
fillInAddress function is executed.
The function, as shown in the following example, takes the selected response and
extracts the address components to visualize within a form.
TypeScript
function fillInAddress() { // Get the place details from the autocomplete object. const place = autocomplete.getPlace(); let address1 = ""; let postcode = ""; // Get each component of the address from the place details, // and then fill-in the corresponding field on the form. // place.address_components are google.maps.GeocoderAddressComponent objects // which are documented at http://goo.gle/3l5i5Mr for (const component of place.address_components as google.maps.GeocoderAddressComponent[]) { // @ts-ignore remove once typings fixed const componentType = component.types[0]; switch (componentType) { case "street_number": { address1 = `${component.long_name} ${address1}`; break; } case "route": { address1 += component.short_name; break; } case "postal_code": { postcode = `${component.long_name}${postcode}`; break; } case "postal_code_suffix": { postcode = `${postcode}-${component.long_name}`; break; } case "locality": (document.querySelector("#locality") as HTMLInputElement).value = component.long_name; break; case "administrative_area_level_1": { (document.querySelector("#state") as HTMLInputElement).value = component.short_name; break; } case "country": (document.querySelector("#country") as HTMLInputElement).value = component.long_name; break; } } address1Field.value = address1; postalField.value = postcode; // After filling the form with address components from the Autocomplete // prediction, set cursor focus on the second address line to encourage // entry of subpremise information such as apartment, unit, or floor number. address2Field.focus(); }
JavaScript
function fillInAddress() { // Get the place details from the autocomplete object. const place = autocomplete.getPlace(); let address1 = ""; let postcode = ""; // Get each component of the address from the place details, // and then fill-in the corresponding field on the form. // place.address_components are google.maps.GeocoderAddressComponent objects // which are documented at http://goo.gle/3l5i5Mr for (const component of place.address_components) { // @ts-ignore remove once typings fixed const componentType = component.types[0]; switch (componentType) { case "street_number": { address1 = `${component.long_name} ${address1}`; break; } case "route": { address1 += component.short_name; break; } case "postal_code": { postcode = `${component.long_name}${postcode}`; break; } case "postal_code_suffix": { postcode = `${postcode}-${component.long_name}`; break; } case "locality": document.querySelector("#locality").value = component.long_name; break; case "administrative_area_level_1": { document.querySelector("#state").value = component.short_name; break; } case "country": document.querySelector("#country").value = component.long_name; break; } } address1Field.value = address1; postalField.value = postcode; // After filling the form with address components from the Autocomplete // prediction, set cursor focus on the second address line to encourage // entry of subpremise information such as apartment, unit, or floor number. address2Field.focus(); } window.initAutocomplete = initAutocomplete;
Once you have this data, you can use it as the matched address for your user. From a few lines of code, you can make sure the customer enters the right address in a short amount of time.
See a working demo and full source code for populating an address entry form in this code sample.
Considerations when implementing Place Autocomplete
Place Autocomplete offers several options that let you customize your implementation if you want to use more than just the widget. You can use a combination of services to accurately match locations.
-
For an address form, set the
typesparameter toaddressto restrict the matches to full street addresses. Learn more about types supported in Place Autocomplete requests. -
Set the appropriate restrictions
and biases if you don't need to search worldwide. You can use
several parameters to bias or restrict matches to specific regions.
-
Use
boundsto set the rectangular bounds to constrain for an area. UsestrictBoundsto make sure only addresses in those areas are returned. -
Use
componentRestrictionsto restrict responses to a certain set of countries.
-
Use
- Leave fields editable in case certain fields are missed from the match and allow customers to update the address if required. Because most addresses returned by Place Autocomplete don't contain subpremise numbers such as apartment, suite, or unit numbers, this example moves the focus to Address Line 2 to encourage the user to fill in that information if necessary.
Provide visual confirmation with Maps Static API
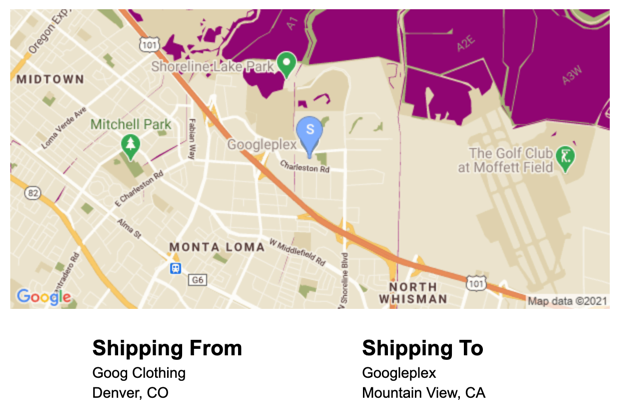
After your customer enters their address, provide visual confirmation of the delivery or pickup location with a static map. This gives the customer extra assurance that the address is correct and reduces failed deliveries or pickups. You can display the static map on the address entry page, or include it in the confirmation email after the transaction is complete.
You can implement both of these use cases with the Maps Static API, which adds an image version of the map to any image tag within a page or email.
Getting started with the Maps Static API
You can use the Maps Static API through a web service call, which creates an image version of a map based on the parameters you specify. Like the dynamic map, you can specify the type of map, use the same cloud-based styles, and add markers to distinguish the location.
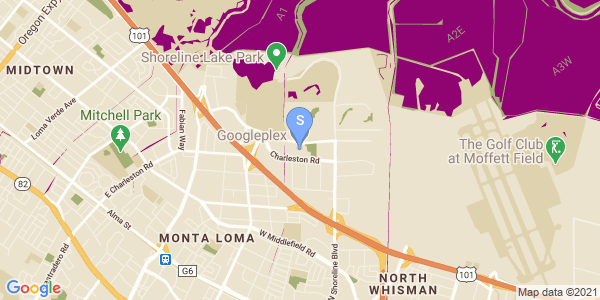
The following call shows a roadmap, with a size of 600x300px, centered on the Googleplex in Mountain View, CA at zoom level 13. It also specifies a blue delivery location marker and an online map style.
      https://maps.googleapis.com/maps/api/staticmap?center=37.422177,-122.084082
      &zoom=13
      &size=600x300
      &maptype=roadmap
      &markers=color:blue%7Clabel:S%7C37.422177,-122.084082
      &map_id=8f348d1b5a61d4bb
      &key=YOUR_API_KEY
      &solution_channel=GMP_guides_checkout_v1_a
This breaks down into the following sections:
| API URL | https://maps.googleapis.com/maps/api/staticmap? |
| map center | center=37.422177,-122.084082 |
| zoom level | zoom=13 |
| image size | size=600x300 |
| type of map | maptype=roadmap |
| store location markers | markers=color:blue%7Clabel:C%7C37.422177,-122.084082 |
| cloud map style | map_id=8f348d1b5a61d4bb |
| API Key | key=YOUR_API_KEY |
| Solution channel parameter. For more information, see the parameter documentation. | solution_channel=GMP_guides_checkout_v1_a |
The request returns the following image:
For more information about Maps Static API options, see the documentation.
Tips to further enhance Checkout
You can further enhance your customer experience by taking advantage of some of the advanced features that Place Autocomplete has to offer. Here are some tips for improving your Autocomplete address entry box:
-
Allow users to enter an address based on a business or point-of-interest name.
The "type ahead" prediction service not only works for addresses, but you can also choose to
allow business or landmark names to be entered. After a user enters a business name, you can
retrieve the address with a call to
Place Details.
To allow for both addresses and establishment names to be entered, remove the
typesproperty from the Autocomplete definition. - Customize the look and feel of the Place Autocomplete box to match your website style. You can also style the autocomplete widget to match the look and feel of your shopping cart. You can use CSS classes to customize the widget's appearance. For more information, see Style Autocomplete.
- Build a custom UI. If you want to build a custom UI instead of using the one designed by Google, call the Place Autocomplete service programmatically to retrieve predictions for a given input. You can retrieve Place Autocomplete predictions programmatically in JavaScript, Android, and iOS as well as calling the web services API directly through Places API.