OAuth এবং Google দিয়ে সাইন ইন করার মাধ্যমে সুবিন্যস্ত লিঙ্কিং

সংক্ষিপ্ত বিবরণ

OAuth-ভিত্তিক সাইন ইন উইথ গুগল স্ট্রিমলাইনড লিঙ্কিং, OAuth লিঙ্কিং- এর উপরে সাইন ইন উইথ গুগল সুবিধাটি যুক্ত করে। এটি গুগল ব্যবহারকারীদের জন্য একটি নির্বিঘ্ন লিঙ্কিং অভিজ্ঞতা প্রদান করে এবং অ্যাকাউন্ট তৈরির সুবিধাও দেয়, যার মাধ্যমে ব্যবহারকারী তার গুগল অ্যাকাউন্ট ব্যবহার করে আপনার পরিষেবাতে একটি নতুন অ্যাকাউন্ট তৈরি করতে পারেন।

OAuth এবং Sign in with Google ব্যবহার করে অ্যাকাউন্ট লিঙ্ক করার জন্য, এই সাধারণ ধাপগুলো অনুসরণ করুন:

  1. প্রথমে, ব্যবহারকারীর গুগল প্রোফাইল অ্যাক্সেস করার জন্য তার অনুমতি নিন।
  2. ব্যবহারকারীর অ্যাকাউন্টটি বিদ্যমান কিনা তা যাচাই করতে তাদের প্রোফাইলের তথ্য ব্যবহার করুন।
  3. বিদ্যমান ব্যবহারকারীদের অ্যাকাউন্টগুলো লিঙ্ক করুন।
  4. আপনার প্রমাণীকরণ সিস্টেমে গুগল ব্যবহারকারীর কোনো মিল খুঁজে না পেলে, গুগল থেকে প্রাপ্ত আইডি টোকেনটি যাচাই করুন। এরপর আপনি আইডি টোকেনে থাকা প্রোফাইল তথ্যের ভিত্তিতে একজন ব্যবহারকারী তৈরি করতে পারবেন।
এই চিত্রে দেখানো হয়েছে, একজন ব্যবহারকারী কীভাবে সরলীকৃত লিঙ্কিং প্রক্রিয়া ব্যবহার করে তার গুগল অ্যাকাউন্ট লিঙ্ক করতে পারেন। প্রথম স্ক্রিনশটটিতে দেখানো হয়েছে, কীভাবে একজন ব্যবহারকারী লিঙ্ক করার জন্য আপনার অ্যাপটি নির্বাচন করতে পারেন। দ্বিতীয় স্ক্রিনশটটিতে ব্যবহারকারী নিশ্চিত করতে পারেন যে আপনার পরিষেবাতে তার কোনো বিদ্যমান অ্যাকাউন্ট আছে কি না। তৃতীয় স্ক্রিনশটটিতে ব্যবহারকারী তার পছন্দের গুগল অ্যাকাউন্টটি নির্বাচন করতে পারেন। চতুর্থ স্ক্রিনশটটিতে আপনার অ্যাপের সাথে তার গুগল অ্যাকাউন্ট লিঙ্ক করার নিশ্চিতকরণ দেখানো হয়েছে। পঞ্চম স্ক্রিনশটটিতে গুগল অ্যাপে সফলভাবে লিঙ্ক করা একটি ব্যবহারকারী অ্যাকাউন্ট দেখানো হয়েছে।
স্ট্রিমলাইনড লিঙ্কিং ব্যবহার করে ব্যবহারকারীর ফোনে অ্যাকাউন্ট লিঙ্ক করা

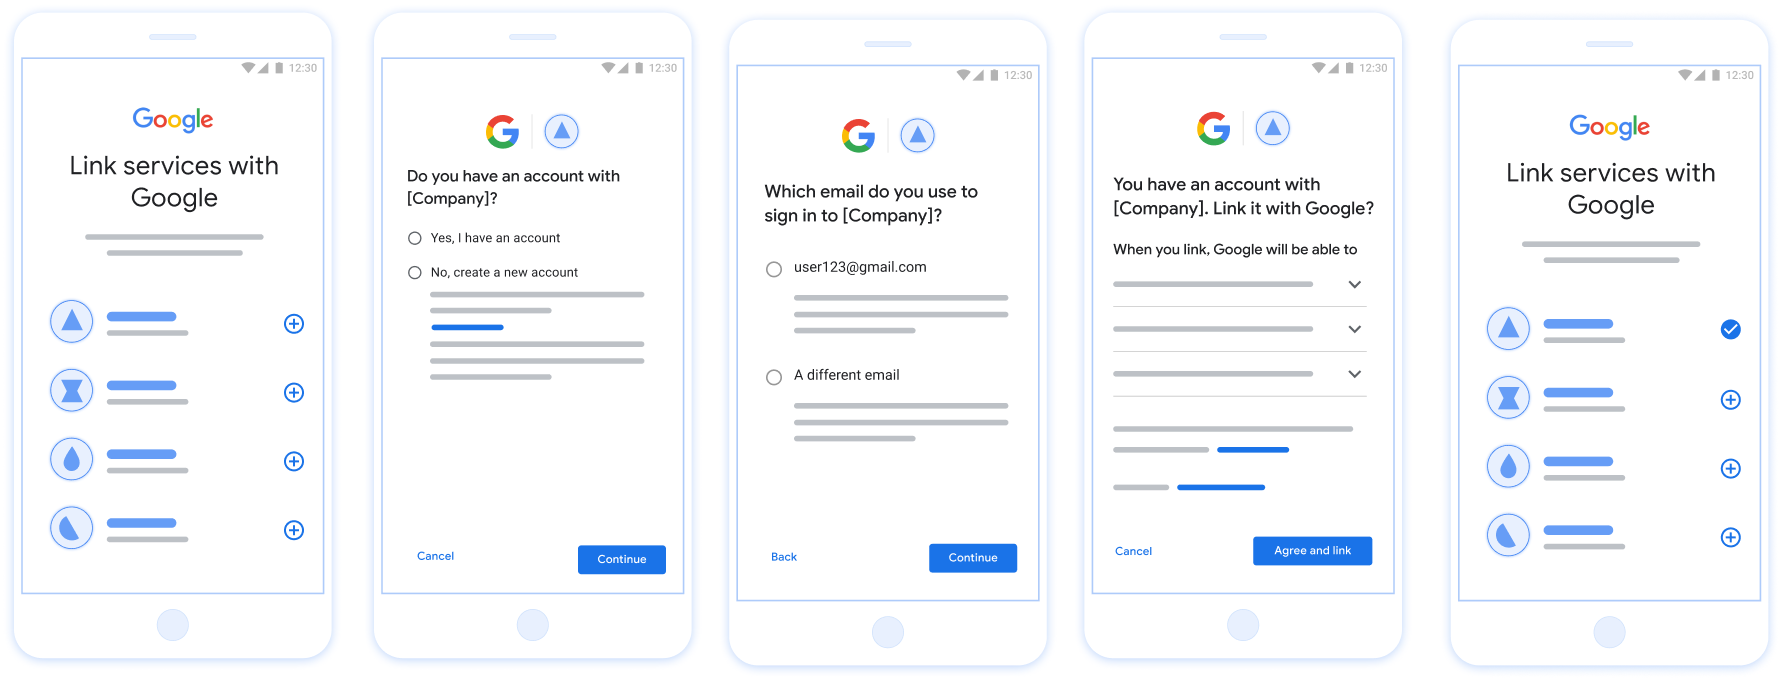
চিত্র ১। স্ট্রিমলাইনড লিঙ্কিং-এর মাধ্যমে ব্যবহারকারীর ফোনে অ্যাকাউন্ট লিঙ্ক করা।

সুবিন্যস্ত সংযোগ: OAuth + Google Flow দিয়ে সাইন ইন

নিম্নলিখিত সিকোয়েন্স ডায়াগ্রামটি স্ট্রিমলাইনড লিঙ্কিং-এর জন্য ব্যবহারকারী, গুগল এবং আপনার টোকেন এক্সচেঞ্জ এন্ডপয়েন্টের মধ্যকার মিথস্ক্রিয়া বিস্তারিতভাবে বর্ণনা করে।

ব্যবহারকারী গুগল অ্যাপ / সার্ভার আপনার টোকেন এক্সচেঞ্জ এন্ডপয়েন্ট আপনার এপিআই ১. ব্যবহারকারী লিঙ্কিং শুরু করেন ২. গুগল দিয়ে সাইন ইন করার অনুরোধ করুন ৩. গুগল দিয়ে সাইন ইন করুন ৪. অভিপ্রায় যাচাই করুন (JWT অ্যাসারশন) ৫. অ্যাকাউন্ট_পাওয়া_গেছে: সত্য/মিথ্যা যদি অ্যাকাউন্ট খুঁজে পাওয়া যায়: ৬. উদ্দেশ্য জানুন যদি কোনো অ্যাকাউন্ট না থাকে: ৬. অভিপ্রায় তৈরি করুন ৭. অ্যাক্সেস_টোকেন, রিফ্রেশ_টোকেন ৮. ব্যবহারকারীর টোকেন সংরক্ষণ করুন ৯. ব্যবহারকারীর রিসোর্স অ্যাক্সেস করুন
চিত্র ২. স্ট্রিমলাইনড লিঙ্কিং ফ্লো-এর ঘটনাক্রম।

ভূমিকা ও দায়িত্ব

নিম্নলিখিত সারণিতে স্ট্রিমলাইনড লিঙ্কিং ফ্লো-তে অংশগ্রহণকারীদের ভূমিকা ও দায়িত্ব সংজ্ঞায়িত করা হয়েছে।

অভিনেতা / উপাদান GAL ভূমিকা দায়িত্বসমূহ
গুগল অ্যাপ / সার্ভার OAuth ক্লায়েন্ট গুগল দিয়ে সাইন ইন করার জন্য ব্যবহারকারীর সম্মতি গ্রহণ করে, আপনার সার্ভারে পরিচয় নিশ্চিতকরণ (JWT) পাঠায় এবং ফলস্বরূপ প্রাপ্ত টোকেনগুলো নিরাপদে সংরক্ষণ করে।
আপনার টোকেন বিনিময় এন্ডপয়েন্ট পরিচয় প্রদানকারী / অনুমোদন সার্ভার পরিচয় যাচাইকরণ, বিদ্যমান অ্যাকাউন্ট পরীক্ষা করা, অ্যাকাউন্ট লিঙ্ক করার ইনটেন্ট ( check , get , create ) পরিচালনা করা এবং অনুরোধকৃত ইনটেন্টের উপর ভিত্তি করে টোকেন ইস্যু করা হয়।
আপনার পরিষেবা এপিআই রিসোর্স সার্ভার একটি বৈধ অ্যাক্সেস টোকেন উপস্থাপন করা হলে ব্যবহারকারীর ডেটাতে প্রবেশাধিকার প্রদান করে।

সুসংহত সংযোগের জন্য প্রয়োজনীয়তা

  • মৌলিক ওয়েব OAuth লিঙ্কিং ফ্লো বাস্তবায়ন করুন। আপনার পরিষেবাতে অবশ্যই OAuth 2.0-সম্মত অথরাইজেশন এবং টোকেন এক্সচেঞ্জ এন্ডপয়েন্ট থাকতে হবে।
  • আপনার টোকেন এক্সচেঞ্জ এন্ডপয়েন্টকে অবশ্যই JSON Web Token (JWT) অ্যাসারশন সমর্থন করতে হবে এবং check , create , ও get ইন্টেন্টগুলো ইমপ্লিমেন্ট করতে হবে।

আপনার OAuth সার্ভার বাস্তবায়ন করুন

আপনার টোকেন এক্সচেঞ্জ এন্ডপয়েন্টে অবশ্যই check , create , get ইন্টেন্টগুলো সাপোর্ট করতে হবে। অ্যাকাউন্ট লিঙ্কিং প্রক্রিয়াটি সম্পন্ন করতে এবং কখন বিভিন্ন ইন্টেন্ট ব্যবহৃত হয় তা জানতে এই ধাপগুলো অনুসরণ করুন:

  1. আপনার প্রমাণীকরণ সিস্টেমে ব্যবহারকারীর কি কোনো অ্যাকাউন্ট আছে? (ব্যবহারকারী হ্যাঁ বা না নির্বাচন করে সিদ্ধান্ত নেবেন)
    1. হ্যাঁ : ব্যবহারকারী কি আপনার প্ল্যাটফর্মে সাইন ইন করার জন্য তাদের গুগল অ্যাকাউন্টের সাথে যুক্ত ইমেলটি ব্যবহার করেন? (ব্যবহারকারী হ্যাঁ বা না নির্বাচন করে সিদ্ধান্ত নেবেন)
      1. হ্যাঁ : আপনার প্রমাণীকরণ সিস্টেমে ব্যবহারকারীর কি একটি মিলে যাওয়া অ্যাকাউন্ট আছে? (নিশ্চিত করার জন্য check intent কল করা হয়)
        1. হ্যাঁ: যদি গেট ইন্টেন্ট সফলভাবে রিটার্ন করে, তাহলে get intent কল করা হয় এবং অ্যাকাউন্টটি লিঙ্ক হয়ে যায়।
        2. না : নতুন অ্যাকাউন্ট তৈরি করবেন? (ব্যবহারকারী হ্যাঁ বা না নির্বাচন করে সিদ্ধান্ত নেবেন)
          1. হ্যাঁ: যদি ক্রিয়েট ইন্টেন্ট সফলভাবে রিটার্ন করে, তাহলে create intent কল করা হয় এবং অ্যাকাউন্টটি লিঙ্ক করা হয়।
          2. না : ওয়েব OAuth ফ্লোটি চালু হয়, ব্যবহারকারীকে তার ব্রাউজারে নিয়ে যাওয়া হয় এবং তাকে অন্য একটি ইমেলের সাথে লিঙ্ক করার বিকল্প দেওয়া হয়।
      2. না : ওয়েব OAuth ফ্লোটি চালু হয়, ব্যবহারকারীকে তার ব্রাউজারে নিয়ে যাওয়া হয় এবং তাকে অন্য একটি ইমেলের সাথে লিঙ্ক করার বিকল্প দেওয়া হয়।
    2. না : আপনার প্রমাণীকরণ সিস্টেমে ব্যবহারকারীর কি একটি মিলে যাওয়া অ্যাকাউন্ট আছে? (নিশ্চিত করার জন্য check intent কল করা হয়)
      1. হ্যাঁ: যদি গেট ইন্টেন্ট সফলভাবে রিটার্ন করে, তাহলে get intent কল করা হয় এবং অ্যাকাউন্টটি লিঙ্ক হয়ে যায়।
      2. না : যদি create intent সফলভাবে রিটার্ন করে, তাহলে create intent কল করা হয় এবং অ্যাকাউন্টটি লিঙ্ক করা হয়।

Check for an existing user account (check intent)

After the user gives consent to access their Google profile, Google sends a request that contains a signed assertion of the Google user's identity. The assertion contains information that includes the user's Google Account ID, name, and email address. The token exchange endpoint configured for your project handles that request.

If the corresponding Google account is already present in your authentication system, your token exchange endpoint responds with account_found=true. If the Google account doesn't match an existing user, your token exchange endpoint returns an HTTP 404 Not Found error with account_found=false.

The request has the following form:

POST /token HTTP/1.1
Host: oauth2.example.com
Content-Type: application/x-www-form-urlencoded

grant_type=urn:ietf:params:oauth:grant-type:jwt-bearer&intent=check&assertion=JWT&scope=SCOPES&client_id=GOOGLE_CLIENT_ID&client_secret=GOOGLE_CLIENT_SECRET

Your token exchange endpoint must be able to handle the following parameters:

Token endpoint parameters
intent For these requests, the value of this parameter is check.
grant_type The type of token being exchanged. For these requests, this parameter has the value urn:ietf:params:oauth:grant-type:jwt-bearer.
assertion A JSON Web Token (JWT) that provides a signed assertion of the Google user's identity. The JWT contains information that includes the user's Google Account ID, name, and email address.
client_id The client ID you assigned to Google.
client_secret The client secret you assigned to Google.

To respond to the check intent requests, your token exchange endpoint must perform the following steps:

  • Validate and decode the JWT assertion.
  • Check if the Google account is already present in your authentication system.
JWT দাবী যাচাই এবং ডিকোড করুন

আপনি আপনার ভাষার জন্য একটি JWT-ডিকোডিং লাইব্রেরি ব্যবহার করে JWT দাবিকে যাচাই এবং ডিকোড করতে পারেন। টোকেনের স্বাক্ষর যাচাই করতে JWK বা PEM ফর্ম্যাটে উপলব্ধ Google-এর পাবলিক কীগুলি ব্যবহার করুন৷

ডিকোড করা হলে, JWT দাবী নিম্নলিখিত উদাহরণের মত দেখায়:

{
  "sub": "1234567890",      // The unique ID of the user's Google Account
  "iss": "https://accounts.google.com",        // The assertion's issuer
  "aud": "123-abc.apps.googleusercontent.com", // Your server's client ID
  "iat": 233366400,         // Unix timestamp of the assertion's creation time
  "exp": 233370000,         // Unix timestamp of the assertion's expiration time
  "name": "Jan Jansen",
  "given_name": "Jan",
  "family_name": "Jansen",
  "email": "jan@gmail.com", // If present, the user's email address
  "email_verified": true,   // true, if Google has verified the email address
  "hd": "example.com",      // If present, the host domain of the user's GSuite email address
                            // If present, a URL to user's profile picture
  "picture": "https://lh3.googleusercontent.com/a-/AOh14GjlTnZKHAeb94A-FmEbwZv7uJD986VOF1mJGb2YYQ",
  "locale": "en_US"         // User's locale, from browser or phone settings
}

টোকেনের স্বাক্ষর যাচাই করার পাশাপাশি, নিশ্চিত করুন যে দাবীর ইস্যুকারী ( iss ক্ষেত্র) হল https://accounts.google.com , দর্শক ( aud ফিল্ড) হল আপনার নির্ধারিত ক্লায়েন্ট আইডি, এবং টোকেনের মেয়াদ শেষ হয়নি ( exp ক্ষেত্র)।

email , email_verified এবং hd ক্ষেত্রগুলি ব্যবহার করে আপনি নির্ধারণ করতে পারেন যে Google হোস্ট করে এবং একটি ইমেল ঠিকানার জন্য অনুমোদিত কিনা। যেসব ক্ষেত্রে Google অনুমোদিত সেক্ষেত্রে ব্যবহারকারী বর্তমানে বৈধ অ্যাকাউন্টের মালিক হিসাবে পরিচিত এবং আপনি পাসওয়ার্ড বা অন্যান্য চ্যালেঞ্জ পদ্ধতিগুলি এড়িয়ে যেতে পারেন। অন্যথায়, লিঙ্ক করার আগে অ্যাকাউন্ট যাচাই করতে এই পদ্ধতিগুলি ব্যবহার করা যেতে পারে।

যেসব ক্ষেত্রে Google কর্তৃত্বপূর্ণ:

  • email একটি @gmail.com প্রত্যয় রয়েছে, এটি একটি Gmail অ্যাকাউন্ট।
  • email_verified সত্য এবং hd সেট করা আছে, এটি একটি G Suite অ্যাকাউন্ট।

ব্যবহারকারীরা Gmail বা G Suite ব্যবহার না করে Google অ্যাকাউন্টের জন্য নিবন্ধন করতে পারেন। যখন email @gmail.com প্রত্যয় থাকে না এবং hd অনুপস্থিত থাকে তখন Google অনুমোদিত নয় এবং ব্যবহারকারীকে যাচাই করার জন্য পাসওয়ার্ড বা অন্যান্য চ্যালেঞ্জ পদ্ধতি সুপারিশ করা হয়। email_verified ও সত্য হতে পারে কারণ Google প্রাথমিকভাবে ব্যবহারকারীকে যাচাই করেছিল যখন Google অ্যাকাউন্ট তৈরি হয়েছিল, তবে তৃতীয় পক্ষের ইমেল অ্যাকাউন্টের মালিকানা তখন থেকে পরিবর্তিত হতে পারে।

Check if the Google account is already present in your authentication system

Check whether either of the following conditions are true:

  • The Google Account ID, found in the assertion's sub field, is in your user database.
  • The email address in the assertion matches a user in your user database.

If either condition is true, the user has already signed up. In that case, return a response like the following:

HTTP/1.1 200 Success
Content-Type: application/json;charset=UTF-8

{
  "account_found":"true",
}

If neither the Google Account ID nor the email address specified in the assertion matches a user in your database, the user hasn't signed up yet. In this case, your token exchange endpoint needs to reply with a HTTP 404 error that specifies "account_found": "false", as in the following example:

HTTP/1.1 404 Not found
Content-Type: application/json;charset=UTF-8

{
  "account_found":"false",
}

Handle automatic linking (get intent)

After the user gives consent to access their Google profile, Google sends a request that contains a signed assertion of the Google user's identity. The assertion contains information that includes the user's Google Account ID, name, and email address. The token exchange endpoint configured for your project handles that request.

If the corresponding Google Account is already present in your authentication system, your token exchange endpoint returns a token for the user. If the Google Account doesn't match an existing user, your token exchange endpoint returns a linking_error error and optional login_hint.

The request has the following form:

POST /token HTTP/1.1
Host: oauth2.example.com
Content-Type: application/x-www-form-urlencoded

grant_type=urn:ietf:params:oauth:grant-type:jwt-bearer&intent=get&assertion=JWT&scope=SCOPES&client_id=GOOGLE_CLIENT_ID&client_secret=GOOGLE_CLIENT_SECRET

Your token exchange endpoint must be able to handle the following parameters:

Token endpoint parameters
intent For these requests, the value of this parameter is get.
grant_type The type of token being exchanged. For these requests, this parameter has the value urn:ietf:params:oauth:grant-type:jwt-bearer.
assertion A JSON Web Token (JWT) that provides a signed assertion of the Google user's identity. The JWT contains information that includes the user's Google Account ID, name, and email address.
scope Optional: Any scopes that you've configured Google to request from users.
client_id The client ID you assigned to Google.
client_secret The client secret you assigned to Google.

To respond to the get intent requests, your token exchange endpoint must perform the following steps:

  • Validate and decode the JWT assertion.
  • Check if the Google account is already present in your authentication system.
JWT দাবী যাচাই এবং ডিকোড করুন

আপনি আপনার ভাষার জন্য একটি JWT-ডিকোডিং লাইব্রেরি ব্যবহার করে JWT দাবিকে যাচাই এবং ডিকোড করতে পারেন। টোকেনের স্বাক্ষর যাচাই করতে JWK বা PEM ফর্ম্যাটে উপলব্ধ Google-এর পাবলিক কীগুলি ব্যবহার করুন৷

ডিকোড করা হলে, JWT দাবী নিম্নলিখিত উদাহরণের মত দেখায়:

{
  "sub": "1234567890",      // The unique ID of the user's Google Account
  "iss": "https://accounts.google.com",        // The assertion's issuer
  "aud": "123-abc.apps.googleusercontent.com", // Your server's client ID
  "iat": 233366400,         // Unix timestamp of the assertion's creation time
  "exp": 233370000,         // Unix timestamp of the assertion's expiration time
  "name": "Jan Jansen",
  "given_name": "Jan",
  "family_name": "Jansen",
  "email": "jan@gmail.com", // If present, the user's email address
  "email_verified": true,   // true, if Google has verified the email address
  "hd": "example.com",      // If present, the host domain of the user's GSuite email address
                            // If present, a URL to user's profile picture
  "picture": "https://lh3.googleusercontent.com/a-/AOh14GjlTnZKHAeb94A-FmEbwZv7uJD986VOF1mJGb2YYQ",
  "locale": "en_US"         // User's locale, from browser or phone settings
}

টোকেনের স্বাক্ষর যাচাই করার পাশাপাশি, নিশ্চিত করুন যে দাবীর ইস্যুকারী ( iss ক্ষেত্র) হল https://accounts.google.com , দর্শক ( aud ফিল্ড) হল আপনার নির্ধারিত ক্লায়েন্ট আইডি, এবং টোকেনের মেয়াদ শেষ হয়নি ( exp ক্ষেত্র)।

email , email_verified এবং hd ক্ষেত্রগুলি ব্যবহার করে আপনি নির্ধারণ করতে পারেন যে Google হোস্ট করে এবং একটি ইমেল ঠিকানার জন্য অনুমোদিত কিনা। যেসব ক্ষেত্রে Google অনুমোদিত সেক্ষেত্রে ব্যবহারকারী বর্তমানে বৈধ অ্যাকাউন্টের মালিক হিসাবে পরিচিত এবং আপনি পাসওয়ার্ড বা অন্যান্য চ্যালেঞ্জ পদ্ধতিগুলি এড়িয়ে যেতে পারেন। অন্যথায়, লিঙ্ক করার আগে অ্যাকাউন্ট যাচাই করতে এই পদ্ধতিগুলি ব্যবহার করা যেতে পারে।

যেসব ক্ষেত্রে Google কর্তৃত্বপূর্ণ:

  • email একটি @gmail.com প্রত্যয় রয়েছে, এটি একটি Gmail অ্যাকাউন্ট।
  • email_verified সত্য এবং hd সেট করা আছে, এটি একটি G Suite অ্যাকাউন্ট।

ব্যবহারকারীরা Gmail বা G Suite ব্যবহার না করে Google অ্যাকাউন্টের জন্য নিবন্ধন করতে পারেন। যখন email @gmail.com প্রত্যয় থাকে না এবং hd অনুপস্থিত থাকে তখন Google অনুমোদিত নয় এবং ব্যবহারকারীকে যাচাই করার জন্য পাসওয়ার্ড বা অন্যান্য চ্যালেঞ্জ পদ্ধতি সুপারিশ করা হয়। email_verified ও সত্য হতে পারে কারণ Google প্রাথমিকভাবে ব্যবহারকারীকে যাচাই করেছিল যখন Google অ্যাকাউন্ট তৈরি হয়েছিল, তবে তৃতীয় পক্ষের ইমেল অ্যাকাউন্টের মালিকানা তখন থেকে পরিবর্তিত হতে পারে।

Check if the Google account is already present in your authentication system

Check whether either of the following conditions are true:

  • The Google Account ID, found in the assertion's sub field, is in your user database.
  • The email address in the assertion matches a user in your user database.

If an account is found for the user, issue an access token and return the values in a JSON object in the body of your HTTPS response, like in the following example:

{
  "token_type": "Bearer",
  "access_token": "ACCESS_TOKEN",
  "refresh_token": "REFRESH_TOKEN",
  "expires_in": SECONDS_TO_EXPIRATION
}

In some cases, account linking based on ID token might fail for the user. If it does so for any reason, your token exchange endpoint needs to reply with a HTTP 401 error that specifies error=linking_error, as the following example shows:

HTTP/1.1 401 Unauthorized
Content-Type: application/json;charset=UTF-8

{
  "error":"linking_error",
  "login_hint":"foo@bar.com"
}

When Google receives a 401 error response with linking_error, Google sends the user to your authorization endpoint with login_hint as a parameter. The user completes account linking using the OAuth linking flow in their browser.

Handle account creation using Sign in with Google (create intent)

When a user needs to create an account on your service, Google makes a request to your token exchange endpoint that specifies intent=create.

The request has the following form:

POST /token HTTP/1.1
Host: oauth2.example.com
Content-Type: application/x-www-form-urlencoded

response_type=token&grant_type=urn:ietf:params:oauth:grant-type:jwt-bearer&scope=SCOPES&intent=create&assertion=JWT&client_id=GOOGLE_CLIENT_ID&client_secret=GOOGLE_CLIENT_SECRET

Your token exchange endpoint must able to handle the following parameters:

Token endpoint parameters
intent For these requests, the value of this parameter is create.
grant_type The type of token being exchanged. For these requests, this parameter has the value urn:ietf:params:oauth:grant-type:jwt-bearer.
assertion A JSON Web Token (JWT) that provides a signed assertion of the Google user's identity. The JWT contains information that includes the user's Google Account ID, name, and email address.
client_id The client ID you assigned to Google.
client_secret The client secret you assigned to Google.

The JWT within the assertion parameter contains the user's Google Account ID, name, and email address, which you can use to create a new account on your service.

To respond to the create intent requests, your token exchange endpoint must perform the following steps:

  • Validate and decode the JWT assertion.
  • Validate user information and create new account.
JWT দাবী যাচাই এবং ডিকোড করুন

আপনি আপনার ভাষার জন্য একটি JWT-ডিকোডিং লাইব্রেরি ব্যবহার করে JWT দাবিকে যাচাই এবং ডিকোড করতে পারেন। টোকেনের স্বাক্ষর যাচাই করতে JWK বা PEM ফর্ম্যাটে উপলব্ধ Google-এর পাবলিক কীগুলি ব্যবহার করুন৷

ডিকোড করা হলে, JWT দাবী নিম্নলিখিত উদাহরণের মত দেখায়:

{
  "sub": "1234567890",      // The unique ID of the user's Google Account
  "iss": "https://accounts.google.com",        // The assertion's issuer
  "aud": "123-abc.apps.googleusercontent.com", // Your server's client ID
  "iat": 233366400,         // Unix timestamp of the assertion's creation time
  "exp": 233370000,         // Unix timestamp of the assertion's expiration time
  "name": "Jan Jansen",
  "given_name": "Jan",
  "family_name": "Jansen",
  "email": "jan@gmail.com", // If present, the user's email address
  "email_verified": true,   // true, if Google has verified the email address
  "hd": "example.com",      // If present, the host domain of the user's GSuite email address
                            // If present, a URL to user's profile picture
  "picture": "https://lh3.googleusercontent.com/a-/AOh14GjlTnZKHAeb94A-FmEbwZv7uJD986VOF1mJGb2YYQ",
  "locale": "en_US"         // User's locale, from browser or phone settings
}

টোকেনের স্বাক্ষর যাচাই করার পাশাপাশি, নিশ্চিত করুন যে দাবীর ইস্যুকারী ( iss ক্ষেত্র) হল https://accounts.google.com , দর্শক ( aud ফিল্ড) হল আপনার নির্ধারিত ক্লায়েন্ট আইডি, এবং টোকেনের মেয়াদ শেষ হয়নি ( exp ক্ষেত্র)।

email , email_verified এবং hd ক্ষেত্রগুলি ব্যবহার করে আপনি নির্ধারণ করতে পারেন যে Google হোস্ট করে এবং একটি ইমেল ঠিকানার জন্য অনুমোদিত কিনা। যেসব ক্ষেত্রে Google অনুমোদিত সেক্ষেত্রে ব্যবহারকারী বর্তমানে বৈধ অ্যাকাউন্টের মালিক হিসাবে পরিচিত এবং আপনি পাসওয়ার্ড বা অন্যান্য চ্যালেঞ্জ পদ্ধতিগুলি এড়িয়ে যেতে পারেন। অন্যথায়, লিঙ্ক করার আগে অ্যাকাউন্ট যাচাই করতে এই পদ্ধতিগুলি ব্যবহার করা যেতে পারে।

যেসব ক্ষেত্রে Google কর্তৃত্বপূর্ণ:

  • email একটি @gmail.com প্রত্যয় রয়েছে, এটি একটি Gmail অ্যাকাউন্ট।
  • email_verified সত্য এবং hd সেট করা আছে, এটি একটি G Suite অ্যাকাউন্ট।

ব্যবহারকারীরা Gmail বা G Suite ব্যবহার না করে Google অ্যাকাউন্টের জন্য নিবন্ধন করতে পারেন। যখন email @gmail.com প্রত্যয় থাকে না এবং hd অনুপস্থিত থাকে তখন Google অনুমোদিত নয় এবং ব্যবহারকারীকে যাচাই করার জন্য পাসওয়ার্ড বা অন্যান্য চ্যালেঞ্জ পদ্ধতি সুপারিশ করা হয়। email_verified ও সত্য হতে পারে কারণ Google প্রাথমিকভাবে ব্যবহারকারীকে যাচাই করেছিল যখন Google অ্যাকাউন্ট তৈরি হয়েছিল, তবে তৃতীয় পক্ষের ইমেল অ্যাকাউন্টের মালিকানা তখন থেকে পরিবর্তিত হতে পারে।

Validate user information and create new account

Check whether either of the following conditions are true:

  • The Google Account ID, found in the assertion's sub field, is in your user database.
  • The email address in the assertion matches a user in your user database.

If either condition is true, prompt the user to link their existing account with their Google Account. To do so, respond to the request with an HTTP 401 error that specifies error=linking_error and gives the user's email address as the login_hint. The following is a sample response:

HTTP/1.1 401 Unauthorized
Content-Type: application/json;charset=UTF-8

{
  "error":"linking_error",
  "login_hint":"foo@bar.com"
}

When Google receives a 401 error response with linking_error, Google sends the user to your authorization endpoint with login_hint as a parameter. The user completes account linking using the OAuth linking flow in their browser.

If neither condition is true, create a new user account with the information provided in the JWT. New accounts don't typically have a password set. It's recommended that you add Sign in with Google to other platforms to enable users to sign in with Google across the surfaces of your application. Alternatively, you can email the user a link that starts your password recovery flow to allow the user to set a password to sign in on other platforms.

When the creation is completed, issue an access token and refresh token and return the values in a JSON object in the body of your HTTPS response, like in the following example:

{
  "token_type": "Bearer",
  "access_token": "ACCESS_TOKEN",
  "refresh_token": "REFRESH_TOKEN",
  "expires_in": SECONDS_TO_EXPIRATION
}

আপনার গুগল এপিআই ক্লায়েন্ট আইডি পান

অ্যাকাউন্ট লিঙ্কিং রেজিস্ট্রেশন প্রক্রিয়ার সময় আপনাকে আপনার গুগল এপিআই ক্লায়েন্ট আইডি প্রদান করতে হবে। OAuth লিঙ্কিং ধাপগুলো সম্পন্ন করার সময় আপনার তৈরি করা প্রজেক্টটি ব্যবহার করে এপিআই ক্লায়েন্ট আইডি পেতে, নিম্নলিখিত ধাপগুলো সম্পন্ন করুন:

  1. ক্লায়েন্ট পৃষ্ঠায় যান।
  2. একটি গুগল এপিআই প্রজেক্ট তৈরি করুন বা নির্বাচন করুন।

    আপনার প্রোজেক্টে ওয়েব অ্যাপ্লিকেশন টাইপের জন্য কোনো ক্লায়েন্ট আইডি না থাকলে, একটি তৈরি করতে 'ক্রিয়েট ক্লায়েন্ট'-এ ক্লিক করুন। 'অথরাইজড জাভাস্ক্রিপ্ট অরিজিনস' বক্সে আপনার সাইটের ডোমেইনটি অবশ্যই অন্তর্ভুক্ত করুন। যখন আপনি লোকাল টেস্ট বা ডেভেলপমেন্ট করবেন, তখন আপনাকে অবশ্যই 'অথরাইজড জাভাস্ক্রিপ্ট অরিজিনস' ফিল্ডে http://localhost এবং http://localhost:<port_number> উভয়ই যোগ করতে হবে।

আপনার বাস্তবায়ন যাচাই করুন

আপনি OAuth 2.0 প্লেগ্রাউন্ড টুলটি ব্যবহার করে আপনার বাস্তবায়ন যাচাই করতে পারেন।

টুলটিতে, নিম্নলিখিত ধাপগুলো অনুসরণ করুন:

  1. OAuth 2.0 কনফিগারেশন উইন্ডোটি খুলতে কনফিগারেশন ক্লিক করুন।
  2. OAuth ফ্লো ফিল্ডে ক্লায়েন্ট-সাইড নির্বাচন করুন।
  3. OAuth Endpoints ফিল্ডে Custom নির্বাচন করুন।
  4. আপনার OAuth 2.0 এন্ডপয়েন্ট এবং Google-কে বরাদ্দ করা ক্লায়েন্ট আইডি সংশ্লিষ্ট ফিল্ডগুলিতে উল্লেখ করুন।
  5. ধাপ ১ অংশে, কোনো গুগল স্কোপ নির্বাচন করবেন না। এর পরিবর্তে, এই ক্ষেত্রটি খালি রাখুন অথবা আপনার সার্ভারের জন্য বৈধ একটি স্কোপ টাইপ করুন (যদি আপনি OAuth স্কোপ ব্যবহার না করেন তবে একটি ইচ্ছামতো স্ট্রিং টাইপ করুন)। আপনার কাজ শেষ হলে, 'Authorize APIs'-এ ক্লিক করুন।
  6. ধাপ ২ এবং ধাপ ৩ অংশে, OAuth 2.0 ফ্লোটি অনুসরণ করুন এবং যাচাই করুন যে প্রতিটি ধাপ উদ্দেশ্য অনুযায়ী কাজ করছে।

আপনি গুগল অ্যাকাউন্ট লিঙ্কিং ডেমো টুলটি ব্যবহার করে আপনার বাস্তবায়ন যাচাই করতে পারেন।

টুলটিতে, নিম্নলিখিত ধাপগুলো অনুসরণ করুন:

  1. ‘Sign in with Google’ বোতামটিতে ক্লিক করুন।
  2. যে অ্যাকাউন্টটি লিঙ্ক করতে চান, সেটি বেছে নিন।
  3. সার্ভিস আইডিটি প্রবেশ করান।
  4. ঐচ্ছিকভাবে এক বা একাধিক স্কোপ লিখুন যেগুলোর জন্য আপনি অ্যাক্সেসের অনুরোধ করবেন।
  5. স্টার্ট ডেমো-তে ক্লিক করুন।
  6. অনুরোধ করা হলে, লিঙ্কিং অনুরোধে সম্মতি ও অস্বীকৃতি জানিয়ে তা নিশ্চিত করুন।
  7. আপনাকে আপনার প্ল্যাটফর্মে পুনঃনির্দেশিত করা হয়েছে কিনা তা নিশ্চিত করুন।