
帳戶是透過業界標準的 OAuth 2.0 授權碼流程連結。
代理程式適用的 OAuth 2.1 和 PKCE
對於無狀態 AI 代理程式和多模態管道,建議強制執行 OAuth 2.1。
- PKCE (用於程式碼交換的金鑰證明):必須用於保護授權碼流程,防止攔截攻擊。
- 沒有隱含流程:隱含流程會在網址中公開存取權杖, 這會對代理程式環境造成安全風險。
您的服務必須支援符合 OAuth 2.0/2.1 規範的授權和權杖交換端點。
建立專案
如要建立專案以使用帳戶連結,請按照下列步驟操作:
- 前往 Google API 控制台。
- 按一下 [Create Project]。
- 輸入名稱或接受系統產生的建議。
- 確認或編輯其餘欄位。
- 點選「建立」。
如要查看專案 ID,請按照下列步驟操作:
- 前往 Google API 控制台。
- 在到達網頁的表格中找出專案。專案 ID 會顯示在「ID」欄中。
設定 OAuth 同意畫面
Google 帳戶連結程序會顯示同意畫面,告知使用者要求存取資料的應用程式、要求存取的資料類型,以及適用條款。您必須先設定 OAuth 同意畫面,才能產生 Google API 用戶端 ID。
- 開啟 Google API 控制台的「OAuth consent screen」(OAuth 同意畫面) 頁面。
- 如果出現提示,請選取您剛建立的專案。
在「OAuth 同意畫面」頁面中填寫表單,然後按一下「儲存」按鈕。
應用程式名稱:要求同意的應用程式名稱。名稱應如實反映應用程式,且與使用者在其他地方看到的應用程式名稱一致。應用程式名稱會顯示在帳戶連結同意畫面上。
應用程式標誌:同意畫面上的圖片,可協助使用者識別您的應用程式。標誌會顯示在帳戶連結同意畫面和帳戶設定中。
支援電子郵件:方便使用者與您聯絡,洽詢同意聲明相關事宜。
Google API 的範圍:範圍可讓應用程式存取使用者的私人 Google 資料。如果是 Google 帳戶連結用途,預設範圍 (電子郵件地址、個人資料、openid) 就已足夠,不需要新增任何敏感範圍。一般而言,最佳做法是在需要存取權時,逐步要求範圍,而不是預先要求。瞭解詳情。
授權網域:為保障您與使用者的安全,Google 只允許應用程式透過 OAuth 驗證,使用授權網域。應用程式的連結必須託管於授權網域。瞭解詳情。
應用程式首頁連結:應用程式的首頁。必須託管在已授權網域。
應用程式隱私權政策連結:顯示在 Google 帳戶連結同意畫面上。必須託管在已授權網域。
應用程式服務條款連結 (選填):必須託管於已授權網域。
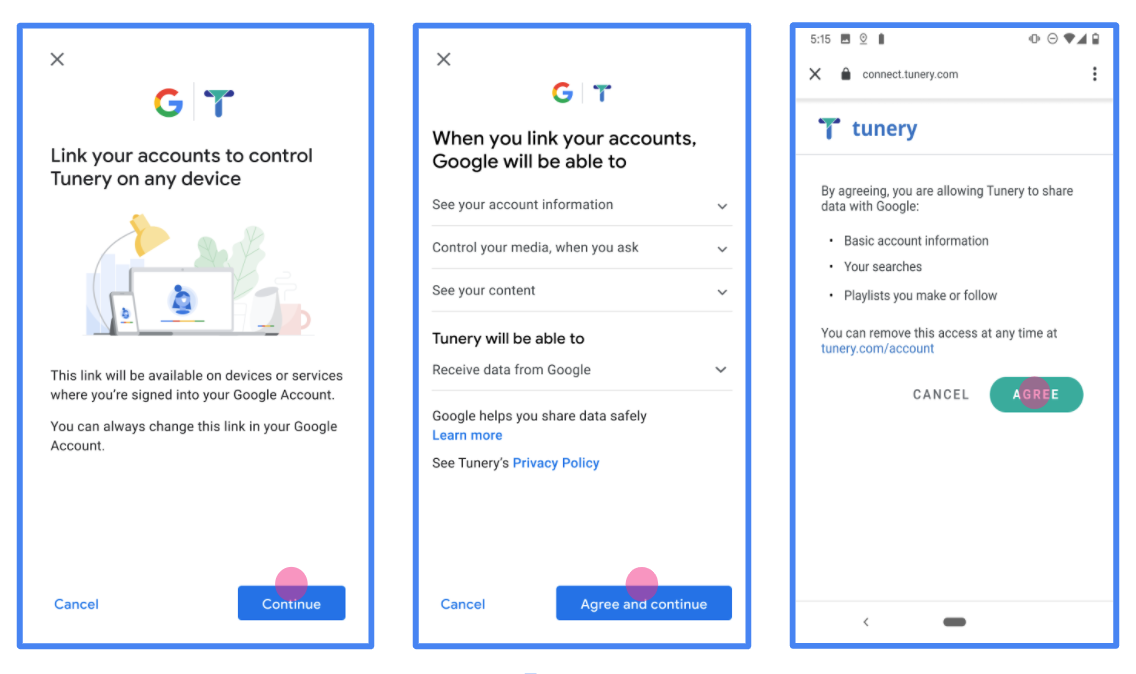
圖 1. 虛構應用程式 Tunery 的 Google 帳戶連結同意畫面
查看「驗證狀態」,如果應用程式需要驗證,請點按「送交驗證」按鈕,將應用程式送交驗證。詳情請參閱「OAuth 驗證規定」。
導入 OAuth 伺服器
An OAuth 2.0 server implementation of the authorization code flow consists of two endpoints, which your service makes available by HTTPS. The first endpoint is the authorization endpoint, which is responsible for finding or obtaining consent from users for data access. The authorization endpoint presents a sign-in UI to your users that aren't already signed in and records consent to the requested access. The second endpoint is the token exchange endpoint, which is used to obtain encrypted strings, called tokens, that authorize a user to access your service.
When a Google application needs to call one of your service's APIs, Google uses these endpoints together to get permission from your users to call these APIs on their behalf.
Google Account Linking: OAuth Authorization Code Flow
The following sequence diagram details interactions between the User, Google, and your service's endpoints.
Roles and responsibilities
The following table defines the roles and responsibilities of the actors in the Google Account Linking (GAL) OAuth flow. Note that in GAL, Google acts as the OAuth Client, while your service acts as the Identity/Service Provider.
| Actor / Component | GAL Role | Responsibilities |
|---|---|---|
| Google App / Server | OAuth Client | Initiates the flow, receives the authorization code, exchanges it for tokens, and securely stores them to access your service's APIs. |
| Your Authorization Endpoint | Authorization Server | Authenticates your users and obtains their consent to share access to their data with Google. |
| Your Token Exchange Endpoint | Authorization Server | Validates authorization codes and refresh tokens, and issues access tokens to the Google Server. |
| Google Redirect URI | Callback Endpoint | Receives the user redirect from your authorization service with the
code and state values. |
An OAuth 2.0 authorization code flow session initiated by Google has the following flow:
- Google opens your authorization endpoint in the user's browser. If the flow started on a voice-only device for an Action, Google transfers the execution to a phone.
- The user signs in, if not signed in already, and grants Google permission to access their data with your API, if they haven't already granted permission.
- Your service creates an authorization code and returns it to Google. To do so, redirect the user's browser back to Google with the authorization code attached to the request.
- Google sends the authorization code to your token exchange endpoint, which verifies the authenticity of the code and returns an access token and a refresh token. The access token is a short-lived token that your service accepts as credentials to access APIs. The refresh token is a long-lived token that Google can store and use to acquire new access tokens when they expire.
- After the user has completed the account linking flow, every subsequent request sent from Google contains an access token.
Implementation Recipe
Follow these steps to implement the Authorization Code flow.
Step 1: Handle authorization requests
When Google initiates account linking, it redirects the user to your authorization endpoint. For detailed protocol contracts and parameter requirements, see the Authorization Endpoint.
To handle the request, perform the following actions:
Validate the request:
- Confirm that the
client_idmatches the Client ID assigned to Google. - Confirm that the
redirect_urimatches the expected Google redirect URL:none https://oauth-redirect.googleusercontent.com/r/YOUR_PROJECT_ID https://oauth-redirect-sandbox.googleusercontent.com/r/YOUR_PROJECT_ID - Verify that
response_typeiscode.
- Confirm that the
Authenticate the user:
- Check if the user is signed in to your service.
- If the user is not signed in, prompt them to complete your sign-in or sign-up flow.
Generate authorization code:
- Create a unique, non-guessable authorization code associated with the user and client.
- Set the code to expire in approximately 10 minutes.
Redirect back to Google:
- Redirect the browser to the URL provided in
redirect_uri. - Append the following query parameters:
code: The authorization code you generated.state: The unmodified state value received from Google.
- Redirect the browser to the URL provided in
Step 2: Handle token exchange requests
Your token exchange endpoint processes two types of requests: exchanging codes for tokens, and refreshing expired access tokens. For detailed protocol contracts and parameter requirements, see the Token Exchange Endpoint.
A. Exchange authorization codes for tokens
When Google receives the authorization code, it calls your token exchange endpoint (POST) to retrieve tokens.
Validate the request:
- Verify
client_idandclient_secret. - Verify the authorization code is valid and not expired.
- Confirm
redirect_urimatches the value used in Step 1. - If validation fails, return an HTTP
400 Bad Requestwith{"error": "invalid_grant"}.
- Verify
Issue tokens:
- Generate a long-lived
refresh_tokenand a short-livedaccess_token(typically 1 hour). - Return an HTTP
200 OKwith the standard JSON token response.
- Generate a long-lived
B. Refresh access tokens
When the access token expires, Google requests a new one using the refresh token.
Validate the request:
- Verify
client_id,client_secret, andrefresh_token. - If validation fails, return an HTTP
400 Bad Requestwith{"error": "invalid_grant"}.
- Verify
Issue new access token:
- Generate a new short-lived
access_token. - Return an HTTP
200 OKwith the JSON token response (optionally including a new refresh token).
- Generate a new short-lived
Handle userinfo requests
The userinfo endpoint is an OAuth 2.0 protected resource that return claims about the linked user. Implementing and hosting the userinfo endpoint is optional, except for the following use cases:
- Linked Account Sign-In with Google One Tap.
- Frictionless subscription on AndroidTV.
After the access token has been successfully retrieved from your token endpoint, Google sends a request to your userinfo endpoint to retrieve basic profile information about the linked user.
| userinfo endpoint request headers | |
|---|---|
Authorization header |
The access token of type Bearer. |
For example, if your userinfo endpoint is available at
https://myservice.example.com/userinfo, a request might look like the following:
GET /userinfo HTTP/1.1
Host: myservice.example.com
Authorization: Bearer ACCESS_TOKEN
For your userinfo endpoint to handle requests, do the following steps:
- Extract access token from the Authorization header and return information for the user associated with the access token.
- If the access token is invalid, return an HTTP 401 Unauthorized error with using the
WWW-AuthenticateResponse Header. Below is an example of a userinfo error response:HTTP/1.1 401 Unauthorized WWW-Authenticate: error="invalid_token", error_description="The Access Token expired"
If the access token is valid, return and HTTP 200 response with the following JSON object in the body of the HTTPS response:
{ "sub": "USER_UUID", "email": "EMAIL_ADDRESS", "given_name": "FIRST_NAME", "family_name": "LAST_NAME", "name": "FULL_NAME", "picture": "PROFILE_PICTURE", }userinfo endpoint response subA unique ID that identifies the user in your system. emailEmail address of the user. given_nameOptional: First name of the user. family_nameOptional: Last name of the user. nameOptional: Full name of the user. pictureOptional: Profile picture of the user.
驗證實作
您可以使用 OAuth 2.0 Playground 工具驗證實作成果。
在工具中執行下列步驟:
- 點選「設定」 開啟「OAuth 2.0 設定」視窗。
- 在「OAuth flow」欄位中,選取「用戶端」。
- 在「OAuth Endpoints」(OAuth 端點) 欄位中,選取「Custom」(自訂)。
- 在對應欄位中,指定 OAuth 2.0 端點和您指派給 Google 的用戶端 ID。
- 在「步驟 1」部分,請勿選取任何 Google 範圍。請將這個欄位留空,或輸入適用於伺服器的範圍 (如果您未使用 OAuth 範圍,則輸入任意字串)。完成後,請按一下「授權 API」。
- 在「步驟 2」和「步驟 3」部分,請完成 OAuth 2.0 流程,並確認每個步驟都能正常運作。
您可以使用 Google 帳戶連結示範工具驗證實作項目。
在工具中執行下列步驟:
- 按一下「使用 Google 帳戶登入」按鈕。
- 選擇要連結的帳戶。
- 輸入服務 ID。
- 選擇性輸入您要要求存取的一或多個範圍。
- 按一下「開始試用」。
- 系統顯示提示時,確認您要同意或拒絕連結要求。
- 確認系統會將你重新導向至平台。