ระบบจะลิงก์บัญชีโดยใช้ขั้นตอน รหัสการให้สิทธิ์ OAuth 2.0 ซึ่งเป็นมาตรฐานอุตสาหกรรม
OAuth 2.1 และ PKCE สำหรับ Agent
เราขอแนะนำให้บังคับใช้ OAuth 2.1 สำหรับ AI Agent แบบไม่เก็บสถานะและไปป์ไลน์แบบมัลติโมดัล
- PKCE (Proof Key for Code Exchange): ต้องใช้เพื่อรักษาความปลอดภัย ขั้นตอนรหัสการให้สิทธิ์ ซึ่งจะป้องกันการโจมตีแบบดักรับ
- ไม่มีขั้นตอนการให้สิทธิ์โดยนัย: ขั้นตอนการให้สิทธิ์โดยนัยจะเปิดเผยโทเค็นเพื่อการเข้าถึงใน URL, ซึ่งเป็นความเสี่ยงด้านความปลอดภัยสำหรับสภาพแวดล้อมของ Agent
บริการของคุณต้องรองรับปลายทาง การให้สิทธิ์ และ การแลกเปลี่ยนโทเค็น ที่เป็นไปตามข้อกำหนด OAuth 2.0/2.1
สร้างโปรเจ็กต์
วิธีสร้างโปรเจ็กต์เพื่อใช้การลิงก์บัญชี
- ไปที่คอนโซล Google API
- คลิกสร้างโปรเจ็กต์
- ป้อนชื่อหรือยอมรับคำแนะนำที่สร้างขึ้น
- ยืนยันหรือแก้ไขช่องที่เหลือ
- คลิกสร้าง
วิธีดูรหัสโปรเจ็กต์
- ไปที่คอนโซล Google API
- ค้นหาโปรเจ็กต์ในตารางบนหน้า Landing Page รหัสโปรเจ็กต์จะปรากฏในคอลัมน์รหัส
กำหนดค่าหน้าจอขอความยินยอม OAuth
กระบวนการลิงก์บัญชี Google มีหน้าจอขอความยินยอมซึ่งจะแจ้งให้ผู้ใช้ทราบว่าแอปพลิเคชันใดขอสิทธิ์เข้าถึงข้อมูลของผู้ใช้ ข้อมูลประเภทใดที่แอปพลิเคชันขอ และข้อกำหนดที่เกี่ยวข้อง คุณจะต้องกำหนดค่าหน้าจอขอความยินยอม OAuth ก่อนที่จะสร้างรหัสไคลเอ็นต์ Google API
- เปิดหน้าหน้าจอขอความยินยอม OAuth ของคอนโซล Google APIs
- หากได้รับข้อความแจ้ง ให้เลือกโปรเจ็กต์ที่คุณเพิ่งสร้าง
ในหน้า "หน้าจอขอความยินยอม OAuth" ให้กรอกแบบฟอร์มแล้วคลิกปุ่ม "บันทึก"
ชื่อแอปพลิเคชัน: ชื่อของแอปพลิเคชันที่ขอความยินยอม ชื่อควรแสดงถึงแอปพลิเคชันของคุณอย่างถูกต้องและสอดคล้องกับชื่อแอปพลิเคชันที่ผู้ใช้เห็นในที่อื่นๆ ชื่อแอปพลิเคชันจะแสดงในหน้าจอขอความยินยอมในการลิงก์บัญชี
โลโก้แอปพลิเคชัน: รูปภาพในหน้าจอขอความยินยอมที่จะช่วยให้ผู้ใช้จดจำแอปของคุณได้ โลโก้จะแสดงในหน้าจอขอความยินยอมในการลิงก์บัญชีและในการตั้งค่าบัญชี
อีเมลสนับสนุน: เพื่อให้ผู้ใช้ติดต่อคุณพร้อมคำถามเกี่ยวกับการยินยอม
ขอบเขตสำหรับ Google APIs: ขอบเขตช่วยให้แอปพลิเคชันเข้าถึงข้อมูล Google ส่วนตัวของผู้ใช้ได้ สำหรับกรณีการใช้งานการลิงก์บัญชี Google ขอบเขตเริ่มต้น (อีเมล โปรไฟล์ openid) ก็เพียงพอแล้ว คุณไม่จำเป็นต้องเพิ่มขอบเขตที่มีความละเอียดอ่อน โดยทั่วไปแล้ว แนวทางปฏิบัติแนะนำคือการขอขอบเขตทีละรายการเมื่อจำเป็นต้องเข้าถึง แทนที่จะขอตั้งแต่แรก ดูข้อมูลเพิ่มเติม
โดเมนที่ได้รับอนุญาต: Google อนุญาตเฉพาะแอปพลิเคชันที่ตรวจสอบสิทธิ์โดยใช้ OAuth ในการใช้โดเมนที่ได้รับอนุญาตเท่านั้นเพื่อเป็นการปกป้องคุณและผู้ใช้ ลิงก์ของแอปพลิเคชันต้องโฮสต์อยู่ในโดเมนที่ได้รับอนุญาต ดูข้อมูลเพิ่มเติม
ลิงก์หน้าแรกของแอปพลิเคชัน: หน้าแรกของแอปพลิเคชัน ต้องโฮสต์ในโดเมนที่ได้รับอนุญาต
ลิงก์นโยบายความเป็นส่วนตัวของแอปพลิเคชัน: แสดงในหน้าจอขอความยินยอมในการลิงก์บัญชี Google ต้องโฮสต์ในโดเมนที่ได้รับอนุญาต
ลิงก์ข้อกำหนดในการให้บริการของแอปพลิเคชัน (ไม่บังคับ): ต้องโฮสต์ในโดเมนที่ได้รับอนุญาต
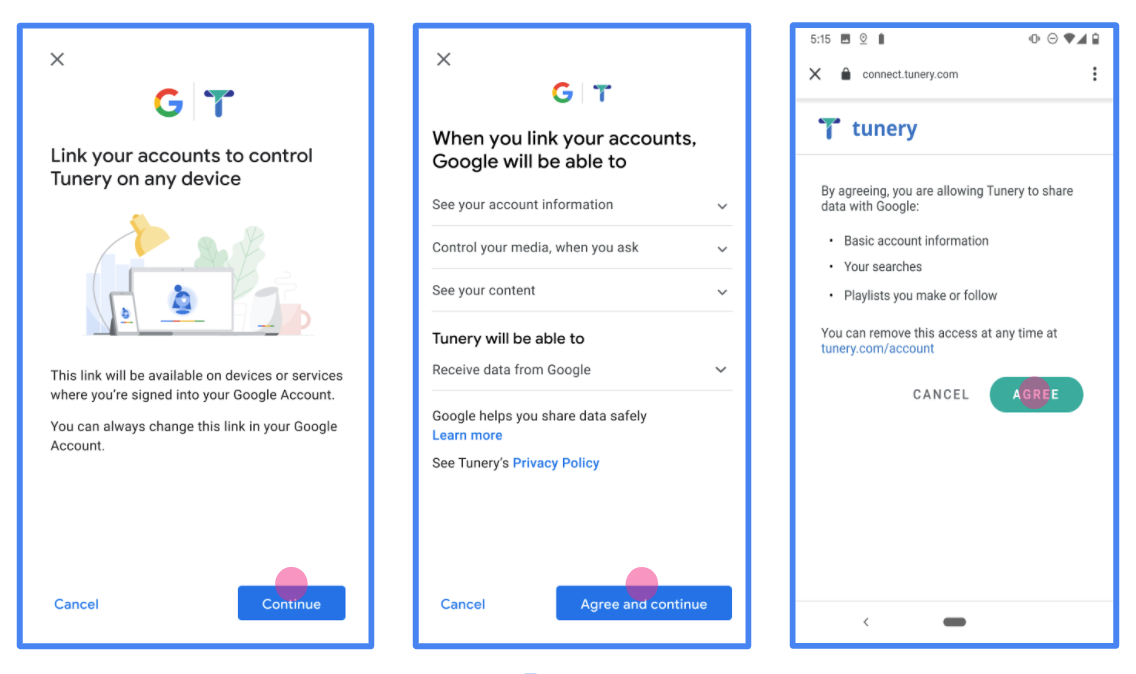
รูปที่ 1 หน้าจอความยินยอมในการลิงก์บัญชี Google สำหรับแอปพลิเคชันสมมติ Tunery
ตรวจสอบ "สถานะการยืนยัน" หากแอปพลิเคชันของคุณต้องได้รับการยืนยัน ให้คลิกปุ่ม "ส่งเพื่อรับการยืนยัน" เพื่อส่งแอปพลิเคชันเพื่อรับการยืนยัน ดูรายละเอียดได้ที่ข้อกำหนดในการยืนยัน OAuth
ติดตั้งใช้งานเซิร์ฟเวอร์ OAuth
An OAuth 2.0 server implementation of the authorization code flow consists of two endpoints, which your service makes available by HTTPS. The first endpoint is the authorization endpoint, which is responsible for finding or obtaining consent from users for data access. The authorization endpoint presents a sign-in UI to your users that aren't already signed in and records consent to the requested access. The second endpoint is the token exchange endpoint, which is used to obtain encrypted strings, called tokens, that authorize a user to access your service.
When a Google application needs to call one of your service's APIs, Google uses these endpoints together to get permission from your users to call these APIs on their behalf.
Google Account Linking: OAuth Authorization Code Flow
The following sequence diagram details interactions between the User, Google, and your service's endpoints.
Roles and responsibilities
The following table defines the roles and responsibilities of the actors in the Google Account Linking (GAL) OAuth flow. Note that in GAL, Google acts as the OAuth Client, while your service acts as the Identity/Service Provider.
| Actor / Component | GAL Role | Responsibilities |
|---|---|---|
| Google App / Server | OAuth Client | Initiates the flow, receives the authorization code, exchanges it for tokens, and securely stores them to access your service's APIs. |
| Your Authorization Endpoint | Authorization Server | Authenticates your users and obtains their consent to share access to their data with Google. |
| Your Token Exchange Endpoint | Authorization Server | Validates authorization codes and refresh tokens, and issues access tokens to the Google Server. |
| Google Redirect URI | Callback Endpoint | Receives the user redirect from your authorization service with the
code and state values. |
An OAuth 2.0 authorization code flow session initiated by Google has the following flow:
- Google opens your authorization endpoint in the user's browser. If the flow started on a voice-only device for an Action, Google transfers the execution to a phone.
- The user signs in, if not signed in already, and grants Google permission to access their data with your API, if they haven't already granted permission.
- Your service creates an authorization code and returns it to Google. To do so, redirect the user's browser back to Google with the authorization code attached to the request.
- Google sends the authorization code to your token exchange endpoint, which verifies the authenticity of the code and returns an access token and a refresh token. The access token is a short-lived token that your service accepts as credentials to access APIs. The refresh token is a long-lived token that Google can store and use to acquire new access tokens when they expire.
- After the user has completed the account linking flow, every subsequent request sent from Google contains an access token.
Implementation Recipe
Follow these steps to implement the Authorization Code flow.
Step 1: Handle authorization requests
When Google initiates account linking, it redirects the user to your authorization endpoint. For detailed protocol contracts and parameter requirements, see the Authorization Endpoint.
To handle the request, perform the following actions:
Validate the request:
- Confirm that the
client_idmatches the Client ID assigned to Google. - Confirm that the
redirect_urimatches the expected Google redirect URL:none https://oauth-redirect.googleusercontent.com/r/YOUR_PROJECT_ID https://oauth-redirect-sandbox.googleusercontent.com/r/YOUR_PROJECT_ID - Verify that
response_typeiscode.
- Confirm that the
Authenticate the user:
- Check if the user is signed in to your service.
- If the user is not signed in, prompt them to complete your sign-in or sign-up flow.
Generate authorization code:
- Create a unique, non-guessable authorization code associated with the user and client.
- Set the code to expire in approximately 10 minutes.
Redirect back to Google:
- Redirect the browser to the URL provided in
redirect_uri. - Append the following query parameters:
code: The authorization code you generated.state: The unmodified state value received from Google.
- Redirect the browser to the URL provided in
Step 2: Handle token exchange requests
Your token exchange endpoint processes two types of requests: exchanging codes for tokens, and refreshing expired access tokens. For detailed protocol contracts and parameter requirements, see the Token Exchange Endpoint.
A. Exchange authorization codes for tokens
When Google receives the authorization code, it calls your token exchange endpoint (POST) to retrieve tokens.
Validate the request:
- Verify
client_idandclient_secret. - Verify the authorization code is valid and not expired.
- Confirm
redirect_urimatches the value used in Step 1. - If validation fails, return an HTTP
400 Bad Requestwith{"error": "invalid_grant"}.
- Verify
Issue tokens:
- Generate a long-lived
refresh_tokenand a short-livedaccess_token(typically 1 hour). - Return an HTTP
200 OKwith the standard JSON token response.
- Generate a long-lived
B. Refresh access tokens
When the access token expires, Google requests a new one using the refresh token.
Validate the request:
- Verify
client_id,client_secret, andrefresh_token. - If validation fails, return an HTTP
400 Bad Requestwith{"error": "invalid_grant"}.
- Verify
Issue new access token:
- Generate a new short-lived
access_token. - Return an HTTP
200 OKwith the JSON token response (optionally including a new refresh token).
- Generate a new short-lived
จัดการคำขอ Userinfo
ปลายทาง userinfo เป็นทรัพยากรที่มีการป้องกันด้วย OAuth 2.0 ซึ่งส่งกลับการอ้างสิทธิ์เกี่ยวกับผู้ใช้ที่ลิงก์ การติดตั้งใช้งานและการโฮสต์ปลายทาง userinfo เป็นตัวเลือกที่ไม่บังคับ ยกเว้นกรณีการใช้งานต่อไปนี้
- ลงชื่อเข้าใช้บัญชีที่ลิงก์ด้วย Google One Tap
- การติดตามที่ราบรื่นบน AndroidTV
หลังจากเรียกโทเค็นเพื่อการเข้าถึงจากปลายทางของโทเค็นเรียบร้อยแล้ว Google จะส่งคำขอไปยังปลายทาง userinfo เพื่อดึงข้อมูลโปรไฟล์พื้นฐานเกี่ยวกับผู้ใช้ที่ลิงก์
| ส่วนหัวของคำขอปลายทางของ userinfo | |
|---|---|
Authorization header |
โทเค็นเพื่อการเข้าถึงของประเภท Bearer |
ตัวอย่างเช่น หากปลายทาง userinfo พร้อมใช้งานที่
https://myservice.example.com/userinfo คำขออาจมีลักษณะดังต่อไปนี้
GET /userinfo HTTP/1.1
Host: myservice.example.com
Authorization: Bearer ACCESS_TOKEN
หากต้องการให้ปลายทาง userinfo จัดการคำขอ ให้ทำตามขั้นตอนต่อไปนี้
- แยกโทเค็นเพื่อการเข้าถึงจากส่วนหัวการให้สิทธิ์ แล้วแสดงผลข้อมูลสำหรับผู้ใช้ที่เชื่อมโยงกับโทเค็นเพื่อการเข้าถึง
- หากโทเค็นเพื่อการเข้าถึงไม่ถูกต้อง ให้แสดงข้อผิดพลาด HTTP 401 Unauthorized ด้วยการใช้ส่วนหัวการตอบกลับ
WWW-Authenticateตัวอย่างการตอบกลับข้อผิดพลาดเกี่ยวกับ Userinfo มีดังนี้HTTP/1.1 401 Unauthorized WWW-Authenticate: error="invalid_token", error_description="The Access Token expired"
หากโทเค็นเพื่อการเข้าถึงถูกต้อง ให้แสดงผลและการตอบสนอง HTTP 200 ด้วยออบเจ็กต์ JSON ต่อไปนี้ในเนื้อหาของ HTTPS การตอบกลับ:
{ "sub": "USER_UUID", "email": "EMAIL_ADDRESS", "given_name": "FIRST_NAME", "family_name": "LAST_NAME", "name": "FULL_NAME", "picture": "PROFILE_PICTURE", }การตอบสนองของปลายทาง userinfo subรหัสที่ไม่ซ้ำกันที่ระบุผู้ใช้ในระบบ emailอีเมลของผู้ใช้ given_nameไม่บังคับ: ชื่อของผู้ใช้ family_nameไม่บังคับ: นามสกุลของผู้ใช้ nameไม่บังคับ: ชื่อเต็มของผู้ใช้ pictureไม่บังคับ: รูปโปรไฟล์ของผู้ใช้
การตรวจสอบการติดตั้งใช้งาน
คุณสามารถตรวจสอบการติดตั้งใช้งานได้โดยใช้เครื่องมือ OAuth 2.0 Playground
ในเครื่องมือ ให้ทำตามขั้นตอนต่อไปนี้
- คลิกการกำหนดค่า เพื่อเปิดหน้าต่างการกำหนดค่า OAuth 2.0
- ในช่องโฟลว์ OAuth ให้เลือกฝั่งไคลเอ็นต์
- ในช่องปลายทาง OAuth ให้เลือกกำหนดเอง
- ระบุปลายทาง OAuth 2.0 และรหัสไคลเอ็นต์ที่คุณกำหนดให้กับ Google ในช่องที่เกี่ยวข้อง
- ในส่วนขั้นตอนที่ 1 ไม่ต้องเลือกขอบเขตของ Google แต่ให้เว้นช่องนี้ว่างไว้หรือพิมพ์ขอบเขตที่ใช้ได้กับเซิร์ฟเวอร์ (หรือสตริงที่กำหนดเองหากคุณไม่ได้ใช้ขอบเขต OAuth) เมื่อเสร็จแล้ว ให้คลิกให้สิทธิ์ API
- ในส่วนขั้นตอนที่ 2 และขั้นตอนที่ 3 ให้ทำตามโฟลว์ OAuth 2.0 และตรวจสอบว่าแต่ละขั้นตอนทำงานตามที่ตั้งใจไว้
คุณสามารถตรวจสอบการติดตั้งใช้งานได้โดยใช้เครื่องมือสาธิตการลิงก์บัญชี Google
ในเครื่องมือ ให้ทำตามขั้นตอนต่อไปนี้
- คลิกปุ่มลงชื่อเข้าใช้ด้วย Google
- เลือกบัญชีที่ต้องการลิงก์
- ป้อนรหัสบริการ
- ป้อนขอบเขตอย่างน้อย 1 รายการที่คุณจะขอสิทธิ์เข้าถึง (ไม่บังคับ)
- คลิกเริ่มการสาธิต
- เมื่อได้รับข้อความแจ้ง ให้ยืนยันว่าคุณอาจให้ความยินยอมและปฏิเสธคำขอลิงก์
- ยืนยันว่าระบบจะนำคุณไปยังแพลตฟอร์มของคุณ