
계정은 업계 표준 OAuth 2.0 승인 코드 흐름을 사용하여 연결됩니다.
에이전트용 OAuth 2.1 및 PKCE
상태 비저장 AI 에이전트 및 멀티모달 파이프라인의 경우 OAuth 2.1 시행이 권장됩니다.
- PKCE (Proof Key for Code Exchange): 승인 코드 플로우를 보호하고 가로채기 공격을 방지하는 데 사용해야 합니다.
- 암시적 흐름 없음: 암시적 흐름은 URL에 액세스 토큰을 노출하므로 에이전트 환경에 보안 위험이 됩니다.
서비스는 OAuth 2.0/2.1 호환 승인 및 토큰 교환 엔드포인트를 지원해야 합니다.
프로젝트 만들기
계정 연결을 사용하도록 프로젝트를 만들려면 다음 단계를 따르세요.
- Google API 콘솔로 이동합니다.
- 프로젝트 만들기를 클릭합니다.
- 이름을 입력하거나 생성된 추천을 수락합니다.
- 나머지 필드를 확인하거나 수정합니다.
- 만들기를 클릭합니다.
프로젝트 ID를 보려면 다음 단계를 따르세요.
- Google API 콘솔로 이동합니다.
- 방문 페이지의 표에서 프로젝트를 찾습니다. 프로젝트 ID는 ID 열에 표시됩니다.
OAuth 동의 화면 구성
Google 계정 연결 프로세스에는 사용자에게 데이터 액세스를 요청하는 애플리케이션, 요청하는 데이터의 종류, 적용되는 약관을 알려주는 동의 화면이 포함됩니다. Google API 클라이언트 ID를 생성하기 전에 OAuth 동의 화면을 구성해야 합니다.
- Google API 콘솔의 OAuth 동의 화면 페이지를 엽니다.
- 메시지가 표시되면 방금 만든 프로젝트를 선택합니다.
'OAuth 동의 화면' 페이지에서 양식을 작성하고 '저장' 버튼을 클릭합니다.
애플리케이션 이름: 동의를 요청하는 애플리케이션의 이름입니다. 이름은 애플리케이션을 정확하게 반영해야 하며 사용자가 다른 곳에서 보는 애플리케이션 이름과 일치해야 합니다. 애플리케이션 이름은 계정 연결 동의 화면에 표시됩니다.
애플리케이션 로고: 사용자가 앱을 인식하는 데 도움이 되는 동의 화면의 이미지입니다. 로고는 계정 연결 동의 화면과 계정 설정에 표시됩니다.
지원 이메일: 사용자가 동의에 대해 문의할 수 있습니다.
Google API 범위: 범위를 사용하면 애플리케이션이 사용자의 비공개 Google 데이터에 액세스할 수 있습니다. Google 계정 연결 사용 사례의 경우 기본 범위 (이메일, 프로필, openid)로 충분하며 민감한 범위를 추가할 필요가 없습니다. 일반적으로 액세스가 필요한 시점에 미리 요청하는 대신 점진적으로 범위를 요청하는 것이 좋습니다. 자세히 알아보기
승인된 도메인: 나와 내 사용자를 보호하기 위해 Google에서는 OAuth를 사용하여 인증하는 애플리케이션만 승인된 도메인을 사용할 수 있도록 허용합니다. 애플리케이션의 링크는 승인된 도메인에서 호스팅되어야 합니다. 자세히 알아보기
애플리케이션 홈페이지 링크: 애플리케이션의 홈페이지입니다. 승인된 도메인에서 호스팅해야 합니다.
애플리케이션 개인정보처리방침 링크: Google 계정 연결 동의 화면에 표시됩니다. 승인된 도메인에서 호스팅해야 합니다.
애플리케이션 서비스 약관 링크 (선택사항): 승인된 도메인에서 호스팅해야 합니다.
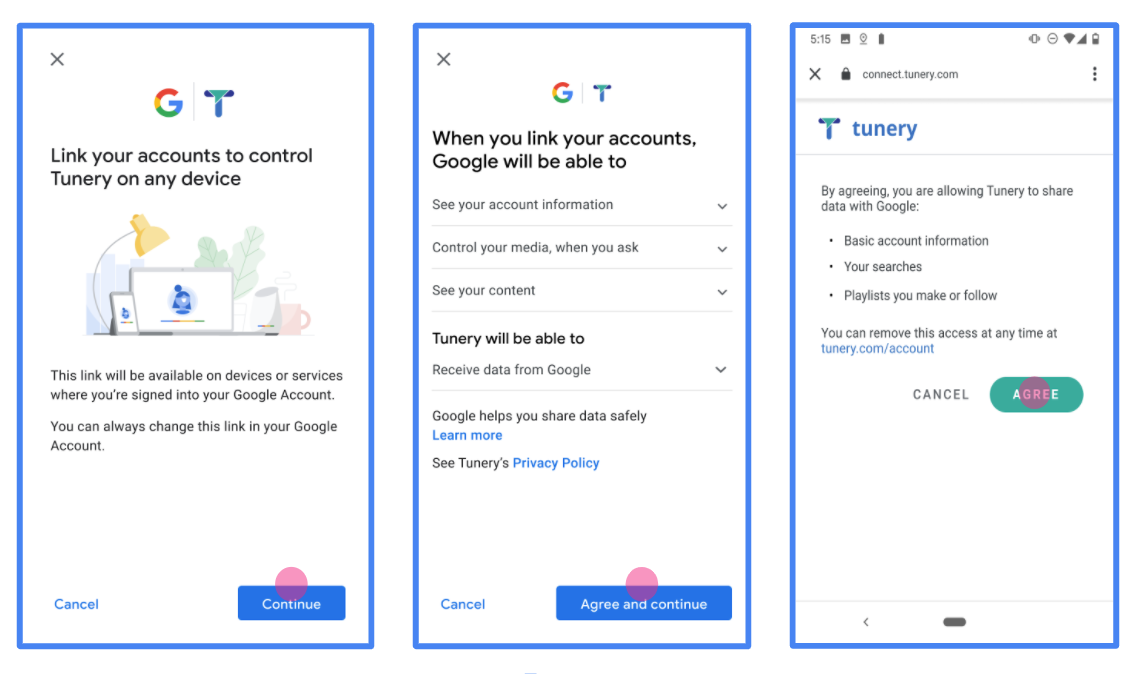
그림 1. 가상 애플리케이션 Tunery의 Google 계정 연결 동의 화면
'인증 상태'를 확인합니다. 애플리케이션에 인증이 필요한 경우 '인증을 위해 제출' 버튼을 클릭하여 인증을 위해 애플리케이션을 제출합니다. 자세한 내용은 OAuth 인증 요구사항을 참고하세요.
OAuth 서버 구현
An OAuth 2.0 server implementation of the authorization code flow consists of two endpoints, which your service makes available by HTTPS. The first endpoint is the authorization endpoint, which is responsible for finding or obtaining consent from users for data access. The authorization endpoint presents a sign-in UI to your users that aren't already signed in and records consent to the requested access. The second endpoint is the token exchange endpoint, which is used to obtain encrypted strings, called tokens, that authorize a user to access your service.
When a Google application needs to call one of your service's APIs, Google uses these endpoints together to get permission from your users to call these APIs on their behalf.
Google Account Linking: OAuth Authorization Code Flow
The following sequence diagram details interactions between the User, Google, and your service's endpoints.
Roles and responsibilities
The following table defines the roles and responsibilities of the actors in the Google Account Linking (GAL) OAuth flow. Note that in GAL, Google acts as the OAuth Client, while your service acts as the Identity/Service Provider.
| Actor / Component | GAL Role | Responsibilities |
|---|---|---|
| Google App / Server | OAuth Client | Initiates the flow, receives the authorization code, exchanges it for tokens, and securely stores them to access your service's APIs. |
| Your Authorization Endpoint | Authorization Server | Authenticates your users and obtains their consent to share access to their data with Google. |
| Your Token Exchange Endpoint | Authorization Server | Validates authorization codes and refresh tokens, and issues access tokens to the Google Server. |
| Google Redirect URI | Callback Endpoint | Receives the user redirect from your authorization service with the
code and state values. |
An OAuth 2.0 authorization code flow session initiated by Google has the following flow:
- Google opens your authorization endpoint in the user's browser. If the flow started on a voice-only device for an Action, Google transfers the execution to a phone.
- The user signs in, if not signed in already, and grants Google permission to access their data with your API, if they haven't already granted permission.
- Your service creates an authorization code and returns it to Google. To do so, redirect the user's browser back to Google with the authorization code attached to the request.
- Google sends the authorization code to your token exchange endpoint, which verifies the authenticity of the code and returns an access token and a refresh token. The access token is a short-lived token that your service accepts as credentials to access APIs. The refresh token is a long-lived token that Google can store and use to acquire new access tokens when they expire.
- After the user has completed the account linking flow, every subsequent request sent from Google contains an access token.
Implementation Recipe
Follow these steps to implement the Authorization Code flow.
Step 1: Handle authorization requests
When Google initiates account linking, it redirects the user to your authorization endpoint. For detailed protocol contracts and parameter requirements, see the Authorization Endpoint.
To handle the request, perform the following actions:
Validate the request:
- Confirm that the
client_idmatches the Client ID assigned to Google. - Confirm that the
redirect_urimatches the expected Google redirect URL:none https://oauth-redirect.googleusercontent.com/r/YOUR_PROJECT_ID https://oauth-redirect-sandbox.googleusercontent.com/r/YOUR_PROJECT_ID - Verify that
response_typeiscode.
- Confirm that the
Authenticate the user:
- Check if the user is signed in to your service.
- If the user is not signed in, prompt them to complete your sign-in or sign-up flow.
Generate authorization code:
- Create a unique, non-guessable authorization code associated with the user and client.
- Set the code to expire in approximately 10 minutes.
Redirect back to Google:
- Redirect the browser to the URL provided in
redirect_uri. - Append the following query parameters:
code: The authorization code you generated.state: The unmodified state value received from Google.
- Redirect the browser to the URL provided in
Step 2: Handle token exchange requests
Your token exchange endpoint processes two types of requests: exchanging codes for tokens, and refreshing expired access tokens. For detailed protocol contracts and parameter requirements, see the Token Exchange Endpoint.
A. Exchange authorization codes for tokens
When Google receives the authorization code, it calls your token exchange endpoint (POST) to retrieve tokens.
Validate the request:
- Verify
client_idandclient_secret. - Verify the authorization code is valid and not expired.
- Confirm
redirect_urimatches the value used in Step 1. - If validation fails, return an HTTP
400 Bad Requestwith{"error": "invalid_grant"}.
- Verify
Issue tokens:
- Generate a long-lived
refresh_tokenand a short-livedaccess_token(typically 1 hour). - Return an HTTP
200 OKwith the standard JSON token response.
- Generate a long-lived
B. Refresh access tokens
When the access token expires, Google requests a new one using the refresh token.
Validate the request:
- Verify
client_id,client_secret, andrefresh_token. - If validation fails, return an HTTP
400 Bad Requestwith{"error": "invalid_grant"}.
- Verify
Issue new access token:
- Generate a new short-lived
access_token. - Return an HTTP
200 OKwith the JSON token response (optionally including a new refresh token).
- Generate a new short-lived
Handle userinfo requests
The userinfo endpoint is an OAuth 2.0 protected resource that return claims about the linked user. Implementing and hosting the userinfo endpoint is optional, except for the following use cases:
- Linked Account Sign-In with Google One Tap.
- Frictionless subscription on AndroidTV.
After the access token has been successfully retrieved from your token endpoint, Google sends a request to your userinfo endpoint to retrieve basic profile information about the linked user.
| userinfo endpoint request headers | |
|---|---|
Authorization header |
The access token of type Bearer. |
For example, if your userinfo endpoint is available at
https://myservice.example.com/userinfo, a request might look like the following:
GET /userinfo HTTP/1.1
Host: myservice.example.com
Authorization: Bearer ACCESS_TOKEN
For your userinfo endpoint to handle requests, do the following steps:
- Extract access token from the Authorization header and return information for the user associated with the access token.
- If the access token is invalid, return an HTTP 401 Unauthorized error with using the
WWW-AuthenticateResponse Header. Below is an example of a userinfo error response:HTTP/1.1 401 Unauthorized WWW-Authenticate: error="invalid_token", error_description="The Access Token expired"
If the access token is valid, return and HTTP 200 response with the following JSON object in the body of the HTTPS response:
{ "sub": "USER_UUID", "email": "EMAIL_ADDRESS", "given_name": "FIRST_NAME", "family_name": "LAST_NAME", "name": "FULL_NAME", "picture": "PROFILE_PICTURE", }userinfo endpoint response subA unique ID that identifies the user in your system. emailEmail address of the user. given_nameOptional: First name of the user. family_nameOptional: Last name of the user. nameOptional: Full name of the user. pictureOptional: Profile picture of the user.
구현 확인
OAuth 2.0 Playground 도구를 사용하여 구현의 유효성을 검사할 수 있습니다.
도구에서 다음 단계를 수행합니다.
- 구성 을 클릭하여 OAuth 2.0 구성 창을 엽니다.
- OAuth 흐름 필드에서 클라이언트 측 을 선택합니다.
- OAuth 엔드포인트 필드에서 맞춤 을 선택합니다.
- 해당 필드에서 OAuth 2.0 엔드포인트와 Google에 할당한 클라이언트 ID를 지정합니다.
- 1단계 섹션에서 Google 범위를 선택하지 않습니다. 대신 이 필드를 비워 두거나 서버에 유효한 범위 (또는 OAuth 범위를 사용하지 않는 경우 임의의 문자열)를 입력합니다. 완료되면 API 승인 을 클릭합니다.
- 2단계 및 3단계 섹션에서 OAuth 2.0 흐름을 진행하고 각 단계가 의도한 대로 작동하는지 확인합니다.
Google 계정 연결 데모 도구를 사용하여 구현의 유효성을 검사할 수 있습니다.
도구에서 다음 단계를 수행합니다.
- Google 계정으로 로그인 버튼을 클릭합니다.
- 연결하려는 계정을 선택합니다.
- 서비스 ID를 입력합니다.
- 액세스 권한을 요청할 범위를 하나 이상 입력합니다(선택사항).
- 데모 시작 을 클릭합니다.
- 메시지가 표시되면 연결 요청에 동의하거나 거부할 수 있음을 확인합니다.
- 플랫폼으로 리디렉션되는지 확인합니다.