
Các tài khoản được liên kết bằng quy trình mã uỷ quyền OAuth 2.0 theo tiêu chuẩn ngành.
OAuth 2.1 và PKCE cho nhân viên hỗ trợ
Đối với các tác nhân AI không trạng thái và quy trình đa phương thức, bạn nên thực thi OAuth 2.1.
- PKCE (Khoá xác thực cho việc trao đổi mã): Phải được dùng để bảo mật quy trình sử dụng mã uỷ quyền, ngăn chặn các cuộc tấn công chặn.
- Không có luồng cấp quyền trực tiếp: Luồng cấp quyền trực tiếp tiết lộ các mã truy cập trong URL, đây là một rủi ro bảo mật đối với môi trường tác nhân.
Dịch vụ của bạn phải hỗ trợ các điểm cuối uỷ quyền và trao đổi mã thông báo tuân thủ OAuth 2.0/2.1.
Tạo dự án
Cách tạo dự án để sử dụng tính năng liên kết tài khoản:
- Chuyển đến Google API Console.
- Nhấp vào Tạo dự án.
- Nhập tên hoặc chấp nhận tên được đề xuất.
- Xác nhận hoặc chỉnh sửa mọi trường còn lại.
- Nhấp vào Tạo.
Cách xem mã dự án:
- Chuyển đến Google API Console.
- Tìm dự án của bạn trong bảng trên trang đích. Mã dự án xuất hiện trong cột Mã.
Định cấu hình màn hình xin phép bằng OAuth
Quy trình liên kết Tài khoản Google bao gồm một màn hình xin phép cho người dùng biết ứng dụng đang yêu cầu quyền truy cập vào dữ liệu của họ, loại dữ liệu mà ứng dụng đang yêu cầu và các điều khoản áp dụng. Bạn cần định cấu hình màn hình xin phép bằng OAuth trước khi tạo mã ứng dụng khách Google API.
- Mở trang màn hình xin phép bằng OAuth của Google API Console.
- Nếu được nhắc, hãy chọn dự án mà bạn vừa tạo.
Trên trang "Màn hình xin phép bằng OAuth", hãy điền thông tin vào biểu mẫu rồi nhấp vào nút “Lưu”.
Tên ứng dụng: Tên của ứng dụng yêu cầu sự đồng ý. Tên này phải phản ánh chính xác ứng dụng của bạn và nhất quán với tên ứng dụng mà người dùng thấy ở những nơi khác. Tên ứng dụng sẽ xuất hiện trên màn hình xin phép Liên kết tài khoản.
Biểu trưng ứng dụng: Một hình ảnh trên màn hình xin phép sẽ giúp người dùng nhận ra ứng dụng của bạn. Biểu trưng này xuất hiện trên màn hình xin phép liên kết tài khoản và trên phần cài đặt tài khoản
Email hỗ trợ: Để người dùng liên hệ với bạn khi có thắc mắc về sự đồng ý của họ.
Phạm vi cho các API của Google: Phạm vi cho phép ứng dụng của bạn truy cập vào dữ liệu Google riêng tư của người dùng. Đối với trường hợp sử dụng liên kết Tài khoản Google, phạm vi mặc định (email, hồ sơ, OpenID) là đủ, bạn không cần thêm bất kỳ phạm vi nhạy cảm nào. Thông thường, bạn nên yêu cầu các phạm vi theo từng bước, tại thời điểm cần có quyền truy cập, thay vì yêu cầu trước. Tìm hiểu thêm.
Miền được uỷ quyền: Để bảo vệ bạn và người dùng, Google chỉ cho phép những ứng dụng xác thực bằng OAuth sử dụng Miền được uỷ quyền. Đường liên kết đến các ứng dụng của bạn phải được lưu trữ trên Miền được uỷ quyền. Tìm hiểu thêm.
Đường liên kết đến trang chủ của ứng dụng: Trang chủ của ứng dụng. Phải được lưu trữ trên một Miền được uỷ quyền.
Đường liên kết đến Chính sách quyền riêng tư của ứng dụng: Xuất hiện trên màn hình xin phép Liên kết với Tài khoản Google. Phải được lưu trữ trên một Miền được uỷ quyền.
Đường liên kết đến Điều khoản dịch vụ của ứng dụng (Không bắt buộc): Phải được lưu trữ trên một Miền được uỷ quyền.
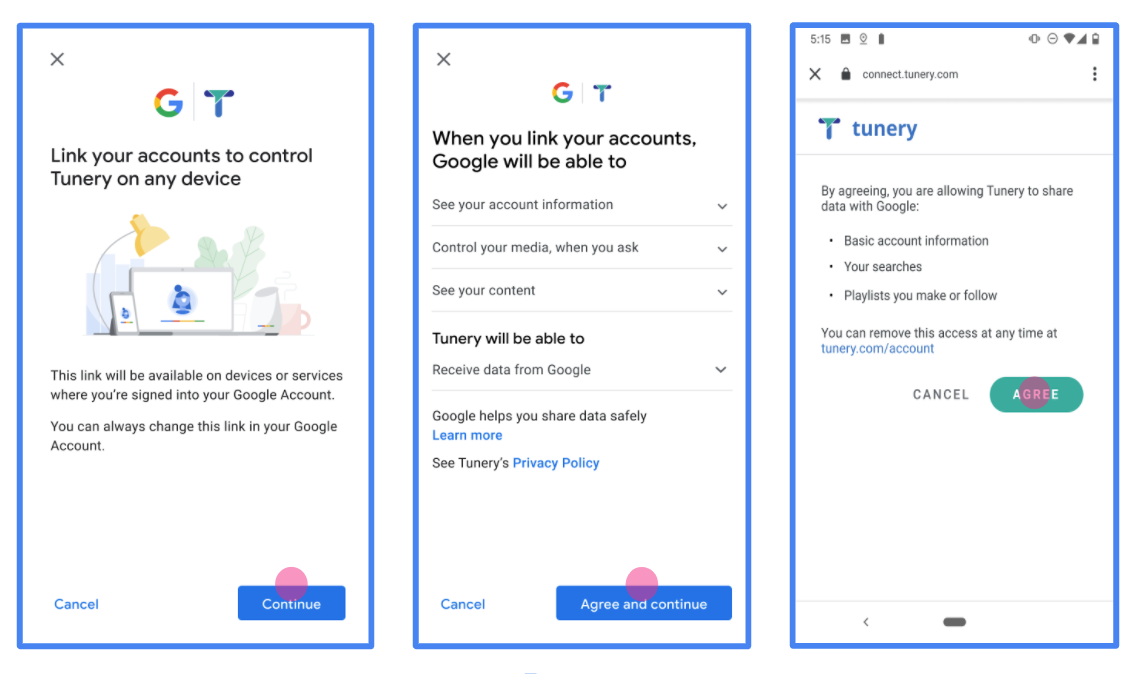
Hình 1 Màn hình đồng ý liên kết Tài khoản Google cho một Ứng dụng giả định, Tunery
Kiểm tra "Trạng thái xác minh". Nếu ứng dụng của bạn cần xác minh, hãy nhấp vào nút "Gửi để xác minh" để gửi ứng dụng của bạn đi xác minh. Hãy tham khảo các yêu cầu xác minh OAuth để biết thông tin chi tiết.
Triển khai máy chủ OAuth
An OAuth 2.0 server implementation of the authorization code flow consists of two endpoints, which your service makes available by HTTPS. The first endpoint is the authorization endpoint, which is responsible for finding or obtaining consent from users for data access. The authorization endpoint presents a sign-in UI to your users that aren't already signed in and records consent to the requested access. The second endpoint is the token exchange endpoint, which is used to obtain encrypted strings, called tokens, that authorize a user to access your service.
When a Google application needs to call one of your service's APIs, Google uses these endpoints together to get permission from your users to call these APIs on their behalf.
Google Account Linking: OAuth Authorization Code Flow
The following sequence diagram details interactions between the User, Google, and your service's endpoints.
Roles and responsibilities
The following table defines the roles and responsibilities of the actors in the Google Account Linking (GAL) OAuth flow. Note that in GAL, Google acts as the OAuth Client, while your service acts as the Identity/Service Provider.
| Actor / Component | GAL Role | Responsibilities |
|---|---|---|
| Google App / Server | OAuth Client | Initiates the flow, receives the authorization code, exchanges it for tokens, and securely stores them to access your service's APIs. |
| Your Authorization Endpoint | Authorization Server | Authenticates your users and obtains their consent to share access to their data with Google. |
| Your Token Exchange Endpoint | Authorization Server | Validates authorization codes and refresh tokens, and issues access tokens to the Google Server. |
| Google Redirect URI | Callback Endpoint | Receives the user redirect from your authorization service with the
code and state values. |
An OAuth 2.0 authorization code flow session initiated by Google has the following flow:
- Google opens your authorization endpoint in the user's browser. If the flow started on a voice-only device for an Action, Google transfers the execution to a phone.
- The user signs in, if not signed in already, and grants Google permission to access their data with your API, if they haven't already granted permission.
- Your service creates an authorization code and returns it to Google. To do so, redirect the user's browser back to Google with the authorization code attached to the request.
- Google sends the authorization code to your token exchange endpoint, which verifies the authenticity of the code and returns an access token and a refresh token. The access token is a short-lived token that your service accepts as credentials to access APIs. The refresh token is a long-lived token that Google can store and use to acquire new access tokens when they expire.
- After the user has completed the account linking flow, every subsequent request sent from Google contains an access token.
Implementation Recipe
Follow these steps to implement the Authorization Code flow.
Step 1: Handle authorization requests
When Google initiates account linking, it redirects the user to your authorization endpoint. For detailed protocol contracts and parameter requirements, see the Authorization Endpoint.
To handle the request, perform the following actions:
Validate the request:
- Confirm that the
client_idmatches the Client ID assigned to Google. - Confirm that the
redirect_urimatches the expected Google redirect URL:- Prod:
https://oauth-redirect.googleusercontent.com/r/YOUR_PROJECT_ID - Sandbox:
https://oauth-redirect-sandbox.googleusercontent.com/r/YOUR_PROJECT_ID
- Prod:
- Verify that
response_typeiscode.
- Confirm that the
Authenticate the user:
- Check if the user is signed in to your service.
- If the user is not signed in, prompt them to complete your sign-in or sign-up flow.
Generate authorization code:
- Create a unique, non-guessable authorization code associated with the user and client.
- Set the code to expire in approximately 10 minutes.
Redirect back to Google:
- Redirect the browser to the URL provided in
redirect_uri. - Append the following query parameters:
code: The authorization code you generated.state: The unmodified state value received from Google.
- Redirect the browser to the URL provided in
Step 2: Handle token exchange requests
Your token exchange endpoint processes two types of requests: exchanging codes for tokens, and refreshing expired access tokens. For detailed protocol contracts and parameter requirements, see the Token Exchange Endpoint.
A. Exchange authorization codes for tokens
When Google receives the authorization code, it calls your token exchange endpoint (POST) to retrieve tokens.
Validate the request:
- Verify
client_idandclient_secret. - Verify the authorization code is valid and not expired.
- Confirm
redirect_urimatches the value used in Step 1. - If validation fails, return an HTTP
400 Bad Requestwith{"error": "invalid_grant"}.
- Verify
Issue tokens:
- Generate a long-lived
refresh_tokenand a short-livedaccess_token(typically 1 hour). - Return an HTTP
200 OKwith the standard JSON token response.
- Generate a long-lived
B. Refresh access tokens
When the access token expires, Google requests a new one using the refresh token.
Validate the request:
- Verify
client_id,client_secret, andrefresh_token. - If validation fails, return an HTTP
400 Bad Requestwith{"error": "invalid_grant"}.
- Verify
Issue new access token:
- Generate a new short-lived
access_token. - Return an HTTP
200 OKwith the JSON token response (optionally including a new refresh token).
- Generate a new short-lived
Handle userinfo requests
The userinfo endpoint is an OAuth 2.0 protected resource that return claims about the linked user. Implementing and hosting the userinfo endpoint is optional, except for the following use cases:
- Linked Account Sign-In with Google One Tap.
- Frictionless subscription on AndroidTV.
After the access token has been successfully retrieved from your token endpoint, Google sends a request to your userinfo endpoint to retrieve basic profile information about the linked user.
| userinfo endpoint request headers | |
|---|---|
Authorization header |
The access token of type Bearer. |
For example, if your userinfo endpoint is available at
https://myservice.example.com/userinfo, a request might look like the following:
GET /userinfo HTTP/1.1
Host: myservice.example.com
Authorization: Bearer ACCESS_TOKEN
For your userinfo endpoint to handle requests, do the following steps:
- Extract access token from the Authorization header and return information for the user associated with the access token.
- If the access token is invalid, return an HTTP 401 Unauthorized error with using the
WWW-AuthenticateResponse Header. Below is an example of a userinfo error response:HTTP/1.1 401 Unauthorized WWW-Authenticate: error="invalid_token", error_description="The Access Token expired"
If the access token is valid, return and HTTP 200 response with the following JSON object in the body of the HTTPS response:
{ "sub": "USER_UUID", "email": "EMAIL_ADDRESS", "given_name": "FIRST_NAME", "family_name": "LAST_NAME", "name": "FULL_NAME", "picture": "PROFILE_PICTURE", }userinfo endpoint response subA unique ID that identifies the user in your system. emailEmail address of the user. given_nameOptional: First name of the user. family_nameOptional: Last name of the user. nameOptional: Full name of the user. pictureOptional: Profile picture of the user.
Xác thực quá trình triển khai
You can validate your implementation by using the OAuth 2.0 Playground tool.
In the tool, do the following steps:
- Click Configuration to open the OAuth 2.0 Configuration window.
- In the OAuth flow field, select Client-side.
- In the OAuth Endpoints field, select Custom.
- Specify your OAuth 2.0 endpoint and the client ID you assigned to Google in the corresponding fields.
- In the Step 1 section, don't select any Google scopes. Instead, leave this field blank or type a scope valid for your server (or an arbitrary string if you don't use OAuth scopes). When you're done, click Authorize APIs.
- In the Step 2 and Step 3 sections, go through the OAuth 2.0 flow and verify that each step works as intended.
You can validate your implementation by using the Google Account Linking Demo tool.
In the tool, do the following steps:
- Click the Sign in with Google button.
- Choose the account you'd like to link.
- Enter the service ID.
- Optionally enter one or more scopes that you will request access for.
- Click Start Demo.
- When prompted, confirm that you may consent and deny the linking request.
- Confirm that you are redirected to your platform.