Poziom kodowania: początkujący
Czas trwania: 10 minut
Typ projektu: automatyzacja przy użyciu menu niestandardowego
Cele
- Dowiedz się, do czego służy dane rozwiązanie.
- dowiedzieć się, jak usługi Apps Script
działają w danym rozwiązaniu.
- Skonfiguruj skrypt.
- Uruchom skrypt.
Informacje o rozwiązaniu
automatycznie wypełniać szablon e-maila danymi z Arkuszy Google. E-maile są wysyłane z Twojego konta Gmail, aby umożliwić Ci odpowiadanie na odpowiedzi odbiorców.
Ważne: ten przykład kreatora e-maili podlega limitom poczty e-mail opisanych w artykule Limity w usługach Google.
Jak to działa
Tworzysz szablon wersji roboczej Gmaila z symbolami zastępczymi, które odpowiadają danym w arkuszu kalkulacyjnym Arkuszy. Każdy nagłówek kolumny w arkuszu reprezentuje tag zastępczy. Skrypt wysyła informacje o każdej zmiennej z arkusza kalkulacyjnego do lokalizacji odpowiedniego tagu zastępczego w wersji roboczej e-maila.
Usługi Apps Script
To rozwiązanie korzysta z następujących usług:
- Usługa Gmail – odbiera, odczytuje i wysyła wersje robocze e-maili, które chcesz wysłać do odbiorców.
- Usługa arkusza kalkulacyjnego – wypełnia obiekty zastępcze e-maili spersonalizowanymi informacjami dotyczącymi każdego odbiorcy.
Wymagania wstępne
Aby korzystać z tego przykładu, musisz spełnić te wymagania wstępne:
- konta Google (konta Google Workspace mogą wymagać zatwierdzenia przez administratora),
- Przeglądarka z dostępem do internetu.
Konfigurowanie skryptu
Tworzenie projektu Apps Script
- Kliknij przycisk poniżej, aby utworzyć kopię przykładowego arkusza kalkulacyjnego Gmail/Arkusze.
Projekt Apps Script dla tego rozwiązania
jest dołączony do arkusza kalkulacyjnego.
Utwórz kopię
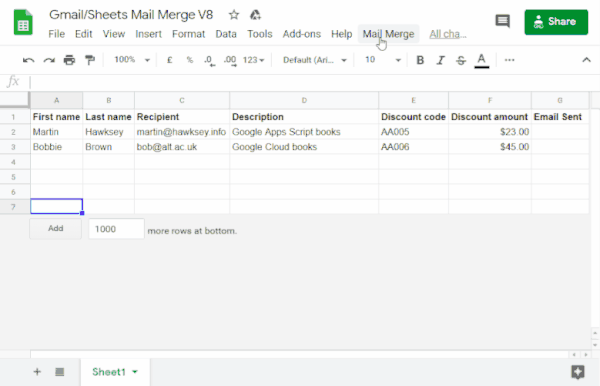
- W skopiowanym arkuszu kalkulacyjnym wpisz w kolumnie Adresaci adresy e-mail, których chcesz używać podczas kreatora e-maili.
- (Opcjonalnie) Dodaj, edytuj lub usuń kolumny, aby dostosować dane, które chcesz uwzględnić w szablonie e-maila.
Jeśli zmienisz nazwę kolumny Adresat lub E-mail wysłany, musisz zaktualizować odpowiedni kod w projekcie Apps Script. Projekt Apps Script możesz otworzyć z poziomu arkusza kalkulacyjnego, klikając Rozszerzenia >
Apps Script.
Tworzenie szablonu e-maila
- Na koncie Gmail utwórz wersję roboczą e-maila. Aby w e-mailu uwzględnić dane z arkusza kalkulacyjnego, użyj obiektów zastępczych odpowiadających nazwom kolumn w nawiasach klamrowych, np.
{{First name}}.
- Jeśli sformatujesz tekst w e-mailu, musisz też sformatować nawiasy zastępcze.
- W obiektach zastępczech rozróżniana jest wielkość liter i muszą one dokładnie odpowiadać nagłówkom kolumn.
- Skopiuj wiersz tematu e-maila w wersji roboczej.
Uruchom skrypt
- W arkuszu kalkulacyjnym kliknij Scalanie poczty >
Wyślij e-maile. Aby wyświetlić to menu niestandardowe, może być konieczne odświeżenie strony.
Gdy pojawi się odpowiedni komunikat, autoryzuj skrypt.
Jeśli na ekranie zgody OAuth wyświetli się ostrzeżenie: Ta aplikacja nie jest zweryfikowana, wybierz Zaawansowane >
Otwórz projekt {Project Name} (niebezpieczny).
Kliknij ponownie Scalanie poczty > Wyślij e-maile.
Wklej temat szablonu e-maila i kliknij OK.
Jeśli zastosujesz filtr do arkusza, skrypt nadal wyśle e-maila do odfiltrowanych uczestników, ale nie doda sygnatury czasowej.
Sprawdź kod
Aby sprawdzić kod Apps Script dla tego rozwiązania, kliknij Wyświetl kod źródłowy poniżej:
Pokaż kod źródłowy
Code.gs
// To learn how to use this script, refer to the documentation:
// https://developers.google.com/apps-script/samples/automations/mail-merge

/*
Copyright 2022 Martin Hawksey

Licensed under the Apache License, Version 2.0 (the "License");
you may not use this file except in compliance with the License.
You may obtain a copy of the License at

    https://www.apache.org/licenses/LICENSE-2.0

Unless required by applicable law or agreed to in writing, software
distributed under the License is distributed on an "AS IS" BASIS,
WITHOUT WARRANTIES OR CONDITIONS OF ANY KIND, either express or implied.
See the License for the specific language governing permissions and
limitations under the License.
*/

/**
 * @OnlyCurrentDoc
*/

/**
 * Change these to match the column names you are using for email
 * recipient addresses and email sent column.
*/
const RECIPIENT_COL  = "Recipient";
const EMAIL_SENT_COL = "Email Sent";

/**
 * Creates the menu item "Mail Merge" for user to run scripts on drop-down.
 */
function onOpen() {
  const ui = SpreadsheetApp.getUi();
  ui.createMenu('Mail Merge')
      .addItem('Send Emails', 'sendEmails')
      .addToUi();
}

/**
 * Sends emails from sheet data.
 * @param {string} subjectLine (optional) for the email draft message
 * @param {Sheet} sheet to read data from
*/
function sendEmails(subjectLine, sheet=SpreadsheetApp.getActiveSheet()) {
  // option to skip browser prompt if you want to use this code in other projects
  if (!subjectLine){
    subjectLine = Browser.inputBox("Mail Merge",
                                      "Type or copy/paste the subject line of the Gmail " +
                                      "draft message you would like to mail merge with:",
                                      Browser.Buttons.OK_CANCEL);

    if (subjectLine === "cancel" || subjectLine == ""){
    // If no subject line, finishes up
    return;
    }
  }

  // Gets the draft Gmail message to use as a template
  const emailTemplate = getGmailTemplateFromDrafts_(subjectLine);

  // Gets the data from the passed sheet
  const dataRange = sheet.getDataRange();
  // Fetches displayed values for each row in the Range HT Andrew Roberts
  // https://mashe.hawksey.info/2020/04/a-bulk-email-mail-merge-with-gmail-and-google-sheets-solution-evolution-using-v8/#comment-187490
  // @see https://developers.google.com/apps-script/reference/spreadsheet/range#getdisplayvalues
  const data = dataRange.getDisplayValues();

  // Assumes row 1 contains our column headings
  const heads = data.shift();

  // Gets the index of the column named 'Email Status' (Assumes header names are unique)
  // @see http://ramblings.mcpher.com/Home/excelquirks/gooscript/arrayfunctions
  const emailSentColIdx = heads.indexOf(EMAIL_SENT_COL);

  // Converts 2d array into an object array
  // See https://stackoverflow.com/a/22917499/1027723
  // For a pretty version, see https://mashe.hawksey.info/?p=17869/#comment-184945
  const obj = data.map(r => (heads.reduce((o, k, i) => (o[k] = r[i] || '', o), {})));

  // Creates an array to record sent emails
  const out = [];

  // Loops through all the rows of data
  obj.forEach(function(row, rowIdx){
    // Only sends emails if email_sent cell is blank and not hidden by a filter
    if (row[EMAIL_SENT_COL] == ''){
      try {
        const msgObj = fillInTemplateFromObject_(emailTemplate.message, row);

        // See https://developers.google.com/apps-script/reference/gmail/gmail-app#sendEmail(String,String,String,Object)
        // If you need to send emails with unicode/emoji characters change GmailApp for MailApp
        // Uncomment advanced parameters as needed (see docs for limitations)
        GmailApp.sendEmail(row[RECIPIENT_COL], msgObj.subject, msgObj.text, {
          htmlBody: msgObj.html,
          // bcc: 'a.bcc@email.com',
          // cc: 'a.cc@email.com',
          // from: 'an.alias@email.com',
          // name: 'name of the sender',
          // replyTo: 'a.reply@email.com',
          // noReply: true, // if the email should be sent from a generic no-reply email address (not available to gmail.com users)
          attachments: emailTemplate.attachments,
          inlineImages: emailTemplate.inlineImages
        });
        // Edits cell to record email sent date
        out.push([new Date()]);
      } catch(e) {
        // modify cell to record error
        out.push([e.message]);
      }
    } else {
      out.push([row[EMAIL_SENT_COL]]);
    }
  });

  // Updates the sheet with new data
  sheet.getRange(2, emailSentColIdx+1, out.length).setValues(out);

  /**
   * Get a Gmail draft message by matching the subject line.
   * @param {string} subject_line to search for draft message
   * @return {object} containing the subject, plain and html message body and attachments
  */
  function getGmailTemplateFromDrafts_(subject_line){
    try {
      // get drafts
      const drafts = GmailApp.getDrafts();
      // filter the drafts that match subject line
      const draft = drafts.filter(subjectFilter_(subject_line))[0];
      // get the message object
      const msg = draft.getMessage();

      // Handles inline images and attachments so they can be included in the merge
      // Based on https://stackoverflow.com/a/65813881/1027723
      // Gets all attachments and inline image attachments
      const allInlineImages = draft.getMessage().getAttachments({includeInlineImages: true,includeAttachments:false});
      const attachments = draft.getMessage().getAttachments({includeInlineImages: false});
      const htmlBody = msg.getBody();

      // Creates an inline image object with the image name as key
      // (can't rely on image index as array based on insert order)
      const img_obj = allInlineImages.reduce((obj, i) => (obj[i.getName()] = i, obj) ,{});

      //Regexp searches for all img string positions with cid
      const imgexp = RegExp('<img.*?src="cid:(.*?)".*?alt="(.*?)"[^\>]+>', 'g');
      const matches = [...htmlBody.matchAll(imgexp)];

      //Initiates the allInlineImages object
      const inlineImagesObj = {};
      // built an inlineImagesObj from inline image matches
      matches.forEach(match => inlineImagesObj[match[1]] = img_obj[match[2]]);

      return {message: {subject: subject_line, text: msg.getPlainBody(), html:htmlBody},
              attachments: attachments, inlineImages: inlineImagesObj };
    } catch(e) {
      throw new Error("Oops - can't find Gmail draft");
    }

    /**
     * Filter draft objects with the matching subject linemessage by matching the subject line.
     * @param {string} subject_line to search for draft message
     * @return {object} GmailDraft object
    */
    function subjectFilter_(subject_line){
      return function(element) {
        if (element.getMessage().getSubject() === subject_line) {
          return element;
        }
      }
    }
  }

  /**
   * Fill template string with data object
   * @see https://stackoverflow.com/a/378000/1027723
   * @param {string} template string containing {{}} markers which are replaced with data
   * @param {object} data object used to replace {{}} markers
   * @return {object} message replaced with data
  */
  function fillInTemplateFromObject_(template, data) {
    // We have two templates one for plain text and the html body
    // Stringifing the object means we can do a global replace
    let template_string = JSON.stringify(template);

    // Token replacement
    template_string = template_string.replace(/{{[^{}]+}}/g, key => {
      return escapeData_(data[key.replace(/[{}]+/g, "")] || "");
    });
    return  JSON.parse(template_string);
  }

  /**
   * Escape cell data to make JSON safe
   * @see https://stackoverflow.com/a/9204218/1027723
   * @param {string} str to escape JSON special characters from
   * @return {string} escaped string
  */
  function escapeData_(str) {
    return str
      .replace(/[\\]/g, '\\\\')
      .replace(/[\"]/g, '\\\"')
      .replace(/[\/]/g, '\\/')
      .replace(/[\b]/g, '\\b')
      .replace(/[\f]/g, '\\f')
      .replace(/[\n]/g, '\\n')
      .replace(/[\r]/g, '\\r')
      .replace(/[\t]/g, '\\t');
  };
}
Modyfikacje
Automatyzację kreatora e-maili możesz dostosować do swoich potrzeb.
Poniżej znajdziesz kilka opcjonalnych zmian, które możesz wprowadzić w kodzie źródłowym.
Dodaj parametry e-maila: UDW, DW, Odpowiedź do lub Od
Przykładowy kod zawiera wiele dodatkowych parametrów, które obecnie są komentowane. Dzięki nim możesz kontrolować nazwę konta, z którego wysłano e-maila, odpowiadać na adresy e-mail oraz adresy e-mail UDW i DW.
Aktywuj parametry, które chcesz dodać, usuwając przed każdym z nich ukośnik prawy //.
Poniższy przykład pokazuje fragment funkcji sendEmails, która aktywuje większość parametrów e-maila:
GmailApp.sendEmail(row[RECIPIENT_COL], msgObj.subject, msgObj.text, {
         htmlBody: msgObj.html,
         bcc: 'bcc@example.com',
         cc: 'cc@example.com',
         from: 'from.alias@example.com',
         name: 'name of the sender',
         replyTo: 'reply@example.com',
        // noReply: true, // if the email should be sent from a generic no-reply email address (not available to gmail.com users)
W powyższym przykładzie parametr noReply jest nadal komentowany, ponieważ jest ustawiony parametr replyTo.
Używaj w e-mailach znaków Unicode
Jeśli chcesz używać w e-mailach znaków Unicode, takich jak emotikony, musisz zaktualizować kod, aby używać usługi poczty zamiast usługi Gmail.
W przykładowym kodzie zaktualizuj ten wiersz:
GmailApp.sendEmail(row[RECIPIENT_COL], msgObj.subject, msgObj.text, {
Zastąp ten wiersz tym kodem:
MailApp.sendEmail(row[RECIPIENT_COL], msgObj.subject, msgObj.text, {
Współtwórcy
Autorem tego przykładu jest Martin Hawksey, kierownik ds. projektowania i technologii w Edinburgh Futures Institute, bloger i ekspert Google Developers.
Ta próbka jest opracowywana przez Google z pomocą Ekspertów Produktowych Google.
Dalsze kroki

