Google Cloud Functions を使用してチャットアプリを作成する

このページでは、Google Cloud Functions を使用してチャットアプリを作成し、操作する方法について説明します。

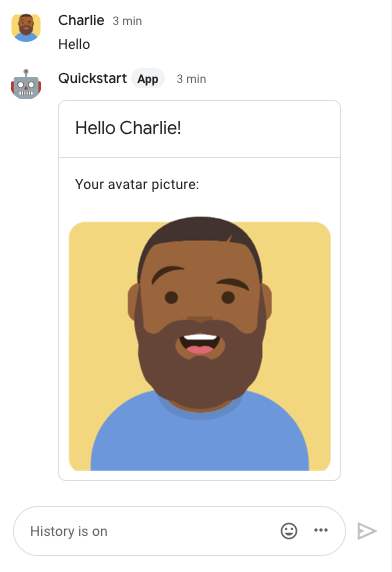
アプリをビルドするには、Google Cloud からのメッセージ イベントへのレスポンスを処理するために使用する Cloud Functions の関数を作成し、デプロイします。次のレスポンスに示すように、レスポンスは、送信者の名前とアバター画像を表示するカードになります。

送信者の表示名とアバター画像を表示するカードを返すチャットアプリ

目標

  • 環境を設定する。
  • Cloud Functions の関数を作成してデプロイする。
  • アプリを Google Chat に公開します。
  • アプリをテストします。

Prerequisites

環境を設定する

Google API を使用する前に、Google Cloud プロジェクトで API を有効にする必要があります。1 つの Google Cloud プロジェクトで 1 つ以上の API を有効にできます。
  • Google Cloud コンソールで、Google Chat API、Cloud Build API、Cloud Functions API、Cloud Pub/Sub API を有効にします。

    API を有効にする

Cloud 関数を作成してデプロイする

送信者の表示名とアバター画像を使用してチャットカードを生成する Cloud Functions の関数を作成してデプロイする。チャットアプリはメッセージを受信すると関数を実行し、カードを返します。

チャットアプリの関数を作成してデプロイするには、次の手順を行います。

Node.js

  1. Google Cloud コンソールで、Cloud Functions ページに移動します。

    Cloud Functions に移動

    チャットアプリのプロジェクトが選択されていることを確認します。

  2. 関数の作成)をクリックします。

  3. [関数の作成] ページで、関数を設定します。

    1. [関数名] に「QuickStartChatApp」と入力します。
    2. [トリガーのタイプ] で、[HTTP] を選択します。
    3. [認証] で、[未認証の呼び出しを許可] を選択します。

      Google Workspace での認証の詳細については、Chat アプリと API リクエストの認証と承認をご覧ください。

    4. [保存] をクリックします。

    5. [次へ] をクリックします。

  4. [ランタイム] で [Node.js 10] を選択します。

  5. [ソースコード] で [インライン エディタ] を選択します。

  6. [エントリ ポイント] で、デフォルトのテキストを削除して「helloChat」と入力します。

  7. index.js の内容を次のコードで置き換えます。

    node/avatar-bot/index.js
    /**
     * Google Cloud Function that responds to messages sent from a
     * Hangouts Chat room.
     *
     * @param {Object} req Request sent from Hangouts Chat room
     * @param {Object} res Response to send back
     */
    exports.helloChat = function helloChat(req, res) {
      if (req.method === 'GET' || !req.body.message) {
        res.send('Hello! This function is meant to be used in a Hangouts Chat ' +
          'Room.');
      }
    
      const sender = req.body.message.sender.displayName;
      const image = req.body.message.sender.avatarUrl;
    
      const data = createMessage(sender, image);
    
      res.send(data);
    };
    
    /**
     * Creates a card with two widgets.
     * @param {string} displayName the sender's display name
     * @param {string} imageUrl the URL for the sender's avatar
     * @return {Object} a card with the user's avatar.
     */
    function createMessage(displayName, imageUrl) {
      const cardHeader = {
        title: `Hello ${displayName}!`,
      };
    
      const avatarWidget = {
        textParagraph: {text: 'Your avatar picture: '},
      };
    
      const avatarImageWidget = {
        image: {imageUrl},
      };
    
      const avatarSection = {
        widgets: [
          avatarWidget,
          avatarImageWidget,
        ],
      };
    
      return {
        cardsV2: [{
          cardId: 'avatarCard',
          card: {
            name: 'Avatar Card',
            header: cardHeader,
            sections: [avatarSection],
          }
        }],
      };
    }

  8. [デプロイ] をクリックします。

Python

  1. Google Cloud コンソールで、Cloud Functions ページに移動します。

    Cloud Functions に移動

    チャットアプリのプロジェクトが選択されていることを確認します。

  2. 関数の作成)をクリックします。

  3. [関数の作成] ページで、関数を設定します。

    1. [関数名] に「QuickStartChatApp」と入力します。
    2. [トリガーのタイプ] で、[HTTP] を選択します。
    3. [認証] で、[未認証の呼び出しを許可] を選択します。

      Google Workspace での認証の詳細については、Chat アプリと API リクエストの認証と承認をご覧ください。

    4. [保存] をクリックします。

    5. [次へ] をクリックします。

  4. [ランタイム] で [Python 3.10] を選択します。

  5. [ソースコード] で [インライン エディタ] を選択します。

  6. [エントリ ポイント] で、デフォルトのテキストを削除して「hello_chat」と入力します。

  7. main.py の内容を次のコードで置き換えます。

    python/avatar-bot/main.py
    from typing import Any, Mapping
    
    import flask
    import functions_framework
    
    
    # Google Cloud Function that responds to messages sent in
    # Google Chat.
    #
    # @param {Object} req Request sent from Google Chat.
    # @param {Object} res Response to send back.
    @functions_framework.http
    def hello_chat(req: flask.Request) -> Mapping[str, Any]:
      if req.method == "GET":
        return "Hello! This function must be called from Google Chat."
    
      request_json = req.get_json(silent=True)
    
      display_name = request_json["message"]["sender"]["displayName"]
      avatar = request_json["message"]["sender"]["avatarUrl"]
    
      response = create_message(name=display_name, image_url=avatar)
    
      return response
    
    
    # Creates a card with two widgets.
    # @param {string} name the sender's display name.
    # @param {string} image_url the URL for the sender's avatar.
    # @return {Object} a card with the user's avatar.
    def create_message(name: str, image_url: str) -> Mapping[str, Any]:
      avatar_image_widget = {"image": {"imageUrl": image_url}}
      avatar_text_widget = {"textParagraph": {"text": "Your avatar picture:"}}
      avatar_section = {"widgets": [avatar_text_widget, avatar_image_widget]}
    
      header = {"title": f"Hello {name}!"}
    
      cards = {
          "cardsV2": [
              {
                  "cardId": "avatarCard",
                  "card": {
                      "name": "Avatar Card",
                      "header": header,
                      "sections": [avatar_section],
                  },
              }
          ]
      }
    
      return cards


  8. [デプロイ] をクリックします。

Java

  1. Google Cloud コンソールで、Cloud Functions ページに移動します。

    Cloud Functions に移動

    チャットアプリのプロジェクトが選択されていることを確認します。

  2. 関数の作成)をクリックします。

  3. [関数の作成] ページで、関数を設定します。

    1. [関数名] に「QuickStartChatApp」と入力します。
    2. [トリガーのタイプ] で、[HTTP] を選択します。
    3. [認証] で、[未認証の呼び出しを許可] を選択します。

      Google Workspace での認証の詳細については、Chat アプリと API リクエストの認証と承認をご覧ください。

    4. [保存] をクリックします。

    5. [次へ] をクリックします。

  4. [ランタイム] で [Java 11] を選択します。

  5. [ソースコード] で [インライン エディタ] を選択します。

  6. [エントリ ポイント] で、デフォルトのテキストを削除して「HelloChat」と入力します。

  7. src/main/java/com/example/Example.java から src/main/java/HelloChat.java に名前を変更しました。

  8. HelloChat.java の内容を次のコードで置き換えます。

    java/avatar-bot/src/main/java/HelloChat.java
    import com.google.api.services.chat.v1.model.CardWithId;
    import com.google.api.services.chat.v1.model.GoogleAppsCardV1Card;
    import com.google.api.services.chat.v1.model.GoogleAppsCardV1CardHeader;
    import com.google.api.services.chat.v1.model.GoogleAppsCardV1Image;
    import com.google.api.services.chat.v1.model.GoogleAppsCardV1Section;
    import com.google.api.services.chat.v1.model.GoogleAppsCardV1TextParagraph;
    import com.google.api.services.chat.v1.model.GoogleAppsCardV1Widget;
    import com.google.api.services.chat.v1.model.Message;
    import com.google.cloud.functions.HttpFunction;
    import com.google.cloud.functions.HttpRequest;
    import com.google.cloud.functions.HttpResponse;
    import com.google.gson.Gson;
    import com.google.gson.JsonObject;
    import java.util.List;
    
    public class HelloChat implements HttpFunction {
      private static final Gson gson = new Gson();
    
      @Override
      public void service(HttpRequest request, HttpResponse response) throws Exception {
        JsonObject body = gson.fromJson(request.getReader(), JsonObject.class);
    
        if (request.getMethod().equals("GET") || !body.has("message")) {
          response.getWriter().write("Hello! This function must be called from Google Chat.");
          return;
        }
    
        JsonObject sender = body.getAsJsonObject("message").getAsJsonObject("sender");
        String displayName = sender.has("displayName") ? sender.get("displayName").getAsString() : "";
        String avatarUrl = sender.has("avatarUrl") ? sender.get("avatarUrl").getAsString() : "";
        Message message = createMessage(displayName, avatarUrl);
    
        response.getWriter().write(gson.toJson(message));
      }
    
      Message createMessage(String displayName, String avatarUrl) {
        GoogleAppsCardV1CardHeader cardHeader = new GoogleAppsCardV1CardHeader();
        cardHeader.setTitle(String.format("Hello %s!", displayName));
    
        GoogleAppsCardV1TextParagraph textParagraph = new GoogleAppsCardV1TextParagraph();
        textParagraph.setText("Your avatar picture: ");
    
        GoogleAppsCardV1Widget avatarWidget = new GoogleAppsCardV1Widget();
        avatarWidget.setTextParagraph(textParagraph);
    
        GoogleAppsCardV1Image image = new GoogleAppsCardV1Image();
        image.setImageUrl(avatarUrl);
    
        GoogleAppsCardV1Widget avatarImageWidget = new GoogleAppsCardV1Widget();
        avatarImageWidget.setImage(image);
    
        GoogleAppsCardV1Section section = new GoogleAppsCardV1Section();
        section.setWidgets(List.of(avatarWidget, avatarImageWidget));
    
        GoogleAppsCardV1Card card = new GoogleAppsCardV1Card();
        card.setName("Avatar Card");
        card.setHeader(cardHeader);
        card.setSections(List.of(section));
    
        CardWithId cardWithId = new CardWithId();
        cardWithId.setCardId("previewLink");
        cardWithId.setCard(card);
    
        Message message = new Message();
        message.setCardsV2(List.of(cardWithId));
    
        return message;
      }
    }

  9. pom.xml の内容を次のコードで置き換えます。

    java/avatar-bot/pom.xml
    <project xmlns="http://maven.apache.org/POM/4.0.0"
             xmlns:xsi="http://www.w3.org/2001/XMLSchema-instance"
             xsi:schemaLocation="http://maven.apache.org/POM/4.0.0 http://maven.apache.org/xsd/maven-4.0.0.xsd">
      <modelVersion>4.0.0</modelVersion>
    
      <groupId>cloudfunctions</groupId>
      <artifactId>http-function</artifactId>
      <version>1.0-SNAPSHOT</version>
    
      <properties>
        <maven.compiler.target>11</maven.compiler.target>
        <maven.compiler.source>11</maven.compiler.source>
      </properties>
    
      <dependencies>
        <dependency>
          <groupId>com.google.cloud.functions</groupId>
          <artifactId>functions-framework-api</artifactId>
          <version>1.0.1</version>
        </dependency>
    
        <!-- https://mvnrepository.com/artifact/com.google.code.gson/gson -->
        <dependency>
            <groupId>com.google.code.gson</groupId>
            <artifactId>gson</artifactId>
            <version>2.9.1</version>
        </dependency>
    
        <!-- https://mvnrepository.com/artifact/com.google.apis/google-api-services-chat -->
        <dependency>
          <groupId>com.google.apis</groupId>
          <artifactId>google-api-services-chat</artifactId>
          <version>v1-rev20230115-2.0.0</version>
        </dependency>
      </dependencies>
    
      <!-- Required for Java 11 functions in the inline editor -->
      <build>
        <plugins>
          <plugin>
            <groupId>org.apache.maven.plugins</groupId>
            <artifactId>maven-compiler-plugin</artifactId>
            <version>3.8.1</version>
            <configuration>
              <excludes>
                <exclude>.google/</exclude>
              </excludes>
            </configuration>
          </plugin>
        </plugins>
      </build>
    </project>

  10. [デプロイ] をクリックします。

Cloud Functions のページが開き、関数名の横にデプロイの進行状況を示すインジケーターが表示されます。進行状況インジケーターが表示されなくなり、チェックマークが表示されると、関数がデプロイされます。

Google Chat にアプリを公開する

Cloud Functions の関数をデプロイしたら、次の手順に沿って Google Chat アプリに変換します。

  1. Google Cloud コンソールで、メニュー アイコン > [Cloud Functions] をクリックします。

    Cloud Functions に移動

    Cloud Functions を有効にしたプロジェクトが選択されていることを確認します。

  2. 関数のリストで、[QuickStartChatApp] をクリックします。

  3. 関数の詳細ページで、[トリガー] をクリックします。

  4. [トリガー URL] で、URL をコピーします。

  5. 「Google Chat API」を検索し、[Google Chat API] をクリックします。

  6. [管理] をクリックします。

  7. [設定] をクリックし、Google Chat アプリを設定します。

    1. [アプリ名] に「Quickstart App」と入力します。
    2. [アバターの URL] に「https://developers.google.com/chat/images/quickstart-app-avatar.png」と入力します。
    3. [説明] に「Quickstart app」と入力します。
    4. [機能] で、[1 対 1 のメッセージを受信する]、[スペースとグループの会話に参加する]、[Cloud Logging にエラーを記録する] を選択します。
    5. [接続設定] で [アプリの URL] を選択し、Cloud Functions のトリガーの URL をボックスに貼り付けます。
    6. [権限] で、[ドメイン内の特定のユーザーとグループ] を選択して、メールアドレスを入力します。
  8. [保存] をクリックします。

これで、Google Chat でメッセージの受信や返信を行う準備が整いました。

Chat アプリをテストする

チャットアプリをテストするには、アプリにダイレクト メッセージを送信します。

  1. Google Chatを開きます。
  2. アプリにダイレクト メッセージを送信するには、[ Chat を開始] をクリックし、表示されたウィンドウで [アプリを探す] をクリックします。
  3. [Find apps] ダイアログで、「Quickstart App」を検索します。
  4. アプリとのダイレクト メッセージを開くには、クイックスタート アプリを見つけて、[追加] > [Chat] の順にクリックします。
  5. ダイレクト メッセージで、「Hello」と入力して enter キーを押します。

表示名とアバター画像を含むカードがアプリから返されます。

次のステップ

Chat アプリのトラブルシューティングとデバッグを行うには、次のページをご覧ください。

  • Chat アプリを作成する際に、アプリのエラーログの読み取りによるデバッグが必要になることがあります。ログを読むには、Google Cloud コンソールでログ エクスプローラに移動します。
  • トラブルシューティングをご覧ください。

Chat アプリに機能を追加するには、以下のガイドをご覧ください。

  • インタラクティブ カードの作成 - カード メッセージは、定義されたレイアウト、ボタンなどのインタラクティブな UI 要素、画像などのリッチメディアをサポートします。カード メッセージを使用して詳細情報を表示し、ユーザーから情報を収集して、次のステップに進みます。
  • スラッシュ コマンドをサポートする - スラッシュ コマンドを登録すると、ユーザーはスラッシュ(/)で始まるコマンドを入力することで、アプリに与える特定のコマンドを登録してアドバタイズできます。/help
  • リリース ダイアログ - ダイアログは、アプリがユーザーとやり取りするために開くことができる、ウィンドウ形式のカードベースのインターフェースです。複数のカードを順番に並べて表示することで、フォームデータの入力など、ユーザーが複数の手順を踏むことができます。

Google Chat API の詳細については、リファレンス ドキュメントをご覧ください。