Tetap teratur dengan koleksi
Simpan dan kategorikan konten berdasarkan preferensi Anda.
Memilih alur pendaftaran
Keputusan penting dengan AFP adalah memilih alur pendaftaran untuk proses orientasi pengguna Anda. Tujuan pendaftaran adalah mengizinkan pengguna Anda untuk membuat akun AdSense baru (atau login ke akun AdSense yang ada) dan menautkannya ke platform Anda. Opsi yang Anda pilih akan bergantung pada sumber daya teknis yang ingin Anda investasikan dalam pengembangan dan pengalaman orientasi yang ingin Anda berikan untuk pengguna Anda.
Opsi 1: Alur tanpa API
Opsi 1 memerlukan sumber daya teknis paling sedikit karena tidak menggunakan API. Anda hanya memerlukan developer web untuk membuat antarmuka pengguna dalam platform Anda. Namun, konsekuensinya, opsi ini mengharuskan pengguna melakukan lebih banyak langkah untuk menyelesaikan alur pendaftaran.
Ringkasan alur pendaftaran tanpa API

Penerapan
Untuk menerapkan alur pendaftaran tanpa API, Anda harus menyediakan komponen UI untuk monetisasi AdSense. Misalnya, di halaman tempat pengguna Anda mengakses "profil pengguna" atau "setelan akun", tambahkan halaman monetisasi yang mencakup hal berikut:
- Deskripsi singkat tentang AdSense dan caranya berinteraksi dengan platform Anda. Pengguna harus benar-benar mengetahui bahwa mereka mendaftar ke akun AdSense baru atau menggunakan akun AdSense lama mereka.
- Informasi tentang kebijakan Program AdSense. Semua pengguna yang mendaftar harus mengetahui tentang Program AdSense dan kebijakannya.
- Bagi hasil yang akan diterima oleh pengguna Anda. Jumlah persentase pendapatan AdSense yang akan disisihkan untuk Anda dan penayang harus ditampilkan secara jelas kepada pengguna. Selain itu, AdSense akan menampilkan informasi ini selama alur orientasi.
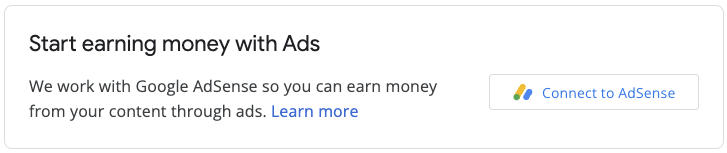
- Tombol "Hubungkan AdSense". Tombol ini akan membuka tab baru dan mengarahkan pengguna ke halaman yang benar di AdSense, bergantung pada apakah mereka sudah memiliki akun AdSense atau belum.
Contoh URL kustom:
https://adsense.google.com/adsense/signup?url={platform-site-url}
Catatan: Google akan memberi Anda URL halaman pendaftaran kustom, dan membantu Anda menentukan konten variabel URL.
- Kotak input untuk mengumpulkan dan menyimpan ID penayang AdSense pengguna. Setelah mengunjungi link di atas, pengguna perlu menyalin dan menempelkan ID penayang mereka ke kotak input ini.
Penting: Anda harus menyimpan ID penayang pengguna, sehingga Anda dapat memberi tag pada halaman konten pengguna dengan informasi penayang yang benar. Lihat Menambahkan tag iklan ke halaman untuk mengetahui informasi selengkapnya.
Pastikan Anda memvalidasi string yang dimasukkan. Format ID penayang adalah: pub-1234567890987654
Atau dalam istilah ekspresi reguler: pub\-\d{16}
Penting: Beberapa pengguna AdSense dapat menempelkan ID penayang tanpa mengklik tombol "Hubungkan AdSense". Beri tahu pengguna bahwa halaman Situs di akun AdSense harus memiliki domain platform yang dicantumkan sebelum iklan dapat ditayangkan. Ini adalah tujuan utama dari tombol ini.
- Status pemberian tag pengguna. Pengguna ingin mengetahui apakah kode iklan mereka ditempatkan di halaman mereka atau tidak. Sebagai bagian dari pengalaman pengguna, beri tahu pengguna saat Anda memberi tag pada halaman mereka dengan ID penayang AdSense. Anda juga dapat mengisi tag meta akun turunan yang akan membantu AdSense selama langkah-langkah verifikasi situs. Hal ini juga menghilangkan kebutuhan untuk memublikasikan tag iklan di halaman mereka atas nama pengguna.
Opsi 2: Alur API semi-terpandu
Opsi 2 menggunakan AdSense Management API untuk sedikit menyederhanakan alur pendaftaran. Opsi ini membutuhkan lebih banyak sumber daya teknis, tetapi mengurangi jumlah langkah yang harus diambil pengguna untuk mendaftar ke AdSense.
Ringkasan alur API semi-terpandu

Penerapan
Untuk menerapkan alur pendaftaran semi-terpandu dengan API, Anda harus menyediakan komponen UI untuk monetisasi AdSense. Misalnya, di halaman tempat pengguna Anda mengakses "profil pengguna" atau "setelan akun", tambahkan halaman monetisasi yang mencakup hal berikut:
- Deskripsi singkat tentang AdSense dan caranya berinteraksi dengan platform Anda. Pengguna harus benar-benar mengetahui bahwa mereka mendaftar ke akun Google AdSense baru atau menggunakan akun AdSense lama mereka.
- Informasi tentang kebijakan Program AdSense. Semua pengguna yang mendaftar harus mengetahui tentang Program AdSense dan kebijakannya.
- Bagi hasil yang akan diterima oleh pengguna Anda. Jumlah persentase pendapatan AdSense yang akan disisihkan untuk Anda dan penayang harus ditampilkan secara jelas kepada pengguna. Selain itu, AdSense akan menampilkan informasi ini selama alur orientasi.
- Tombol "Hubungkan AdSense". Tombol ini akan memberi Anda otorisasi sebagai platform untuk mengakses informasi akun pelanggan AdSense menggunakan AdSense Management API. Ikuti petunjuk di dokumentasi developer kami untuk menyiapkan hal ini. Menggunakan API ini, Anda dapat melakukan dua langkah berikutnya.
- Gunakan AdSense Management API untuk mengumpulkan ID penayang AdSense pengguna. Pastikan Anda memvalidasi string yang dimasukkan.
Format ID penayang adalah: pub-1234567890987654
Atau dalam istilah ekspresi reguler: pub\-\d{16}
Penting: Anda harus menyimpan ID penayang pengguna, sehingga Anda dapat memberi tag pada halaman konten pengguna dengan informasi penayang yang benar. Lihat Menambahkan tag iklan ke halaman untuk mengetahui informasi selengkapnya.
- Gunakan AdSense Management API untuk memeriksa apakah pengguna telah menambahkan situs platform ke akun AdSense mereka. Jika belum, minta pengguna agar mengikuti link di bawah untuk menyelesaikan penyiapan. Nama situs yang harus Anda periksa di API adalah variabel
{platform-site-url}
di link di bawah.
https://adsense.google.com/adsense/signup?url={platform-site-url}
Catatan: Google akan memberi Anda URL halaman pendaftaran kustom, dan membantu Anda menentukan konten variabel URL.
- - Status pemberian tag pengguna. Pengguna ingin mengetahui apakah kode iklan mereka ditempatkan di halaman mereka atau tidak. Sebagai bagian dari pengalaman pengguna, beri tahu pengguna saat Anda memberi tag pada halaman mereka dengan ID penayang AdSense. Anda juga dapat mengisi tag meta akun turunan yang akan membantu AdSense selama langkah-langkah verifikasi situs. Hal ini juga menghilangkan kebutuhan untuk memublikasikan tag iklan di halaman mereka atas nama pengguna.
Opsi 3: Embedded Connect
Koneksi Tersemat menghilangkan semua kerumitan dalam menangani akun AdSense dalam berbagai status. Bergantung pada akun, klien iklan, dan status situs untuk akun AdSense pengguna tertentu, alur Connect yang Disertakan akan menampilkan pengalaman orientasi yang disesuaikan untuk setiap pengguna sehingga Anda tidak perlu melakukannya.

Penerapan ini melibatkan library JavaScript, div kosong tempat AdSense akan merender widget pendaftaran, dan beberapa fungsi callback yang akan memungkinkan Anda menyimpan ID penayang setelah pengguna menyelesaikan alur pendaftaran. Anda dapat menggunakan AdSense Management API sebagai tambahan untuk meningkatkan pengalaman, misalnya dengan mengambil unit iklan atau status iklan Otomatis.
Pelajari Embedded Connect lebih lanjut
Kecuali dinyatakan lain, konten di halaman ini dilisensikan berdasarkan Lisensi Creative Commons Attribution 4.0, sedangkan contoh kode dilisensikan berdasarkan Lisensi Apache 2.0. Untuk mengetahui informasi selengkapnya, lihat Kebijakan Situs Google Developers. Java adalah merek dagang terdaftar dari Oracle dan/atau afiliasinya.
[[["Mudah dipahami","easyToUnderstand","thumb-up"],["Memecahkan masalah saya","solvedMyProblem","thumb-up"],["Lainnya","otherUp","thumb-up"]],[["Informasi yang saya butuhkan tidak ada","missingTheInformationINeed","thumb-down"],["Terlalu rumit/langkahnya terlalu banyak","tooComplicatedTooManySteps","thumb-down"],["Sudah usang","outOfDate","thumb-down"],["Masalah terjemahan","translationIssue","thumb-down"],["Masalah kode / contoh","samplesCodeIssue","thumb-down"],["Lainnya","otherDown","thumb-down"]],[],[[["\u003cp\u003eAdSense for Platforms (AFP) offers three signup flow options to onboard users, each with varying technical requirements and user experiences.\u003c/p\u003e\n"],["\u003cp\u003eThe API-less flow is the simplest to implement but requires more user steps; the Semi-assisted API flow utilizes the AdSense Management API for a smoother experience; and Embedded Connect provides a fully customized and automated signup process.\u003c/p\u003e\n"],["\u003cp\u003eAll signup flows necessitate clear communication with users about AdSense policies, revenue share, and tagging status, ensuring transparency and understanding.\u003c/p\u003e\n"],["\u003cp\u003eRegardless of the chosen flow, securely storing the user's AdSense Publisher ID is crucial for proper ad serving and revenue tracking.\u003c/p\u003e\n"],["\u003cp\u003eAFP provides flexibility for platforms to tailor the signup experience to their specific needs and technical capabilities while adhering to AdSense guidelines.\u003c/p\u003e\n"]]],["The document outlines three signup flows for integrating AdSense into a platform. The API-less flow requires users to manually connect their AdSense account via a link and input their publisher ID. The semi-assisted API flow utilizes the AdSense Management API to retrieve the user's publisher ID and check their site status, reducing user steps. Embedded Connect, a third option, uses a JavaScript library for a streamlined experience and handles complex account states automatically. All options involve displaying AdSense policies and revenue sharing information.\n"],null,["Choose a sign up flow\n---------------------\n\nAn important decision with AFP is to choose a sign up flow to onboard your users. The purpose of the sign up is to allow your users to create a new AdSense account (or sign in to an existing AdSense account) and link it to your platform. The option you choose will depend on the technical resources you want to invest in development and the onboarding experience you want to provide for your users.\n\n### Option 1: API-less flow\n\nOption 1 requires the fewest technical resources as it doesn't use an API. You will only need a web developer to build the user interface within your platform. However, the trade-off is that this option requires your users to take more steps to complete the signup flow.\n\n#### Overview of the API-less signup flow\n\n#### Implementation\n\nTo implement an API-less signup flow, you need to provide a UI component for AdSense monetization. For example, on the page where your users access their \"user profile\" or \"account settings\", add a monetization page that includes the following:\n\n- A short description of AdSense and how it interacts with your platform. Users should be completely aware that they're either signing up for a new AdSense account or using their existing AdSense account.\n- Information about the [AdSense Program policies](https://support.google.com/adsense/answer/48182). All users who sign up should be aware of the AdSense Program and its policies.\n- The revenue share that your users will receive. It's important to explicitly show users what percentage of the AdSense revenue you will keep and what percentage the publisher will keep. AdSense will additionally show this information during the onboarding flow.\n- A \"Connect AdSense\" button. This button will open a new tab and take the user to the correct page in AdSense depending on whether or not they have an existing AdSense account. \n Example custom URL: \n `https://adsense.google.com/adsense/signup?url={platform-site-url}` \n **Note:** Google will provide you with the URL of the custom signup page, and help you define the contents of the URL variable.\n- An input box to collect and store the user's AdSense publisher ID. After a user visits the link above, they will need to copy and paste their publisher ID into this input box. \n **Important:** It's critical that you store the user's publisher ID so that you can tag the user's content pages with the correct publisher information. See the [Add the ad tag to your pages](/adsense/platforms/transparent/ad-tags) for more information. \n Make sure you validate the inputted string. The format of a publisher ID is: `pub-1234567890987654` \n Or in regex terms: `pub\\-\\d{16}` \n **Important:** Some AdSense users may paste their publisher ID without clicking on the \"Connect AdSense\" button. It's important to let users know that the **Sites** page in their AdSense account needs to have the platform domain listed before ads can be served. This is the primary purpose of this button.\n- The user's tagging status. Users will want to know whether their ad code has been placed on their pages or not. As part of the user experience, let your users know when you've tagged their pages with their AdSense publisher ID. You can additionally populate the [child account meta tag](/adsense/platforms/transparent/meta-tags#child_account) which will assist AdSense during the site verification steps. This also removes the need to publish ad tags on their pages on the user's behalf.\n\n### Option 2: Semi-assisted API flow\n\nOption 2 uses the [AdSense Management API](https://developers.google.com/adsense/management) to slightly simplify the signup flow. It requires more technical resources but reduces the number of steps your users need to take to sign up for AdSense.\n\n#### Overview of the semi-assisted API flow\n\n#### Implementation\n\nTo implement a semi-assisted signup flow with an API, you need to provide a UI component for AdSense monetization. For example, on the page where your users access their \"user profile\" or \"account settings\", add a monetization page that includes the following:\n\n- A short description of AdSense and how it interacts with your platform. Users should be completely aware that they are signing up for a Google AdSense account, or using their existing AdSense account.\n- Information about the [AdSense Program policies](https://support.google.com/adsense/answer/48182). All users who sign up should be aware of the AdSense Program and its policies.\n- The revenue share that your users will receive. It's important to explicitly show users what percentage of the AdSense revenue you will keep and what percentage the publisher will keep. AdSense will additionally show this information during the onboarding flow.\n- A \"Connect AdSense\" button. This button will authorize you as the platform to access an AdSense customer's account information using the [AdSense Management API](https://developers.google.com/adsense/management). Please follow the instructions on our developer documentation to set this up. Using this API you can perform the next two steps.\n- Use the AdSense Management API to collect the user's AdSense publisher ID. Make sure you validate the inputted string. \n The format of a publisher ID is: `pub-1234567890987654` \n Or in regex terms: `pub\\-\\d{16}` \n **Important:** It's critical that you store the user's publisher ID so that you can tag the user's content pages with the correct publisher information. See the See the [Add the ad tag to your pages](/adsense/platforms/transparent/ad-tags) for more information.\n- Use the AdSense Management API to check if the user has added the platform site to their AdSense account. If not, ask the user to follow the link below to complete the set up. The name of the site you should check for in the API is the `{platform-site-url}` variable in the link below. \n `https://adsense.google.com/adsense/signup?url={platform-site-url}` \n **Note:** Google will provide you with the URL of the custom signup page, and help you define the contents of the url variable.\n- - The user's tagging status. Users will want to know whether their ad code has been placed on their pages or not. As part of the user experience, let your users know when you've tagged their pages with their AdSense publisher ID. You can additionally populate the [child account meta tag](/adsense/platforms/transparent/meta-tags#child_account) which will assist AdSense during the site verification steps. This also removes the need to publish ad tags on their pages on the user's behalf.\n\n### Option 3: Embedded Connect\n\nEmbedded Connect removes all the complexity of dealing with AdSense accounts in different states. Depending on the account, ad client and site statuses for a given user's AdSense account, the Embedded Connect flow will present a customized onboarding experience for each user so that you don't have to.\n\nThe implementation involves a JavaScript library, an empty div where AdSense will render a sign-up widget, and some callback functions which will allow you to save the publisher ID once the user has completed the sign-up flow. You can supplementally use the [AdSense Management API](/adsense/management) to augment the experience, for example by retrieving ad units or the state of Auto ads.\n\n[Learn more about Embedded Connect](/adsense/platforms/transparent/embedded-connect)"]]