Sử dụng bộ sưu tập để sắp xếp ngăn nắp các trang
Lưu và phân loại nội dung dựa trên lựa chọn ưu tiên của bạn.
Chọn quy trình đăng ký
Một quyết định quan trọng khi sử dụng AFP là chọn quy trình đăng ký để hướng dẫn làm quen cho người dùng. Mục đích của việc đăng ký là để cho phép người dùng của bạn tạo một tài khoản AdSense mới (hoặc đăng nhập vào tài khoản AdSense hiện có) và liên kết tài khoản đó với nền tảng của bạn. Lựa chọn của bạn sẽ phụ thuộc vào những tài nguyên kỹ thuật mà bạn muốn đầu tư trong quá trình phát triển và trải nghiệm làm quen mà bạn muốn cung cấp cho người dùng của mình.
Cách 1: Quy trình không sử dụng API
Tùy chọn 1 yêu cầu ít tài nguyên kỹ thuật nhất vì quy trình này không sử dụng API. Bạn sẽ chỉ cần một nhà phát triển web để xây dựng giao diện người dùng trên nền tảng của mình. Tuy nhiên, để đổi lại, tùy chọn này yêu cầu người dùng của bạn thực hiện nhiều bước hơn để hoàn tất quy trình đăng ký.
Tổng quan về quy trình đăng ký không sử dụng API

Triển khai
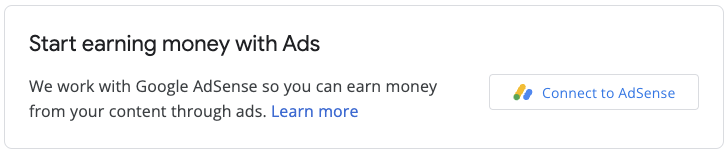
Để triển khai quy trình đăng ký không sử dụng API, bạn cần cung cấp một thành phần giao diện người dùng để kiếm tiền thông qua AdSense. Ví dụ: trên trang mà người dùng của bạn truy cập vào phần "hồ sơ người dùng" hoặc "cài đặt tài khoản", hãy thêm một trang kiếm tiền gồm những thông tin sau:
- Nội dung mô tả ngắn gọn về AdSense và cách AdSense tương tác với nền tảng của bạn. Bạn phải cho người dùng biết rõ là họ đang đăng ký một tài khoản AdSense mới hay đang sử dụng tài khoản AdSense hiện có.
- Thông tin về Chính sách chương trình của AdSense. Bạn phải cho tất cả những người dùng đăng ký biết về Chương trình AdSense và các chính sách của chương trình này.
- Phần doanh thu chia sẻ mà người dùng của bạn sẽ nhận được. Điều quan trọng là bạn phải cho người dùng biết rõ tỷ lệ phần trăm doanh thu AdSense sẽ thuộc về bạn và tỷ lệ phần trăm doanh thu AdSense sẽ thuộc về nhà xuất bản. AdSense cũng sẽ hiển thị thông tin này trong quy trình hướng dẫn làm quen.
- Nút "Kết nối với AdSense". Nút này sẽ mở một thẻ mới và đưa người dùng đến đúng trang trong AdSense, tuỳ thuộc vào việc họ đã có tài khoản AdSense hay chưa.
Ví dụ về URL tuỳ chỉnh:
https://adsense.google.com/adsense/signup?url={platform-site-url}
Lưu ý: Google sẽ cung cấp cho bạn URL của trang đăng ký tuỳ chỉnh và giúp bạn xác định nội dung của biến URL.
- Một hộp nhập dữ liệu để thu thập và lưu trữ mã nhà xuất bản AdSense của người dùng. Sau khi truy cập vào đường liên kết ở trên, người dùng cần sao chép và dán mã nhà xuất bản của mình vào ô nhập dữ liệu này.
Lưu ý quan trọng: Điều quan trọng là bạn phải lưu trữ mã nhà xuất bản của người dùng để có thể gắn thẻ các trang nội dung của người dùng bằng đúng thông tin của nhà xuất bản. Hãy xem phần Thêm thẻ quảng cáo vào các trang của bạn để biết thêm thông tin.
Hãy nhớ xác thực chuỗi đã nhập. Định dạng của mã nhà xuất bản là: pub-1234567890987654
Hoặc theo thuật toán biểu thức chính quy: pub\-\d{16}
Lưu ý quan trọng: Một số người dùng AdSense có thể sẽ dán mã nhà xuất bản của mình mà không nhấp vào nút "Kết nối với AdSense". Điều quan trọng là bạn phải cho người dùng biết rằng trang Trang web trong tài khoản AdSense của họ cần nêu rõ miền của nền tảng thì quảng cáo mới có thể phân phát. Đây là mục đích chính của nút này.
- Trạng thái gắn thẻ của người dùng. Người dùng sẽ muốn biết liệu mã quảng cáo đã được đặt trên các trang của họ hay chưa. Trong trải nghiệm người dùng, hãy cho người dùng của bạn biết thời điểm bạn đã gắn thẻ các trang của họ bằng mã nhà xuất bản AdSense của họ. Ngoài ra, bạn có thể điền thẻ meta của tài khoản con để hỗ trợ AdSense trong các bước xác minh trang web. Nhờ đó, bạn không cần phải thay mặt người dùng phát hành thẻ quảng cáo trên các trang của họ.
Tuỳ chọn 2: Quy trình đăng ký sử dụng API bán hỗ trợ
Tùy chọn 2 sử dụng API Quản lý AdSense để cải tiến quy trình đăng ký đơn giản hơn một chút. Quy trình này yêu cầu nhiều tài nguyên kỹ thuật hơn, nhưng người dùng sẽ thực hiện ít bước hơn để đăng ký AdSense.
Tổng quan về quy trình đăng ký sử dụng API bán hỗ trợ

Triển khai
Để triển khai quy trình đăng ký bán hỗ trợ bằng API, bạn cần cung cấp một thành phần giao diện người dùng để kiếm tiền thông qua AdSense. Ví dụ: trên trang mà người dùng của bạn truy cập vào phần "hồ sơ người dùng" hoặc "cài đặt tài khoản", hãy thêm một trang kiếm tiền gồm những thông tin sau:
- Nội dung mô tả ngắn gọn về AdSense và cách AdSense tương tác với nền tảng của bạn. Bạn phải cho người dùng biết rõ là họ đang đăng ký một tài khoản Google AdSense hay đang sử dụng tài khoản AdSense hiện có.
- Thông tin về Chính sách chương trình của AdSense. Bạn phải cho tất cả những người dùng đăng ký biết về Chương trình AdSense và các chính sách của chương trình này.
- Phần doanh thu chia sẻ mà người dùng của bạn sẽ nhận được. Điều quan trọng là bạn phải cho người dùng biết rõ tỷ lệ phần trăm doanh thu AdSense sẽ thuộc về bạn và tỷ lệ phần trăm doanh thu AdSense sẽ thuộc về nhà xuất bản. AdSense cũng sẽ hiển thị thông tin này trong quy trình hướng dẫn làm quen.
- Nút "Kết nối với AdSense". Nút này sẽ cho phép bạn – với tư cách là nền tảng – xem thông tin tài khoản của khách hàng AdSense bằng cách sử dụng API Quản lý AdSense. Vui lòng làm theo hướng dẫn trong tài liệu dành cho nhà phát triển để thiết lập API này. Khi sử dụng API này, bạn có thể thực hiện 2 bước tiếp theo.
- Sử dụng API Quản lý AdSense để thu thập mã nhà xuất bản AdSense của người dùng. Ngoài ra, hãy nhớ xác thực chuỗi đã nhập.
Định dạng của mã nhà xuất bản là: pub-1234567890987654
Hoặc theo thuật ngữ biểu thức chính quy: pub\-\d{16}
Lưu ý quan trọng: Điều quan trọng là bạn phải lưu trữ mã nhà xuất bản của người dùng để có thể gắn thẻ các trang nội dung của người dùng bằng đúng thông tin của nhà xuất bản. Hãy xem phần Thêm thẻ quảng cáo vào các trang của bạn để biết thêm thông tin.
- Sử dụng API Quản lý AdSense để kiểm tra xem người dùng đã thêm trang web của nền tảng vào tài khoản AdSense của họ hay chưa. Nếu chưa, hãy yêu cầu người dùng nhấp vào đường liên kết ở bên dưới để hoàn tất việc thiết lập. Tên của trang web mà bạn nên kiểm tra trong API là biến
{platform-site-url}
trong đường liên kết ở bên dưới.
https://adsense.google.com/adsense/signup?url={platform-site-url}
Lưu ý: Google sẽ cung cấp cho bạn URL của trang đăng ký tuỳ chỉnh và giúp bạn xác định nội dung của biến url.
- – Trạng thái gắn thẻ của người dùng. Người dùng sẽ muốn biết liệu mã quảng cáo đã được đặt trên các trang của họ hay chưa. Trong trải nghiệm người dùng, hãy cho người dùng của bạn biết thời điểm bạn đã gắn thẻ các trang của họ bằng mã nhà xuất bản AdSense của họ. Ngoài ra, bạn có thể điền thẻ meta của tài khoản con để hỗ trợ AdSense trong các bước xác minh trang web. Nhờ đó, bạn không cần phải thay mặt người dùng phát hành thẻ quảng cáo trên các trang của họ.
Cách 3: Kết nối được nhúng
Tính năng Kết nối được nhúng giúp bạn giải quyết mọi vấn đề phức tạp khi xử lý các tài khoản AdSense ở nhiều trạng thái. Tuỳ thuộc vào tài khoản, ứng dụng quảng cáo và trạng thái trang web của tài khoản AdSense của một người dùng cụ thể, quy trình tích hợp của tính năng Kết nối sẽ hiển thị trải nghiệm làm quen được tuỳ chỉnh cho từng người dùng để bạn không phải làm gì cả.

Quá trình triển khai này liên quan đến một thư viện JavaScript, một div trống mà AdSense sẽ hiển thị tiện ích đăng ký và một số hàm gọi lại cho phép bạn lưu mã nhà xuất bản sau khi người dùng hoàn tất quy trình đăng ký. Bạn có thể sử dụng thêm AdSense Management API để nâng cao trải nghiệm, chẳng hạn như bằng cách truy xuất đơn vị quảng cáo hoặc trạng thái của Quảng cáo tự động.
Tìm hiểu thêm về tính năng Nhúng Connect
Trừ phi có lưu ý khác, nội dung của trang này được cấp phép theo Giấy phép ghi nhận tác giả 4.0 của Creative Commons và các mẫu mã lập trình được cấp phép theo Giấy phép Apache 2.0. Để biết thông tin chi tiết, vui lòng tham khảo Chính sách trang web của Google Developers. Java là nhãn hiệu đã đăng ký của Oracle và/hoặc các đơn vị liên kết với Oracle.
[[["Dễ hiểu","easyToUnderstand","thumb-up"],["Giúp tôi giải quyết được vấn đề","solvedMyProblem","thumb-up"],["Khác","otherUp","thumb-up"]],[["Thiếu thông tin tôi cần","missingTheInformationINeed","thumb-down"],["Quá phức tạp/quá nhiều bước","tooComplicatedTooManySteps","thumb-down"],["Đã lỗi thời","outOfDate","thumb-down"],["Vấn đề về bản dịch","translationIssue","thumb-down"],["Vấn đề về mẫu/mã","samplesCodeIssue","thumb-down"],["Khác","otherDown","thumb-down"]],[],[[["\u003cp\u003eAdSense for Platforms (AFP) offers three signup flow options to onboard users, each with varying technical requirements and user experiences.\u003c/p\u003e\n"],["\u003cp\u003eThe API-less flow is the simplest to implement but requires more user steps; the Semi-assisted API flow utilizes the AdSense Management API for a smoother experience; and Embedded Connect provides a fully customized and automated signup process.\u003c/p\u003e\n"],["\u003cp\u003eAll signup flows necessitate clear communication with users about AdSense policies, revenue share, and tagging status, ensuring transparency and understanding.\u003c/p\u003e\n"],["\u003cp\u003eRegardless of the chosen flow, securely storing the user's AdSense Publisher ID is crucial for proper ad serving and revenue tracking.\u003c/p\u003e\n"],["\u003cp\u003eAFP provides flexibility for platforms to tailor the signup experience to their specific needs and technical capabilities while adhering to AdSense guidelines.\u003c/p\u003e\n"]]],["The document outlines three signup flows for integrating AdSense into a platform. The API-less flow requires users to manually connect their AdSense account via a link and input their publisher ID. The semi-assisted API flow utilizes the AdSense Management API to retrieve the user's publisher ID and check their site status, reducing user steps. Embedded Connect, a third option, uses a JavaScript library for a streamlined experience and handles complex account states automatically. All options involve displaying AdSense policies and revenue sharing information.\n"],null,["Choose a sign up flow\n---------------------\n\nAn important decision with AFP is to choose a sign up flow to onboard your users. The purpose of the sign up is to allow your users to create a new AdSense account (or sign in to an existing AdSense account) and link it to your platform. The option you choose will depend on the technical resources you want to invest in development and the onboarding experience you want to provide for your users.\n\n### Option 1: API-less flow\n\nOption 1 requires the fewest technical resources as it doesn't use an API. You will only need a web developer to build the user interface within your platform. However, the trade-off is that this option requires your users to take more steps to complete the signup flow.\n\n#### Overview of the API-less signup flow\n\n#### Implementation\n\nTo implement an API-less signup flow, you need to provide a UI component for AdSense monetization. For example, on the page where your users access their \"user profile\" or \"account settings\", add a monetization page that includes the following:\n\n- A short description of AdSense and how it interacts with your platform. Users should be completely aware that they're either signing up for a new AdSense account or using their existing AdSense account.\n- Information about the [AdSense Program policies](https://support.google.com/adsense/answer/48182). All users who sign up should be aware of the AdSense Program and its policies.\n- The revenue share that your users will receive. It's important to explicitly show users what percentage of the AdSense revenue you will keep and what percentage the publisher will keep. AdSense will additionally show this information during the onboarding flow.\n- A \"Connect AdSense\" button. This button will open a new tab and take the user to the correct page in AdSense depending on whether or not they have an existing AdSense account. \n Example custom URL: \n `https://adsense.google.com/adsense/signup?url={platform-site-url}` \n **Note:** Google will provide you with the URL of the custom signup page, and help you define the contents of the URL variable.\n- An input box to collect and store the user's AdSense publisher ID. After a user visits the link above, they will need to copy and paste their publisher ID into this input box. \n **Important:** It's critical that you store the user's publisher ID so that you can tag the user's content pages with the correct publisher information. See the [Add the ad tag to your pages](/adsense/platforms/transparent/ad-tags) for more information. \n Make sure you validate the inputted string. The format of a publisher ID is: `pub-1234567890987654` \n Or in regex terms: `pub\\-\\d{16}` \n **Important:** Some AdSense users may paste their publisher ID without clicking on the \"Connect AdSense\" button. It's important to let users know that the **Sites** page in their AdSense account needs to have the platform domain listed before ads can be served. This is the primary purpose of this button.\n- The user's tagging status. Users will want to know whether their ad code has been placed on their pages or not. As part of the user experience, let your users know when you've tagged their pages with their AdSense publisher ID. You can additionally populate the [child account meta tag](/adsense/platforms/transparent/meta-tags#child_account) which will assist AdSense during the site verification steps. This also removes the need to publish ad tags on their pages on the user's behalf.\n\n### Option 2: Semi-assisted API flow\n\nOption 2 uses the [AdSense Management API](https://developers.google.com/adsense/management) to slightly simplify the signup flow. It requires more technical resources but reduces the number of steps your users need to take to sign up for AdSense.\n\n#### Overview of the semi-assisted API flow\n\n#### Implementation\n\nTo implement a semi-assisted signup flow with an API, you need to provide a UI component for AdSense monetization. For example, on the page where your users access their \"user profile\" or \"account settings\", add a monetization page that includes the following:\n\n- A short description of AdSense and how it interacts with your platform. Users should be completely aware that they are signing up for a Google AdSense account, or using their existing AdSense account.\n- Information about the [AdSense Program policies](https://support.google.com/adsense/answer/48182). All users who sign up should be aware of the AdSense Program and its policies.\n- The revenue share that your users will receive. It's important to explicitly show users what percentage of the AdSense revenue you will keep and what percentage the publisher will keep. AdSense will additionally show this information during the onboarding flow.\n- A \"Connect AdSense\" button. This button will authorize you as the platform to access an AdSense customer's account information using the [AdSense Management API](https://developers.google.com/adsense/management). Please follow the instructions on our developer documentation to set this up. Using this API you can perform the next two steps.\n- Use the AdSense Management API to collect the user's AdSense publisher ID. Make sure you validate the inputted string. \n The format of a publisher ID is: `pub-1234567890987654` \n Or in regex terms: `pub\\-\\d{16}` \n **Important:** It's critical that you store the user's publisher ID so that you can tag the user's content pages with the correct publisher information. See the See the [Add the ad tag to your pages](/adsense/platforms/transparent/ad-tags) for more information.\n- Use the AdSense Management API to check if the user has added the platform site to their AdSense account. If not, ask the user to follow the link below to complete the set up. The name of the site you should check for in the API is the `{platform-site-url}` variable in the link below. \n `https://adsense.google.com/adsense/signup?url={platform-site-url}` \n **Note:** Google will provide you with the URL of the custom signup page, and help you define the contents of the url variable.\n- - The user's tagging status. Users will want to know whether their ad code has been placed on their pages or not. As part of the user experience, let your users know when you've tagged their pages with their AdSense publisher ID. You can additionally populate the [child account meta tag](/adsense/platforms/transparent/meta-tags#child_account) which will assist AdSense during the site verification steps. This also removes the need to publish ad tags on their pages on the user's behalf.\n\n### Option 3: Embedded Connect\n\nEmbedded Connect removes all the complexity of dealing with AdSense accounts in different states. Depending on the account, ad client and site statuses for a given user's AdSense account, the Embedded Connect flow will present a customized onboarding experience for each user so that you don't have to.\n\nThe implementation involves a JavaScript library, an empty div where AdSense will render a sign-up widget, and some callback functions which will allow you to save the publisher ID once the user has completed the sign-up flow. You can supplementally use the [AdSense Management API](/adsense/management) to augment the experience, for example by retrieving ad units or the state of Auto ads.\n\n[Learn more about Embedded Connect](/adsense/platforms/transparent/embedded-connect)"]]