Mantieni tutto organizzato con le raccolte
Salva e classifica i contenuti in base alle tue preferenze.
Scegli un flusso di registrazione
Una decisione importante con l'AFP è scegliere un flusso di registrazione per l'onboarding degli utenti. Lo scopo della registrazione è consentire agli utenti di creare un nuovo account AdSense (o accedere a un account AdSense esistente) e collegarlo alla tua piattaforma. L'opzione che scegli dipenderà dalle risorse tecniche che vuoi investire nello sviluppo e dall'esperienza di onboarding che vuoi offrire ai tuoi utenti.
Opzione 1: flusso senza API
L'opzione 1 richiede il minor numero di risorse tecniche in quanto non utilizza un'API. Avrai bisogno di uno sviluppatore web solo per creare l'interfaccia utente all'interno della tua piattaforma. Tuttavia, il compromesso è che questa opzione richiede agli utenti di eseguire più passaggi per completare la procedura di registrazione.
Panoramica del flusso di registrazione senza API

Implementazione
Per implementare un flusso di registrazione senza API, devi fornire un componente dell'interfaccia utente per la monetizzazione di AdSense. Ad esempio, nella pagina in cui gli utenti accedono al loro "profilo utente" o alle "impostazioni dell'account", aggiungi una pagina di monetizzazione che includa quanto segue:
- Una breve descrizione di AdSense e di come interagisce con la tua piattaforma. Gli utenti devono essere perfettamente consapevoli di stare registrando un nuovo account AdSense o di utilizzare il proprio account AdSense esistente.
- Informazioni sulle Norme del programma AdSense. Tutti gli utenti che si registrano devono conoscere il programma AdSense e le relative norme.
- La quota di condivisione delle entrate che riceveranno i tuoi utenti. È importante mostrare esplicitamente agli utenti la percentuale di entrate di AdSense che ti terrai e quella che rimarrà al publisher. AdSense mostrerà queste informazioni anche durante il flusso di onboarding.
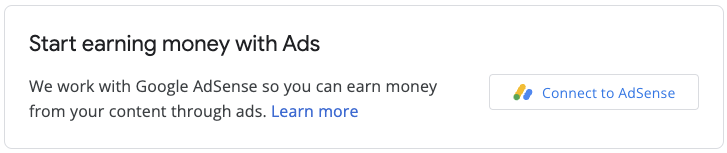
- Un pulsante "Collega AdSense". Questo pulsante aprirà una nuova scheda e reindirizzerà l'utente alla pagina corretta in AdSense, a seconda che abbia o meno un account AdSense esistente.
Esempio di URL personalizzato:
https://adsense.google.com/adsense/signup?url={platform-site-url}
Nota: Google ti fornirà l'URL della pagina di registrazione personalizzata e ti aiuterà a definire i contenuti della variabile URL.
- Una casella di immissione per raccogliere e memorizzare l'ID publisher AdSense dell'utente. Dopo aver visitato il link riportato sopra, l'utente dovrà copiare e incollare il proprio ID editore in questa casella di immissione.
Importante: è fondamentale memorizzare l'ID editore dell'utente per poter taggare le pagine dei contenuti dell'utente con le informazioni corrette dell'editore. Per ulteriori informazioni, consulta Aggiungere il tag annuncio alle pagine.
Assicurati di convalidare la stringa inserita. Il formato di un ID publisher è: pub-1234567890987654
In termini di regex: pub\-\d{16}
Importante: alcuni utenti AdSense potrebbero incollare il proprio ID publisher senza fare clic sul pulsante "Collega AdSense". È importante comunicare agli utenti che, prima che gli annunci possano essere pubblicati, nella pagina Siti del loro account AdSense deve essere elencato il dominio della piattaforma. Questo è lo scopo principale di questo pulsante.
- Lo stato del tagging dell'utente. Gli utenti vorranno sapere se il codice annuncio è stato inserito o meno nelle loro pagine. Nell'ambito dell'esperienza utente, comunica agli utenti quando hai taggato le loro pagine con il loro ID publisher AdSense. Inoltre, puoi compilare il metatag dell'account secondario, che aiuterà AdSense durante i passaggi di verifica del sito. In questo modo, non è più necessario pubblicare i tag annuncio sulle pagine per conto dell'utente.
Opzione 2: flusso dell'API semi-assistito
L'opzione 2 utilizza l'API AdSense Management per semplificare leggermente la procedura di registrazione. Richiede più risorse tecniche, ma riduce il numero di passaggi che gli utenti devono seguire per registrarsi ad AdSense.
Panoramica del flusso dell'API semi-assistita

Implementazione
Per implementare un flusso di registrazione semi-assistita con un'API, devi fornire un componente dell'interfaccia utente per la monetizzazione di AdSense. Ad esempio, nella pagina in cui gli utenti accedono al loro "profilo utente" o alle "impostazioni dell'account", aggiungi una pagina di monetizzazione che includa quanto segue:
- Una breve descrizione di AdSense e di come interagisce con la tua piattaforma. Gli utenti devono essere perfettamente consapevoli di registrarsi per un account Google AdSense o di utilizzare il proprio account AdSense esistente.
- Informazioni sulle Norme del programma AdSense. Tutti gli utenti che si registrano devono conoscere il programma AdSense e le relative norme.
- La quota di condivisione delle entrate che riceveranno i tuoi utenti. È importante mostrare esplicitamente agli utenti la percentuale di entrate di AdSense che ti terrai e quella che rimarrà al publisher. AdSense mostrerà queste informazioni anche durante il flusso di onboarding.
- Un pulsante "Collega AdSense". Questo pulsante ti autorizza, in qualità di piattaforma, ad accedere ai dati dell'account di un cliente AdSense utilizzando l'API di gestione di AdSense. Per configurare questa opzione, segui le istruzioni riportate nella nostra documentazione per gli sviluppatori. Utilizzando questa API, puoi eseguire i due passaggi successivi.
- Utilizza l'API AdSense Management per raccogliere l'ID publisher AdSense dell'utente. Assicurati di convalidare la stringa inserita.
Il formato di un ID publisher è: pub-1234567890987654
In termini di regex: pub\-\d{16}
Importante: è fondamentale memorizzare l'ID publisher dell'utente per poter taggare le pagine dei contenuti dell'utente con le informazioni corrette del publisher. Per ulteriori informazioni, consulta Aggiungere il tag annuncio alle pagine.
- Utilizza l'API di gestione di AdSense per verificare se l'utente ha aggiunto il sito della piattaforma al proprio account AdSense. In caso contrario, chiedi all'utente di seguire il link di seguito per completare la configurazione. Il nome del sito che devi controllare nell'API è la variabile
{platform-site-url}
nel link di seguito.
https://adsense.google.com/adsense/signup?url={platform-site-url}
Nota: Google ti fornirà l'URL della pagina di registrazione personalizzata e ti aiuterà a definire i contenuti della variabile url.
- - Lo stato del tagging dell'utente. Gli utenti vorranno sapere se il codice annuncio è stato inserito o meno nelle loro pagine. Nell'ambito dell'esperienza utente, comunica agli utenti quando hai taggato le loro pagine con il loro ID publisher AdSense. Inoltre, puoi compilare il meta tag dell'account secondario, che aiuterà AdSense durante i passaggi di verifica del sito. In questo modo, non è più necessario pubblicare i tag annuncio sulle pagine per conto dell'utente.
Opzione 3: Embedded Connect
Embedded Connect rimuove tutta la complessità di gestire gli account AdSense in stati diversi. A seconda dello stato dell'account, dell'account cliente pubblicitario e del sito per l'account AdSense di un determinato utente, il flusso di Embedded Connect presenterà un'esperienza di onboarding personalizzata per ogni utente, in modo che tu non debba farlo.

L'implementazione prevede una libreria JavaScript, un elemento div vuoto in cui AdSense mostrerà un widget di registrazione e alcune funzioni di callback che ti consentiranno di salvare l'ID publisher una volta che l'utente avrà completato il flusso di registrazione. Puoi utilizzare anche l'API AdSense Management per migliorare l'esperienza, ad esempio recuperando le unità pubblicitarie o lo stato degli annunci automatici.
Scopri di più su Embedded Connect
Salvo quando diversamente specificato, i contenuti di questa pagina sono concessi in base alla licenza Creative Commons Attribution 4.0, mentre gli esempi di codice sono concessi in base alla licenza Apache 2.0. Per ulteriori dettagli, consulta le norme del sito di Google Developers. Java è un marchio registrato di Oracle e/o delle sue consociate.
[[["Facile da capire","easyToUnderstand","thumb-up"],["Il problema è stato risolto","solvedMyProblem","thumb-up"],["Altra","otherUp","thumb-up"]],[["Mancano le informazioni di cui ho bisogno","missingTheInformationINeed","thumb-down"],["Troppo complicato/troppi passaggi","tooComplicatedTooManySteps","thumb-down"],["Obsoleti","outOfDate","thumb-down"],["Problema di traduzione","translationIssue","thumb-down"],["Problema relativo a esempi/codice","samplesCodeIssue","thumb-down"],["Altra","otherDown","thumb-down"]],[],[[["\u003cp\u003eAdSense for Platforms (AFP) offers three signup flow options to onboard users, each with varying technical requirements and user experiences.\u003c/p\u003e\n"],["\u003cp\u003eThe API-less flow is the simplest to implement but requires more user steps; the Semi-assisted API flow utilizes the AdSense Management API for a smoother experience; and Embedded Connect provides a fully customized and automated signup process.\u003c/p\u003e\n"],["\u003cp\u003eAll signup flows necessitate clear communication with users about AdSense policies, revenue share, and tagging status, ensuring transparency and understanding.\u003c/p\u003e\n"],["\u003cp\u003eRegardless of the chosen flow, securely storing the user's AdSense Publisher ID is crucial for proper ad serving and revenue tracking.\u003c/p\u003e\n"],["\u003cp\u003eAFP provides flexibility for platforms to tailor the signup experience to their specific needs and technical capabilities while adhering to AdSense guidelines.\u003c/p\u003e\n"]]],["The document outlines three signup flows for integrating AdSense into a platform. The API-less flow requires users to manually connect their AdSense account via a link and input their publisher ID. The semi-assisted API flow utilizes the AdSense Management API to retrieve the user's publisher ID and check their site status, reducing user steps. Embedded Connect, a third option, uses a JavaScript library for a streamlined experience and handles complex account states automatically. All options involve displaying AdSense policies and revenue sharing information.\n"],null,["Choose a sign up flow\n---------------------\n\nAn important decision with AFP is to choose a sign up flow to onboard your users. The purpose of the sign up is to allow your users to create a new AdSense account (or sign in to an existing AdSense account) and link it to your platform. The option you choose will depend on the technical resources you want to invest in development and the onboarding experience you want to provide for your users.\n\n### Option 1: API-less flow\n\nOption 1 requires the fewest technical resources as it doesn't use an API. You will only need a web developer to build the user interface within your platform. However, the trade-off is that this option requires your users to take more steps to complete the signup flow.\n\n#### Overview of the API-less signup flow\n\n#### Implementation\n\nTo implement an API-less signup flow, you need to provide a UI component for AdSense monetization. For example, on the page where your users access their \"user profile\" or \"account settings\", add a monetization page that includes the following:\n\n- A short description of AdSense and how it interacts with your platform. Users should be completely aware that they're either signing up for a new AdSense account or using their existing AdSense account.\n- Information about the [AdSense Program policies](https://support.google.com/adsense/answer/48182). All users who sign up should be aware of the AdSense Program and its policies.\n- The revenue share that your users will receive. It's important to explicitly show users what percentage of the AdSense revenue you will keep and what percentage the publisher will keep. AdSense will additionally show this information during the onboarding flow.\n- A \"Connect AdSense\" button. This button will open a new tab and take the user to the correct page in AdSense depending on whether or not they have an existing AdSense account. \n Example custom URL: \n `https://adsense.google.com/adsense/signup?url={platform-site-url}` \n **Note:** Google will provide you with the URL of the custom signup page, and help you define the contents of the URL variable.\n- An input box to collect and store the user's AdSense publisher ID. After a user visits the link above, they will need to copy and paste their publisher ID into this input box. \n **Important:** It's critical that you store the user's publisher ID so that you can tag the user's content pages with the correct publisher information. See the [Add the ad tag to your pages](/adsense/platforms/transparent/ad-tags) for more information. \n Make sure you validate the inputted string. The format of a publisher ID is: `pub-1234567890987654` \n Or in regex terms: `pub\\-\\d{16}` \n **Important:** Some AdSense users may paste their publisher ID without clicking on the \"Connect AdSense\" button. It's important to let users know that the **Sites** page in their AdSense account needs to have the platform domain listed before ads can be served. This is the primary purpose of this button.\n- The user's tagging status. Users will want to know whether their ad code has been placed on their pages or not. As part of the user experience, let your users know when you've tagged their pages with their AdSense publisher ID. You can additionally populate the [child account meta tag](/adsense/platforms/transparent/meta-tags#child_account) which will assist AdSense during the site verification steps. This also removes the need to publish ad tags on their pages on the user's behalf.\n\n### Option 2: Semi-assisted API flow\n\nOption 2 uses the [AdSense Management API](https://developers.google.com/adsense/management) to slightly simplify the signup flow. It requires more technical resources but reduces the number of steps your users need to take to sign up for AdSense.\n\n#### Overview of the semi-assisted API flow\n\n#### Implementation\n\nTo implement a semi-assisted signup flow with an API, you need to provide a UI component for AdSense monetization. For example, on the page where your users access their \"user profile\" or \"account settings\", add a monetization page that includes the following:\n\n- A short description of AdSense and how it interacts with your platform. Users should be completely aware that they are signing up for a Google AdSense account, or using their existing AdSense account.\n- Information about the [AdSense Program policies](https://support.google.com/adsense/answer/48182). All users who sign up should be aware of the AdSense Program and its policies.\n- The revenue share that your users will receive. It's important to explicitly show users what percentage of the AdSense revenue you will keep and what percentage the publisher will keep. AdSense will additionally show this information during the onboarding flow.\n- A \"Connect AdSense\" button. This button will authorize you as the platform to access an AdSense customer's account information using the [AdSense Management API](https://developers.google.com/adsense/management). Please follow the instructions on our developer documentation to set this up. Using this API you can perform the next two steps.\n- Use the AdSense Management API to collect the user's AdSense publisher ID. Make sure you validate the inputted string. \n The format of a publisher ID is: `pub-1234567890987654` \n Or in regex terms: `pub\\-\\d{16}` \n **Important:** It's critical that you store the user's publisher ID so that you can tag the user's content pages with the correct publisher information. See the See the [Add the ad tag to your pages](/adsense/platforms/transparent/ad-tags) for more information.\n- Use the AdSense Management API to check if the user has added the platform site to their AdSense account. If not, ask the user to follow the link below to complete the set up. The name of the site you should check for in the API is the `{platform-site-url}` variable in the link below. \n `https://adsense.google.com/adsense/signup?url={platform-site-url}` \n **Note:** Google will provide you with the URL of the custom signup page, and help you define the contents of the url variable.\n- - The user's tagging status. Users will want to know whether their ad code has been placed on their pages or not. As part of the user experience, let your users know when you've tagged their pages with their AdSense publisher ID. You can additionally populate the [child account meta tag](/adsense/platforms/transparent/meta-tags#child_account) which will assist AdSense during the site verification steps. This also removes the need to publish ad tags on their pages on the user's behalf.\n\n### Option 3: Embedded Connect\n\nEmbedded Connect removes all the complexity of dealing with AdSense accounts in different states. Depending on the account, ad client and site statuses for a given user's AdSense account, the Embedded Connect flow will present a customized onboarding experience for each user so that you don't have to.\n\nThe implementation involves a JavaScript library, an empty div where AdSense will render a sign-up widget, and some callback functions which will allow you to save the publisher ID once the user has completed the sign-up flow. You can supplementally use the [AdSense Management API](/adsense/management) to augment the experience, for example by retrieving ad units or the state of Auto ads.\n\n[Learn more about Embedded Connect](/adsense/platforms/transparent/embedded-connect)"]]